Home Office Makeover on a Budget
Hi! It’s Jordan, and I’m excited to share my latest project with you… my home office makeover! This space has been functional, but a blank canvas the past couple years. It feels great to finally have a fully designed office where I can be both creative and productive at home. Click through to see more of the design process, budget interior tips, before & after images, and a tour of this room with sources!
If you’re feeling confused because you previously scrolled through my dark green home office tour last fall, that is actually where my husband works from our home. This office is all mine! We’re lucky to have enough rooms in our home that we can each have our own workspace. Both rooms have added function and personality to our builder-grade home. If you’re looking for even more office inspiration, check out Sarah’s home office reveal, and the Tuesday Made office, where Sarah and I both work- a few days a week.
Before
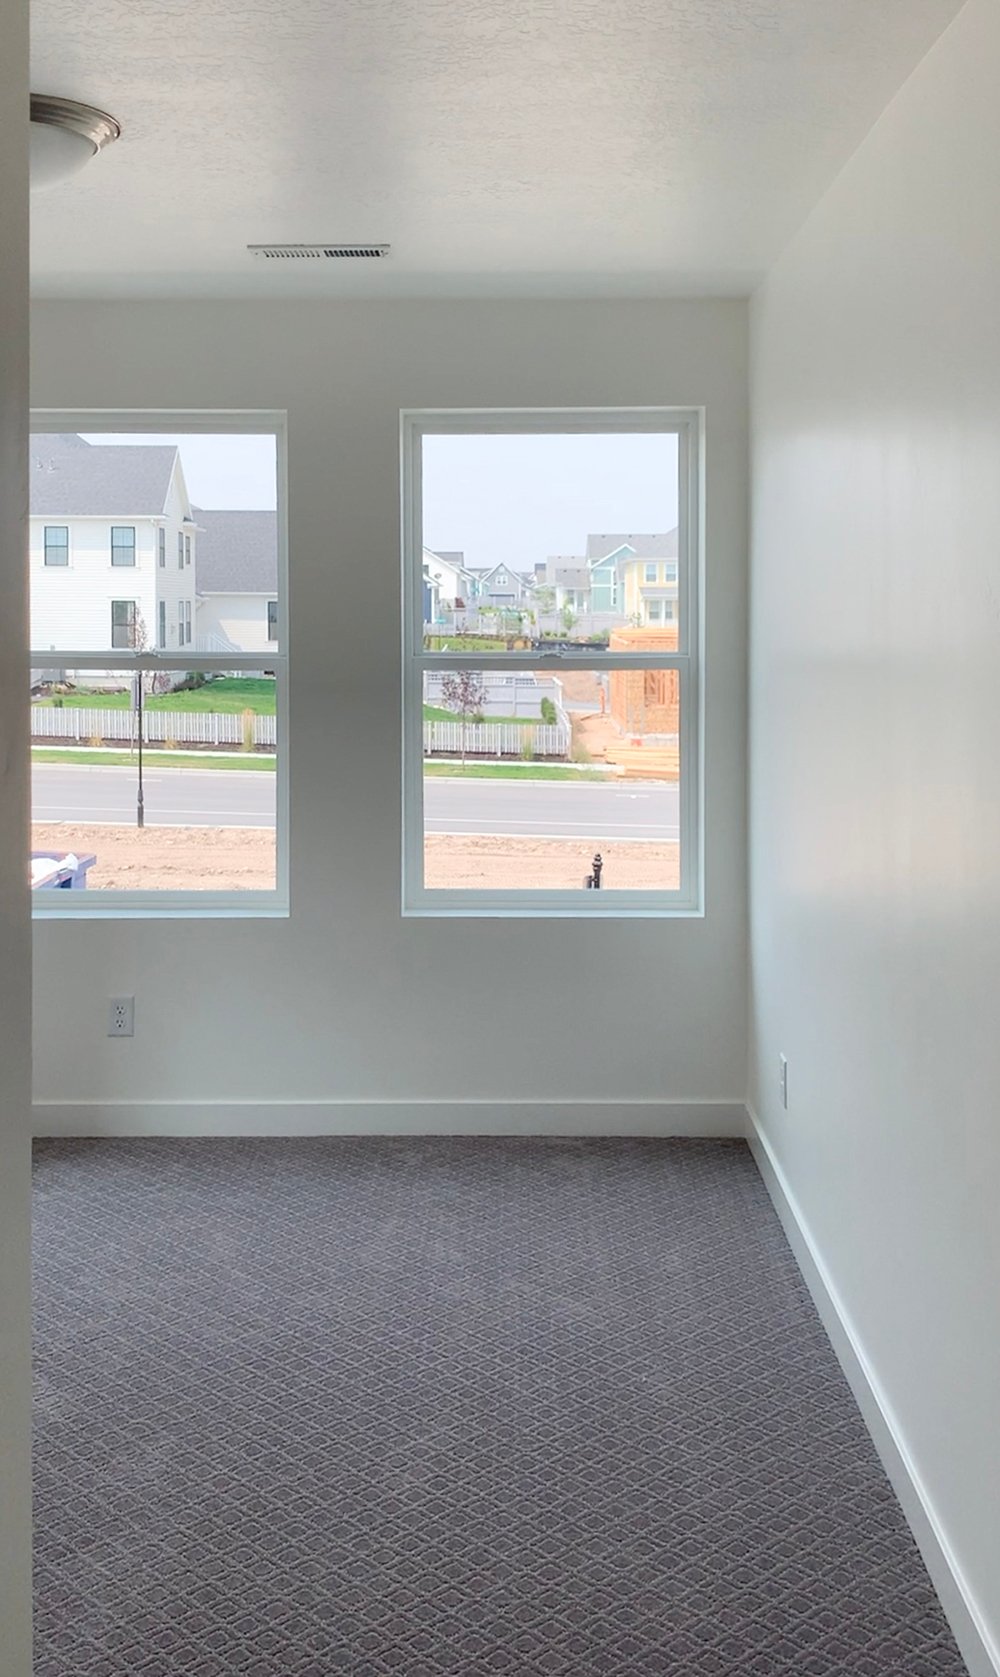
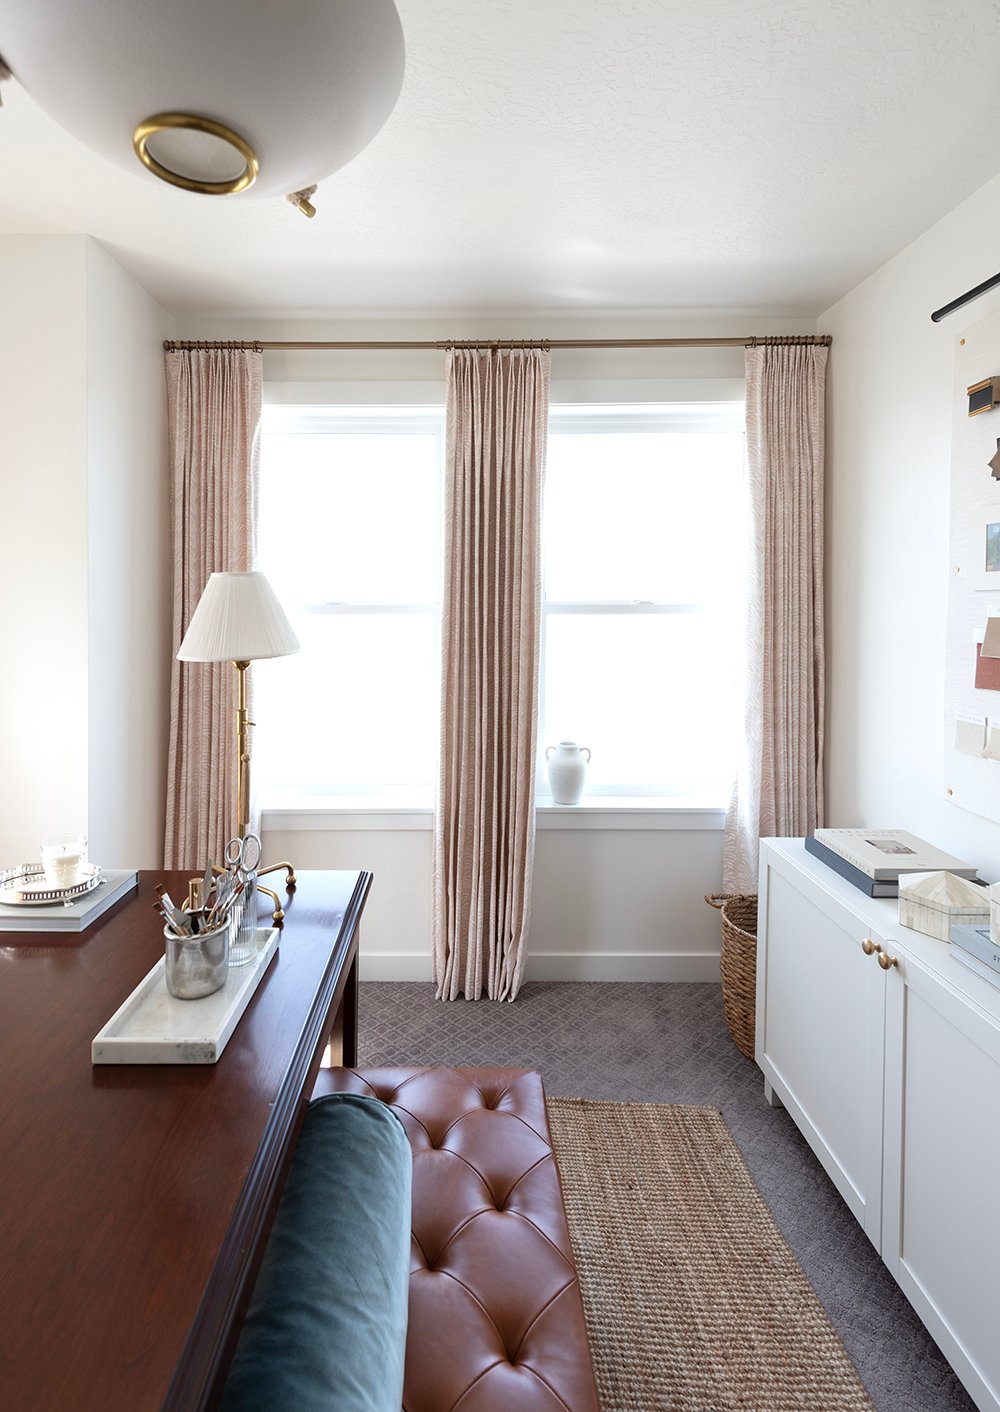
As is typical of a builder-grade home, the before image of this room was simple and boring… no window trim or coverings, brushed nickel door knobs, a boring light fixture, and gray paint. You may also notice the layout of the room is very similar to my husband’s office- they are basically mirror images of each other. My workspace has an additional window and a smaller closet… two things I wanted to address in the room design.
I made a few quick decisions that helped shape the design of this room. First, I decided to use a hand-me-down desk that I got from my parents. It’s made of heavy, solid wood and has a great amount of surface area. I also made a make-shift credenza with two storage cabinets from IKEA to store my office and craft supplies. Last, I purchased a jute rug to layer over the gray carpet. Other than that, this room has been a boring catch-all for various half-finished projects (oops) that I wanted to remedy with a cohesive design plan.
When I began pulling inspiration to complete the office, I considered painting the walls with a dusty blue or pale mauve, but ended up sticking with the original white. I love the way the sunlight bounces around the room throughout the day and I feel energized working in a bright, light-flooded office. I also enjoyed the idea of keeping things neutral so that when working on design plans for other projects, my workspace would not interfere with the decision making process. To bring in texture and personality, I focused on drapery, light fixtures, and artwork (plus a couple more DIYs I’ll be sharing here on the blog soon!).
Drapery & Textiles
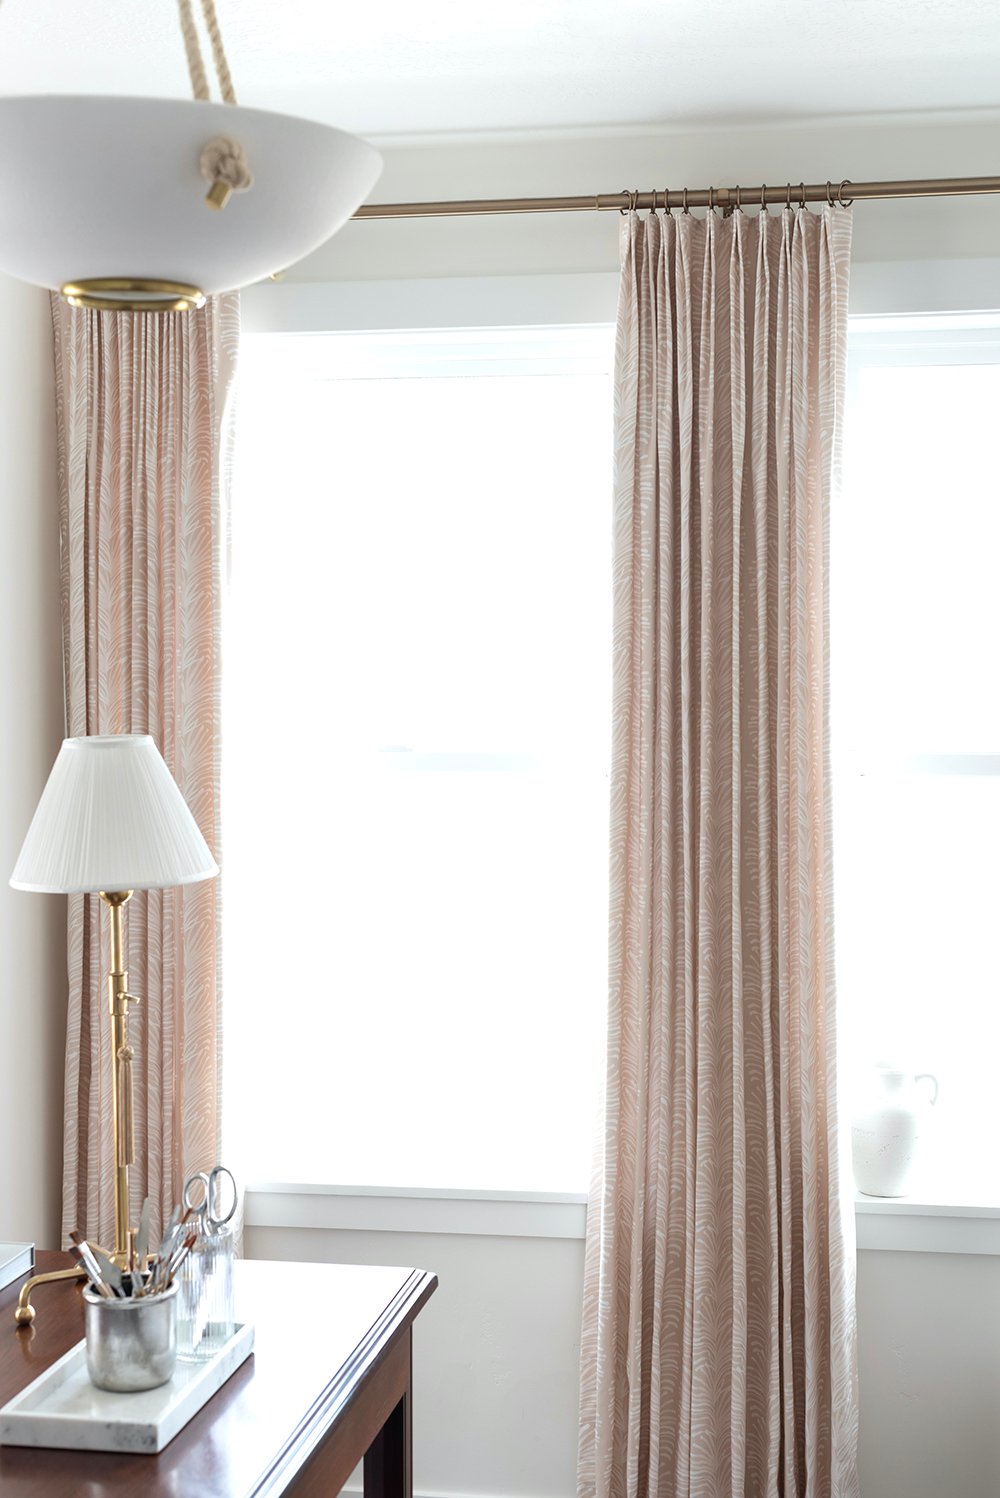
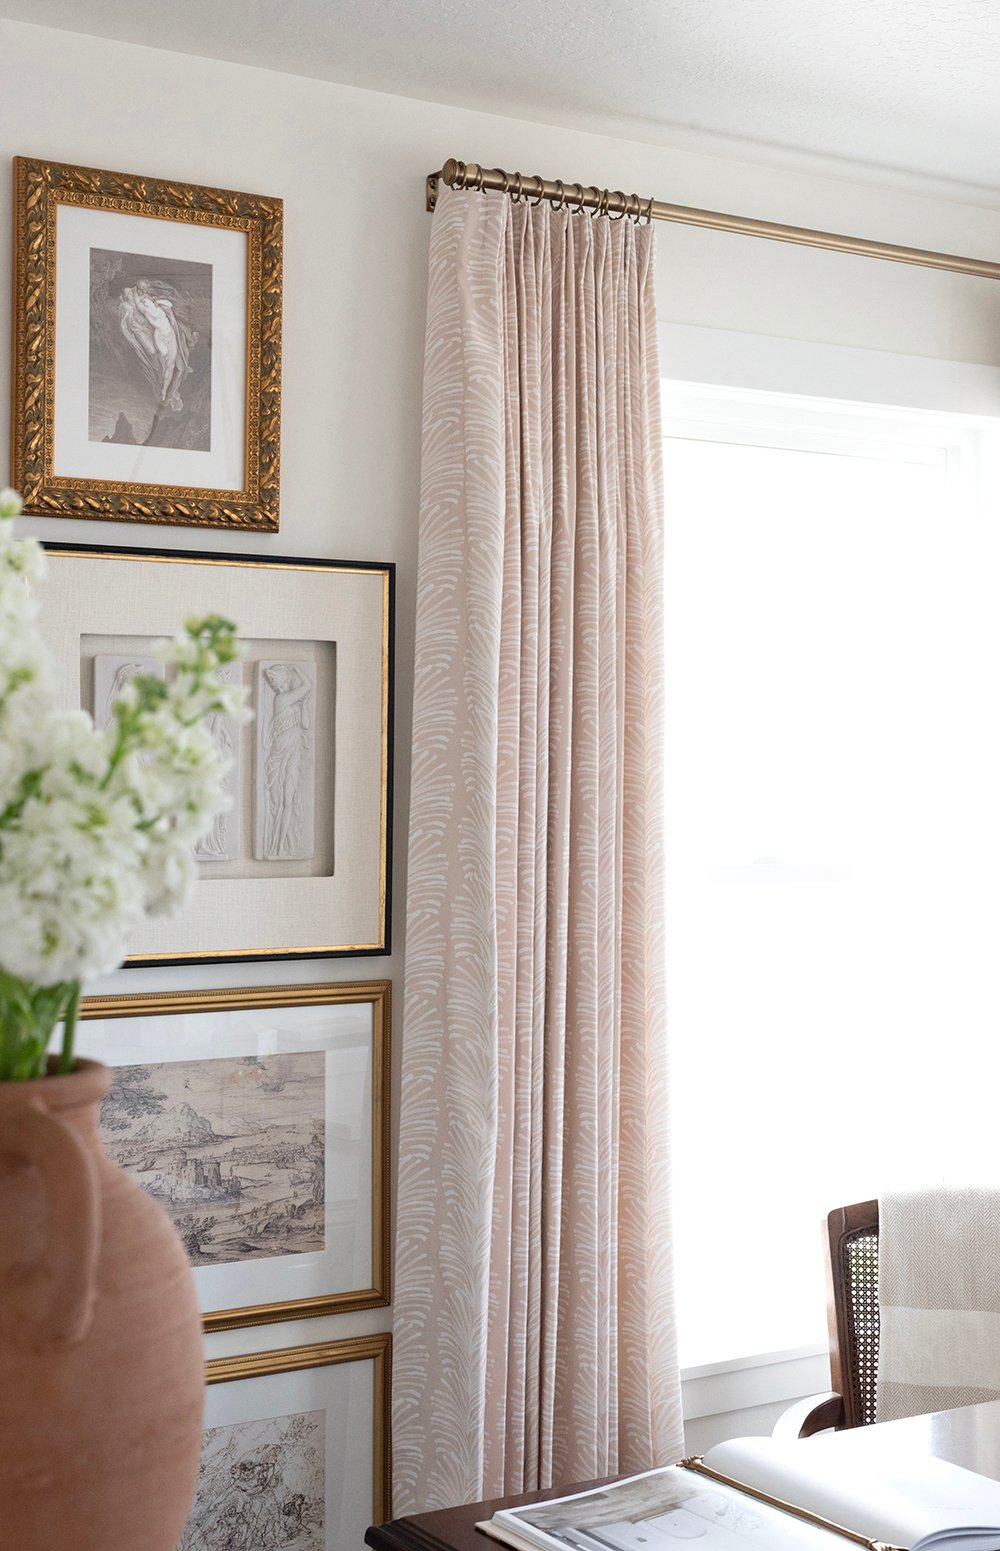
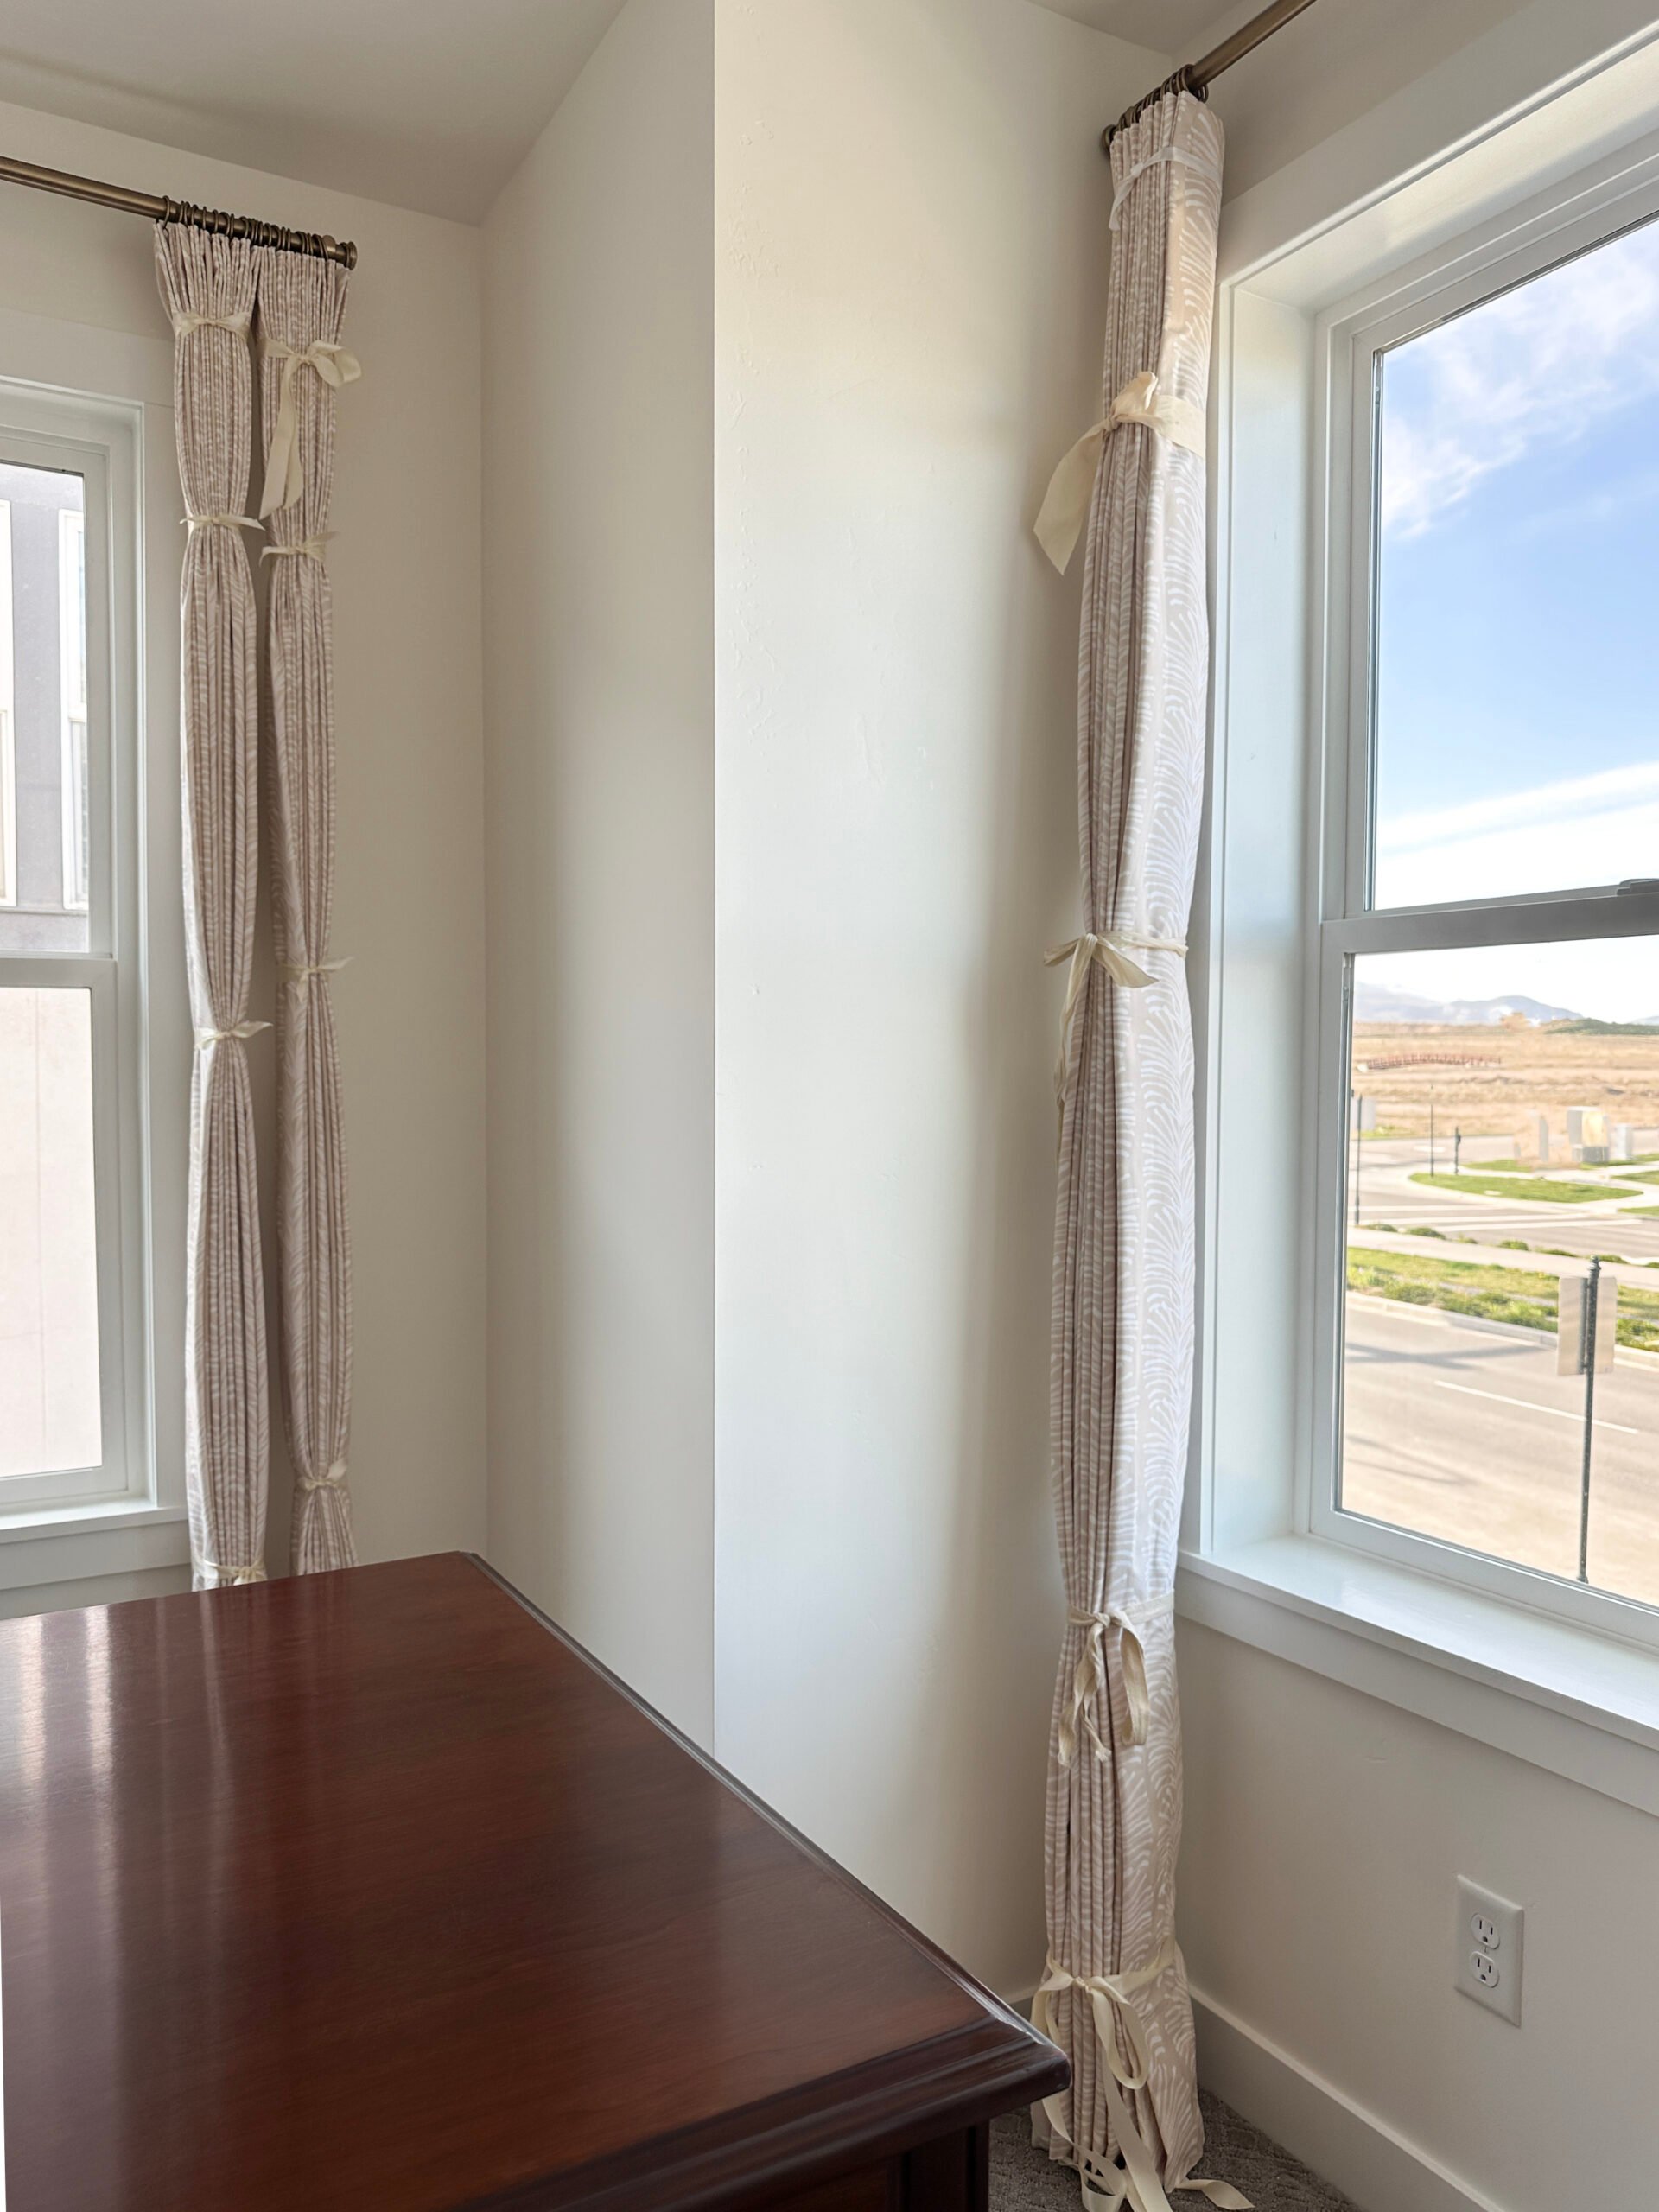
The number one thing that completely changed the feel of this room was the addition of custom window treatments. I selected these drapery panels from Pepper Home that added the perfect amount of texture and even a subtle touch of color. Do you see the gorgeous blush undertones? These panels are fully customizable, which made the installation process easy. I selected the color and pattern (Emma in Sand,) the pleating style (tailored pleats- I love the European feel), and the lining, width, and length of each panel. You can also add trim options! They shipped quickly and after trimming out the windows and hanging these drapes (with a quick intermission using Sarah’s tutorial on how to “train” readymade curtains) the entire room suddenly felt cozy and intentional.
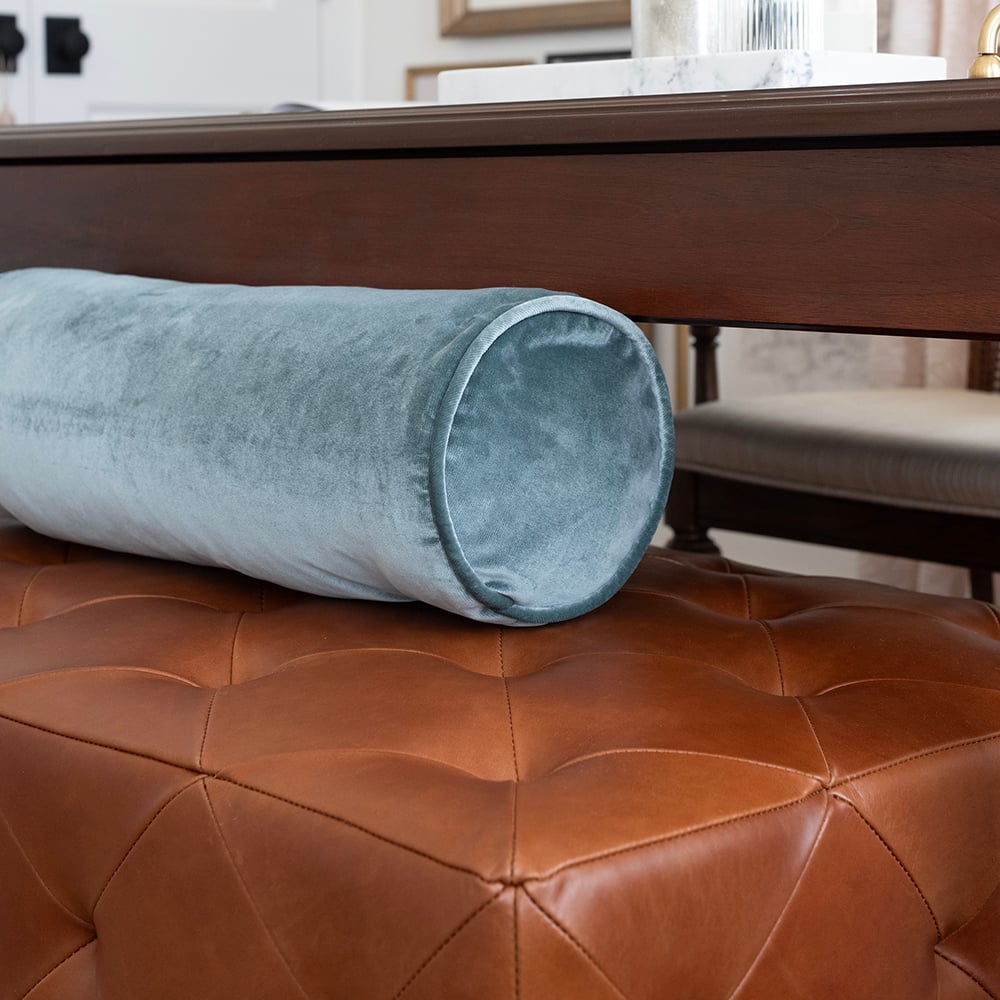
While I was at it, I couldn’t help but snag this pretty bolster pillow from Pepper Home with fabric from their latest Paradiso collection. The peacock velvet was the perfect compliment to the touches of blue and pink that would eventually be sprinkled throughout the room. It’s also customizable…lots of shapes, sizes, and trim options to choose from!
DIY Wall Art
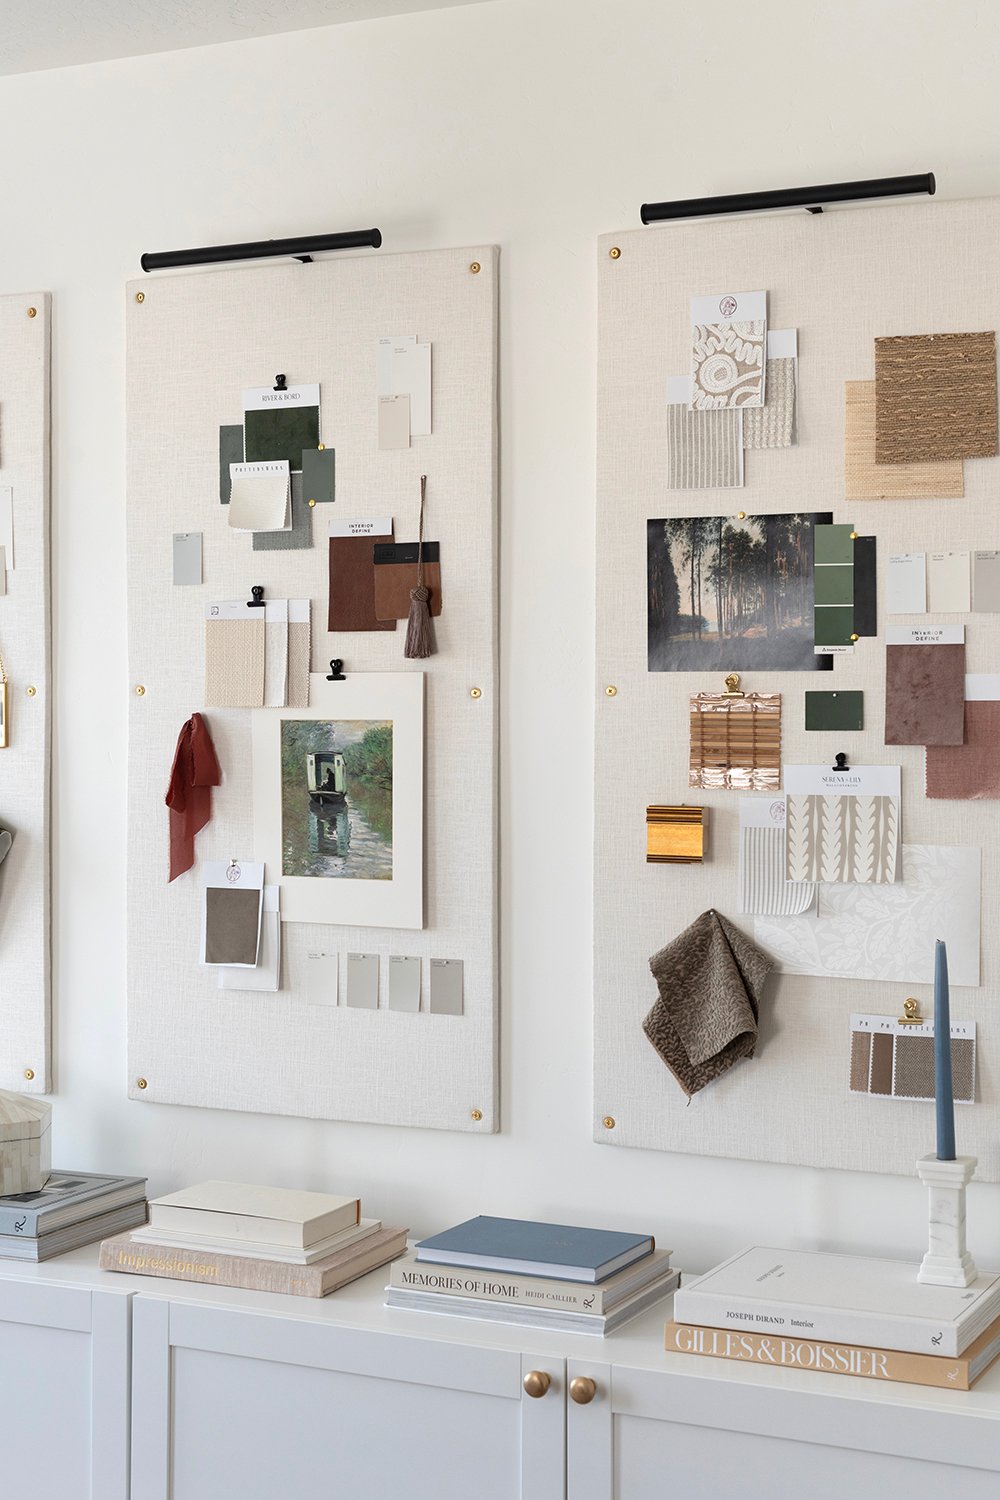
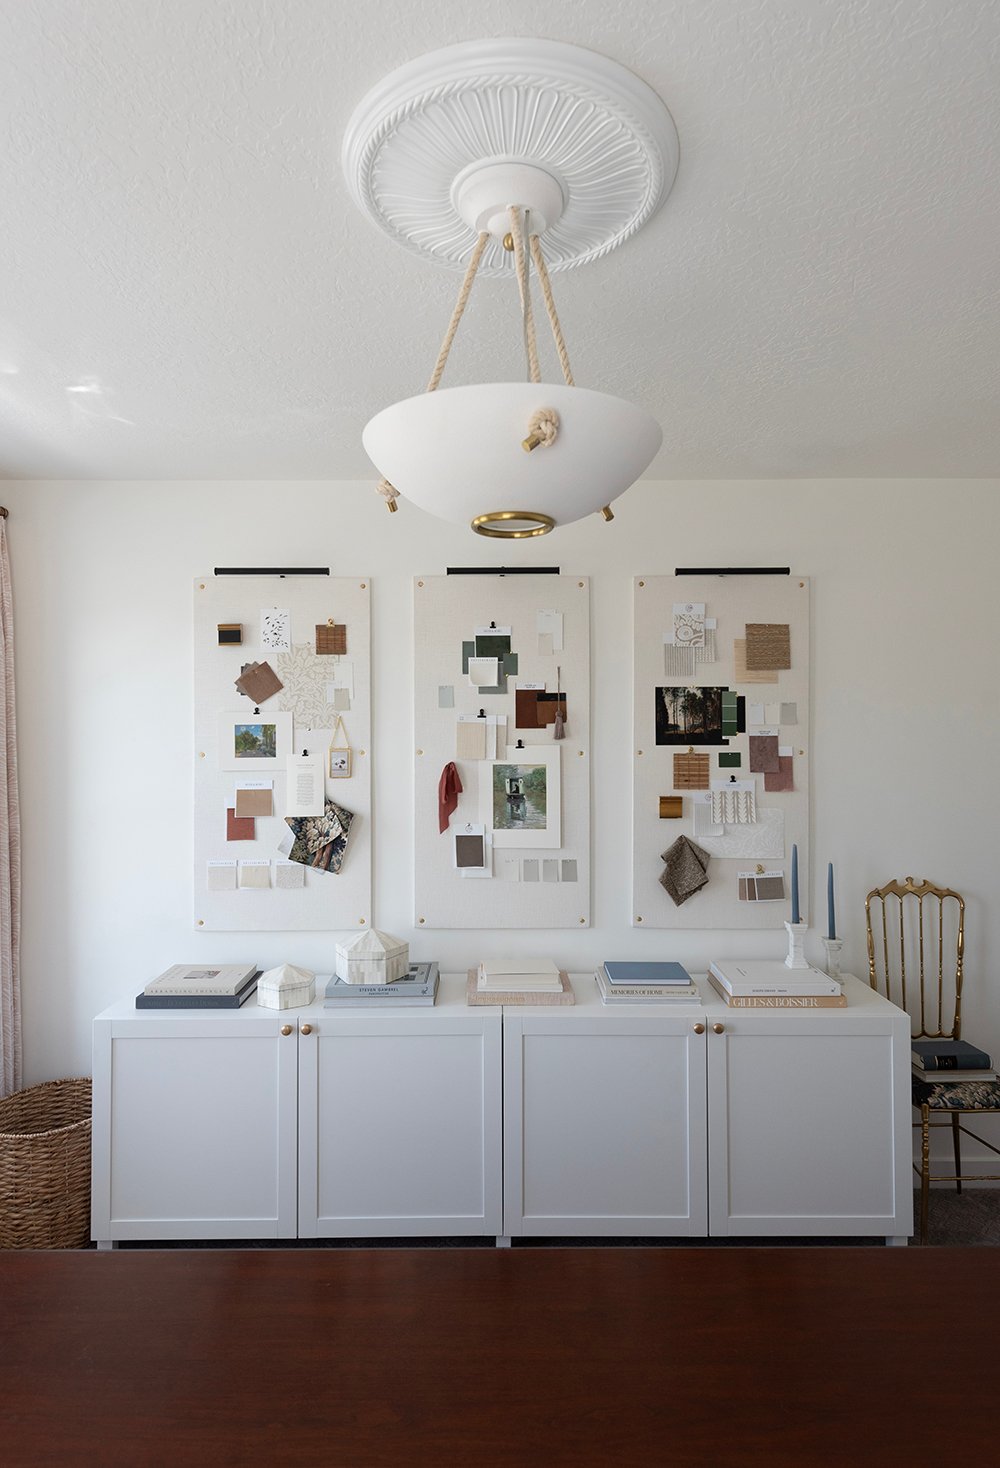
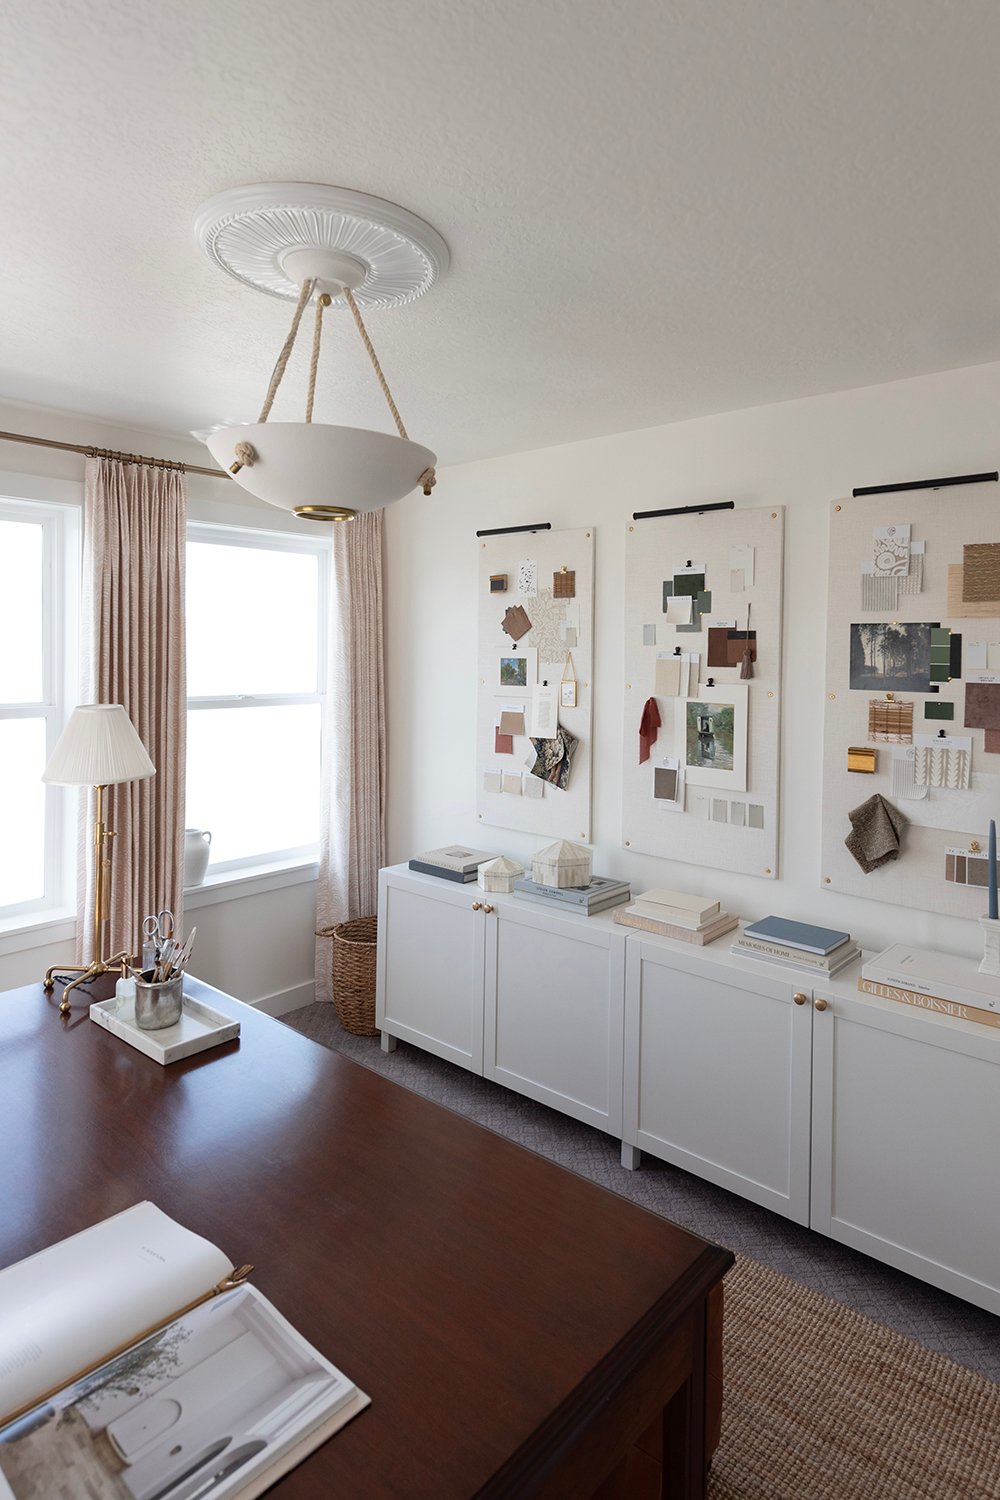
My next step was choosing how best to fill the two blank walls in the room. I knew early on that I wanted to include something to hold my various swatches that inevitably clutter surfaces during my design and creative process. What better way to organize these than with large pin boards? Three perfectly filled the negative space above my storage credenza. I wanted to find some fabric wrapped boards on a budget. Enter acoustic insulation board. This is a lightweight, easy-to-cut material that comes in 4 foot by 8 foot sheets for less than $30. This was more than enough to make my three large pin boards. It is a little messy and sheds when cut, but since I wanted to cover them in fabric anyway, these were the perfect solution.
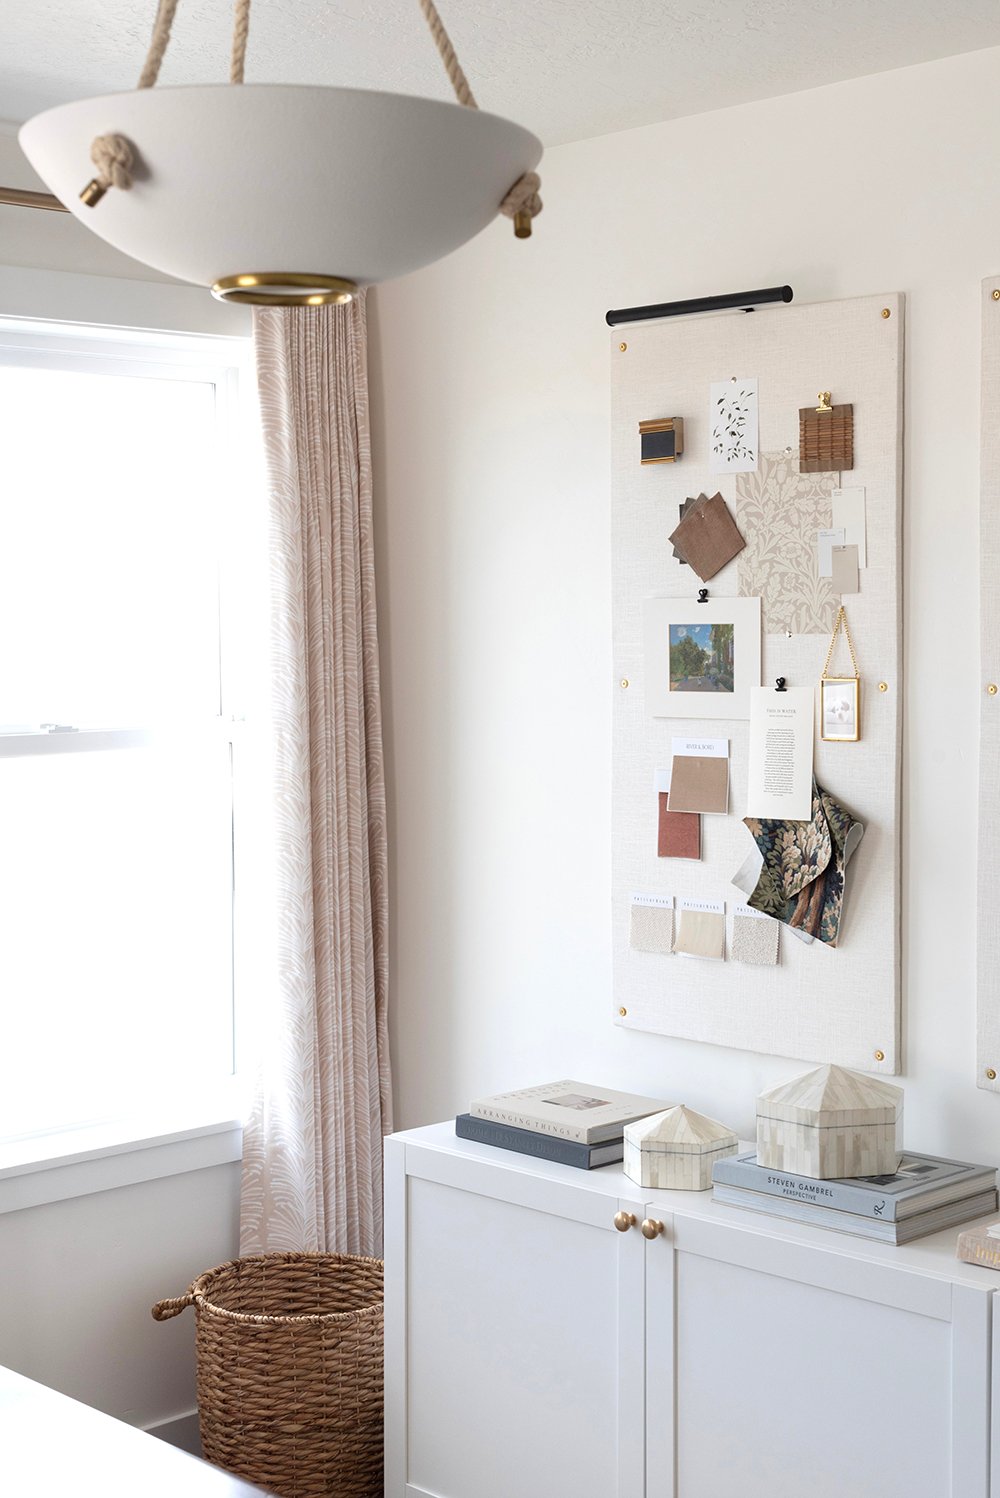
Just a few quick swipes with a utility knife was enough to cut through the insulation board, then I wrapped them with linen fabric and installed them on the wall with brass screws and countersunk washers.
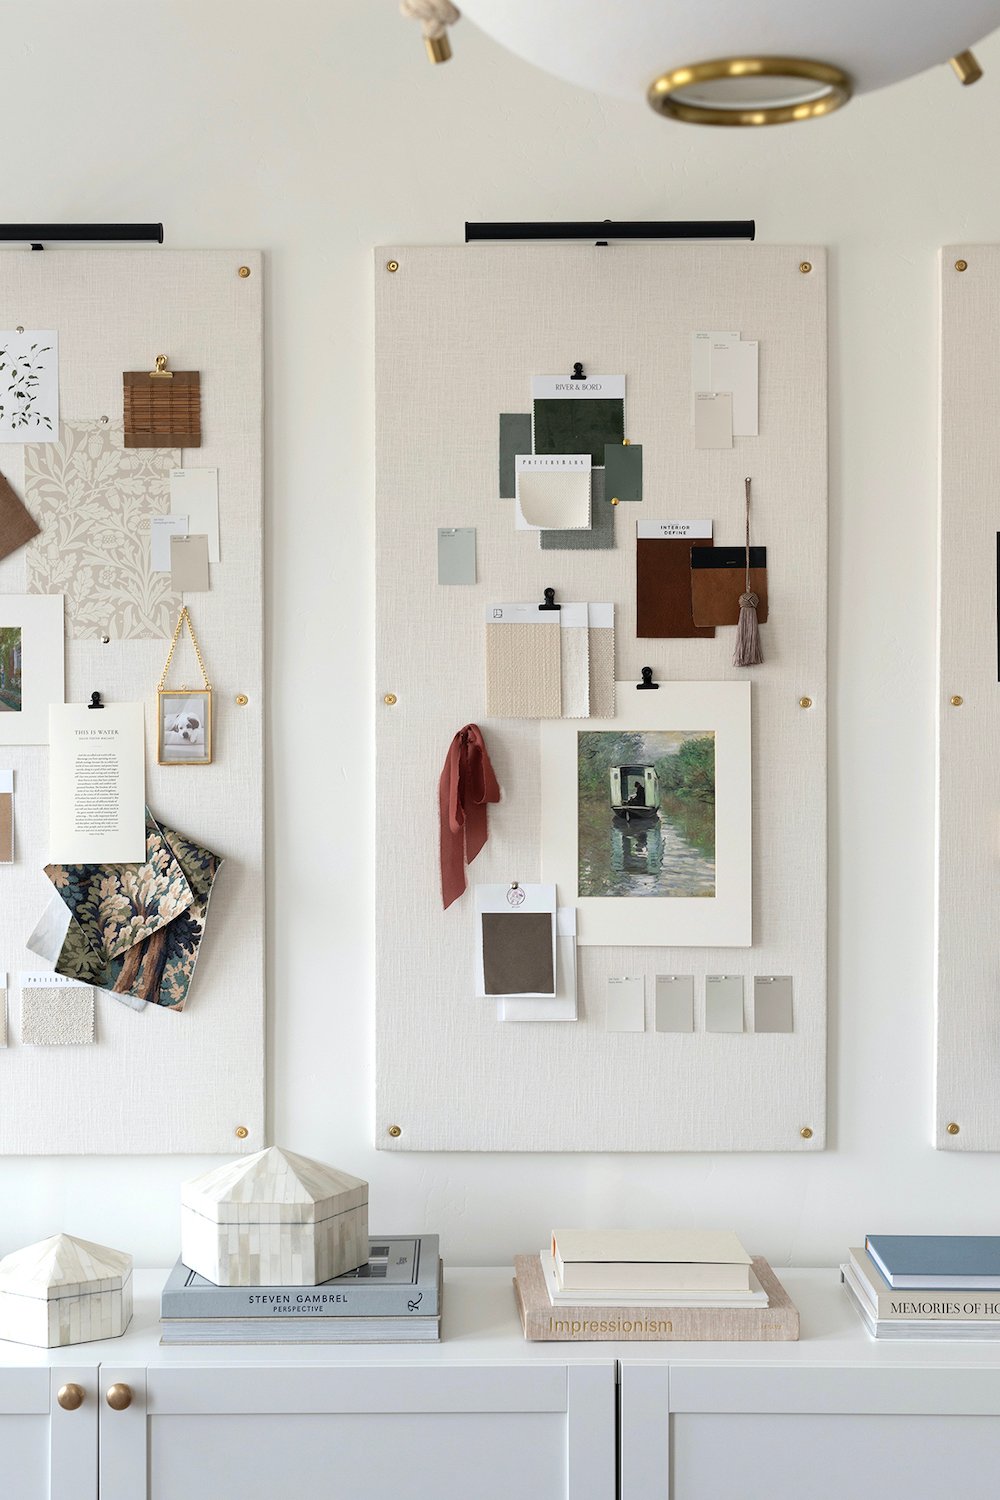
To finish off this wall, I paired each board with an inexpensive plug-in picture light, and added some vintage brass hardware to the storage cabinet beneath.
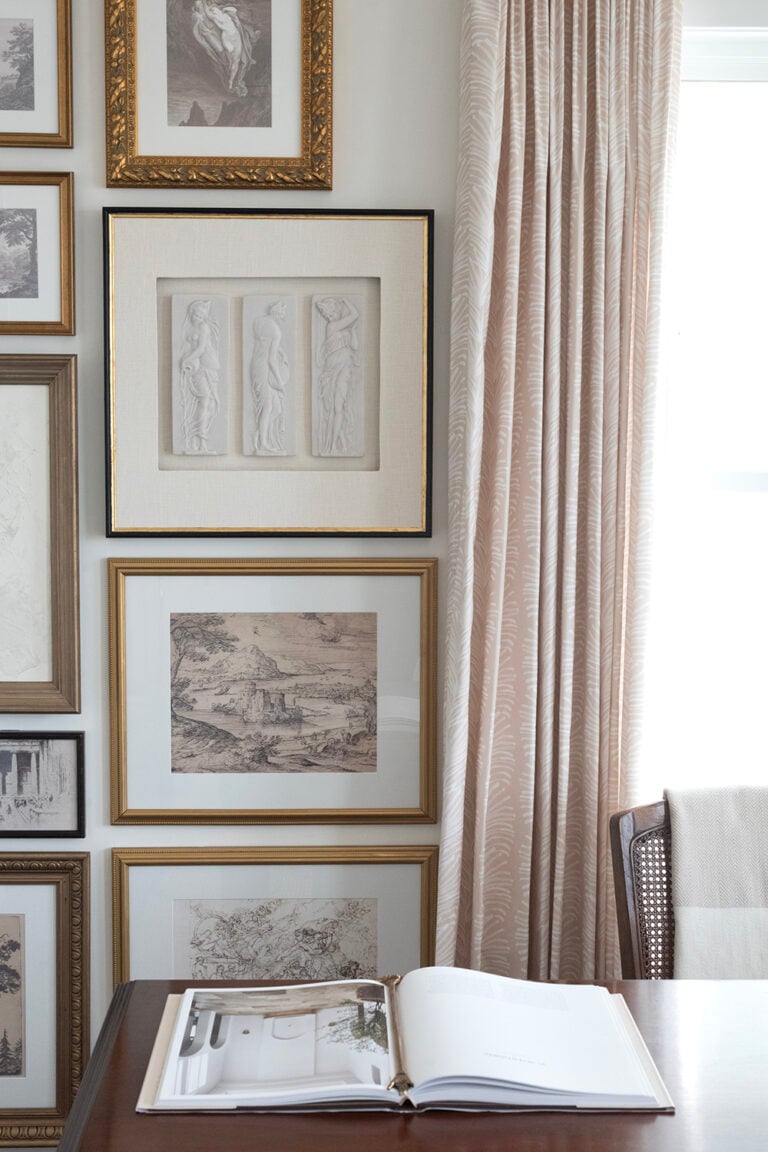
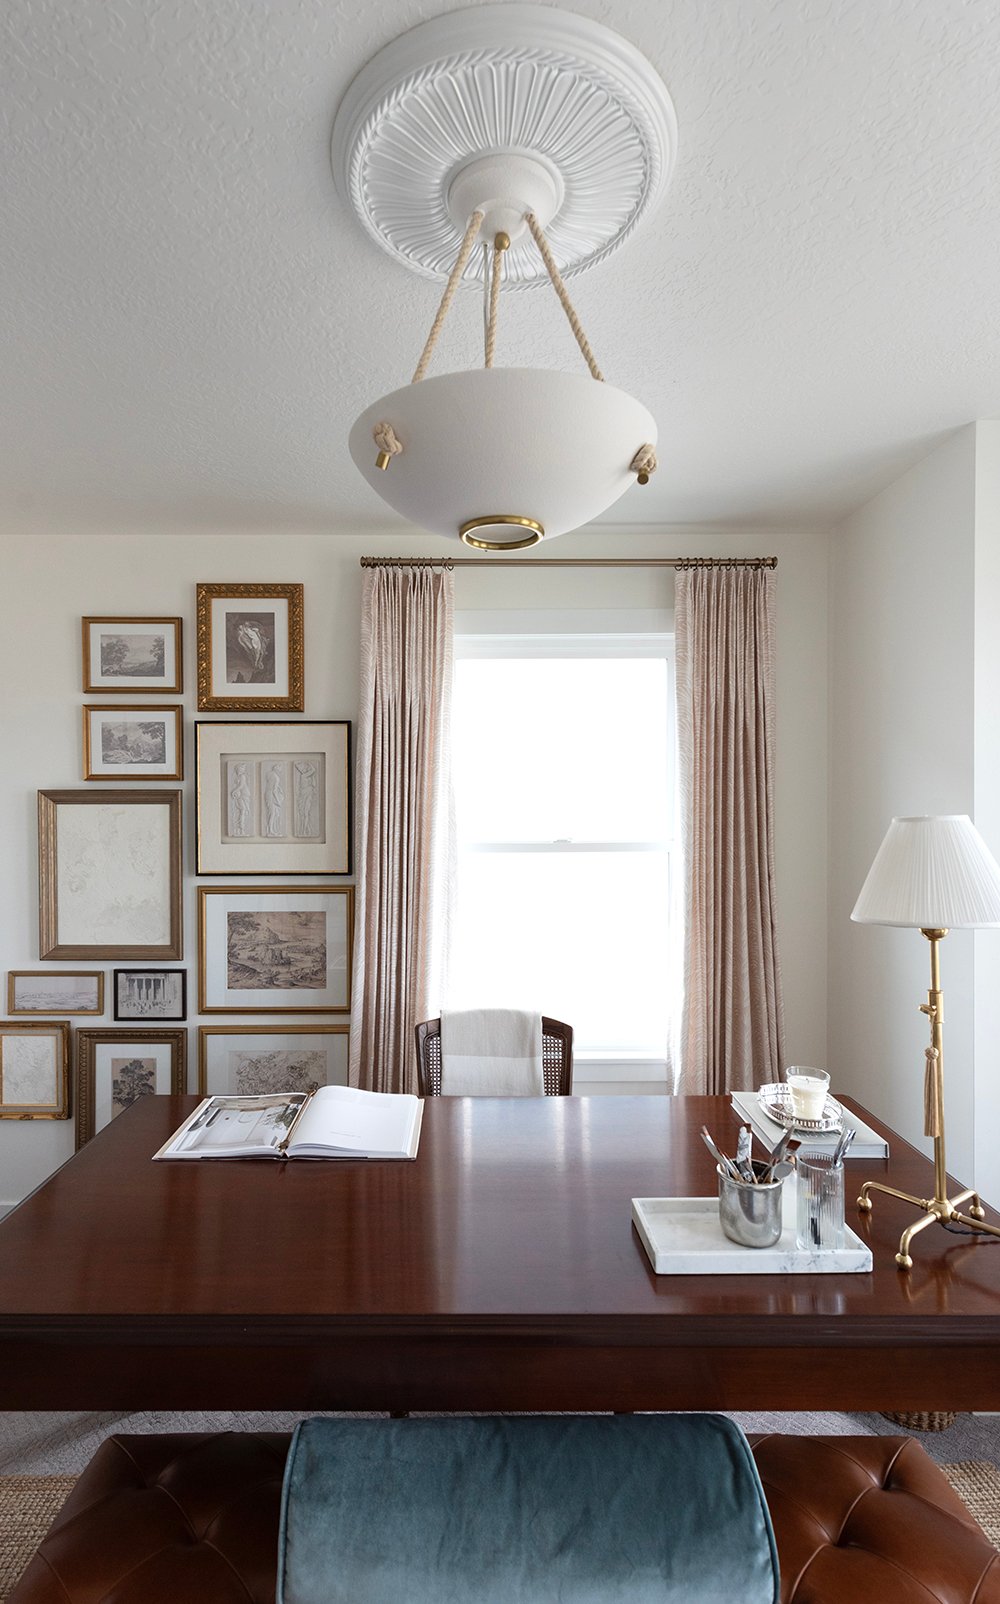
The last wall to address was the one behind my desk, next to the single window. I had one piece of DIY artwork I created a few years ago (with these marble reliefs), plus a bunch of secondhand frames. Like Sarah, I love a good visit to the thrift store and always check out the art section! My frame collection had been piling up, so I thought it was finally time to install them on the wall. A few of the frames had some art in them from previous spaces, and two of them had cork boards from DIYs from my teenage years (I used them to hang my jewelry in high school… I’ve always loved a good pin board!). While I had a good frame collection, I needed to fill them with art. Again, on a budget.
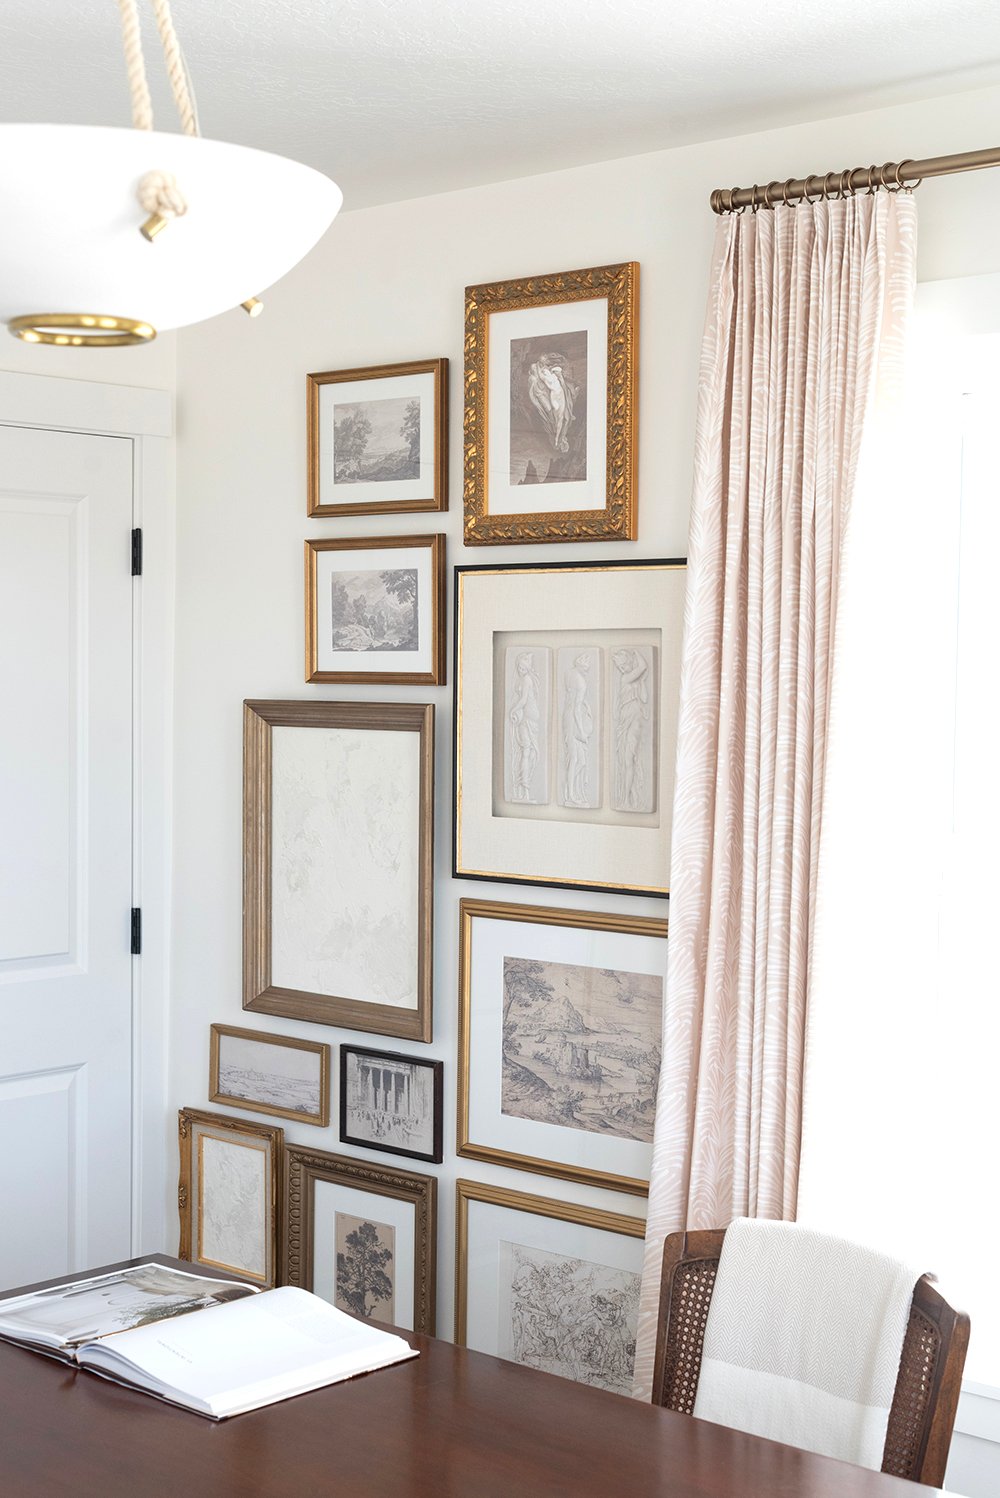
For a couple of the frames, I created some neutral plaster canvas art (see Sarah’s tutorial here). I also envisioned some drawing and etching style prints. One of my favorite resources for inexpensive art is searching the online collections of museums around the world. You can download high res images of public domain art- for free! Most of these came from The Met, then I sent the files to a local print shop to be professionally printed. A few of the frames required replacement glass, and I paired some of the artwork alongside a mat. For a scrappy gallery wall project, I’ve been so happy with the result! What do you think?
The last two projects for this room were a couple quick furniture DIYs. I built a gallery pedestal over the weekend with my dad, and recovered the seat of a chair I found on Facebook Marketplace. This post is getting long, so I’m planning to share separate tutorials for both of those. Coming here to the Room for Tuesday blog, soon!

Lighting

Last, I swapped out the builder-installed ceiling light with this pretty plaster pendant from the Tuesday Made shop (it’s on sale until tomorrow with code LIGHTING20). It’s paired alongside this simple ceiling medallion. The table lamp, on my desk, is also on sale! I was ready to style and enjoy my finished office…
My goal was to have a work space that felt polished and organized, even when I am in the midst of a DIY or design project. Craft supplies & project samples can start to feel messy, cluttered, and overwhelming. I’m happy to report, this room has delivered on keeping me organized and inspired. We are in full-blown yard & patio clean up over here, so this office has been a great home base for my landscaping ideas lately.
Get the Look: Sources
Click directly on each item below to be redirected.

simple gold frame // ornate gold frame // black gold frame (similar) // plaster pendant light // curtain rod // drapery // table lamp // desk (similar) // bolster pillow // leather ottoman // jute rug // terracotta vase (similar) // gallery pedestal (similar) // design books // picture lights // pin boards (similar) // chair fabric // vintage chair (similar) // storage cabinets // bone boxes // marble candle holders
FAQ
I found Frame Destination in my search for frame replacement materials. Most of my frames required standard glass sizes, but they also offer custom sizes- for both glass and mats!
The closet holds things like linens for our inflatable guest bed, extra blankets, and home decor. The cabinets hold office and craft supplies, project samples, gift wrap, and tech items- like extra SD cards and extension cords!
This ottoman was a last minute addition to the room, because I honestly love to put my feet up while working! It doubles as extra seating for the opposing side of the desk, and it offers an additional surface to rifle through the storage credenza. It will likely end up in our living room eventually, but then I’ll have to replace it with another ottoman…I love it so much and it functions well for me!
Related
If you’re on the hunt for more home office posts, I’ll link some reader favorites for you below…
- Sarah’s Home Office
- Tuesday Made Office Tour (where Sarah & I both work!)
- Jordan’s Dark Green Home Office
- 5 Things Every Home Office Needs
- Mapleleaf Offices : Part One and Part Two (where Emmett works)
- 5 Tips for Working From Home & Setting Up a Home Office
- Sarah’s Previous Home Office
- DIY Built-Ins and Office Organization
- DIY Linen Office Organization Board
Thank you so much for taking the time to tour my home office! I hope it provided some valuable information and ideas on how to pull together an office on a budget… and maybe a DIY project or two for you to tackle in the future. Let me know if you have any questions, and have a great rest of your week! More to come soon.

Good morning, Jordan! What a great looking, neat and organized office. How fantastic that you and the hubs each inhabit your own room. (Seriously, I’d rather share a bathroom than a work space.🤣) Although you completed this makeover on a budget, the strategic splurges elevate the entire look. The custom drapes add color, texture, pattern, and warmth! You could hardly ask for more. I really dig the whimsical feather/fern/zebra pattern. Anatomically speaking, putting my feet up while seated at a desk feels impossible, but I do love the addition of the oversized luxe leather ottoman. Goodness knows, any creative space of mine can always benefit from more surface area! That gorg plaster pendant though? I’m mesmerized! The knotted ropes? I can’t keep up with all the incredible lighting in the Tuesday Made shop! As for your two featured DIYs, professional level plus super-handy tips! The gallery wall looks sophisticated and cohesive. Such a stellar mix of images, texture, and frames! I might have to peruse The Met offerings just for kicks. Your pinboards are so perfectly curated they act as art too. Great hint about the insulation board btw. Job well done! I can envision scads of inspired endeavors transpiring here…under Margo’s careful supervision.😍 Thanks for sharing. Have a wonderful Wednesday, Jordan!
Hi Peggi, and thank you!! I took a chance and ordered the drapes without seeing a fabric sample in real life, and I’m so happy with the subtle color & pattern they brought to the space! And I couldn’t be happier with the pendant light…Tuesday Made really has the best lighting. I have about 5 fixtures on my ever-growing wish list. The pin boards were actually really fun to fill. It was nice to pull each room in my home onto them and see how they all work together (even though I usually feel like I’m flying by the seat of my pants when making decisions.) Have a wonderful Wednesday & rest of your week!
Hi! Do you have the picture lights plugged in? I’m trying to track the cords but couldn’t find them.
Hi Brittany! Good eye – the picture lights are plugged in & hidden behind cord coverings between the bottom of the pin boards and the credenza. I didn’t get to painting the cord covers before photographing the space, though, so I used some photoshop magic to hide them instead. You can see how they look on the reel on my Instagram (@jordankarolla), if you’re interested!
Good morning Jordan! This home office looks like a fun weekend upgrading the look and feel- you did a phenomenal job! The blush undertones in the curtains against the white walls, elevates the feel of the space so much- the warmth and texture window coverings bring to a space is undeniable. Your diy pin boards are art in-and-of-themselves. Such a smart and fun way to work through your designs; ever changing artwork and it looks awesome above your credenza. The vignette of your desk with the gallery wall in view is a whole look; I love the modern light fixture paired with a more detailed ceiling medallion, and the asymmetrical gallery wall is a stunning backdrop. I’m in my asymmetrical era and I’m not mad about it, lol. I can’t wait to see your diy tutorials hit the blog. You certainly bring style in spades to these home spaces you’ve been tackling. Have a fantastic Wednesday Jordan!
Good morning, Lauren! Thank you so much. You always have such a good eye for window treatments, and I’m so glad you approve of these! They totally transformed the space and I mostly look at them, instead of my usual view out of the window…haha! I’m excited to share the rest of the DIYs soon. Have a wonderful rest of your day!
Great job all around, Jordan! I love it.
Thank you so much, Christiane!!
Good Morning Jordan!
I’m a day late in reading your home office reveal, I love it! So incredibly pretty 😍 It’s such a bright space with a well thought out design. The drapery is gorgeous and Sarah’s curtain training tutorial worked perfectly 👍 I’ve never heard of Pepper Home so I’ll definitely check the website for more details. Your DIY art is amazing and your art pin boards are ingenious. I absolutely love how you filled them too! A fabulous way to organize design ideas for the rest of your home. So smart! And your ikea credenza is fantastic, I especially love the way you styled it with books, gorgeous boxes that add storage function and of course pretty candleholders for perfect evening ambiance ☺️ Just wonderful! I especially love you worked with your Dad to create that sweet pedestal for your floral arrangement, so special 🫶 The desk you scored from your parents home fits perfectly, a classic beauty and was a lifesaver on the budget I’m sure. I never would have thought to add an ottoman as a footstool another smart idea. So clever! Your Facebook marketplace vintage chair is so cool and I adore the fabric you chose to recover the seat. Did you paint it gold? It’s so cute. And last but not least the lighting from the shop is stunning 😍 and the ceiling medallion adds such a perfect detail that so complementary. Well done! I thoroughly enjoyed this post and the picture of Margo is the sweetest! Such a cutie 💝 Thanks for sharing!
Hi Colleen! Thank you so much! Pepper Home is new to me too, and I’m so happy to have found them. They have such a great selection for drapery, pillows, and even wallpaper. The gold chair is actually made of solid brass, so no painting needed! It’s been a dream vintage find for me for years, and I happened to snag two on Facebook Marketplace recently. Have a wonderful weekend!
Hi. The room looks gorgeous! I have a similar window situation and was already looking at some Pepperhome curtains. Can I ask did you do 25 inch panels and just put one panel in the center of the two windows? Thx in advance!
Hi Jacqueline! Each of these panels is 50″ wide. Coverage wise, I could have done 25″ panels on the single window and the outside edges of the two windows, but I generally like a fuller look, so I went with 50″. And yes, between the two windows is just one panel! I split the rings and did half on each side of the center rod bracket. I absolutely love my Pepper Home drapes, so I can’t recommend them enough!
I have been dying to make my own pinboards and love your ideas for this. Is the acoustic sound board pretty easy to pin into? I’ve never felt it before, and clearly, you have things pinned in! I’m curious how you decided on this material before I pull the trigger.
Thank you so much!!