Our Vintage Dining Set Transformation + Tips for Furniture Restoration
 We’ve lived in our home for almost two years now without eating a single dinner at a dining table inside. We typically eat in the basement at the countertop or outside on our patio, due to the lack of dining setup inside. A few weeks ago all of that changed when we finished our vintage dining set. I purchased the antique table and chairs right after we moved in and this project completion has been a labor of love and a lonnnng time coming. Many of you asked for a DIY tutorial on the entire transformation process, but unfortunately that isn’t exactly how this project played out. We did about 60% of the work ourselves and hired professionals for the other 40% (like professional painting and upholstery). However, I thought it would be helpful to share tips & tricks for restoring and transforming vintage or antique furniture… so you can see what the actual process looked like, and my reasoning for hiring the pros for certain portions of this project. Click through for all the details!
*Quick disclaimer- I did a pretty good job sharing the process on IG stories, and it’s saved in a dedicated “dining set” highlight. Still images, on the other hand, are seriously lacking for this project. My apologies for the poor image quality of the before images, which is a result of screen shots and quick phone photos sent between Emmett and myself.
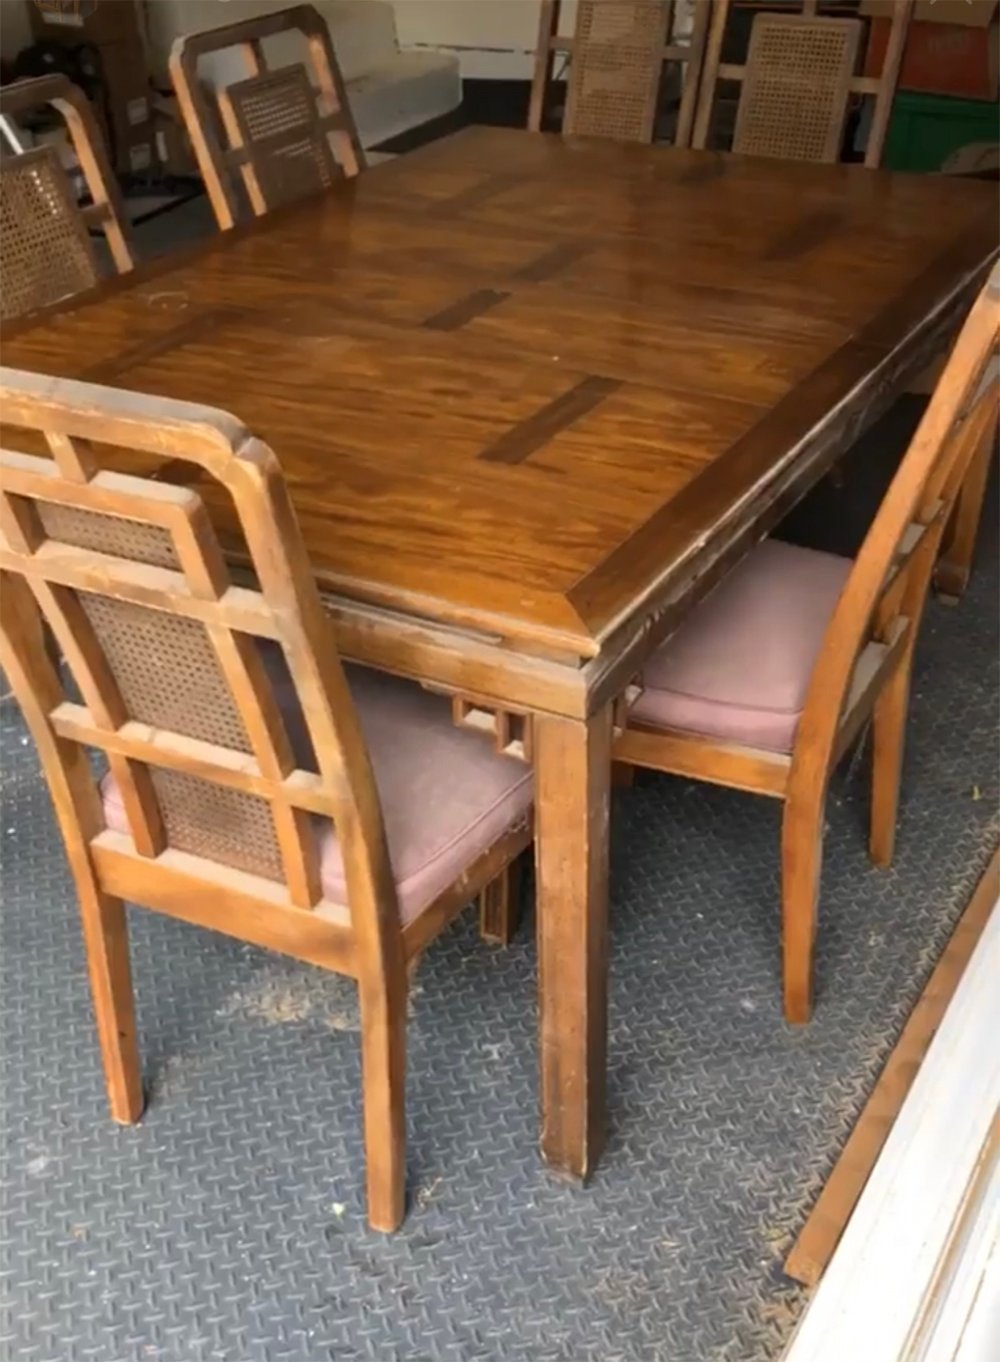 First up… the story behind finding this dining set. Almost two years ago, I convinced Emmett to go with me to an elderly lady’s storage unit and buy this vintage set (her son had listed it on FB Marketplace for her). We arrived to find it covered under an inch of dust, smelling like pet urine, and as we pulled it out of the unit, one table leg snapped in half, a chair fell apart, another chair lost a leg, and pieces were literally falling off as we loaded it up. Emmett was giving me the “are you kidding?!” look, and I didn’t even negotiate because despite the terrible condition, I could totally see the potential and fell in love with the shape and very dusty details. We found out the set hadn’t been used in over 50 years and is over 100 years old. Although very cool, we knew we had our work cut out for us in repairing and restoring the set.
 The dining set sat in our garage for over a year before we had the time or energy to begin repairing it. Once we finally started the process, Emmett would work on it in between projects an hour or two at a time. He began by taking mostly everything apart and accessing the damage. We formulated a plan as to what needed to be replaced, reinforced, and how we were going to accomplish that. I worked on the design plan while Emmett worked to reinforce and repair the table and chairs with dowels, wood glue, and replacing pieces that weren’t salvageable. Want to see my design inspiration?
 A few years ago I walked into the Alice Lane showroom, here in Salt Lake, and fell in love with a dining set on their showroom floor. I loved the textural cane back on the dining chairs, the two toned floated table, and the high contrast pairing. If I had an unlimited budget, I probably would’ve bought it right then and there, but the entire set was wayyy out of my price range. I had basically given up on that entire look, until a few months later when I stumbled upon the FB Marketplace listing. Given the shape of the dining table with the floated top and the matching cane chairs, I thought my vision might be in reach after all…. plus the vintage set has a thousand times more character. I’m so glad I waited and was patient (another thrifting piece of advice- PATIENCE). That designer set was really a huge inspiration for the entire color palette and two-toned look.
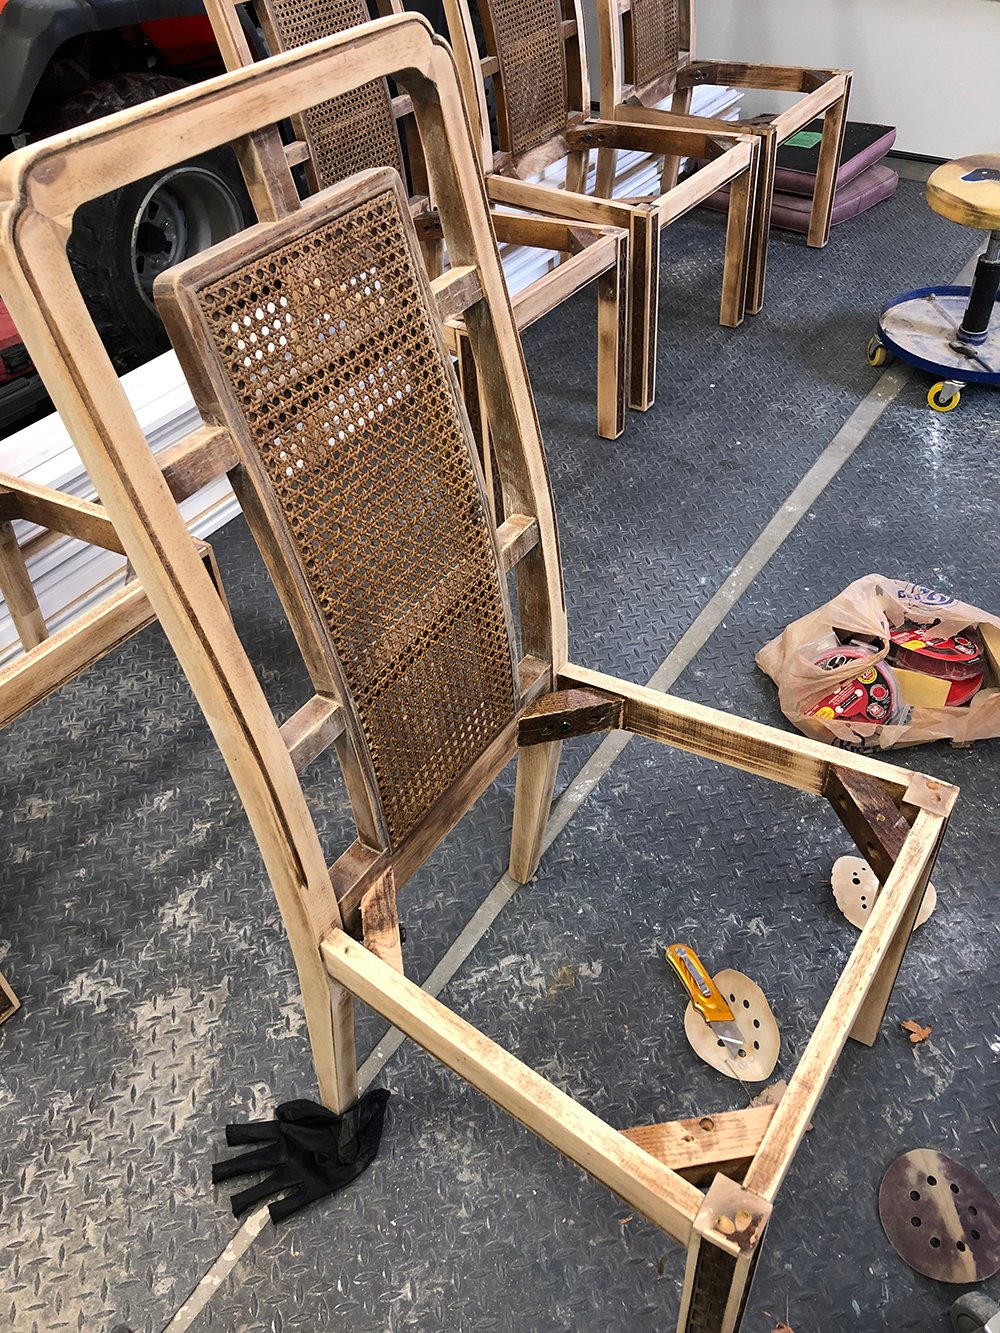
 Once the repairs were made and the table & chairs felt sturdy (and safe) again, we were able to begin the cosmetic transformation. The first step was sanding… a LOT of intricate sanding. Emmett estimated he spent around 40 hours sanding.
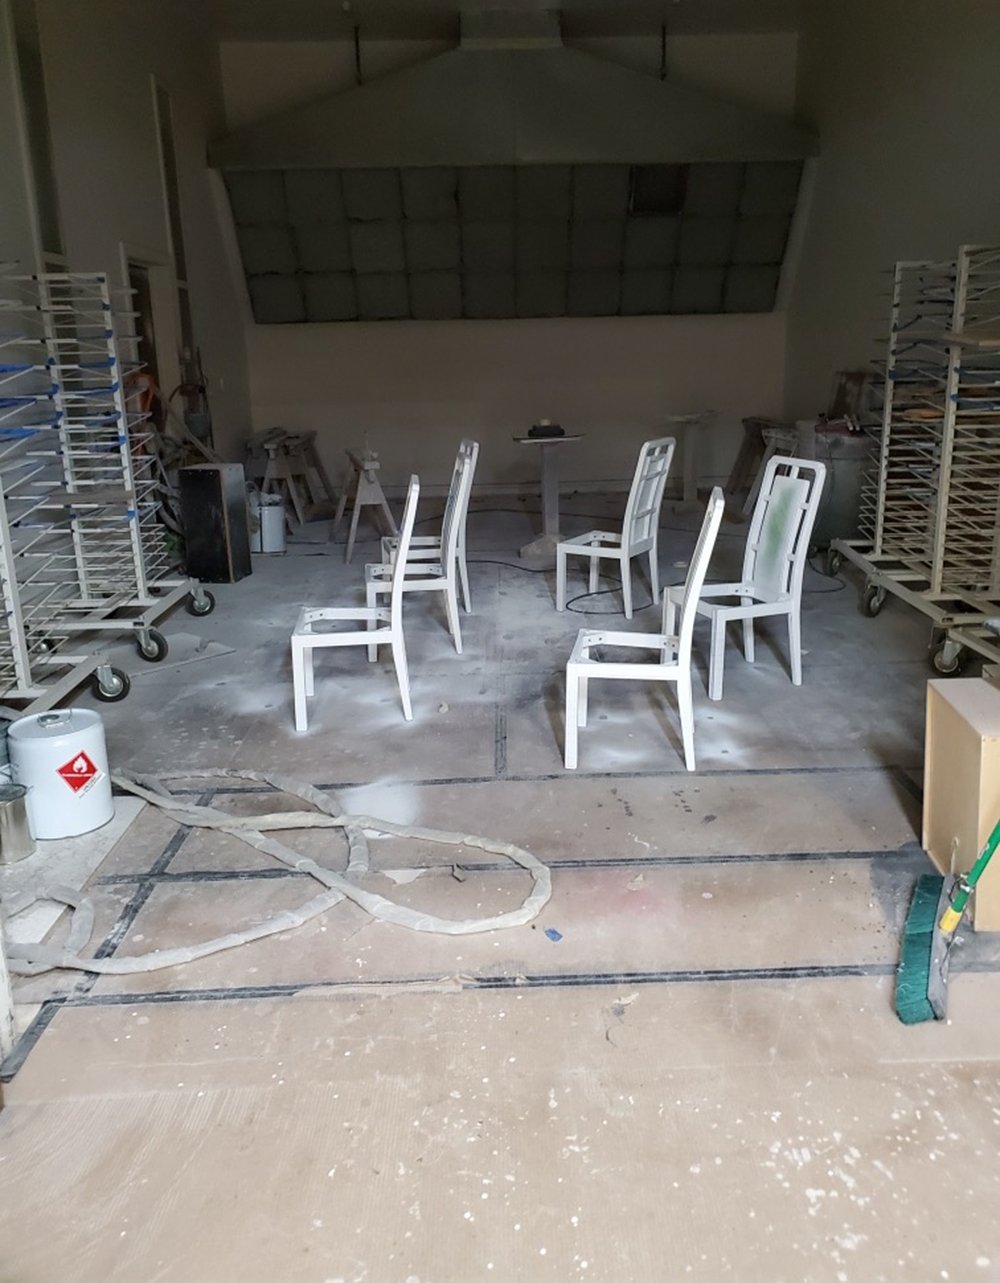
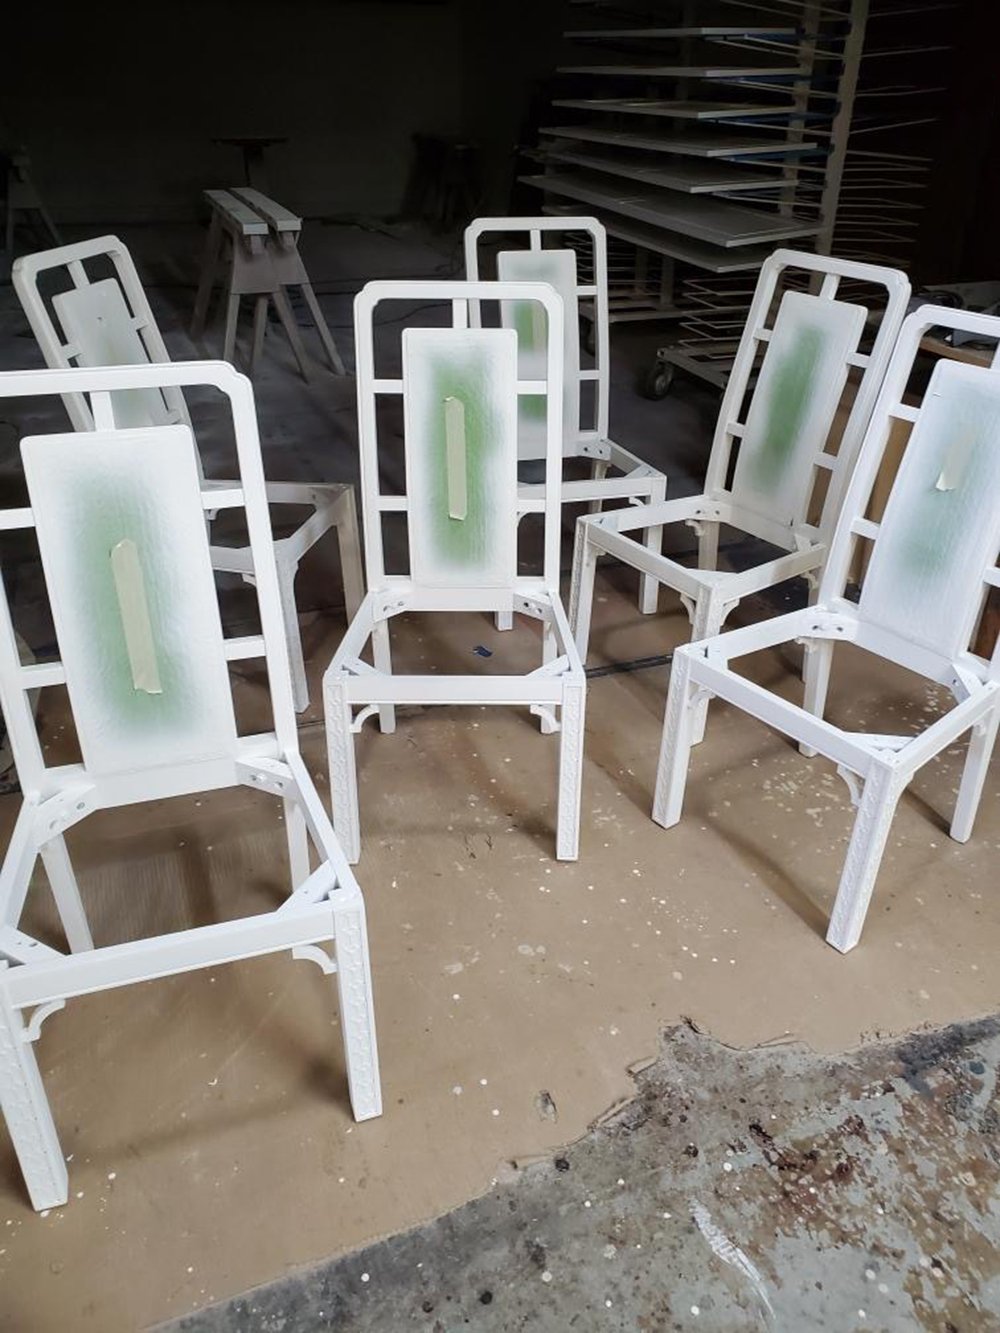
 After sanding, almost ready to move onto paint, we decided to hire a professional. Emmett & I both really want to use this dining set for years to come… it’s such a special piece we want to have in our family for a long time! Given he works for a commercial cabinetry & fixture company, we paid one of his friends at work to professionally paint the set. The table and chairs were first sprayed with a high quality primer, pictured below. We taped off the original cane, which was in incredible shape. We didn’t do anything to the cane webbing other than clean it.
 Next, the chairs and table base were sprayed with pre catalyzed lacquer. Given this is our main dining set we plan to use multiple times each day, it had to be super durable. I didn’t want to risk paint chipping, water or beverage rings, or scuffs.
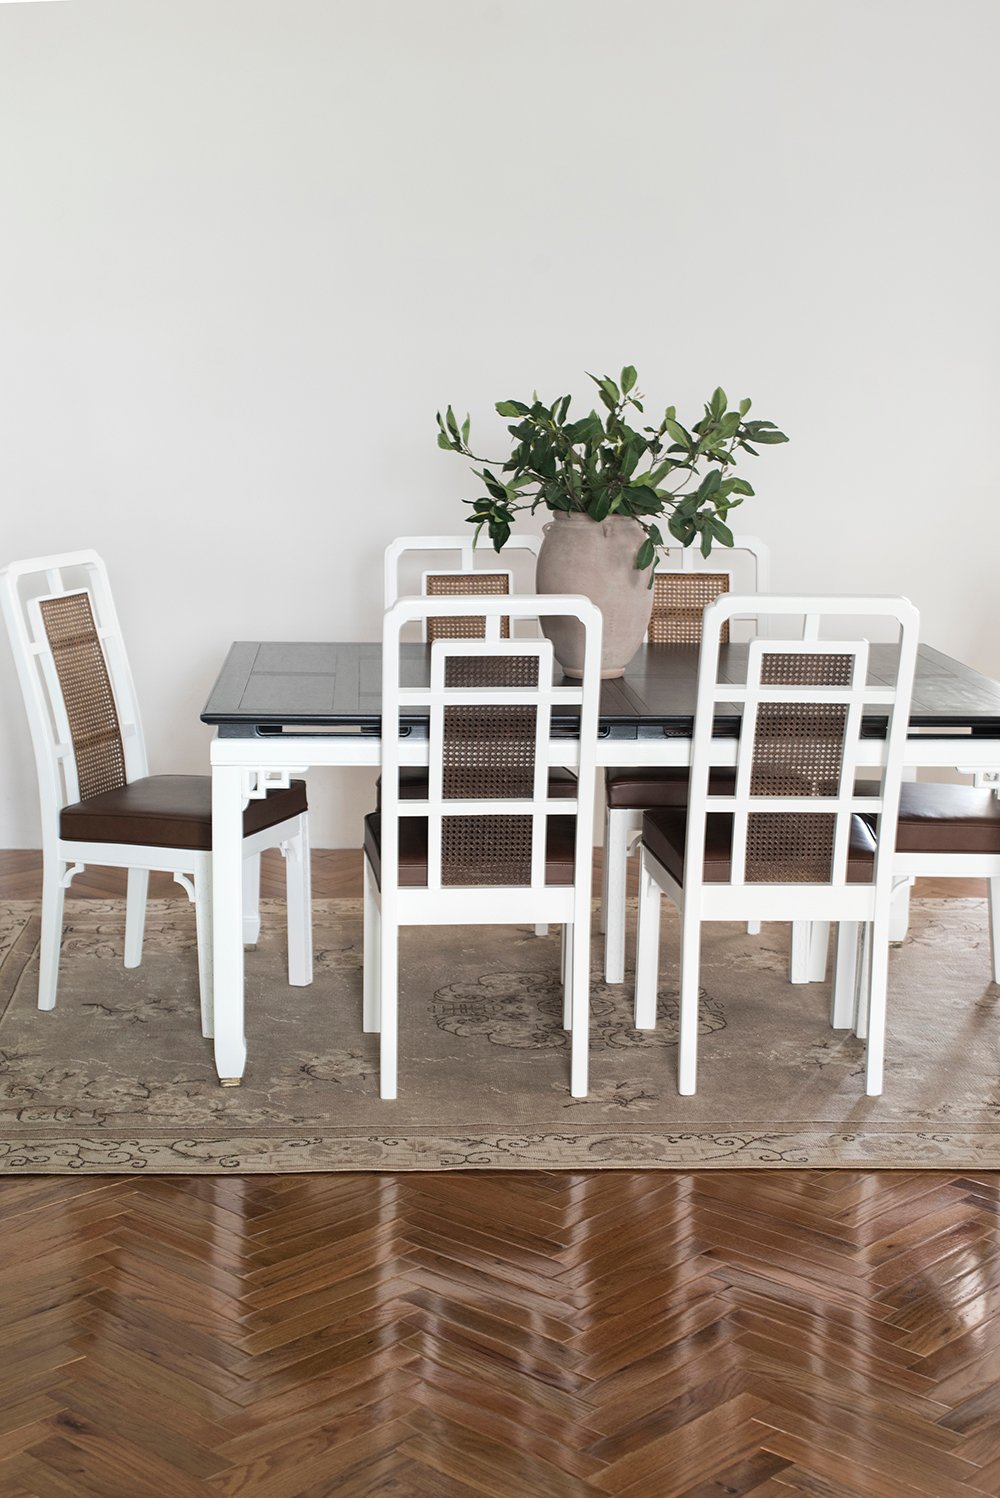
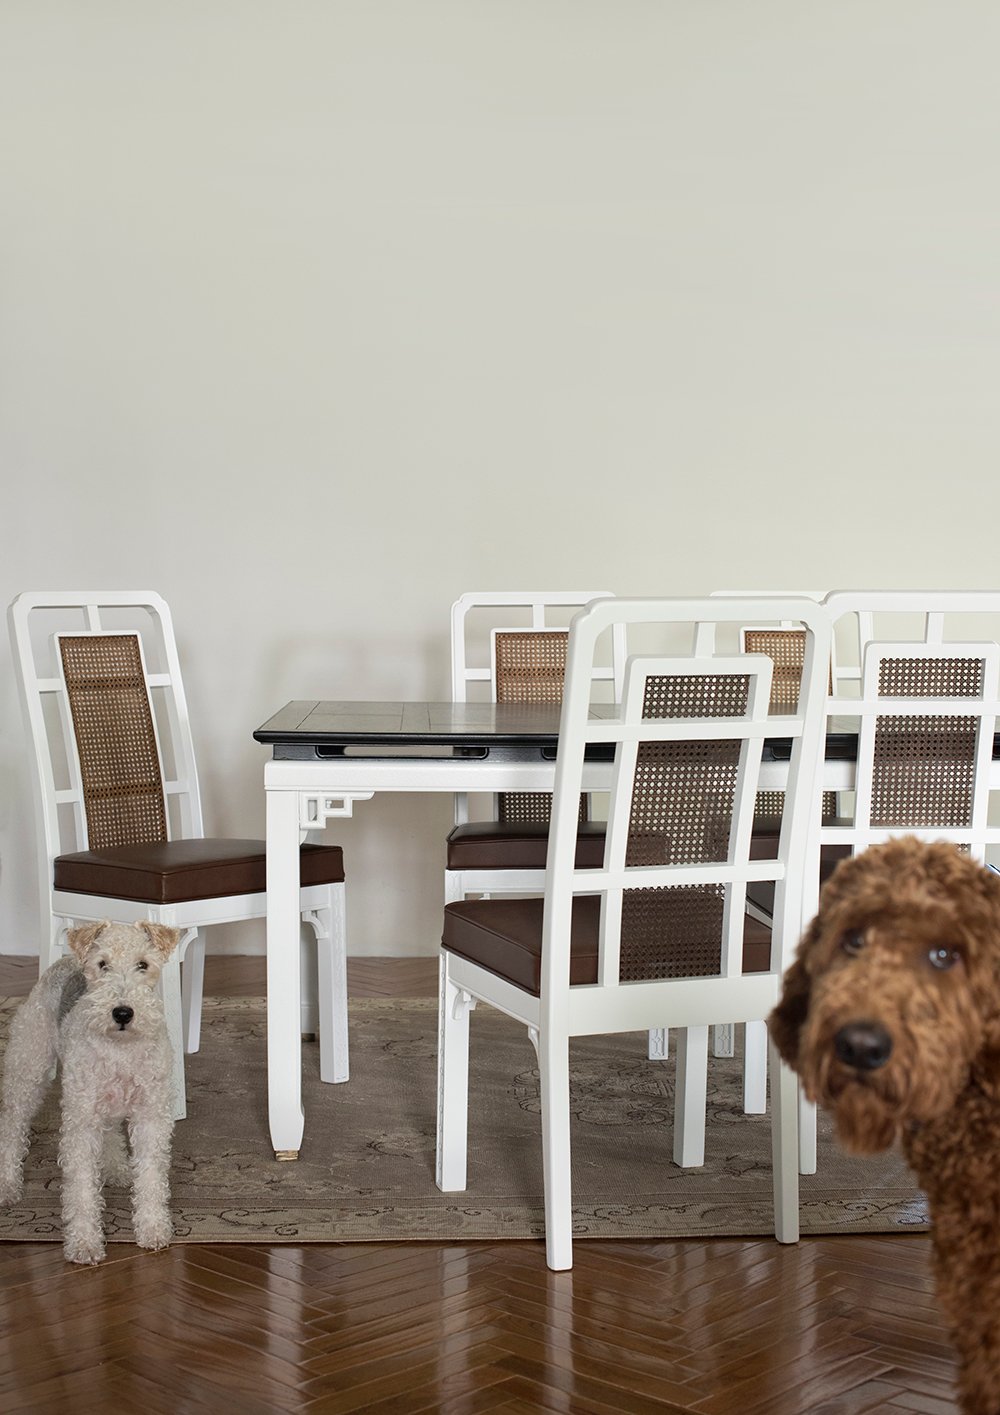
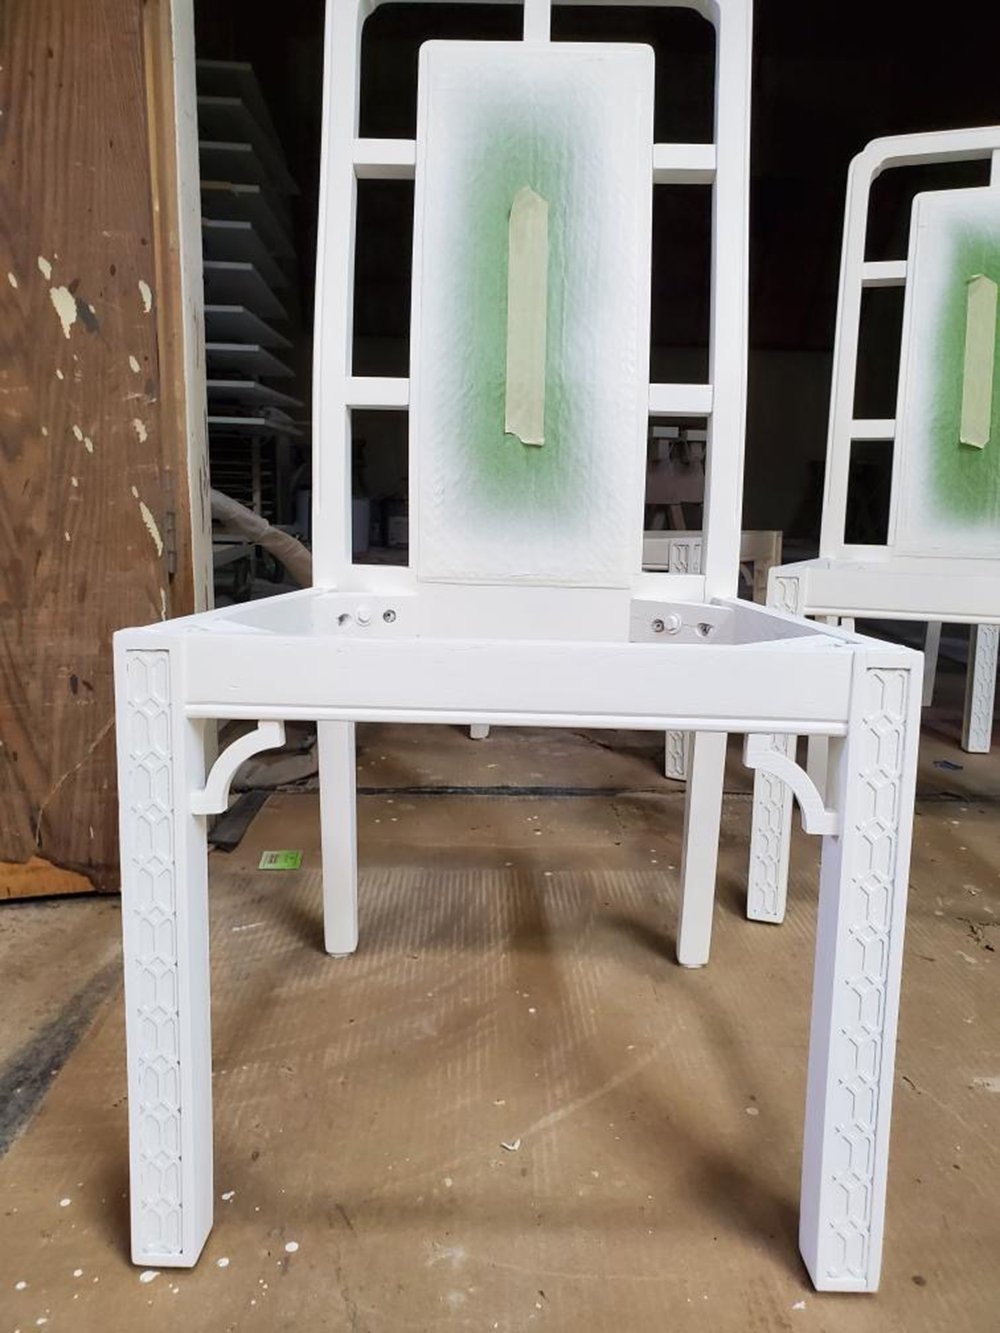 The paint color I selected for the chairs and table base is Extra White by Sherwin-Williams. Isn’t the detail within the chairs incredible? The decorative bracket pieces that connect the seat and the leg all had to be replaced. We enlisted the help of our friend and previous neighbor, Brad (who is a very talented woodworker), to exactly replicate that original chair detail. He cut out 24(!) of those tiny pieces that perfectly match the antique, original ones. The only difference? These are sturdy and aren’t snapped in half like the majority of the originals.
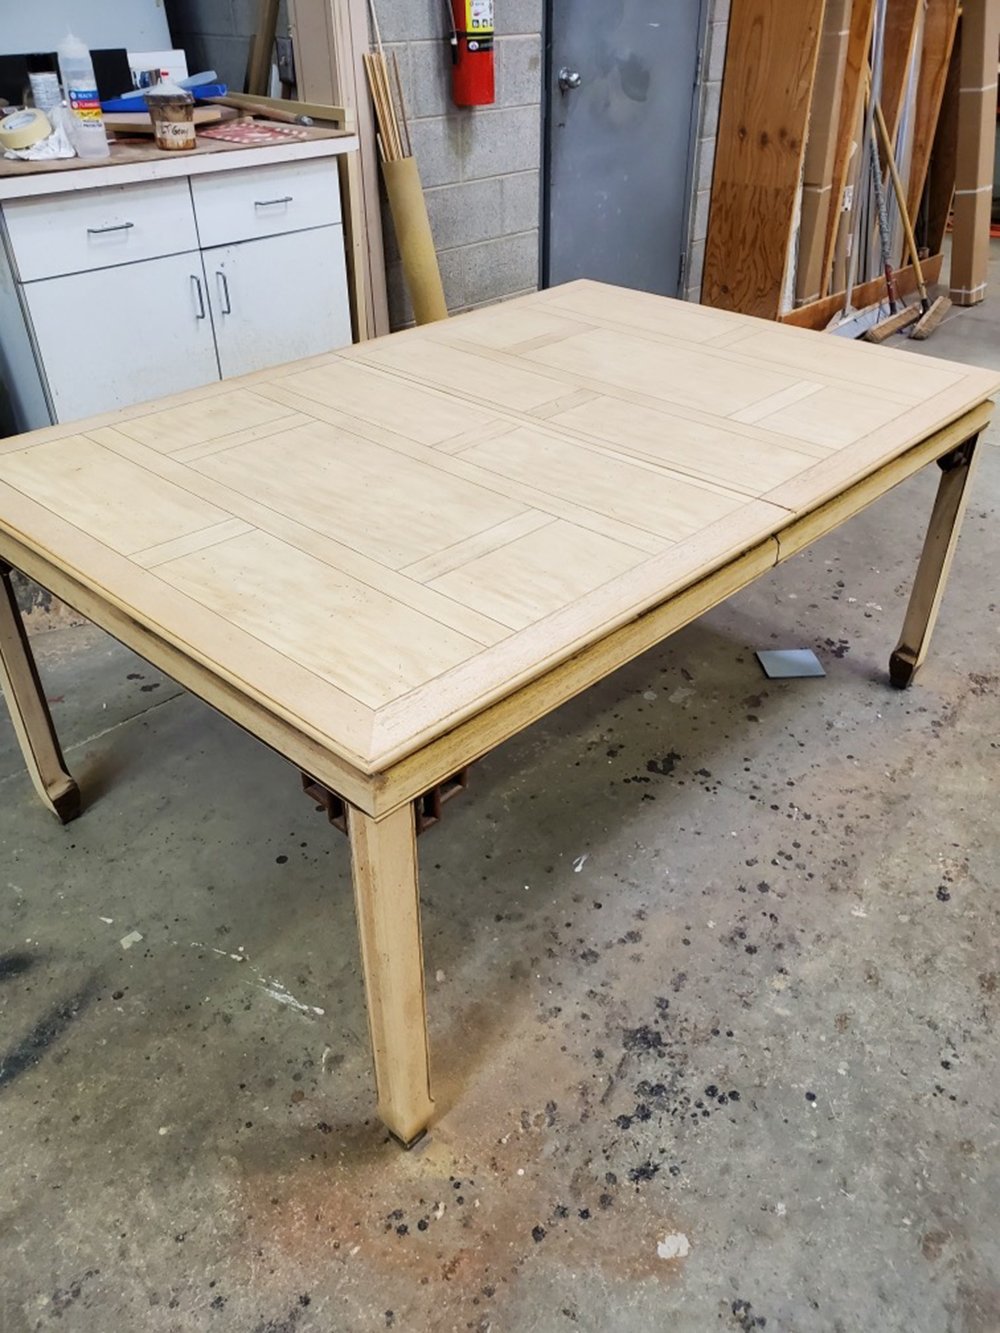
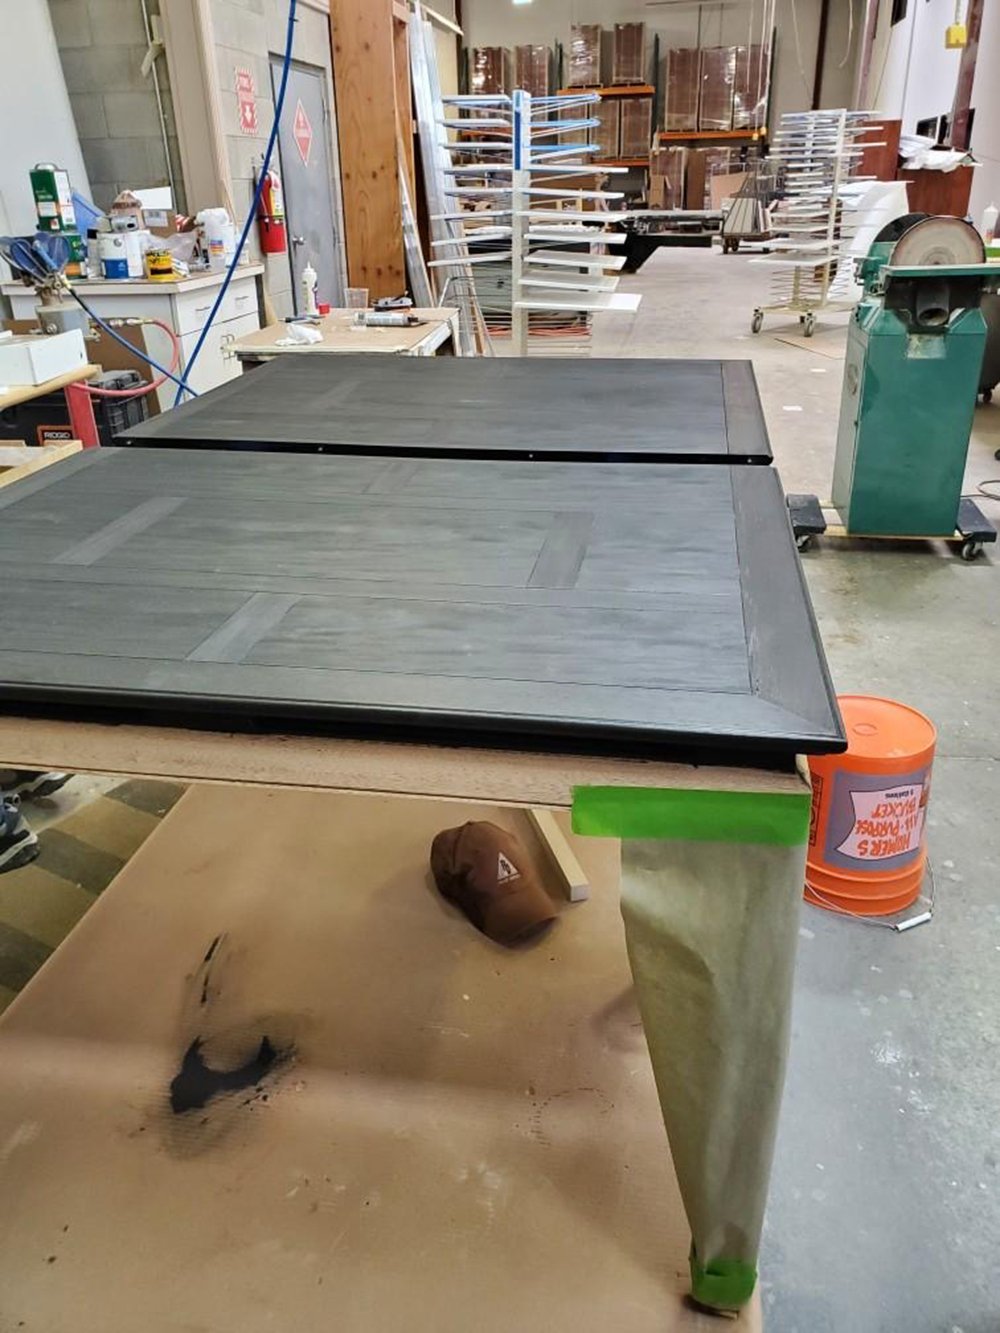
 My initial plan was to paint the tabletop Tricorn Black, but after Emmett finished sanding the top- we uncovered a beautiful handmade table with incredible woodgrain. There was no way I was going to cover that up! Instead we mixed up a custom black stain at Emmett’s work and used that as an alternative to paint. It allowed the grain to show through, while giving me the high contrast look I wanted. After it was stained, a couple coats of matte poly was layered on for durability.
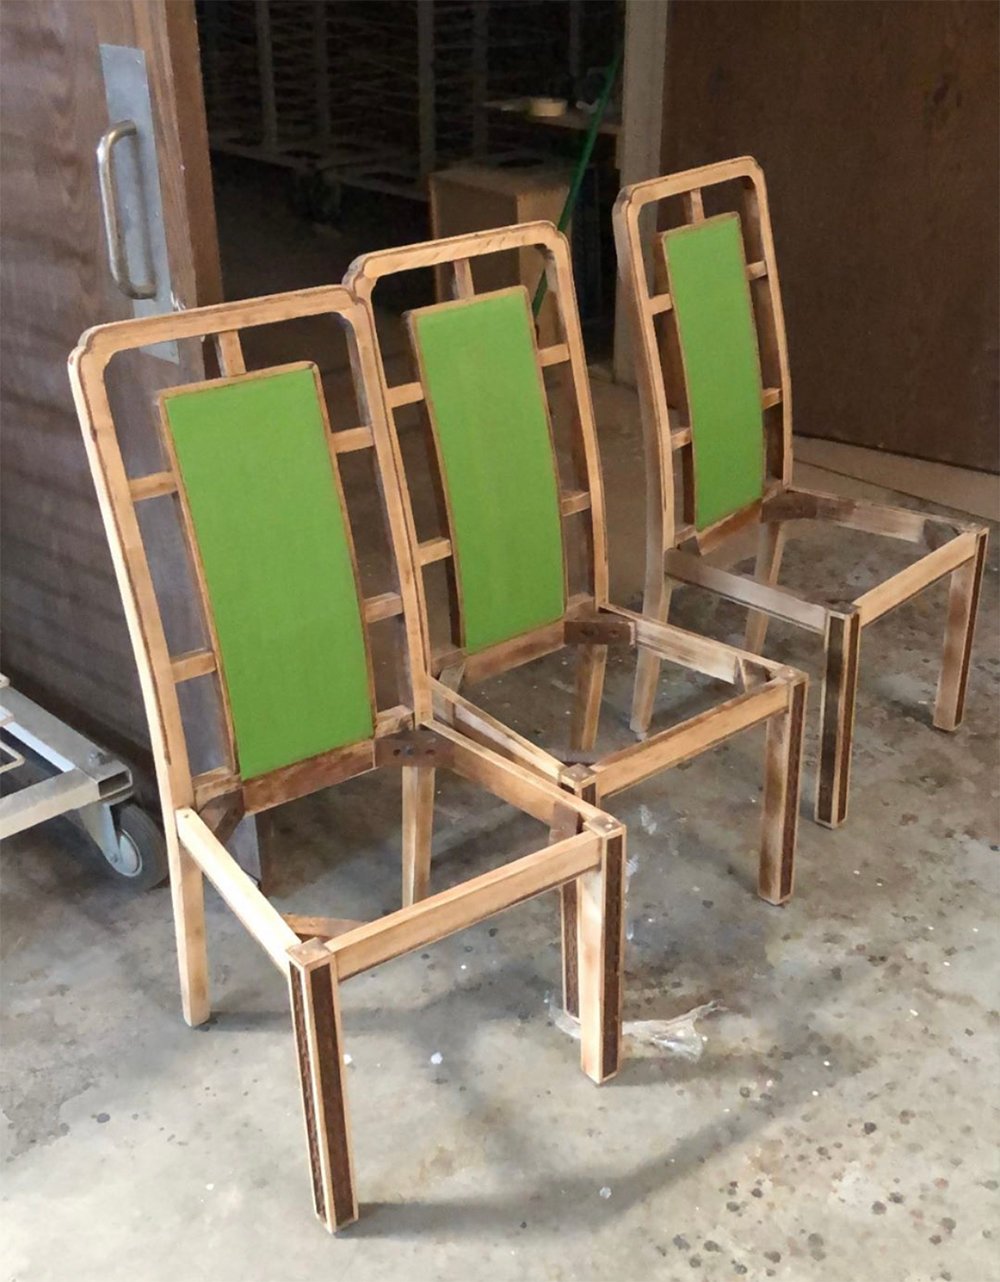
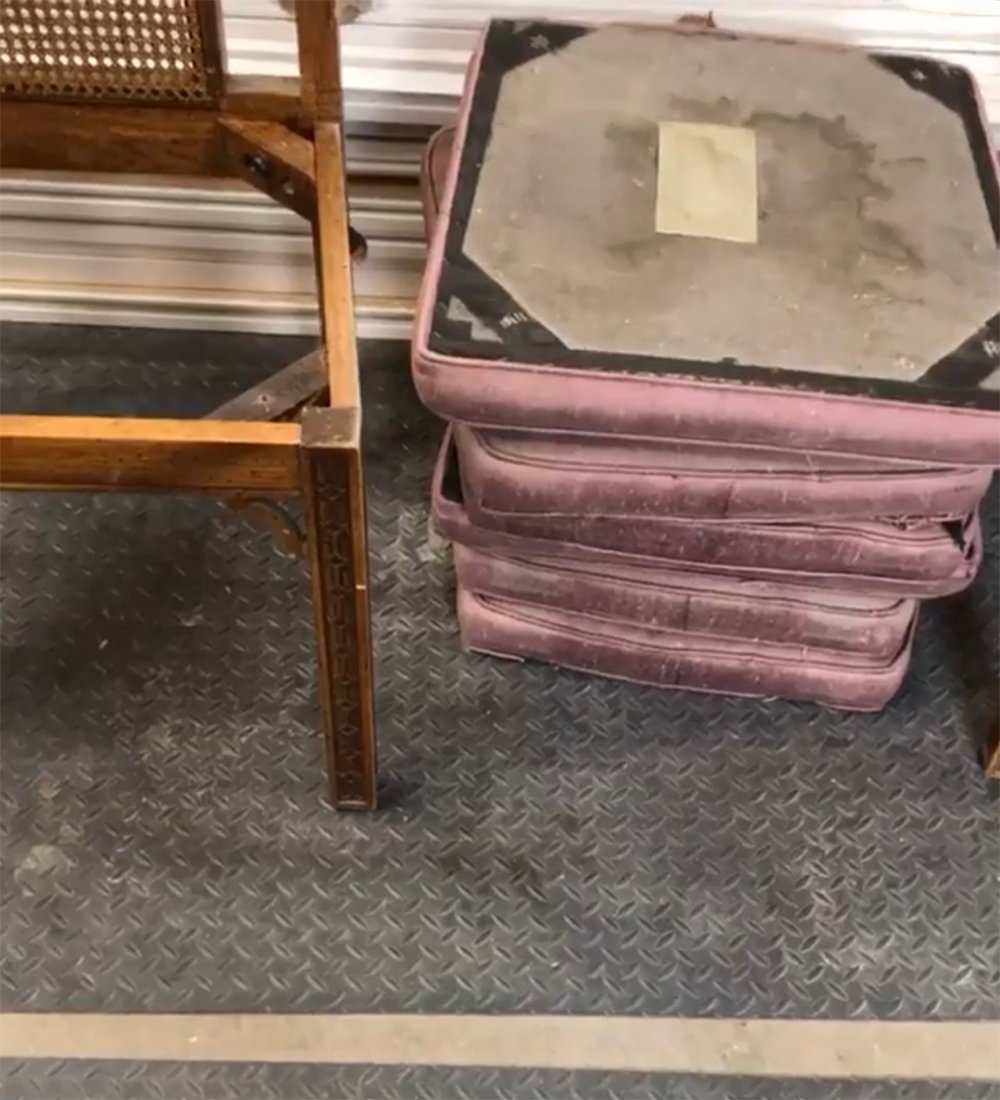
 The original seat cushions, pictured below, had also seen better days. While they were upholstered in what used to be a beautiful silk, they were rotton, moldy, torn, and very smelly (TMI?).
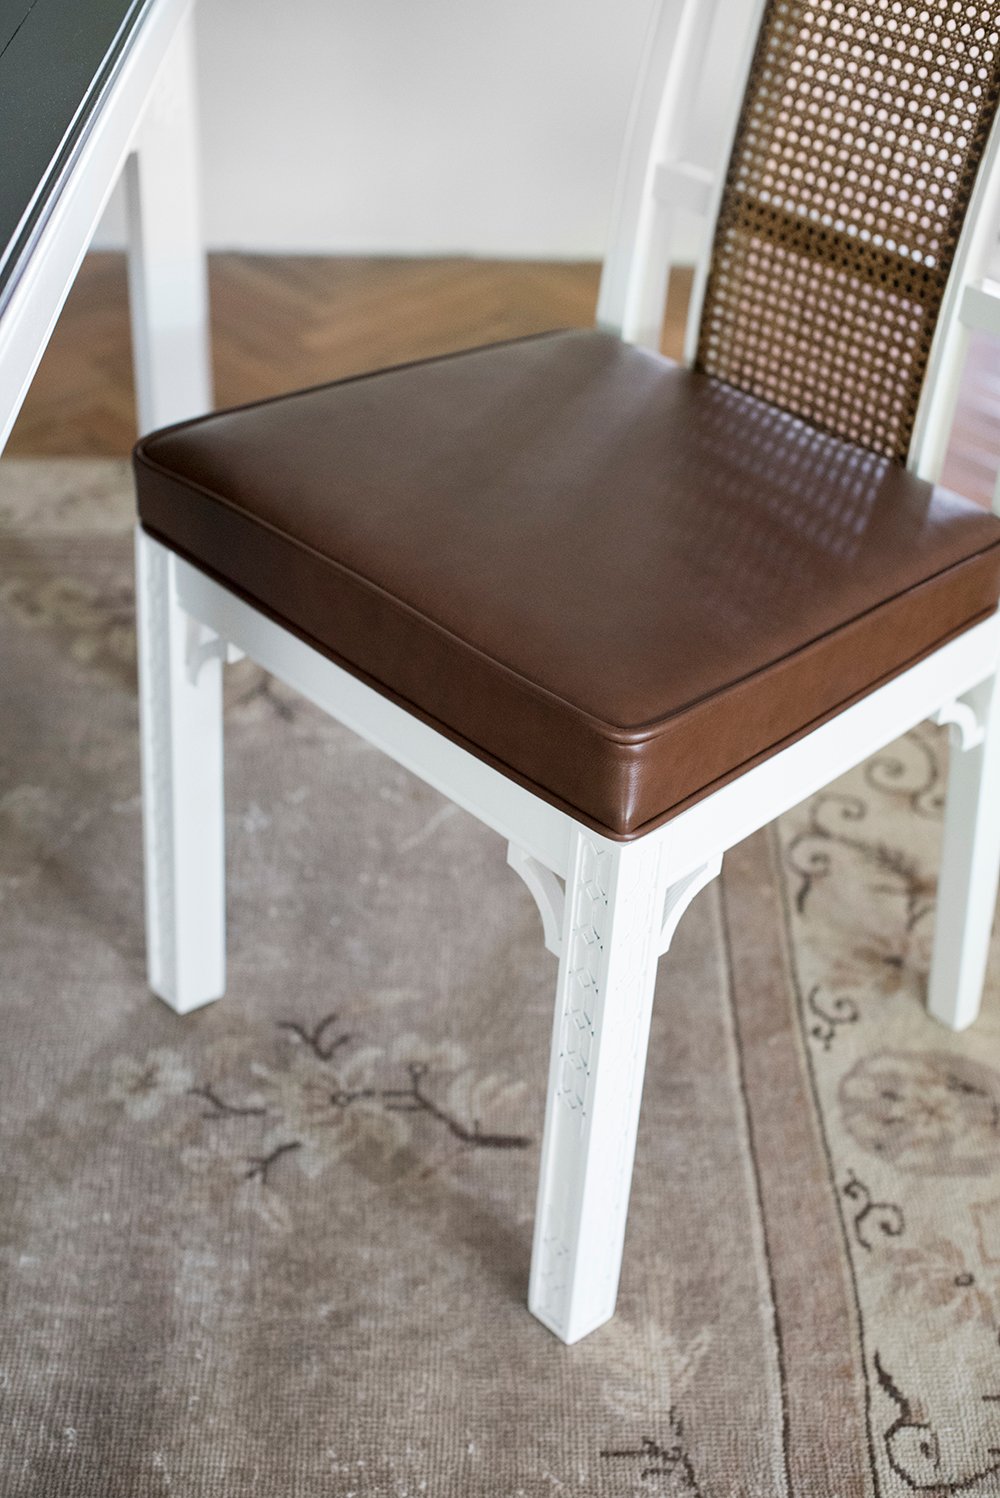
 I decided to call in another professional for this portion of the project. I wanted a buttery soft, genuine, pebbled leather for the seats… mostly because leather is super durable, easy to clean, and will withstand the test of time in comparison to other upholstery materials (you guys know how much I love my leather bed). Having spent a good chunk of change on premium leather (around $450), I figured upholstering six seats would be too stressful. I had my upholsterer cut new wood for the seats, new foam cushions, and I also specified a double welt detail like the vintage ones, so the seat cushions are brand new. As much as I’d like to think I have that kind of skill level, they did a much better job than I ever could.
 Although this project took forever and was a total labor of love, I’m thrilled with the way things turned out. Our dining room is far from finished, but I can’t wait to share many meals and make lots of memories around this table.
Tips for Restoring & Transforming Vintage & Antique Furniture…
- The majority of vintage pieces were built to last. It’s true when you hear someone say, “They don’t make them like they used to.” Try to reinforce, tighten, and repair the original structure.
- If replacement pieces are necessary, try to replicate them exactly (like our chair pieces). Keep them as close to the original as possible to preserve the antique design and integrity.
- Understand when the DIY route might not be the best course of action and know when to hire a professional. In our case, we want this dining set to be heirloom quality- especially given the age of the piece, so we were willing to hire professionals.
- If your piece is of a higher value or you want it to last for years to come, take the time to do it the right way (repair, sand, use primer, high quality paint, enamel, lacquer… or powder coating on metal components). Use quality materials instead of a quick DIY, like spray paint in a can.
- Set a budget. Furniture restoration can be costly, so much like considering the value of your home, be smart about how much money you want to sink into a furniture project. Will you be keeping this piece forever (heirloom quality furniture) or would you ever plan to sell it down the road as your aesthetic evolves? How much did you pay for it? What research have you done to determine its value?
Hopefully these tips are helpful if you’re considering a higher-end or antique furniture project. Don’t get me wrong, I’m all for quick makeovers too (like my enamel desk), but I know those types of pieces aren’t worth as much. Therefore I didn’t spend as much on materials, time, or energy.
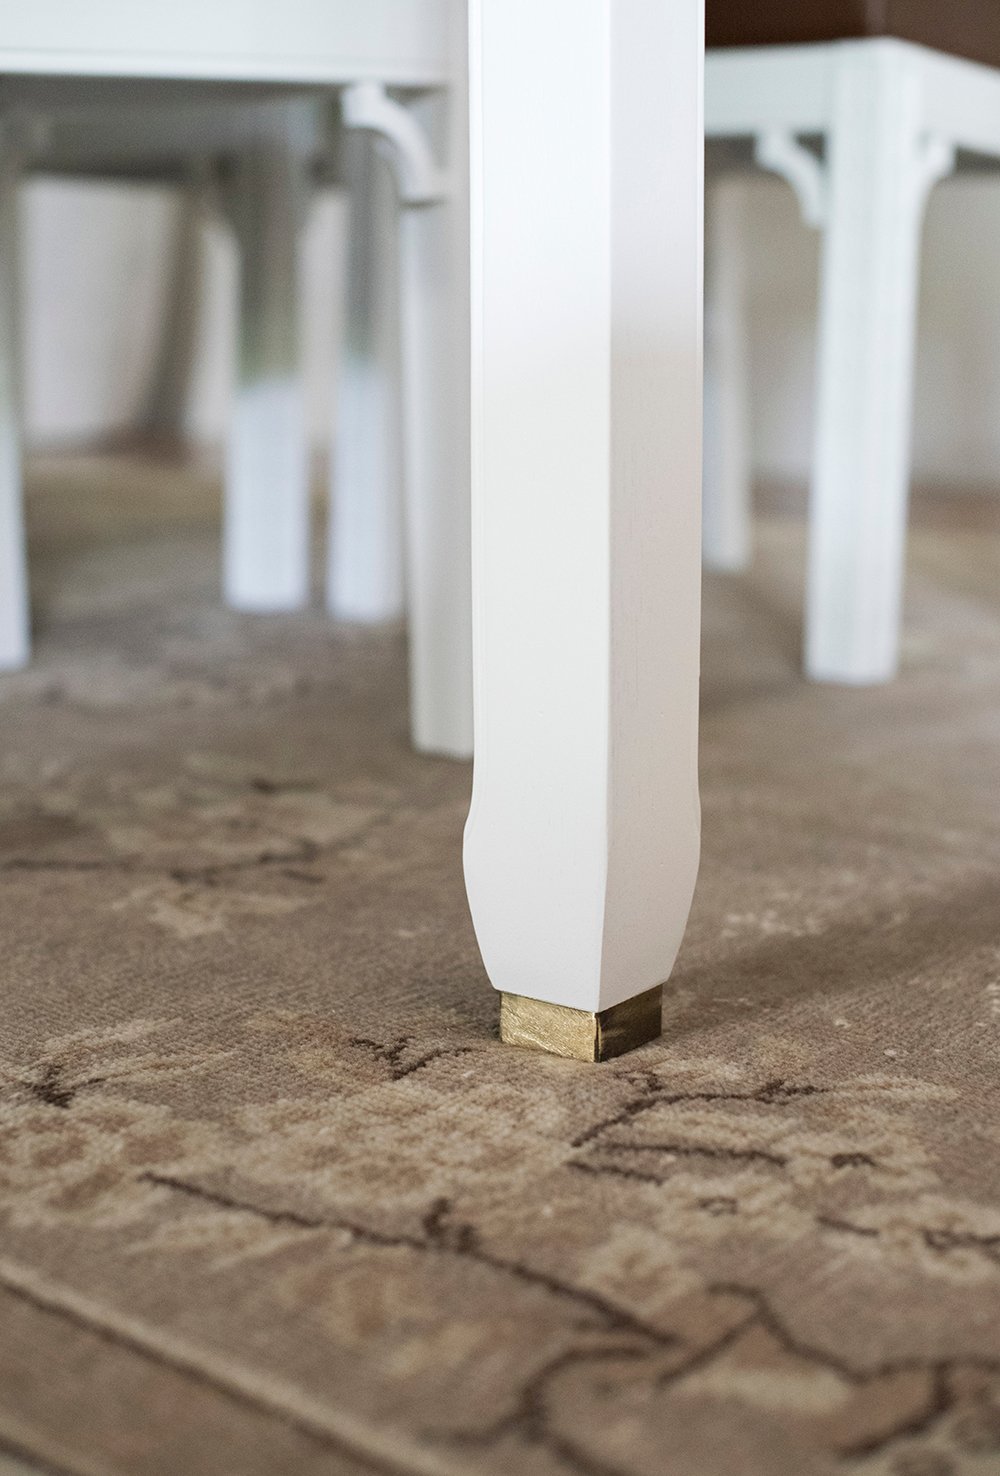 I also had to photograph a closeup of the brass feet! Isn’t that another stunning detail? I didn’t even realize the feet were brass until we got the table home. I was carrying the snapped leg into the garage and rubbed the dust off of the foot accidentally to reveal the brass. I was so excited! Emmett, on the other hand, was not amused as the table leg I was raving about, was snapped in half, which equates to a LOT of work. Ha!
 This dining set already had a ton of character to begin with, and after a whole lot of love went into this thing… I know this special find will become a piece in our home we’ll cherish for years to come. It’s actually making me very excited to tackle our dining room later this year. It makes sense to address that space sooner rather than later, since the kitchen and formal living room are both finished (and the dining room lives in between those two spaces). I also have to give a big thank you to our friend Brad for cutting all of those intricate chair pieces for us! You know you have good friends when they’re willing to help with the tedious projects. Happy Tuesday, friends!
This is so gorgeous! And those feet?! I’m excited to see your dining space rise to the level of your kitchen and living room, but I am really starting to worry for your office. It was supposed to be first! I completely understand that the house tells you what it needs (oh man do I understand that…) but YOU Sarah, you NEED a beautiful workspace! :)
Thank you, Stacy! Discovering the brass feet was the BEST surprise. I know, I know… somehow my office always gets pushed to the end of the list. I’m anxiously awaiting the day. Guest bedroom, probably the dining room, and hopefully the office can come next?! Who knows. We’re still having plumbing issues in the mater bath upstairs. Sheesh. Maybe the office will be one of those projects that spans over the course of a year? We tackle a little bit at a time? TBD, but hopefully soon. Believe me when I say, I am most excited about that space. xo
Gorgeous transformation!! Can’t wait to see
How the rest of the room evolves!
Thank you so much, Leigh! xo
Wow…on so many levels. I love, love, love that you had an inspiration and were able to make a vintage score to bring it to life. No shade to the designer version, but yours is 1000% more beautiful and cool. Kudos to you for seeing the diamond through the dust, and kudos to Emmett for the tireless and tedious restoration! He’s setting the bar awfully high for hubbies & honeys everywhere. (Mine would certainly have left me at the storage unit with the decrepit treasure!) The details on the set are truly show-stopping! The ebonized floating top, amazing original cane, supple leather seats and all the incredible carving on the chairs! How fun will it be to design a room around this beauty?! Bravo, you two!💜🎉
Thank you so much, Peggi! I also love our version and it has so much more character. I like that it’s unique and lots of love went into restoring it. BIG kudos to Emmett for the elbow grease. I honestly didn’t help with this project. It really does have me excited and my brain is buzzing with ideas for the dining room. We need to make progress in the guest bedroom first though. For some reason, our motivation has been lacking. Whew! xo
I absolutely love this; more than I thought I would originally. I’ll admit, I couldn’t see your vision when you first started sharing, but after seeing your inspiration…holy WOW! Yours is a million times better than the designer version! I love it in the space; it’s a perfect fit! I must admit, Emmett deserves so many kudos…if that was Jeff he’d have walked away and told me “you’re on your own”, and I would forever hear about it regardless of how it turned out! I’m a sucker for vintage pieces, and I’m always hunting. I too bought my dining set and matching china hutch on FB marketplace. It’s not super old like this one, but it’s old enough. In its better days it was a beautiful example of high end mission style furniture; it has gorgeous detail, and was built to last, but the finish hasn’t held up well, and it’s the most hideous shade of brown stain I think I could ever imagine. I’ve wanted to refinish it, but I’m slowly coming to the realization that it just doesn’t work in this home. We probably should have let it live at the old house when we moved; it was a perfect fit there. Almost like it was made for that room. These tips are wonderful; I may just need to try to reimagine my dining set with these tips in mind and see if I can fall in love with it again. What a labor of love! You have the ultimate vision and patience Sarah! I can’t wait to see what you do with the rest of the space, and I’m happy for you and Emmett to finally have a dedicated place to eat! So what did you whip up for your first dinner at this beauty??
Thank you, Lauren! I’m probably biased, but I like our version better than the inspiration set too. It has so much character! Emmett definitely deserves all the credit. I really didn’t help with this one, other than design. I think at this point in our marriage, he just expects my crazy ideas… I’m just lucky he’s almost always on board and up for a challenge. Ha! FB Marketplace is a true gold mine. I love mission style furniture- your set sounds beautiful. Isn’t it weird how you can love a piece so much, but sometimes moving with those beloved pieces doesn’t always work out or fit the new home? I ran into that issue too. Maybe you can make it work or breathe new life into it with paint or stain? Our first meal at the table was on a Tuesday (go figure), so we had tacos. Typical. lol! xo
Be still my DIY wannabe heart ❤️ Omg that dining set transformation is incredible 🥳 The inspiration set is lovely but honestly I adore all those amazing details on your stunning work 😍
I’m with Emmett I would have run the other way when I saw that set in a storage locker 😂
You certainly have an amazing vision for seeing diamonds in the rough. Wow! I mean I’ve painted an old piece of furniture to freshen its appearance but you completely salvaged a precious piece. Bravo! I’m seriously gob smacked! Way to go! You never cease to Amaze Sarah.
Xoxo
Hey, thanks Colleen!! He was not super excited that I wanted a “piece of crap dining set”. Haha! I really appreciate your kind words. How is your dream backyard coming together? When do you finally get to start enjoying it?! xo
You are so sweet to ask about our backyard ☺️ it’s really coming together. It’s been very challenging and we have had no shortage of hiccups to say the least but the gorgeous cedar fence is almost installed and it’s so beautiful 😍 We are so incredibly pleased. Hopefully the inspector can come on Friday so the liner and water can come next week, then the landscaping. I think we are a mere 2 weeks away to completion 🥳 Woohoo!
YAY!! I am so excited for you. You’re going to have all summer to enjoy the space and relax in the pool. I’m still trying to convince Emmett we need a pool. Haha! He’s not budging. I’ll love variously through you and your beautiful dream backyard :)
Love the tansformation of your salvage pieces! I was sympathizing with the 40 hours of sanding, and with the leg detail a lot of that was undoubtedly hand sanding, ugh… I especially liked the 2 tone for both chairs and table, and how the pieces stand alone and yet work in composition. I picked up a barrel chair with caning on the sides this weekend at a garage sale that is in dire need of reupholstery (although the wood frame and cane is in great shape). You have given me an idea with the 2 tone for wood/cane but I may reverse the coloring. Hey, thanks!
Thank you Melanie! It was definitely a LOT of intricate hand sanding. Your barrel chair sounds amazing! If you need a seat reupholstery guide, I posted one here. As long as the cane is in great shape, the upholstery should be an easy fix :) Awesome find!!