Our Basement Bathroom Design Plan & Before Images
 Guys… I’m sorry, but I’ve been holding out on you. I designed our basement bathroom (surprise!!!), have started ordering renovation materials, and that is going to be our next big project. I know- I know what you’re thinking… the formal living room isn’t even finished (aka- you must be crazy)! Well, you’re not exactly wrong. Here’s how this entire situation played out: we thought the living room would be finished weeks ago for the One Room Challenge, the basement bathroom started having plumbing issues that needed resolved ASAP and Lowe’s asked us to partner once again, so naturally- we got excited, planned ahead, committed, and decided to do it big! The living room is on the home stretch and *as soon* as it’s finished, we’re diving into the basement bath next. Emmett and I are both very excited about this one! Click through to see the before images, the design plan, and more details on why this space had to suddenly come next in the renovation line up…
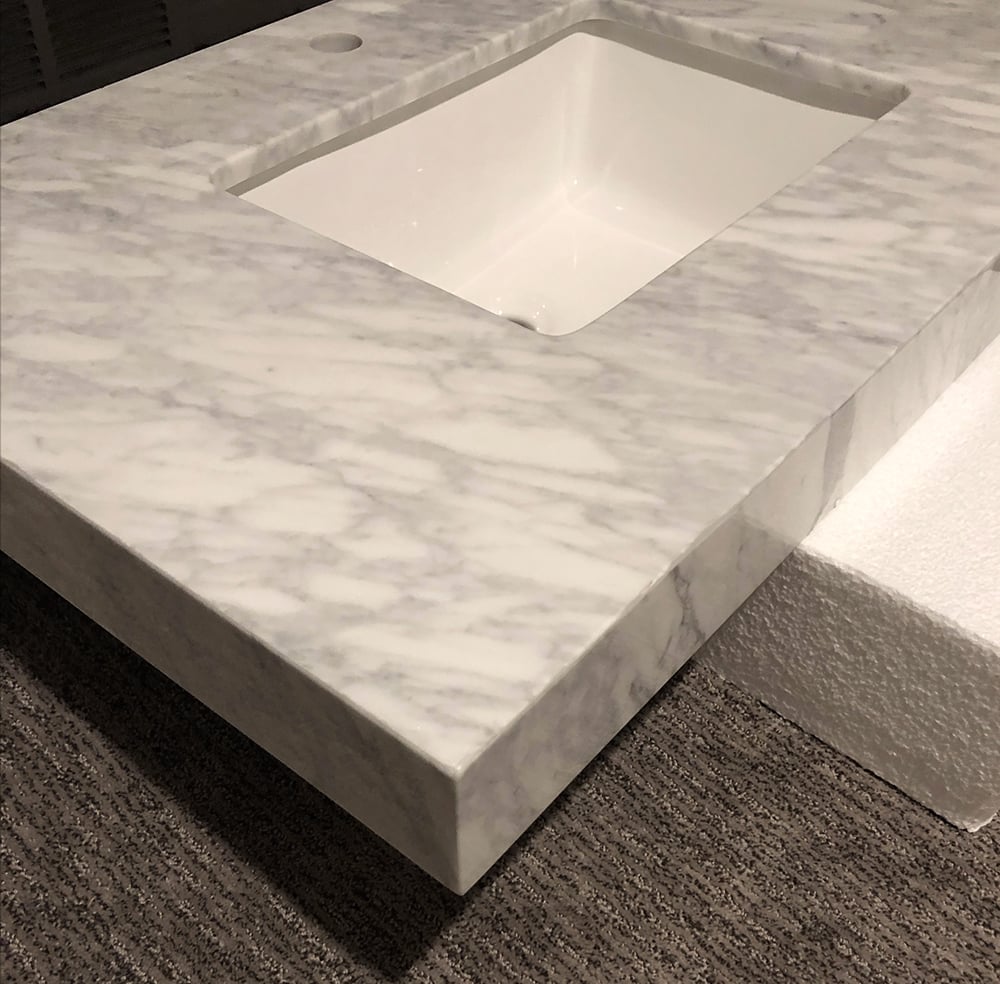 Our basement may or may not be filled with pretty bathroom furnishings right now. I designed this room a couple months ago, basing everything around this thick, marble vanity top (pictured above). Before I dive into all of the fun design details… let me give you a little bit of the backstory.
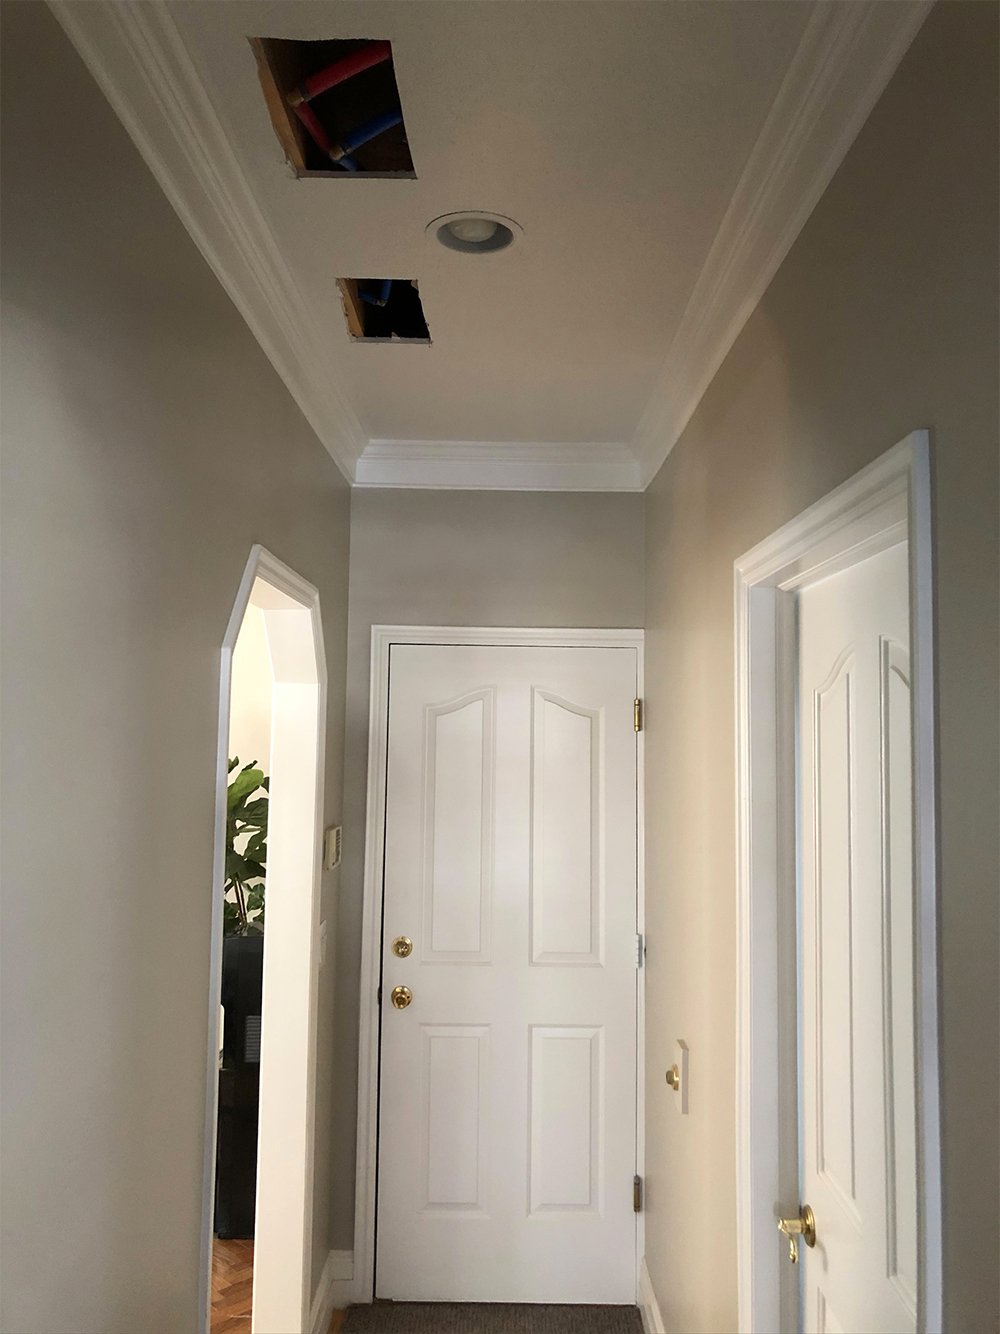 Almost exactly a year ago, just before moving into this house, the home inspector told us all of the pipes and plumbing would need to be replaced (there was a gnarly plumbing product recall in the late 80’s / early 90’s and this house is FILLED with it). The average person probably would’ve bailed, but we were like… “yeah, we’re going to renovate anyway- so it’s fine… we’ll take that risk.” We moved in knowing that inevitable leaking would become an issue and would need to be tackled eventually. A few weeks after moving in, we started renovating our guest bathroom because of said leaking. That happened fast! Remember this renovation? It was the very first room we tackled because of plumbing issues. Fast forward to now… there are little holes cut in random areas on the ceiling throughout our home, where Emmett has been replacing pipes as needed (yep- that’s the laundry room below).
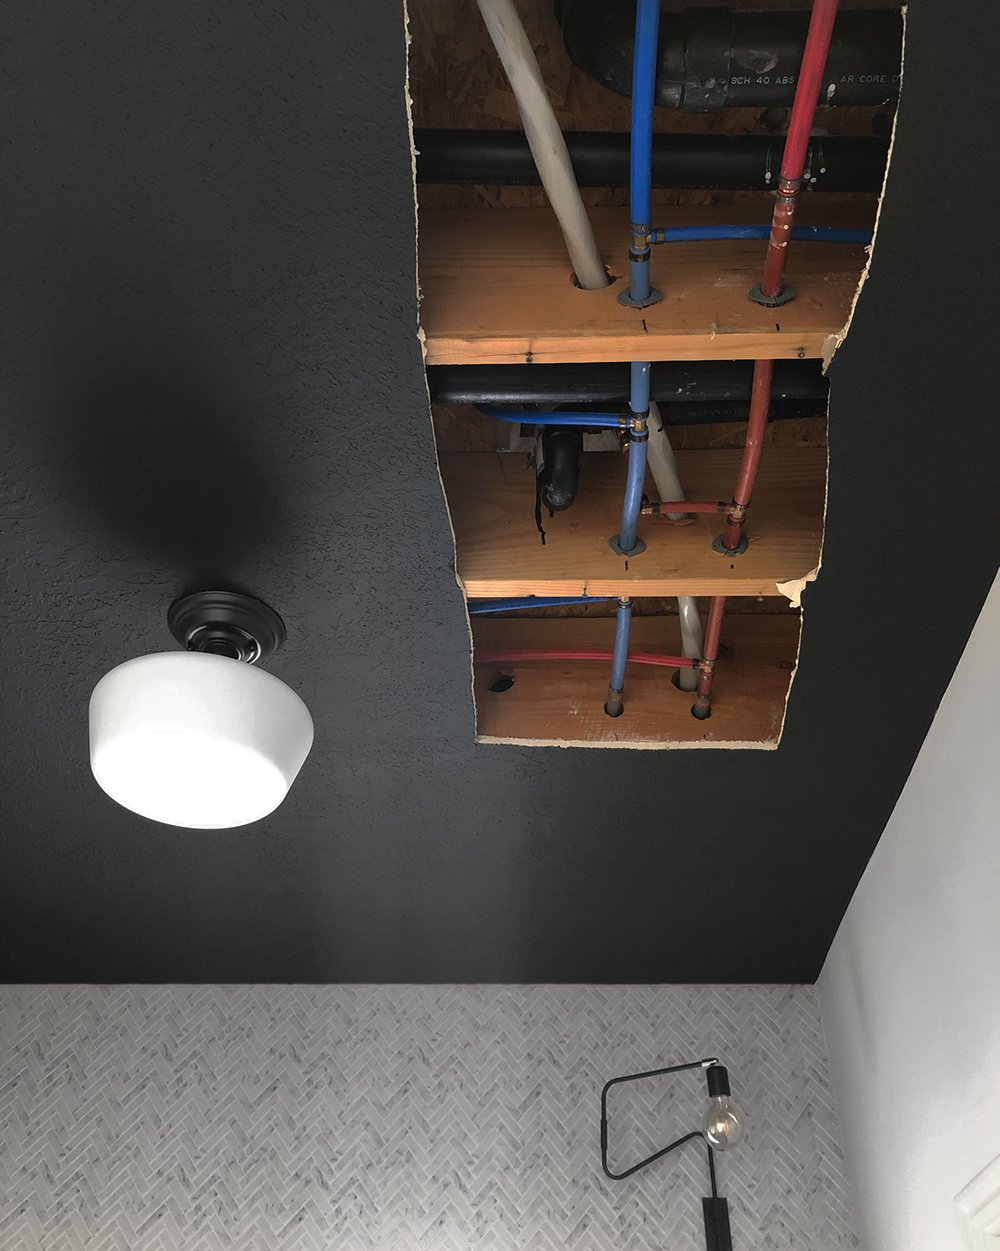 We’ve been updating the plumbing a little at a time. When renovating the kitchen, all of the plumbing was swapped. We updated the piping that routed through the formal living room, when we took that space down to the studs. You get the picture. I actually don’t notice the random holes in the ceiling anymore, and Emmett has promised to patch them (even though we’ll be renovating those rooms someday), but they’re there because of necessary plumbing updates we’ve had to make. 90% of the pipes in this house have to be switched, and you better believe we’re doing it right / by the book. That’s why I say, “sometimes the house tells you what comes next.” It’s true. That’s definitely the case with this renovation, thanks to plumbing.
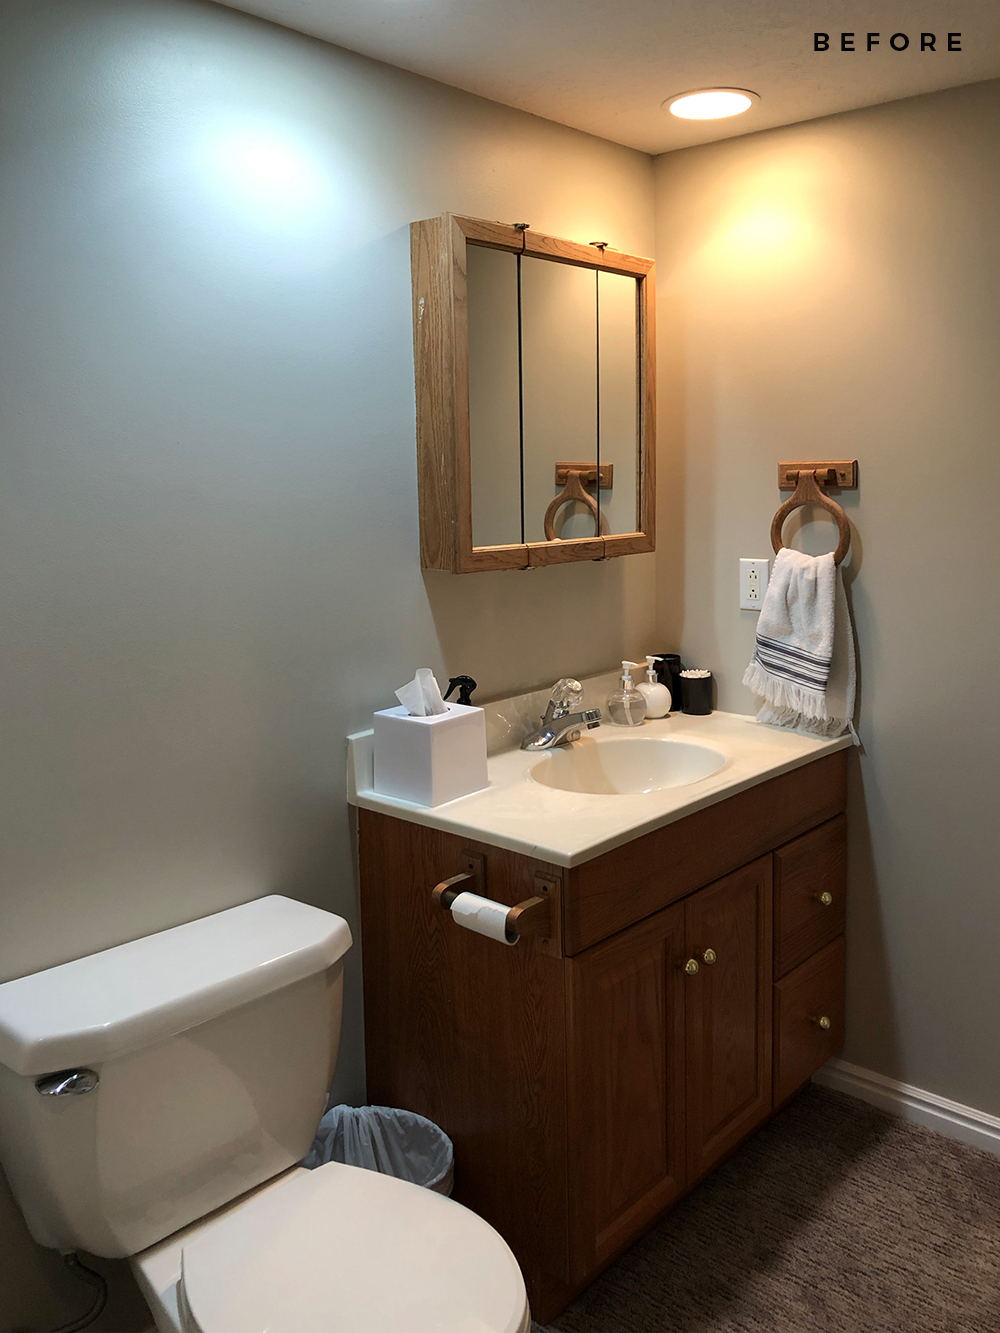
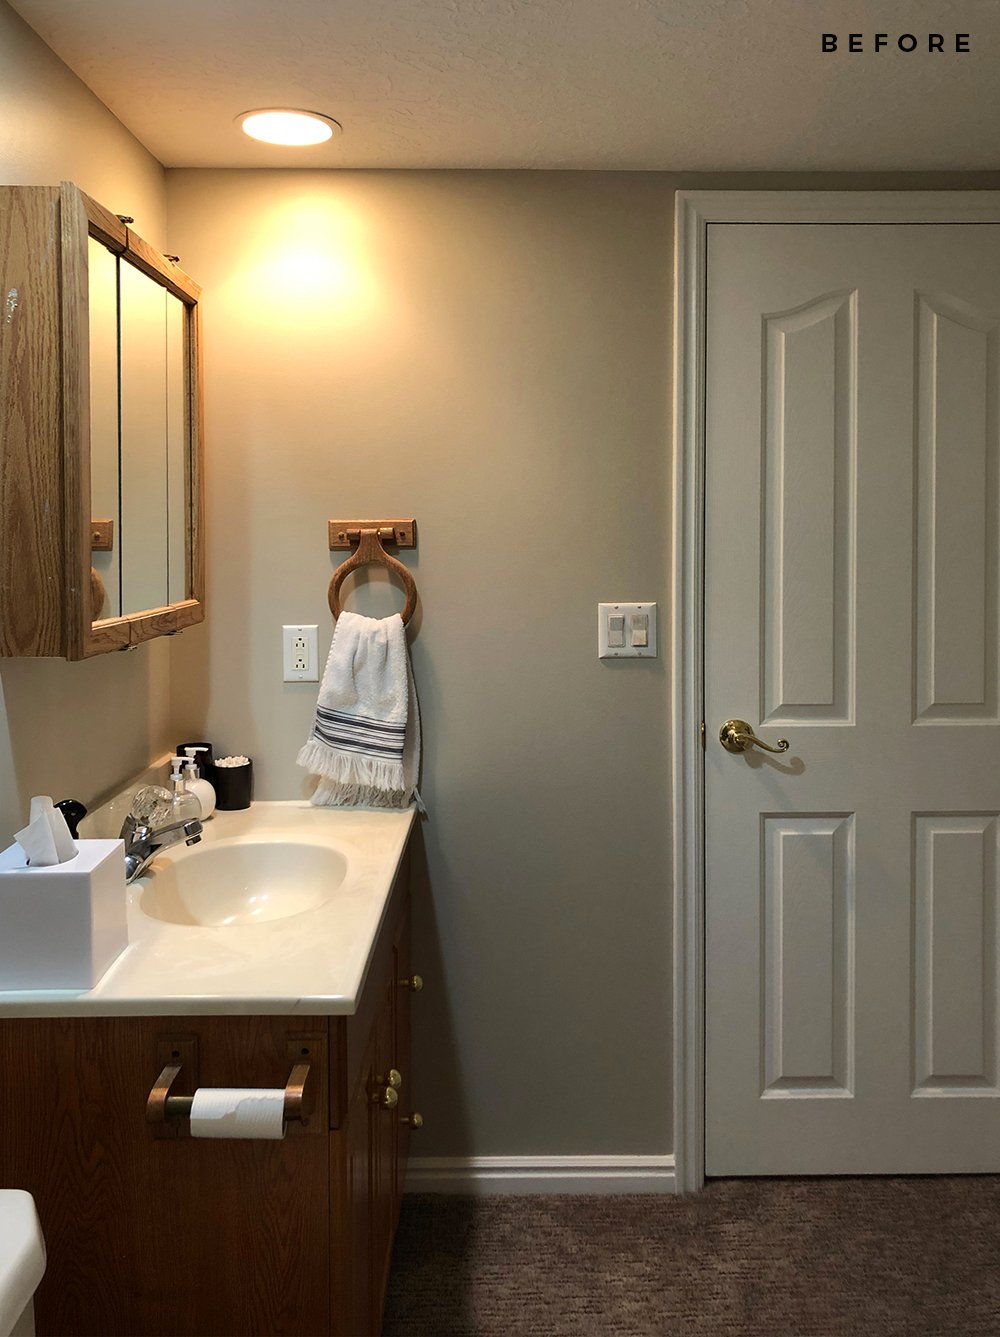
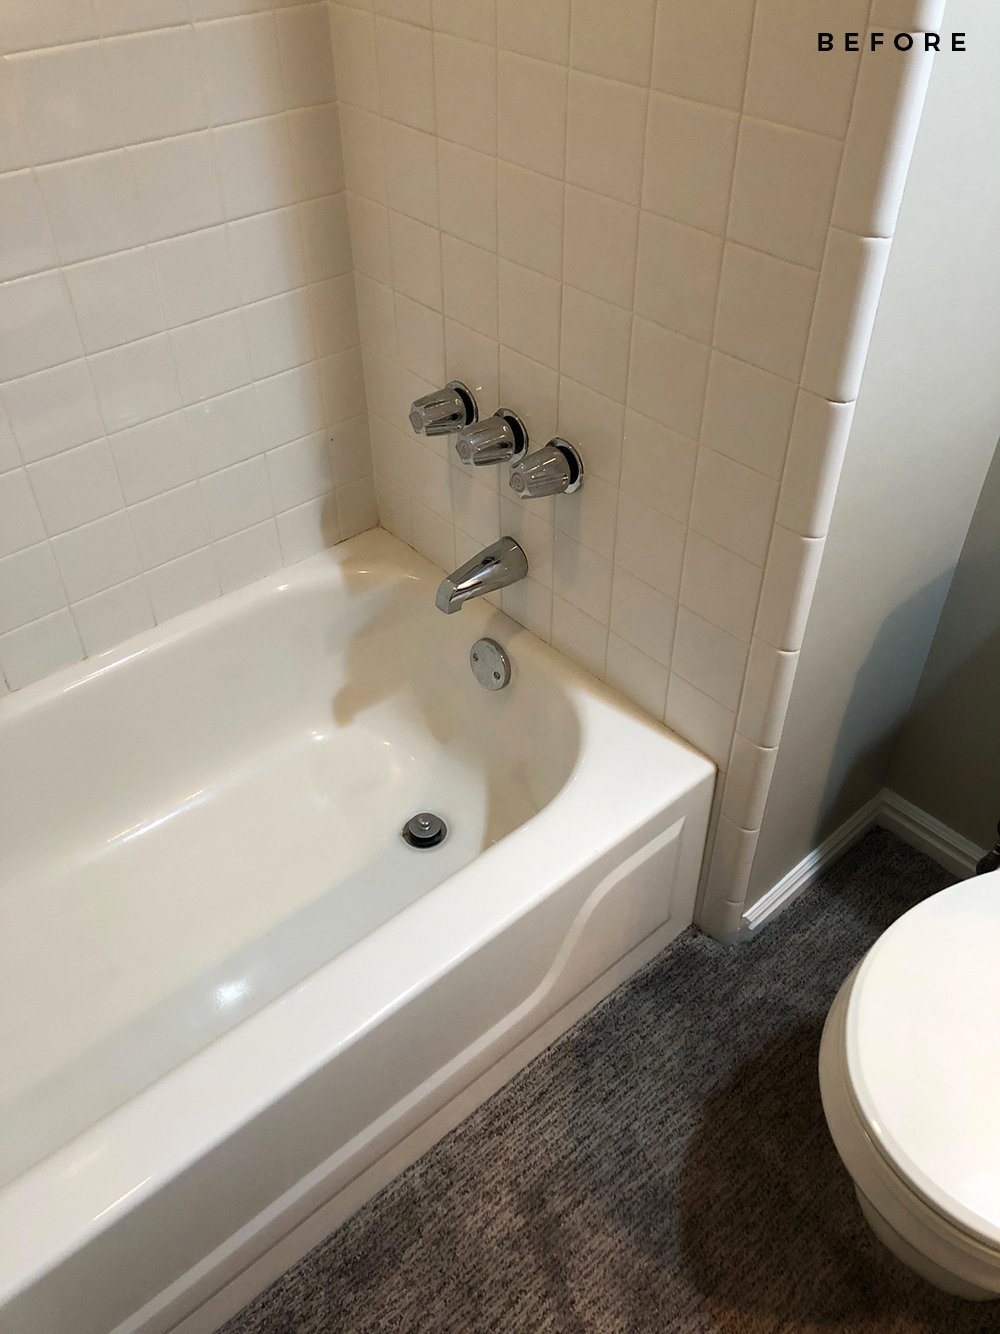
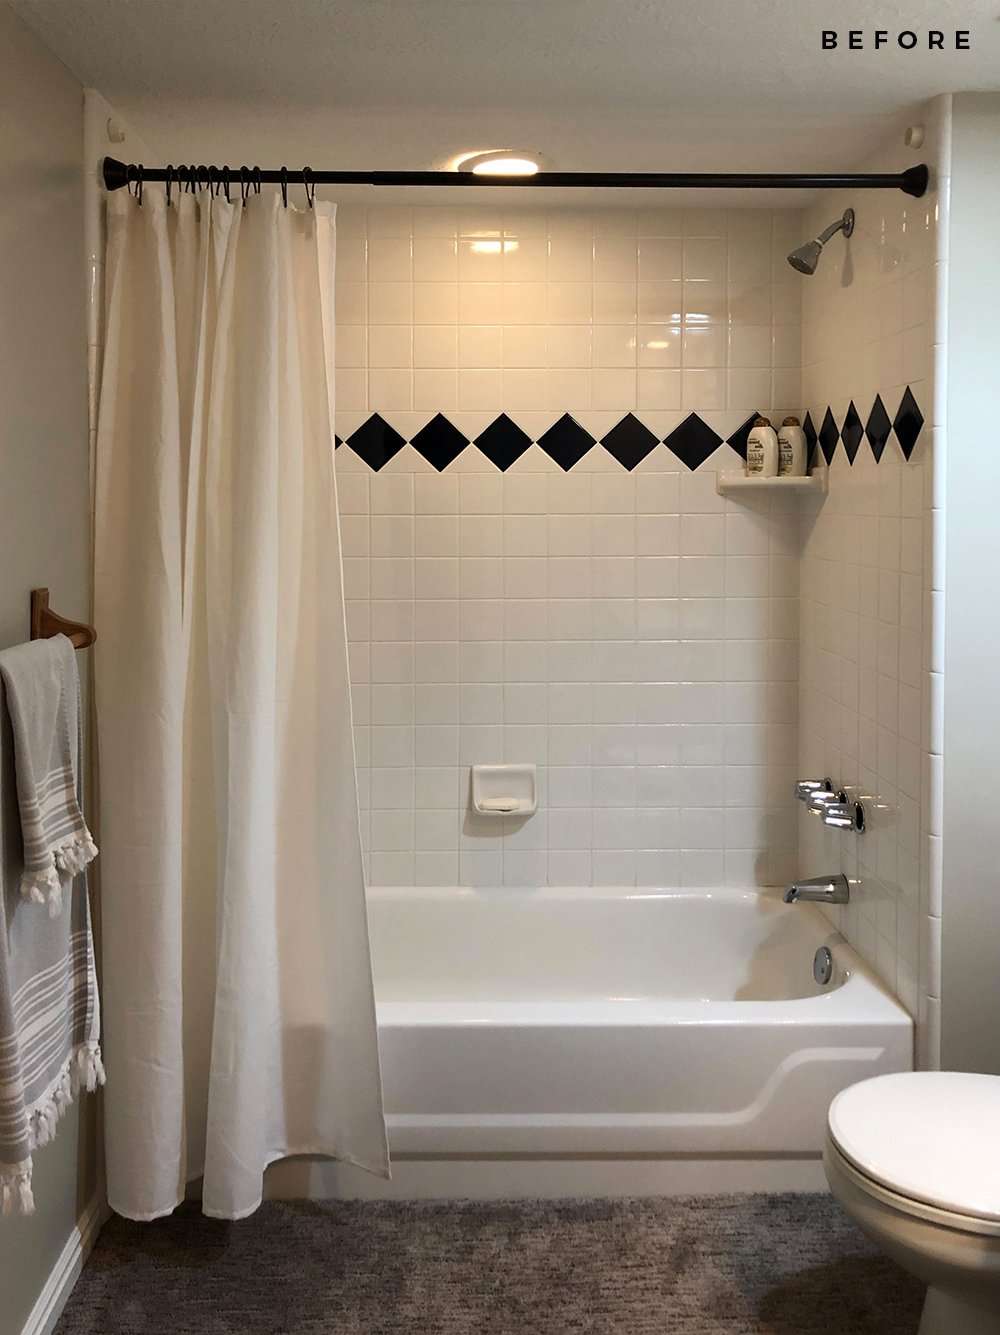
 Allllllll of that to say- this is why the basement bathroom was the next on the docket- mostly because it needs immediate plumbing attention. We also spend a TON of time in the basement (watching tv in the media room, eating at the basement kitchen countertop each night because we have no dining table upstairs). We were both excited at the opportunity to renovate the basement bath, because it’s pretty ugly. Want to see?
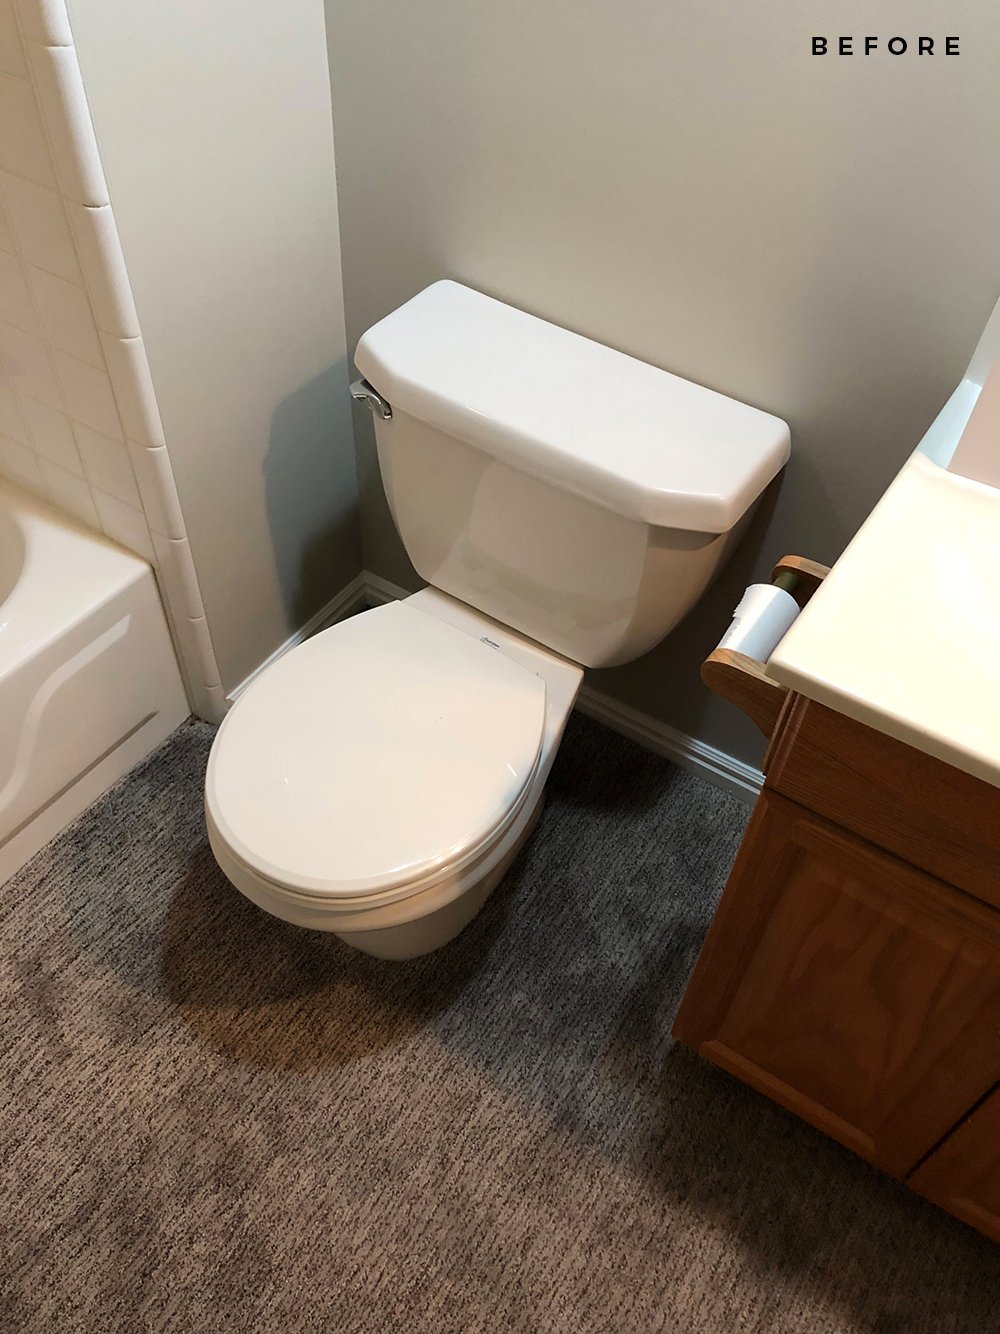
 Are you wondering, “CARPET?!!!!” yeahhh- I thought so. Haha! There is carpet down there. Pretty cozy and functional, right? I’m kidding! Being the germaphobe I am, I’m wondering how much pee and water has splashed and absorbed into it… it’s a scary place I don’t allow my mind to wander.
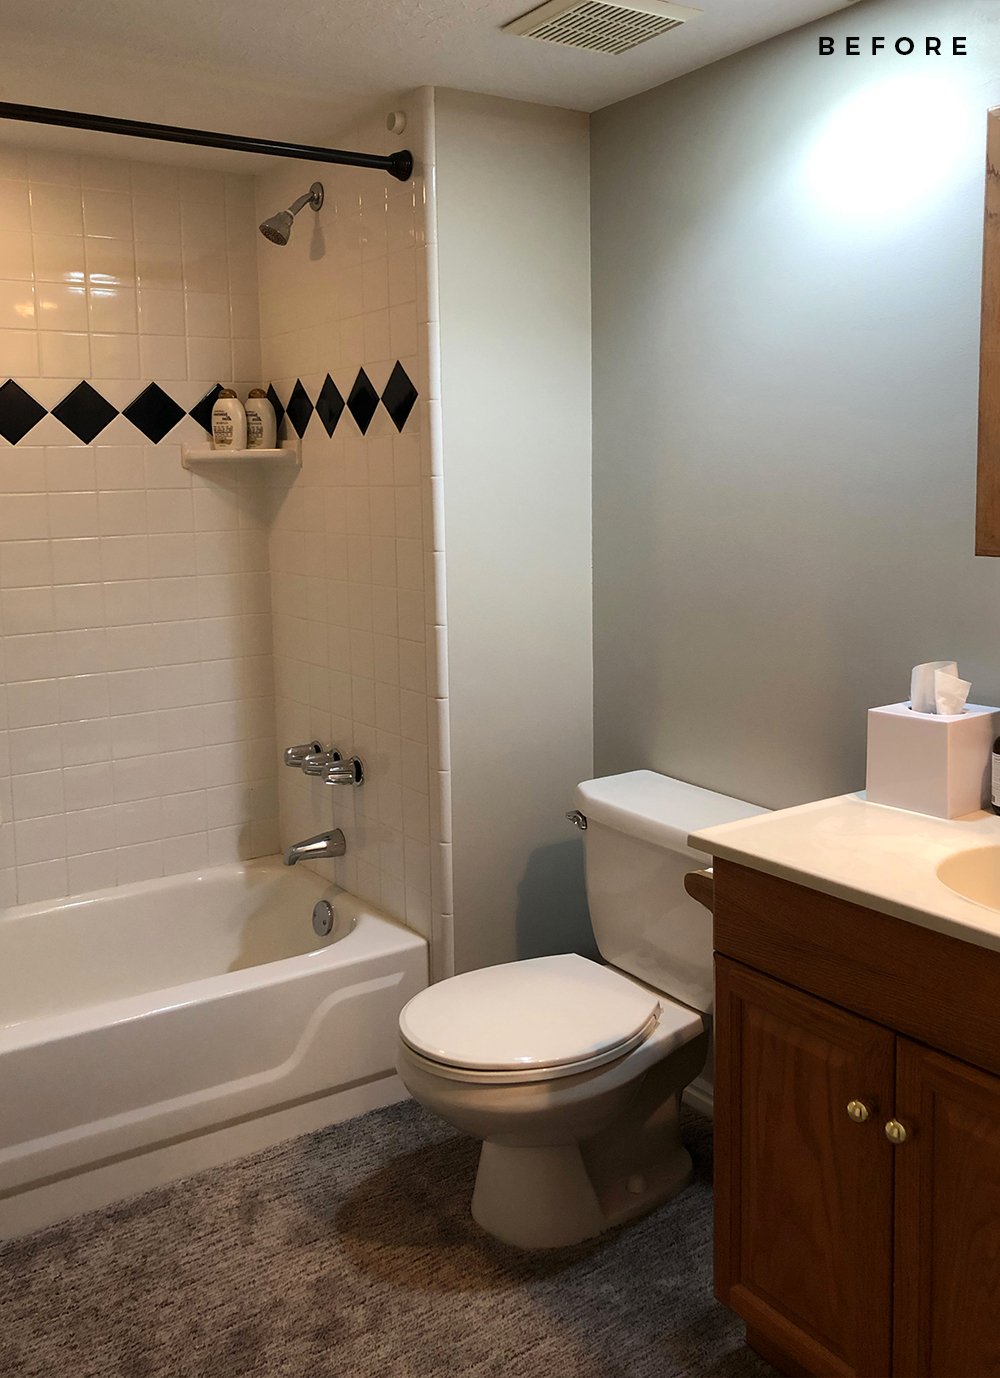 How grossed out are you by the carpet, for real though- on a scale of 1 to 10? That’s another reason we needed to tackle this space sooner rather than later- because plumbing leaks and carpet certainly do NOT mix. That’s a recipe for disaster.
 Before I share the rest of the before images- as it looks in its current state, I wanted to record some goals for this space. This room is going to be a tricky one from a design point-of-view. My intention is to make it feel more cozy and inviting- despite the fact it’s located in a basement.
BASEMENT BATHROOM GOALS
- Create a Warm Space– This bathroom might live in the basement, but I don’t want it to feel cold or cave-like. We’re adding extra amenities to increase comfort & warmth (see below).
- Consider Extra Amenities– We’ll be installing heated tile floors, as well as a towel warmer. We’ve never installed either of these in the past, but thought the basement bath could use extra elements to enhance the cozy factor.
- Make the Room Feel Larger– the ceiling is shorter than the rest of our home and the space is kind of cramped. We’re going to remove the bathtub and convert it to a shower-only. An open-bottom vanity will also lighten the look and elongate the ceiling height.
- Keep It Classic– We’re using a mix of hand-painted and marble tile, paired with nickel plumbing fixtures to keep this room feeling classic and sophisticated!
- Add Function & Privacy for Guests– We have two guest bedrooms in the basement, as well as our kitchen and living space. We want friends & family to feel welcome and comfortable down here.
If you missed my bathroom renovation planning tips, they’re in this post! It’s definitely worth a read, as I’ll be applying all of those.
 You know what’s crazy? I had this exact bathroom growing up… the vanity, medicine cabinet, towel holder, toilet, tile, plumbing fixtures, toilet paper holder, EVERYTHING. It kind of brought be back to my 80’s childhood through a time warp. Minus the carpet- we didn’t have carpet in my childhood home (thanks for that, Mom).
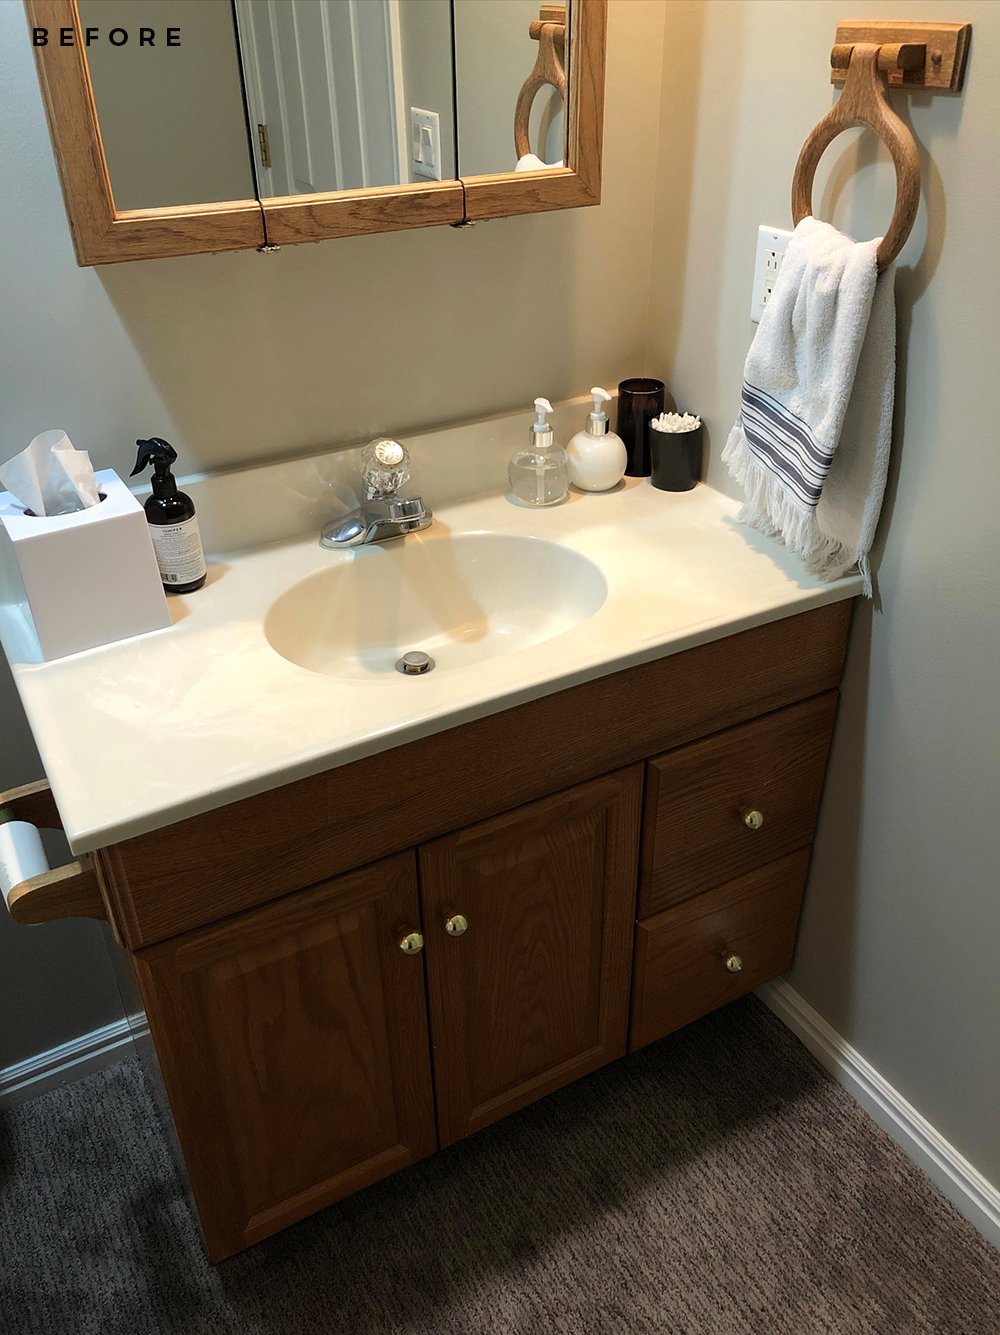 When we toured the house, Emmett and I both did a double take and stopped in our tracks because it was like stepping back in time, into the house I grew up in. Our high school sweetheart selves had no idea we’d be into design and renovating someday, about to demo an exact replica of my bathroom. It was a bittersweet moment, honestly.
 Enough of the mush… are you ready to see my design plan? I thought so! Good riddance to the failing pipes and icky carpet.
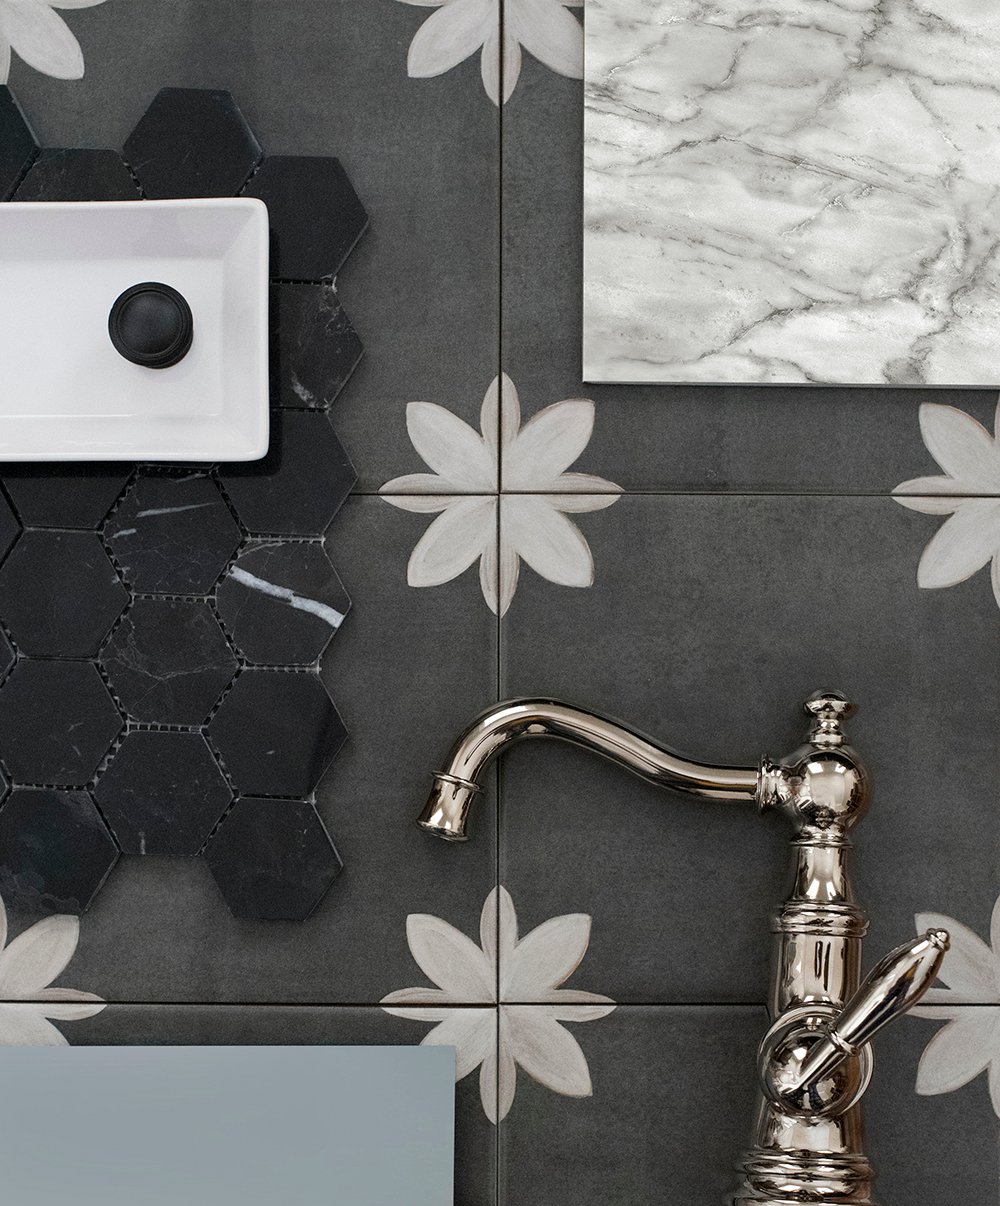
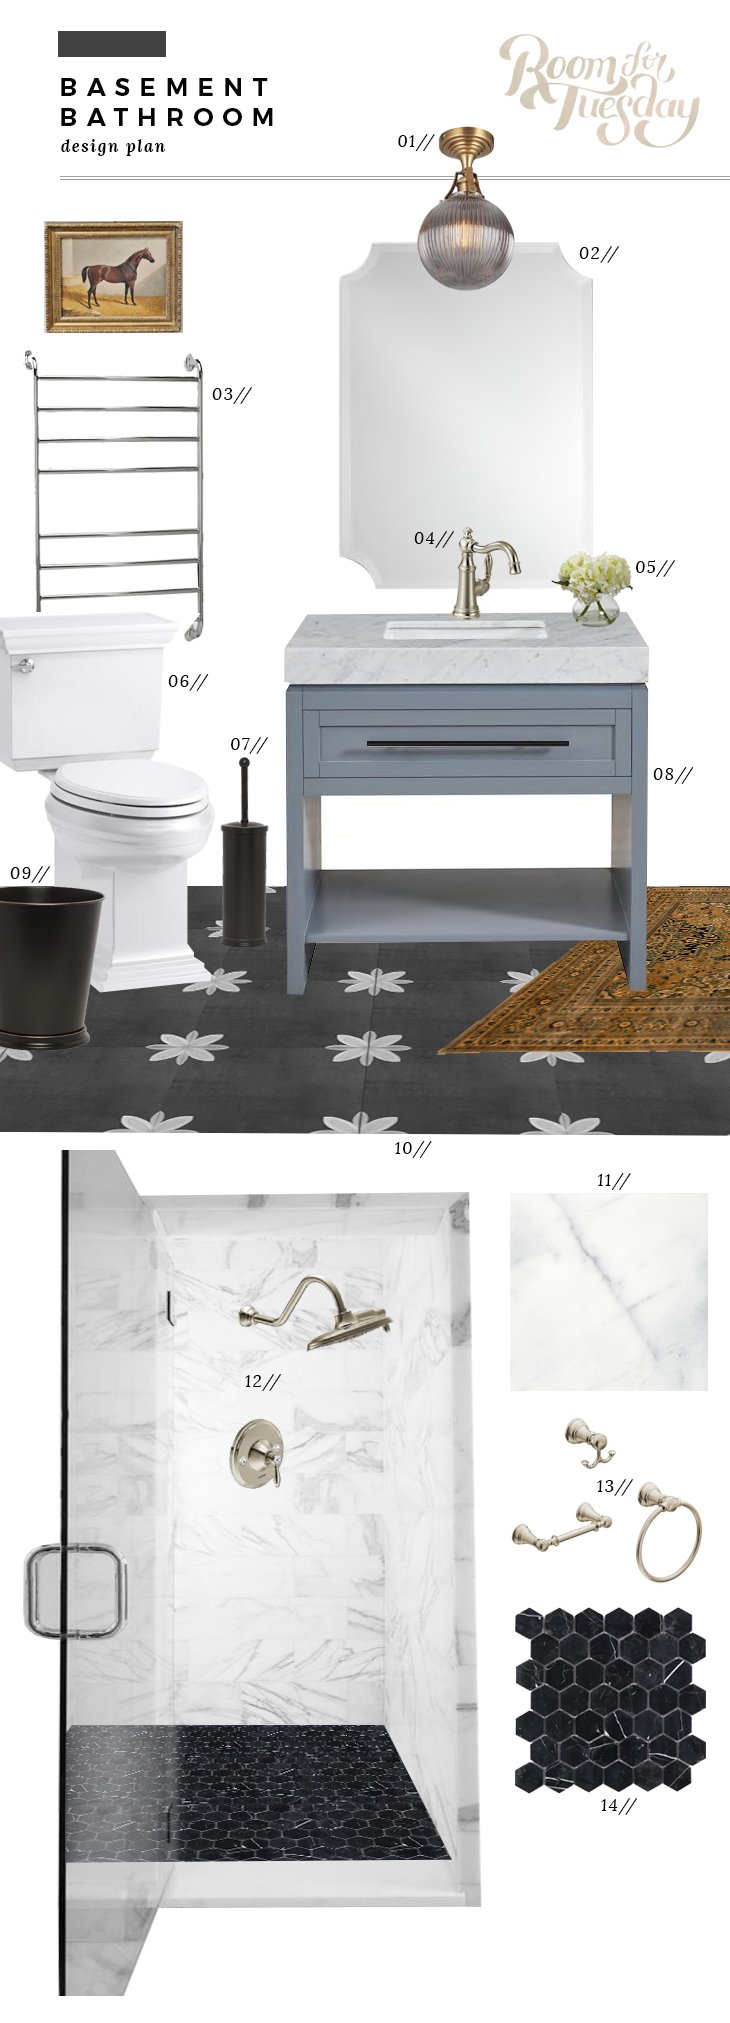 01: semi flush mount light fixture // 02: beveled wall mirror // 03: towel warmer // 04: single hole faucet // 05: faux floral arrangement // 06: kohler toilet // 07: toilet brush // 08: vanity with marble top and sink // 09: waste basket // 10: patterned floor tile // 11: marble wall tile // 12: shower trim // 13: bathroom hardware set // 14: nero marble floor tile
What do you think? I’m pretty excited to transform this space (just as soon as we wrap up the living room). Don’t worry, I’ll be adding plenty of color through vintage textiles and art! The vanity base is currently sitting in the basement- check it out below…
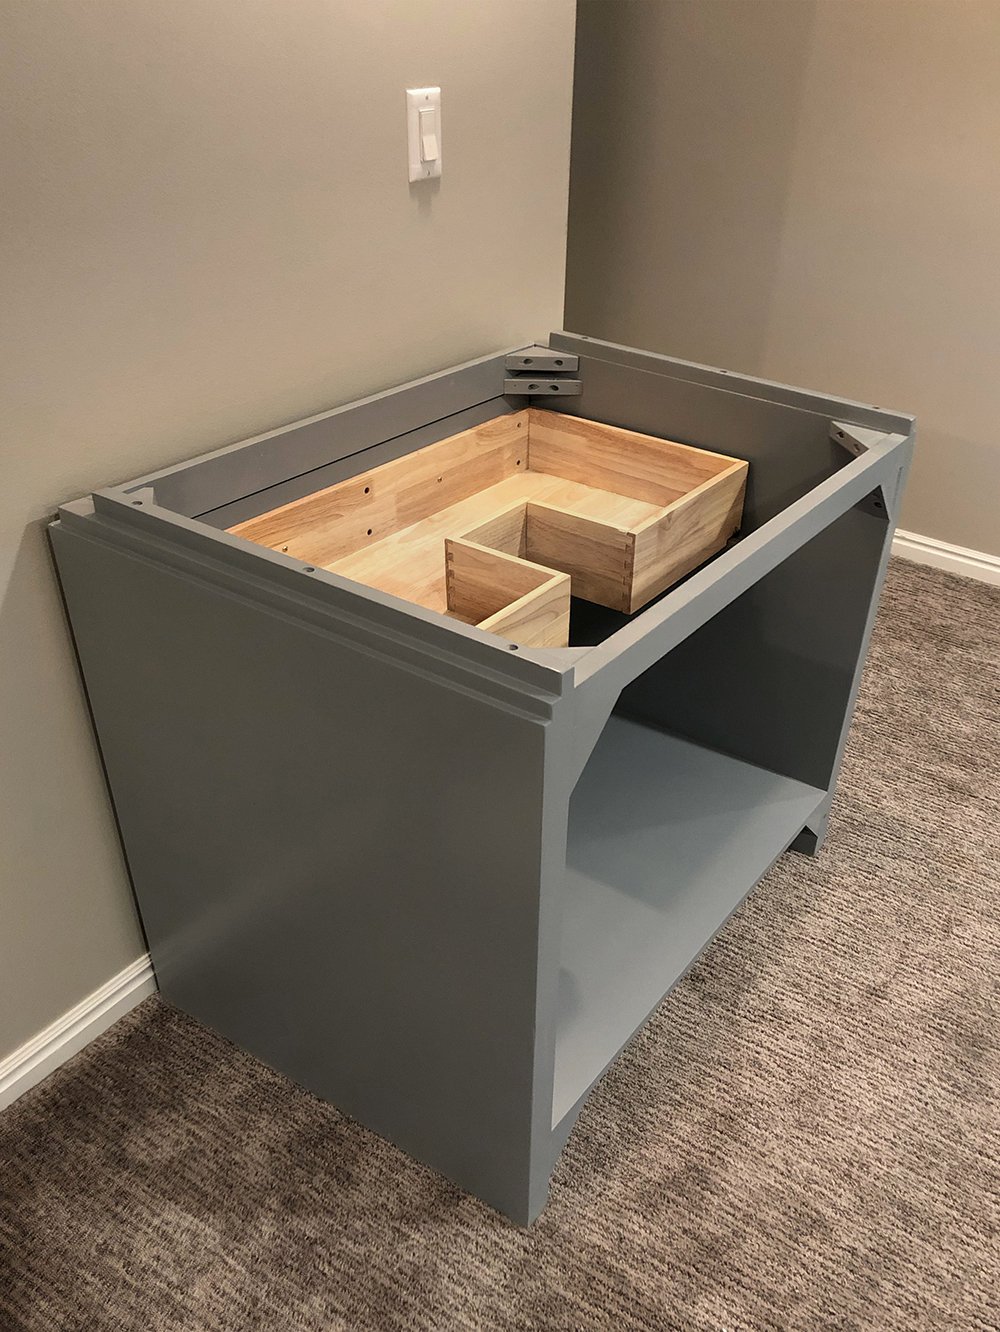 It looks more blue in person. I’m trying to decide if I want to keep it blue or paint it. I have awhile to decide though. Right now, I’m just compiling the items as they arrive, taking inventory, and getting organized to ensure this one goes smoothly. The good news is this… we have other bathrooms to use and we won’t be repeating our first One Room Challenge scenario, where we peed in the backyard while renovating our one-and-only bath. We’re already winning! What could go wrong? Ha.
 Who is ready to watch us tackle the basement bath? Please tell me you’ll follow along and you’re not sick of our renovation projects yet. I’m very excited about this one! There will be new challenges, plenty of tutorials (like heated tile floors), and hopefully a gorgeous bathroom by the end of it. We’re planning to take a week or two off for Christmas, but come January- it’s GO time.
Sick of your renovation projects….are you kidding…never! I like all the choices for this renovation.
Carpet is soooo gross! We moved into a new home with carpet in the bathroom and I hated it! Why do they do this other than it is cheaper than tile?!
This home was meant to be renovated by you two. When you hear it needs all new plumbing…uh not a job for us but you guys got this! I somehow missed your post on the basement kitchen and had to go check it out.
Keep on renovating..I’ll be here!
Haha, thanks for hanging around Danna!! I have nooooo idea why anyone would ever put carpet in a bathroom. I’d rather have laminate or linoleum flooring- even something cheap would be more sanitary. I’m so grossed out by it.
Oh, I am so ready for his, especially heated floor tutorials! Can’t want to see the progress.
Yes!! I can’t wait to tackle that soon- right after the holidays we’re diving in :)
you are going to love heated floors! We have them in our master bath in GA and enjoy them all winter long.
I’m so excited!! We’ll be installing them in our master bath someday when the time comes to renovate that space, as well :) I’m happy to hear you think they’re well worth it!
I’m interested to see how you make this bathroom feel warm and cozy, given all the white, black and gray. The heated floors are great. We have them in our bathroom (in Wisconsin). Do you mean warm and cozy in terms of temperature, or also in terms of aesthetics?
Great question, Amy! My goal is always both :)
Carpet in the bathroom is 10 out of 10 for the yuck factor!!! Why oh why?
I know I will never get tired of your renovations. I’m looking forward to this so much! I love the way you plan, set the stage, and take us along for the ride, with any problems included. Thank you for doing that!
I’m in agreement there, Jennifer! Haha! Thanks so much for following along on our journey :) xo
Excited! Our house had carpet in the bathroom, it was literally the first thing we did when we got the keys to rip that carpet up and put it in the skip!
Yessss!! My mindset exactly, Meg!
Yippee! These plans look beautiful!! I love that patterned floor tile and the black marble hex. A heated towel warmer is one of my (no longer) secret bathroom dreams. Oh, the luxury. Sigh. I also like the ribbed globe on the ceiling fixture; it looks kind of smoky, but the website describes it as clear? The vanity reads simple but substantial- I dig it. The blue is pretty, but what other color would you consider? A green? A red? (Bold for 2020!!) More details! Whatever you choose, I am here for it! (And, we do not need to discuss carpet in a bathroom. An affront.)
Happy Monday!
Thank you Peggi! I’m also excited about the towel warmer… we’ve never had one either, and I’m looking forward to testing it out :) The light hasn’t arrived yet, but I’m hoping it’s smokey. Fingers crossed! It should be here this week- I’ll keep you updated.
I’m SO excited to see this transformation! I’ve been eyeing that tile at Lowes for our own basement bathroom, and I love the design you’ve created. I also can’t wait to see a tutorial (hopefully??) for heated floors!
Thanks Laurel! We’re definitely sharing a tutorial for the heated floors :) stay tuned! xo
I love your knack for putting together the permanent things of a room. It all looks quite beautiful- albeit a bit cool toned and monochromatic but I know you will bring in those textiles! Also, I just decided I want an antique painting of English racing horses across a dreamy English landscape for my hall bathroom!! For $30 or less; let’s get thrifting ;-)
Thank you, Julie! Yessss to the horse painting- thrifting challenge accepted :) make it happen! xo
Excited to see this one! Such a well thought out design and it looks stylish as well as cozy already. We have a bath that we will be tackling in early spring too, so this will be a great motivator. What is your goal timeframe from start to finish?
Thank you Kolina! We’re hoping to get started after the holiday season (early January) and finish in February / early March.
SO excited to follow along, Sarah! I love seeing different bath renovations, because they’re often all so different and since they’re smaller, you can go more bold in them. I feel like windowless bathrooms are especially hard, so excited to see it all come together.
Oh, and thanks to MY Mom and my 70’s childhood, we did have carpet in the bathrooms, BUT they were more like full floor mats – not tacked down and able to be picked up and washed in the w/d. Thank goodness for that! The tile underneath was small 1” square tiles and no heated floors back then, so they were so cold without the wall to wall mat. Even though it didn’t seem weird or gross at all at the time, it definitely does now though! Shudder.
Thanks Anne! Windowless bathrooms are definitely tricky. I think carpeted bathrooms were more popular (and dare I say- trendy?) in past years? Whew! So glad that’s not the case anymore. Haha!
This bathroom renovation looks pretty dreamy, you guys. Guests will be wowed and possibly wish to move in…as if they don’t already. Cheers, Ardith
Thank you Ardith!! xo
Can’t wait to see it come together. I love the floor tile and heated floors are a dream!
Thanks Melissa! I am so pumped for the heated flooring- can’t wait to test it out :)
Love it so much! I kinda dig the powdery blue as it flows to the deep navy of the media room! No matter what you decide, I know it will be magic ✨ and I can’t wait to follow along!
Thank you! I’m also digging the light blue… and also- less work. Haha! xo
We had carpet in our basement bathroom and I couldn’t even walk in the room without getting grossed out. We are almost done renovating it now (very similar to yours except we selected a light gray marble floor because of the low ceilings and no natural light). I’m really really looking forward to seeing what you do; every renovation is my new favorite!
Aw thank you Amanda, and congrats on your own renovation! It sounds beautiful and I can’t wait to see the carpet go… I know you can relate!
It looks like you have a great plan with these finishes. Never going to get sick of your renovations!
Aw, thank you Liz! xox
Hi Sarah
I was all geared up to use the Nero black hex tile for my shower floor. The same one you used in your basement bathroom remodel. The “descriptions and specifications” on the Lowe’s website said not to use it for shower floors and that it was non-vitreous (meaning it absorbs a lot of water), also it’s polished. Could you share why you choose to use it anyway? I really want to use it in my shower, but don’t wanna go against manufacturers recommendations, if it’s a bad idea.
Thank Sophie
Hi Sophie! Such a good question… I’ll start by saying- marble in a shower is not for everyone (whether it’s the floor tile or wall tile). Because marble is a porous stone, it absorbs and can stain… bath products, water, etc. It’s more of a staining and patina issue, which is why it’s not the “preferred” choice for showers. People have been using natural stone in bath and shower settings since the beginning of time, and I don’t mind a good patina- so I’m perfectly content (and very happy) to use it. Eventually it will dull over time. Nero marble doesn’t stain as easily as carrara since it’s black, but it will absorb bath products, causing it to dull over time. In terms of water proofing and durability- it’s perfectly fine to use marble on the shower floor. The water proofing and barrier actually happens a layer BELOW the tile, so the tile selection doesn’t really matter there. Like any natural stone, I will need to seal the marble tile from time-to-time (every 6 months or so). One last thing to consider… slipping. I’m always careful to choose a floor tile with lots of grout lines (small hex tile, penny tile, etc) so that you have good traction underfoot in the shower. Marble can be slippery when wet and large marble tiles wouldn’t be optimal on a shower floor for that reason. Hope this helped to answer your question :)
Thank you, I greatly appreciate you sharing your insight and knowledge about natural stone.
So happy it was helpful, Sophie! :)
Love the bathroom! Could you use the Nero black tile as a floor tile in a small powder room? It’s listed as a wall tile on the Lowe’s website…
Thank you Genevieve! Yes- you can use this tile as floor tile :) I’ve noticed that many tile products have been listed as “one function only” on the Lowe’s website over the years.
Hi, Sarah! We are renovating our bathroom as well and are using the same floor tile! It’s SO beautiful! My question is did you use the unwanted grout for the tile? I think. You used Mapei Charcoal if I’m not mistaken. Thanks again for all of your wonderful posts! Love them all!