Our Shed Build, Supply List, and Budget
 Last week I revealed our storage shed, and as promised- I’m following up with a progression of the build, our complete supply list, and the budget breakdown. Since sharing the final outcome, I’ve received hundreds of “can you link the shed?” messages, and unfortunately- I designed it and Emmett built it, so I don’t have an easy link for you. However- if you’re handy, into DIY projects, and are looking to tackle this project yourself (or turn it over to your favorite contractor to build for you), this post contains all the answers you’re looking for to achieve the look! Click through to see how this project evolved and to get the supply list sources, along with the number crunching.
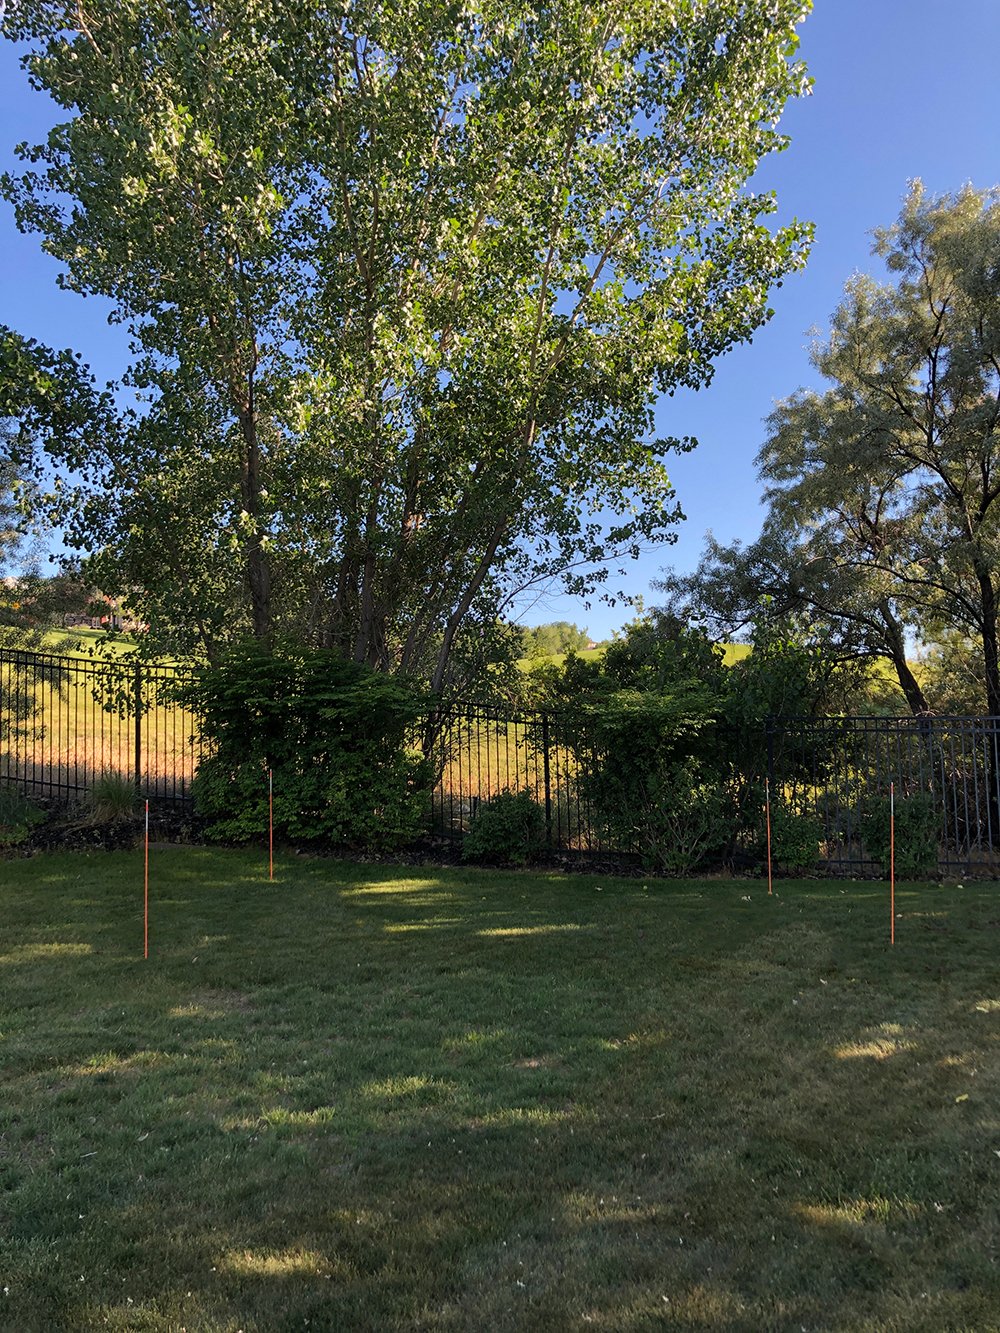
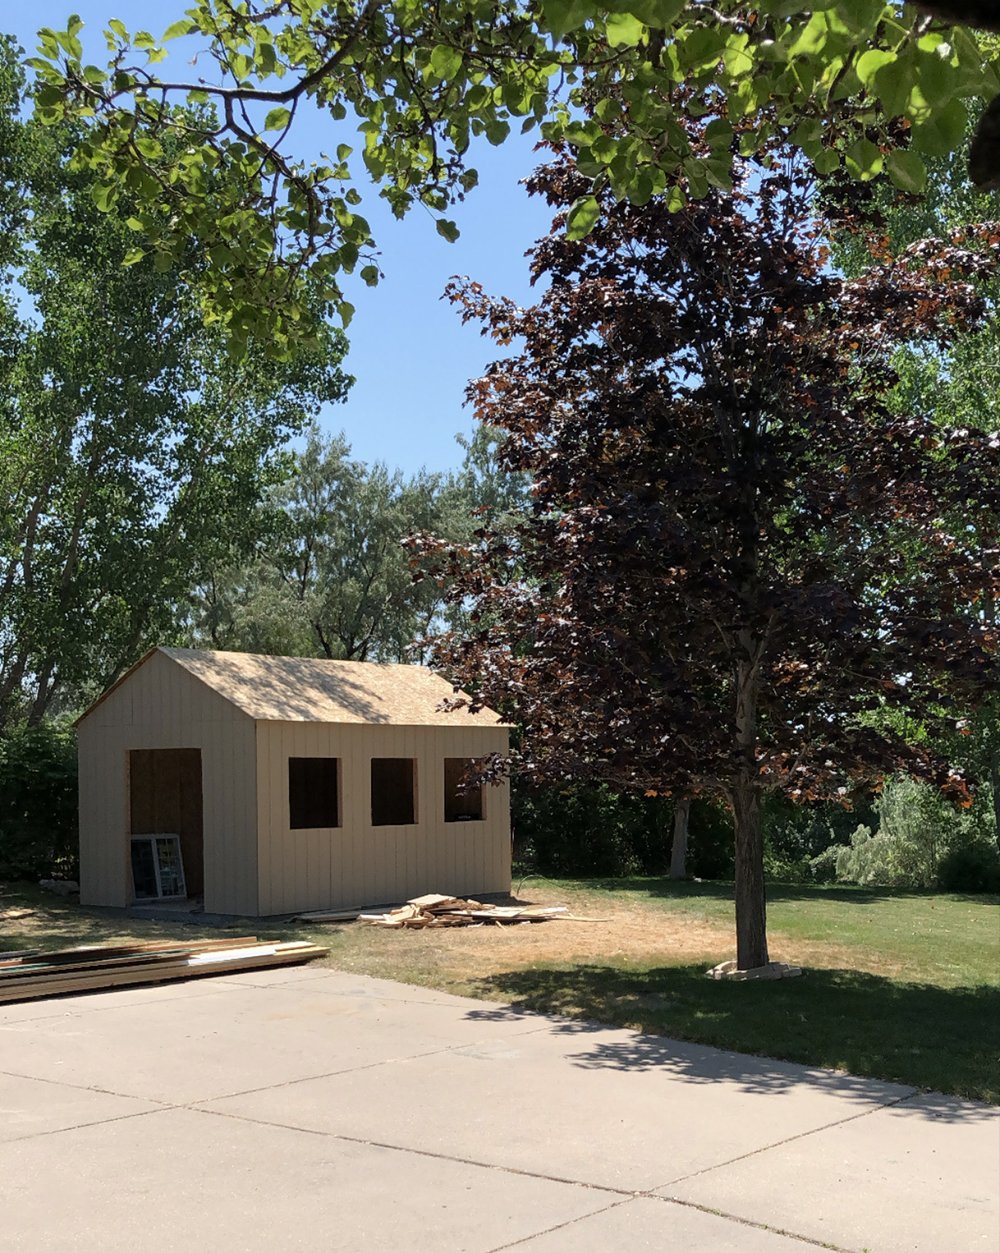
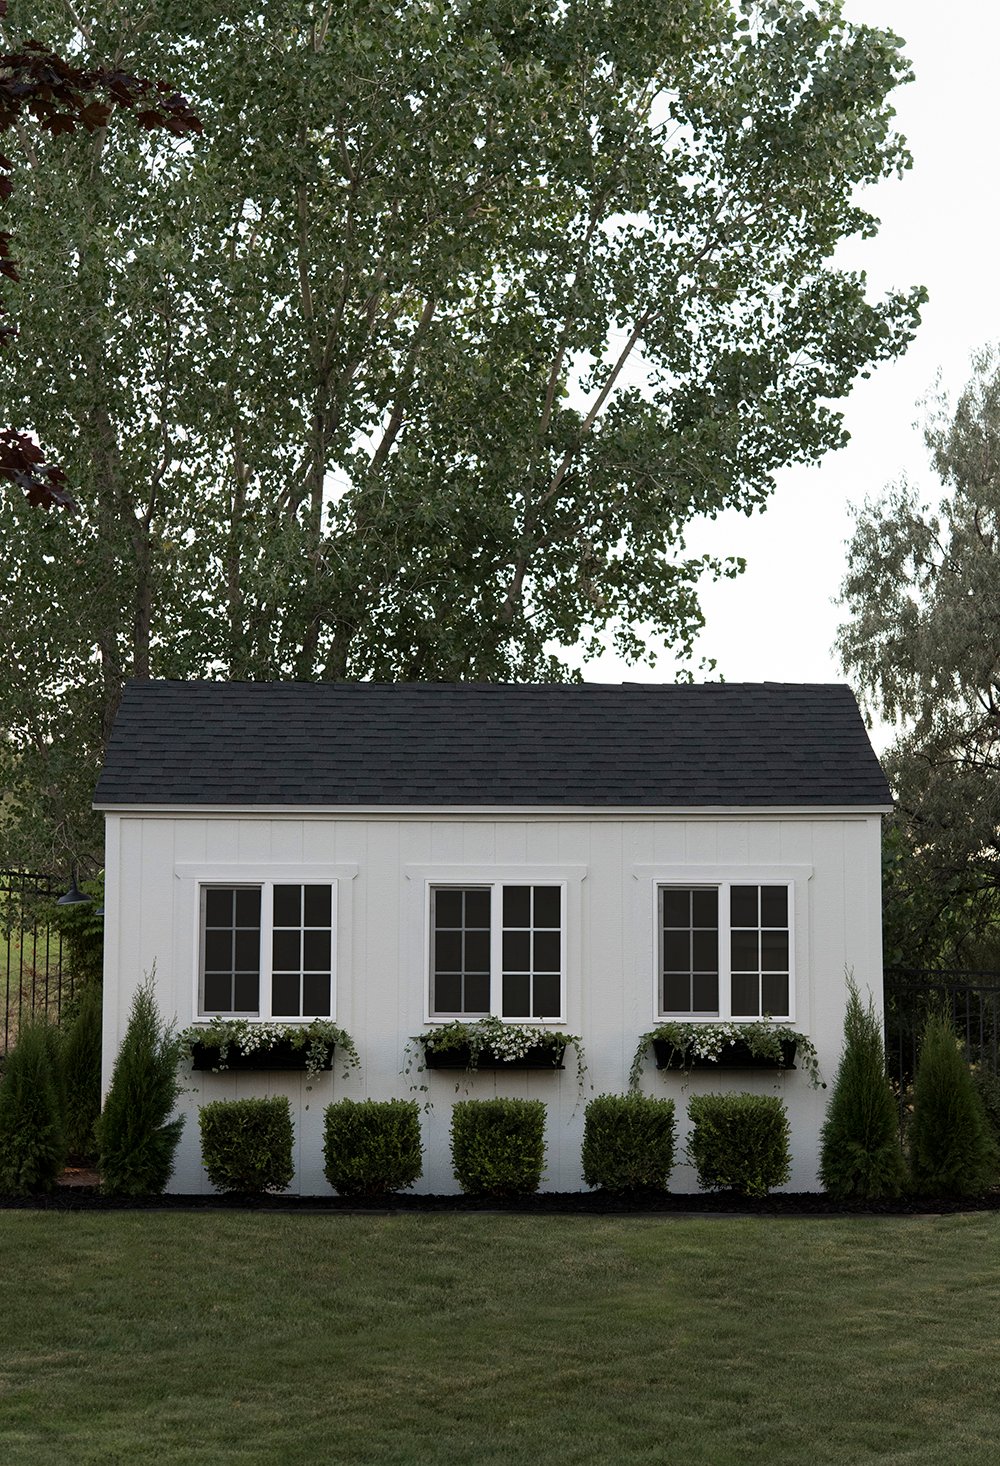
 As I previously mentioned in the reveal post, our initial plan was to relocate our existing shed to the plot pictured below. However, it wasn’t in great shape (20+ years old), would’ve been difficult to move, and building a new storage shed to fit our exterior aesthetic seemed like a smart investment. When dreaming up this project, Emmett and I discussed the size, design plan, and staked out the location in our yard.
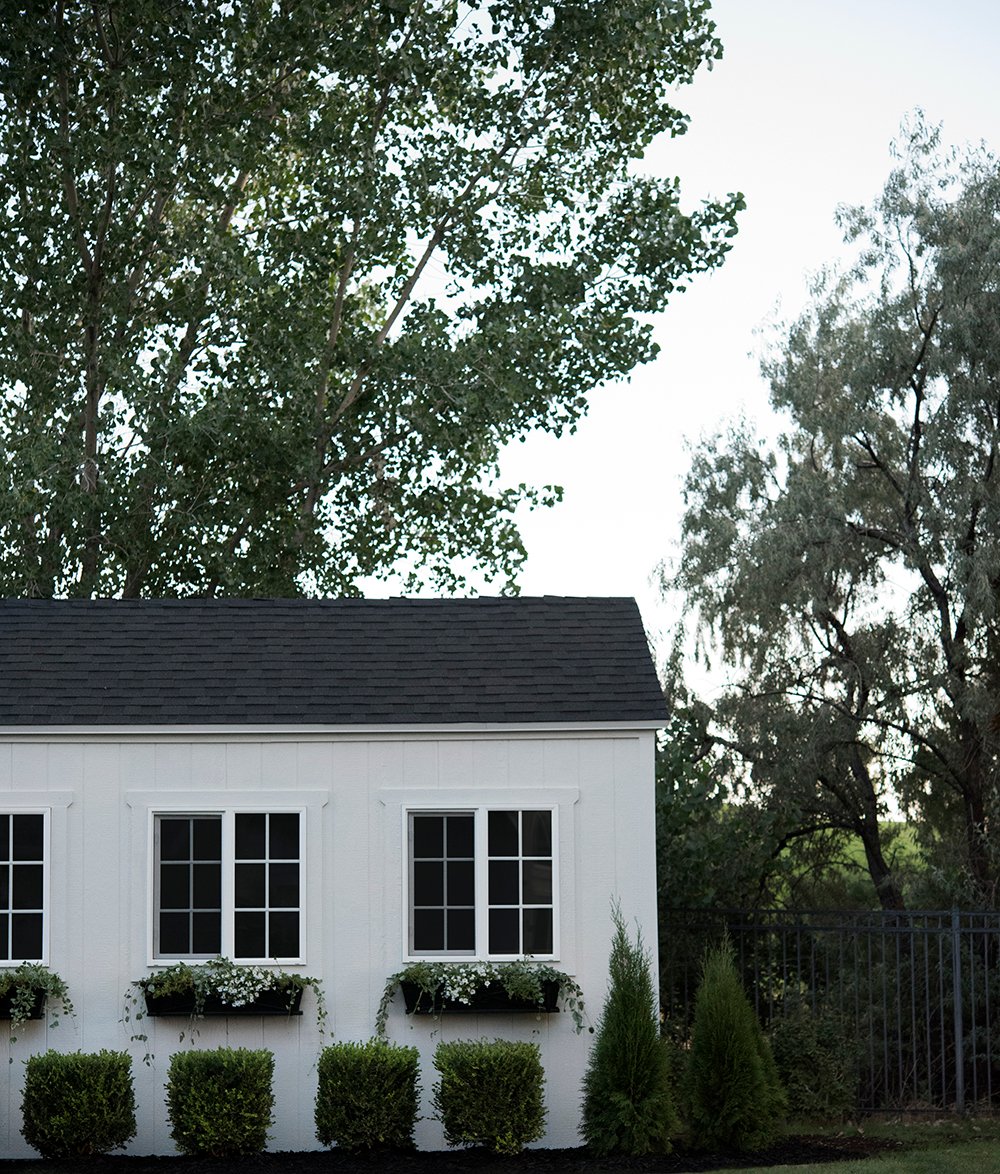
 Below, you’ll find our complete supply list. Our shed is on the larger side- 12′ x 16′. Another thing to note is to check with your city or township in regards to building regulations. In our area, most building codes allow sheds less than 200 square feet with no permit. Our shed is just under the regulation at 192 square feet. The size will definitely influence your supply quantity and overall cost!
SUPPLY LIST
- Treated Lumber, for the sill plate
- Douglas Fir Studs, for framing
- Fir Lumber, for ceiling joists
- LP Smart Siding, for siding
- LP Smart Side Trim Pieces, for exterior trim
- CMI Drip Edge, for drip edge
- Sheathing, for roof sheathing
- Tab Roof Shingles (in onyx black), for roof shingles
- Roofing Underlayment, for the roof
- Air Vent Louver, for venting
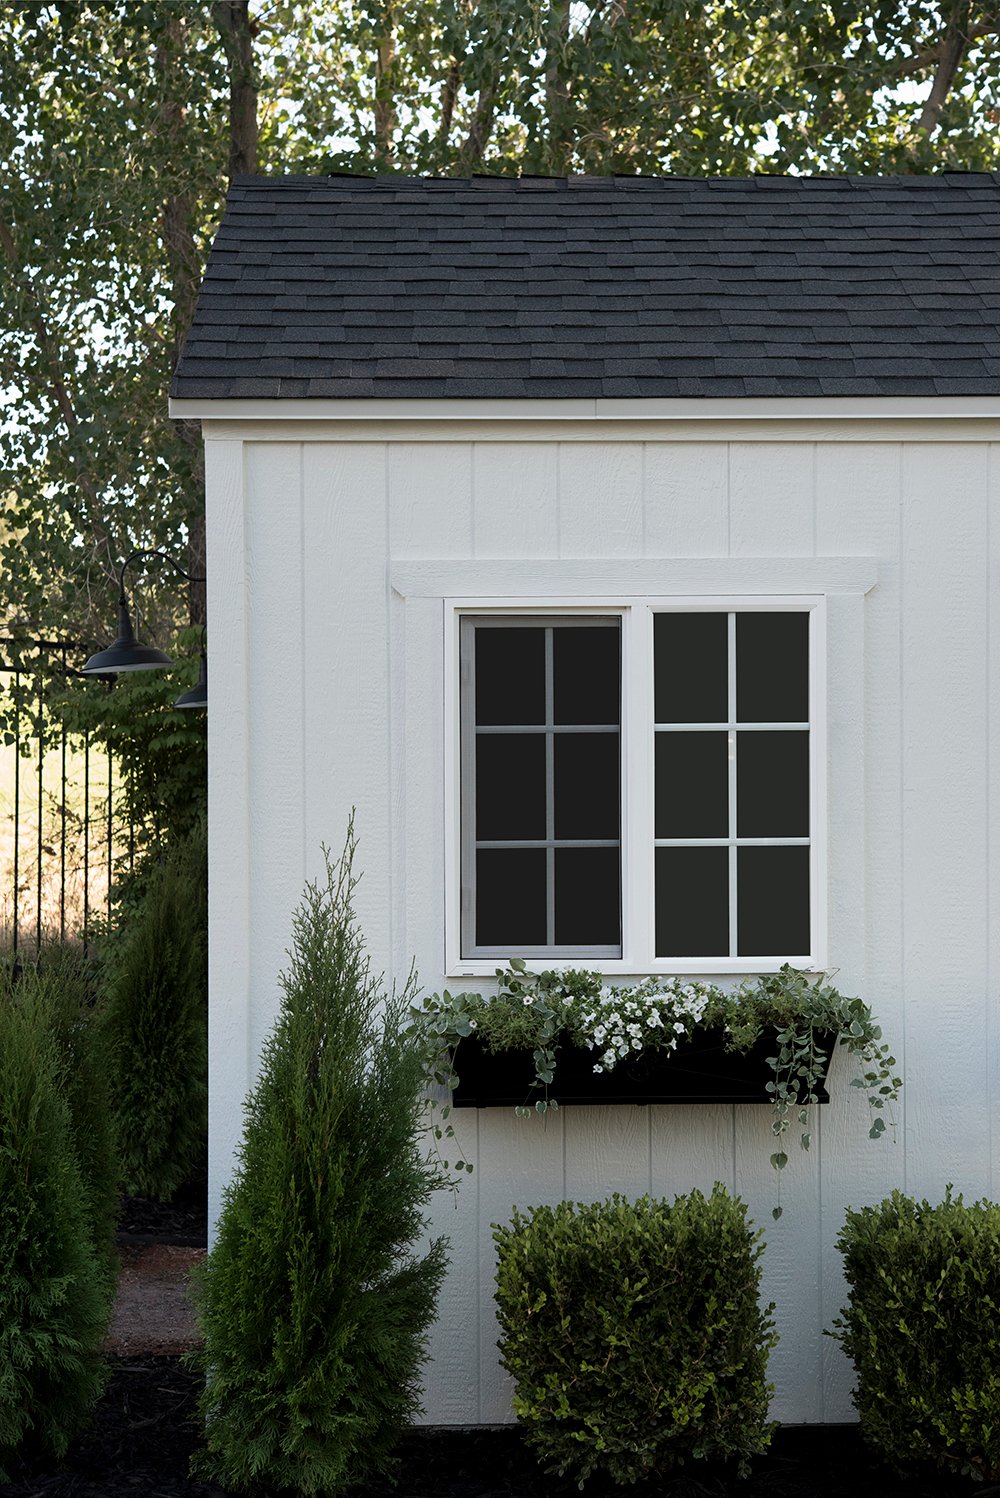
- ThermaStar Pella Windows, for windows
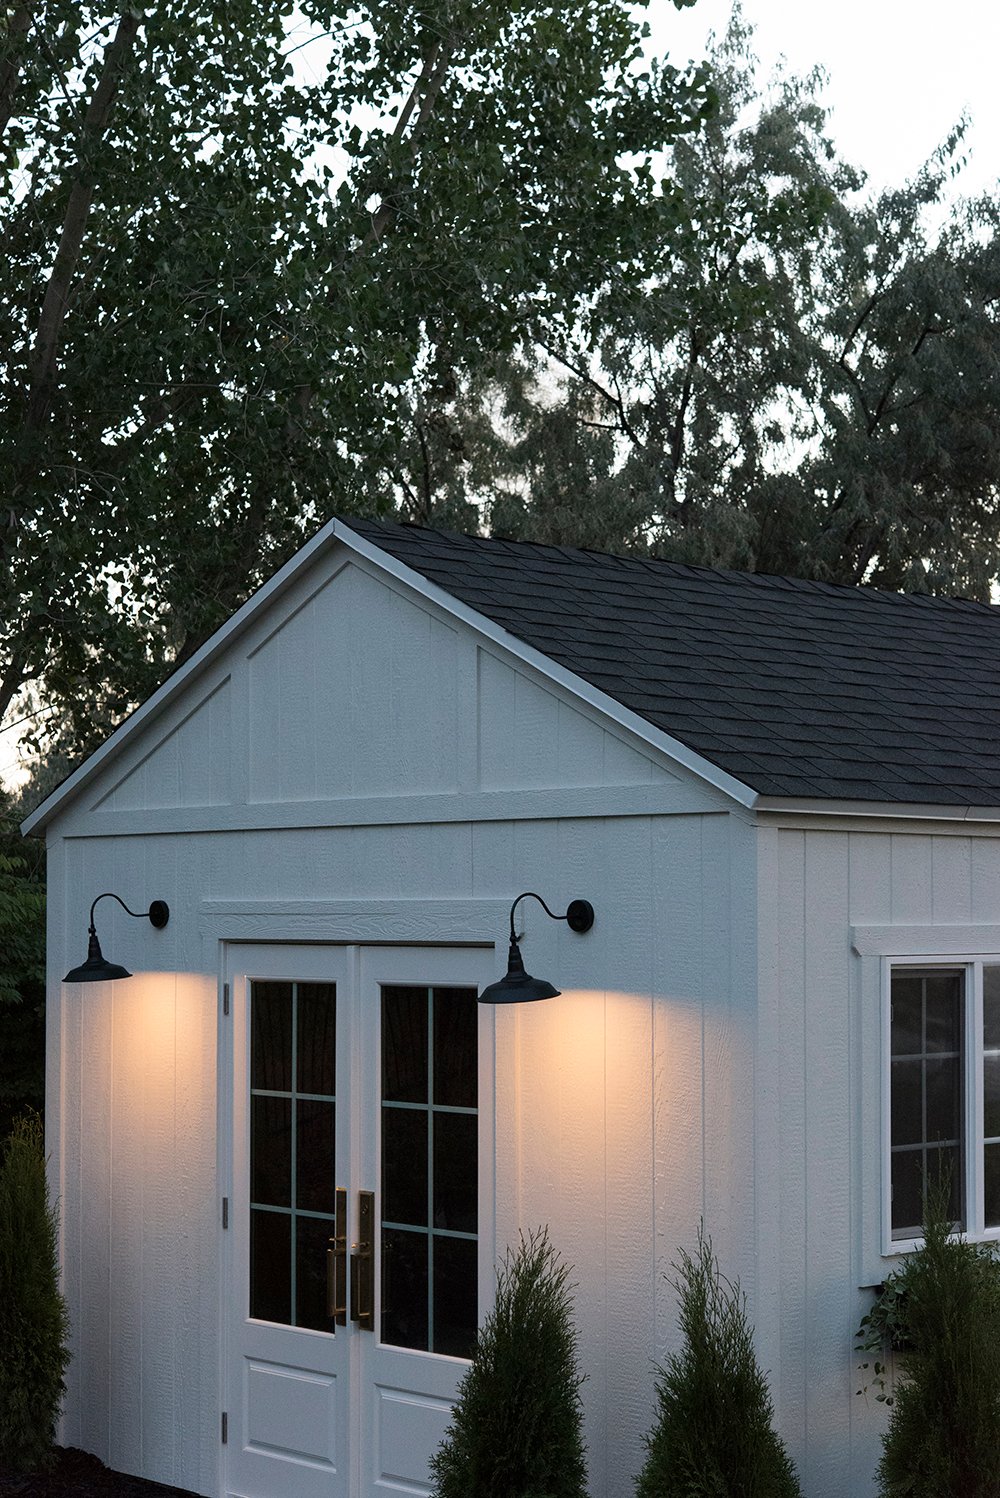
- French Doors, for entry door (visit your local store to customize mullions, color, & style)
- Brass Door Hardware, for entry door
- Solar Sconces, for exterior lighting
- Black Mulch, for landscaping
- Boxwoods, for landscaping
- Emerald Arborvitae, for landscaping
- Window Planter Boxes, for curb appeal (spray painted)
- Rain Refresh Paint (in color SW Nuance), for exterior
- Rebar, for concrete pad
- Concrete Pad, we hired a local company to drive a truck out and we poured it ourselves
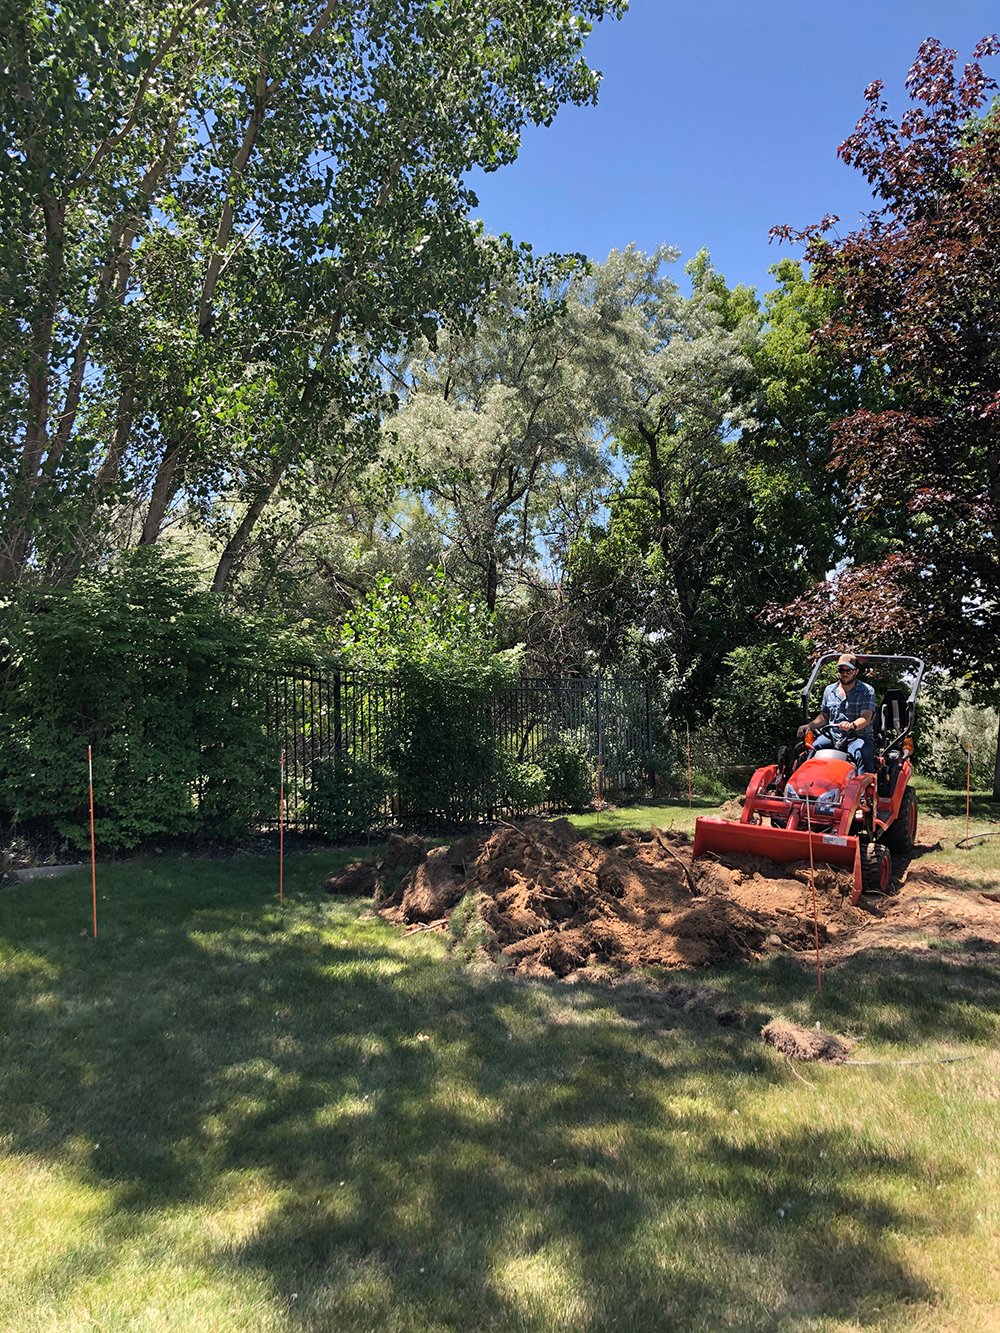 Emmett began by digging and leveling the foundation for the concrete pad. If you’re interested to see the shed progress in video format- I have it all saved right here in an IG highlight.
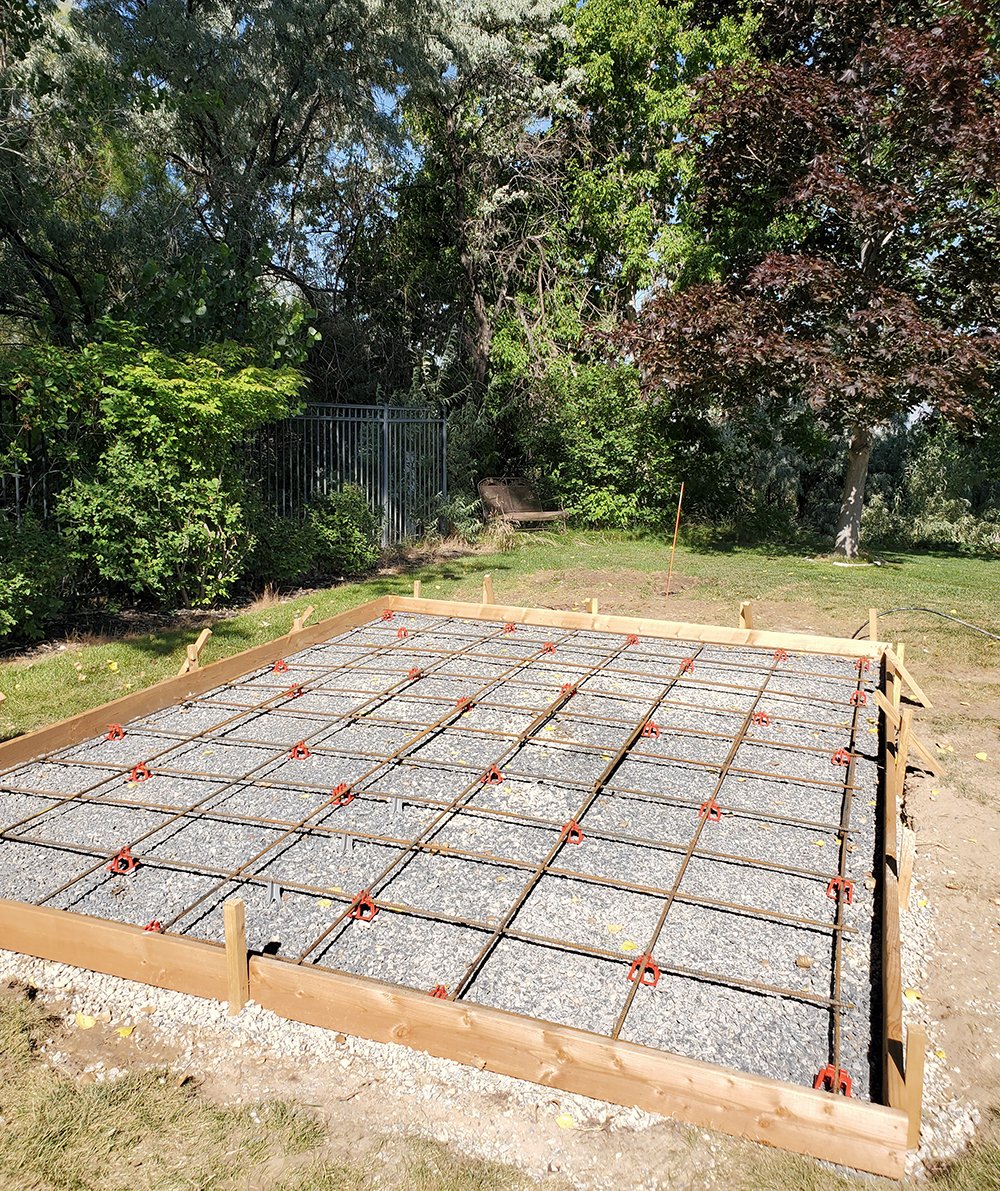 Next, we built the frame and set the rebar for the concrete pad. We hired a local concrete company to bring a truckload to us, and poured the concrete pad ourselves. Emmett actually has a ton of experience in this area, as his college job was construction- and he did a lot of concrete work during that time. I operated the tractor, filling the bucket with concrete, and pouring it into the frame, while he shifted and smoothed.
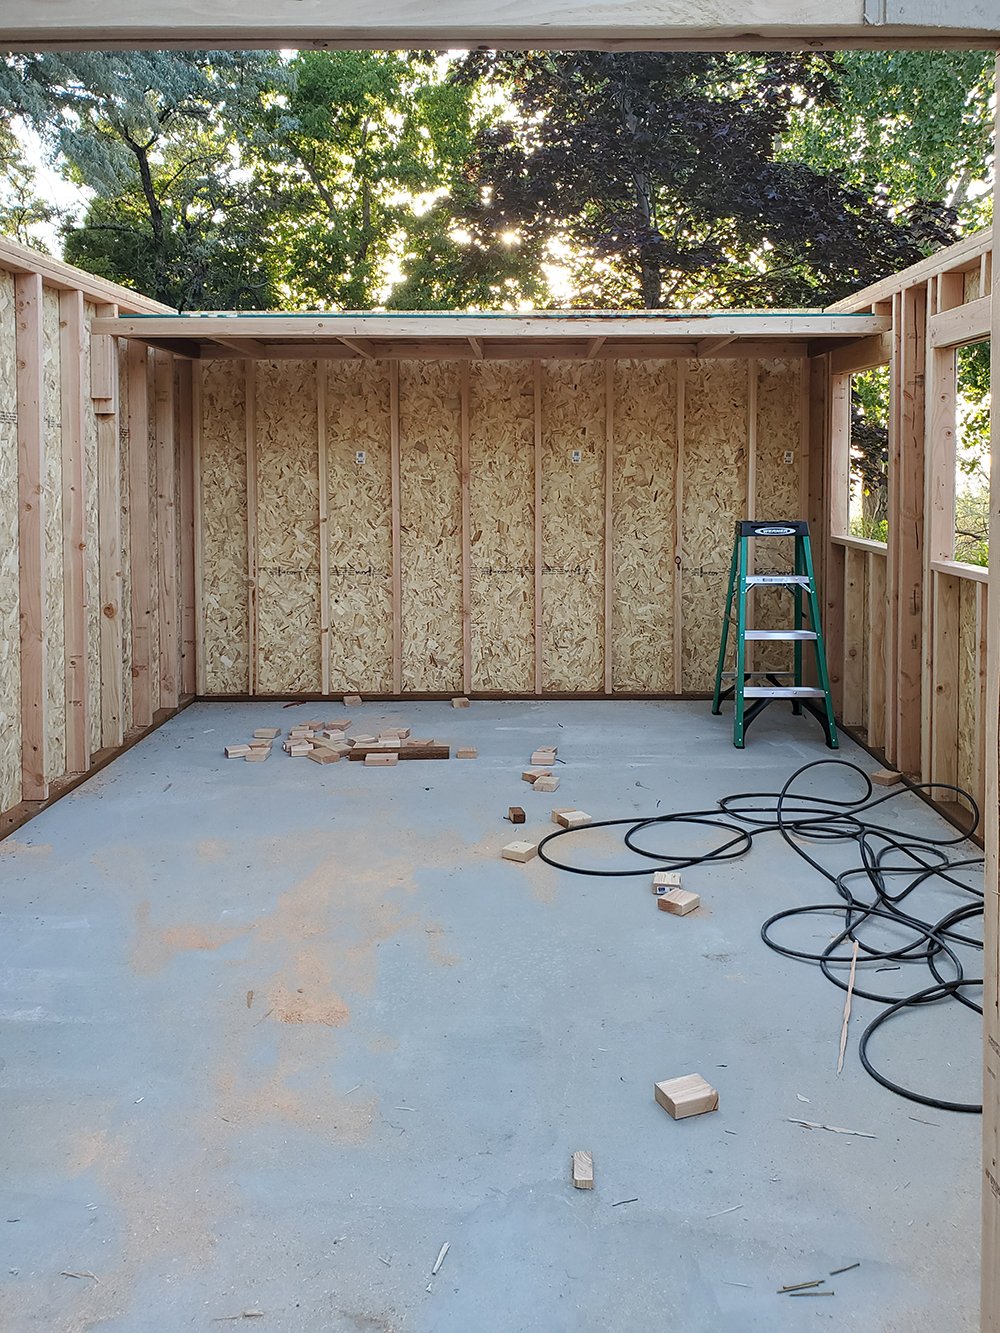
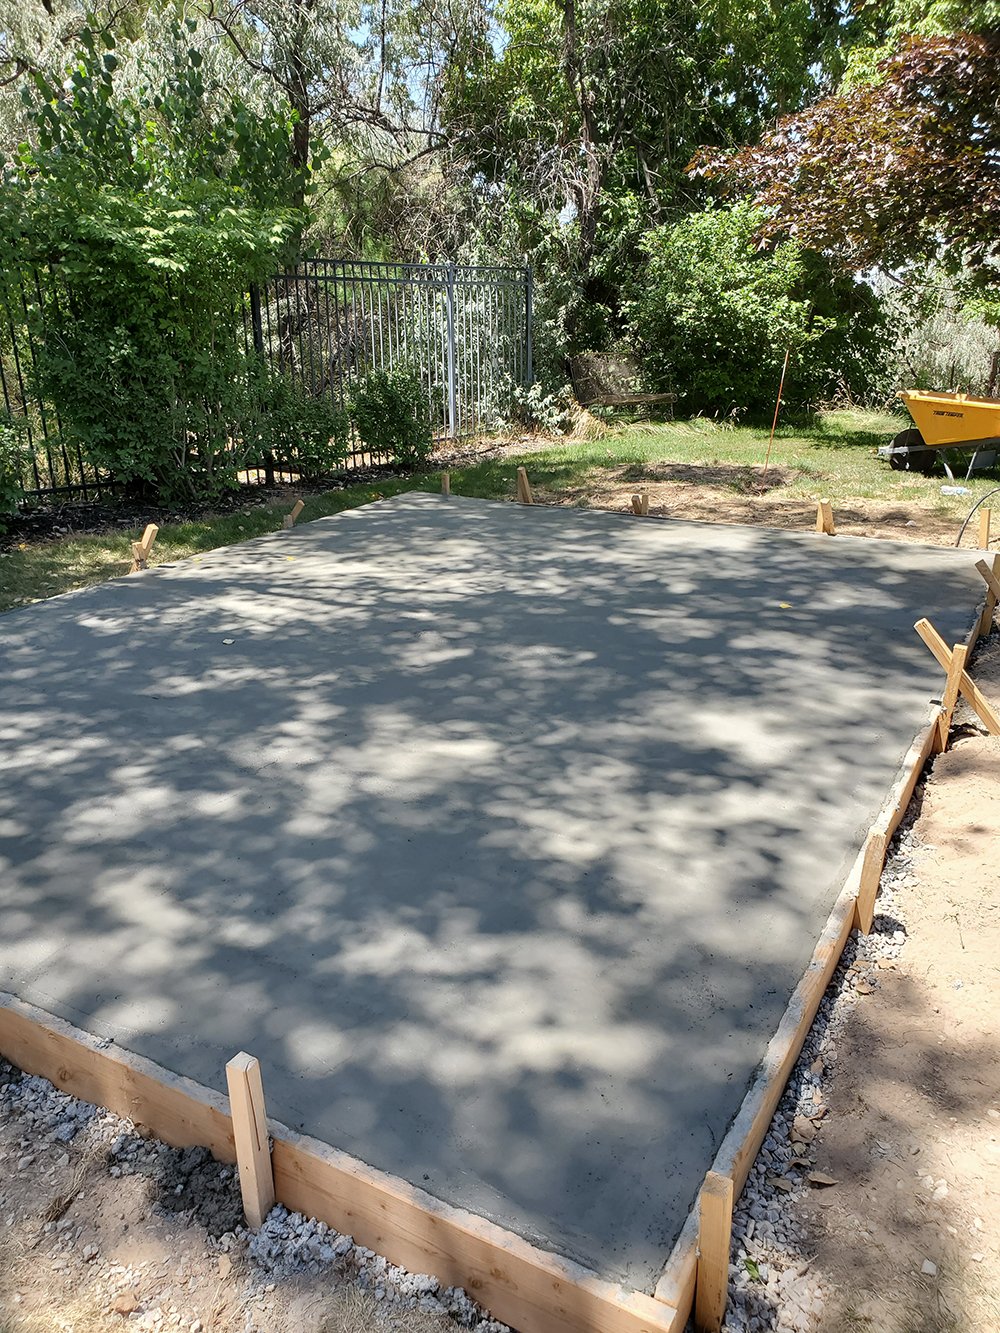 Once the pad had cured, we began building a couple days later. Emmett started by framing everything out. As you can see below, we designed the shed to have a loft for additional storage space in the back.
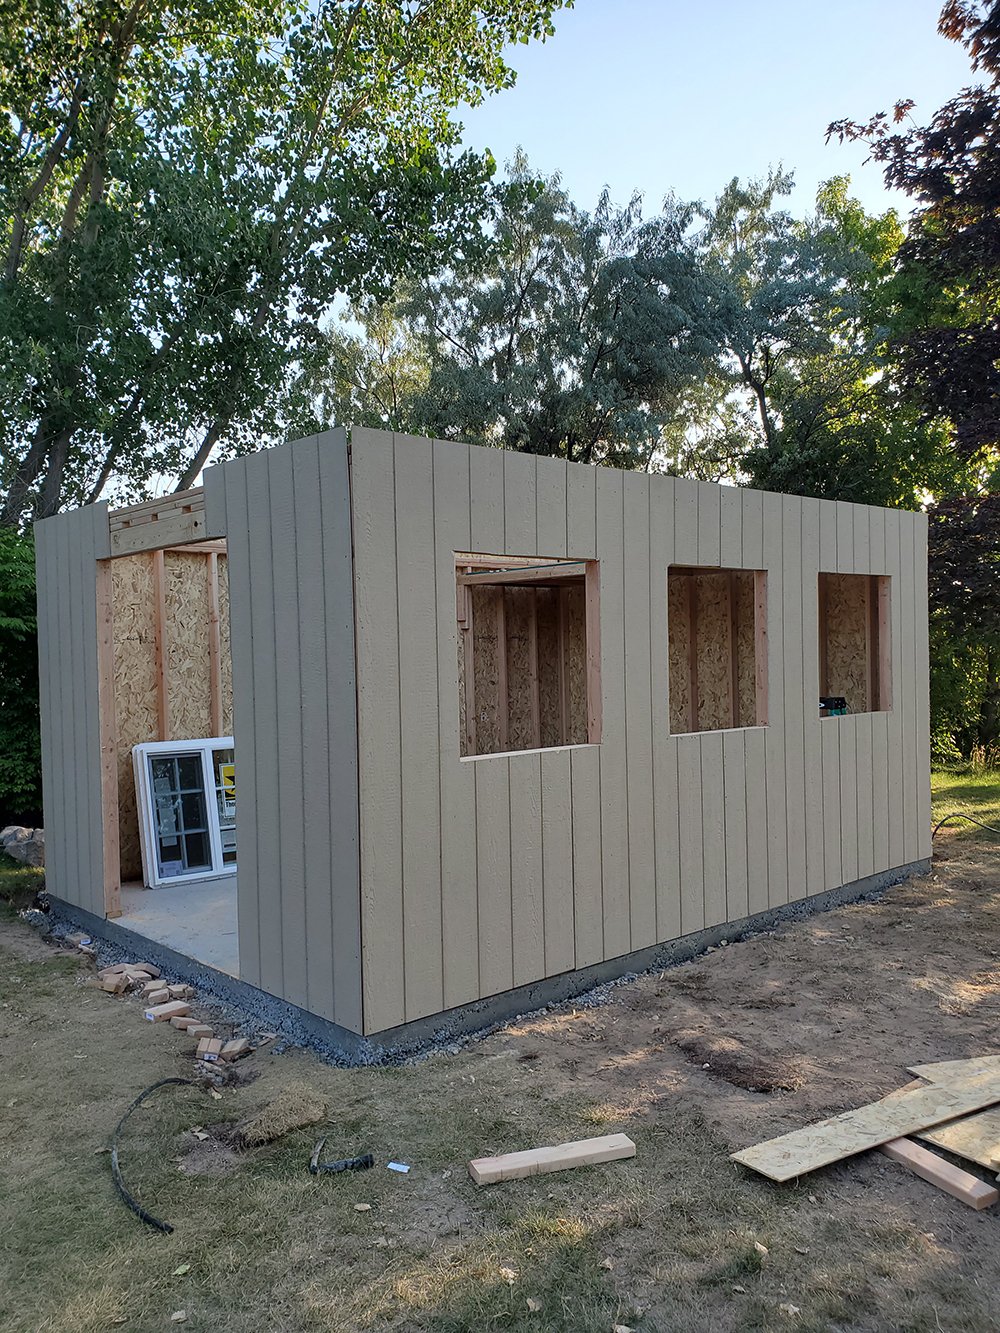
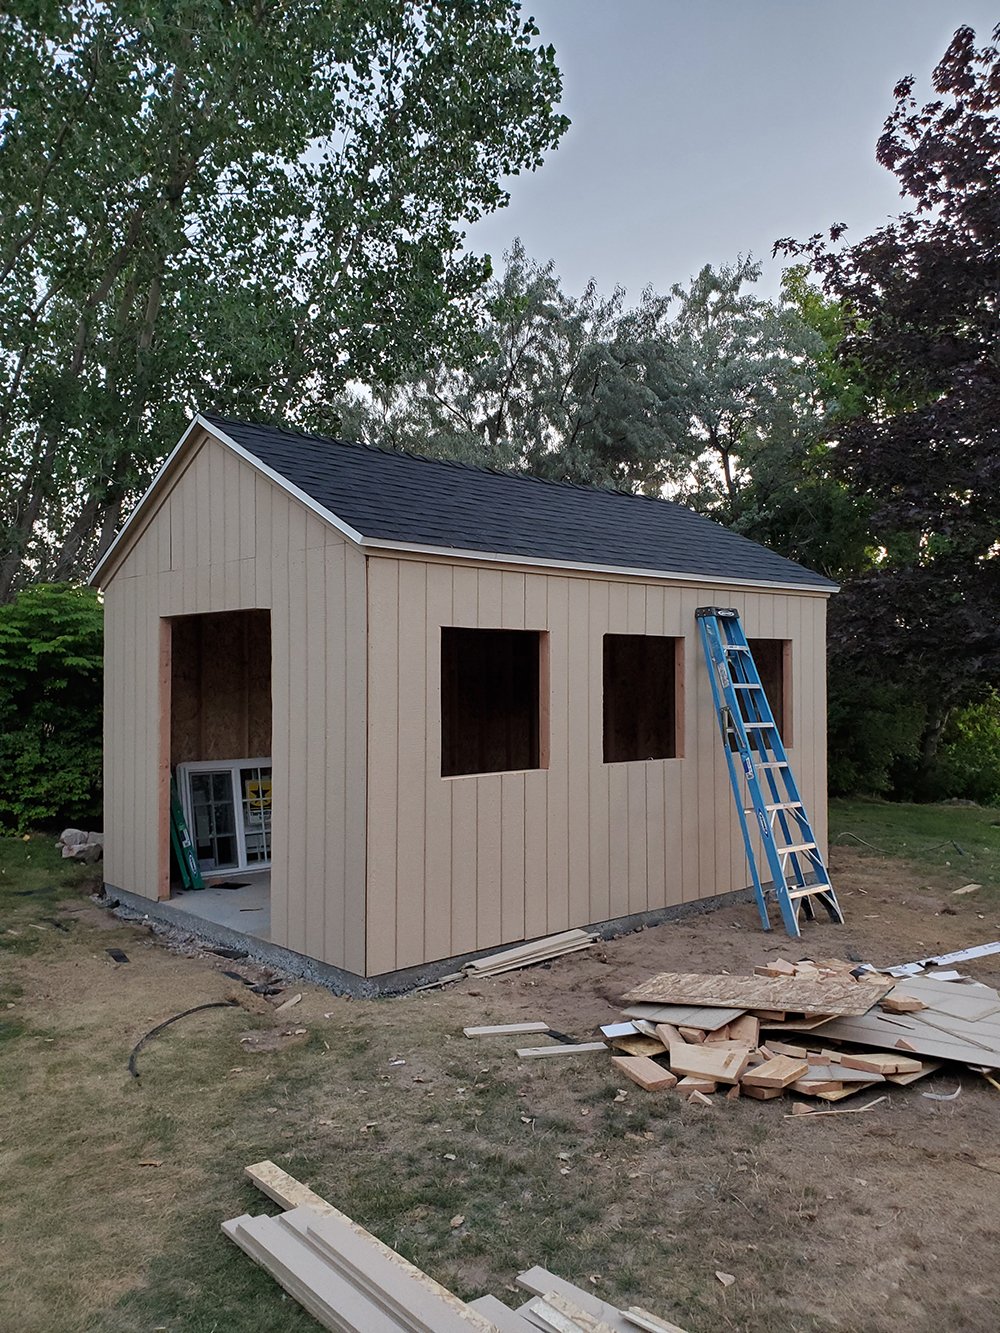
 The next step was to wrap the frame in siding. This part of the process went really quickly. He had this completed in a couple of hours.
 After that, the upper portion of the shed was built. Check out the view from our driveway… once the pitch for the roof went up, it really started to look like a shed.
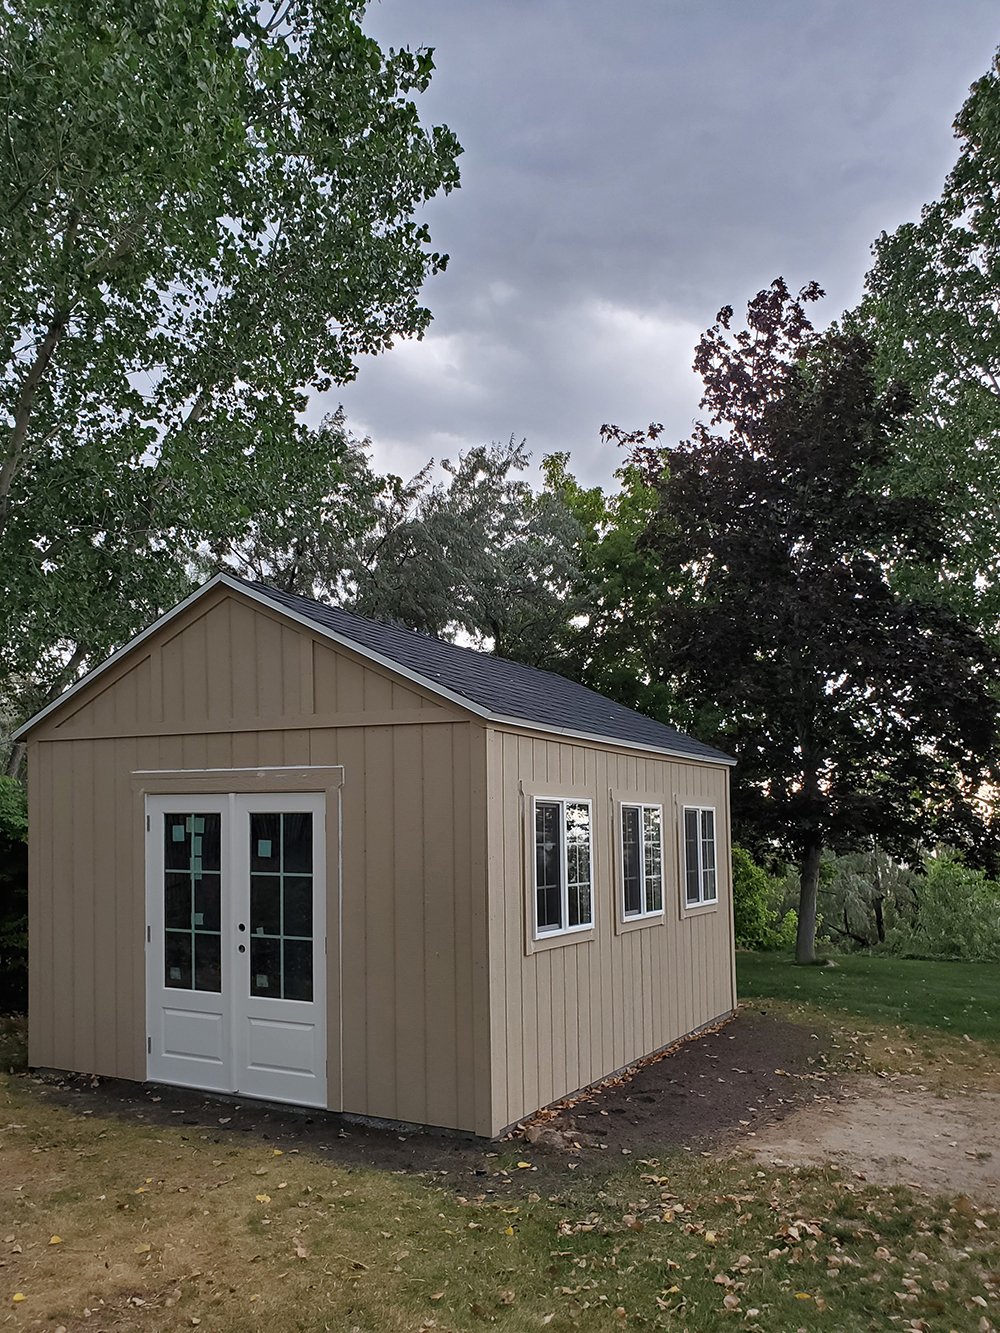
 Then he installed the underlayment for the roof, the shingles, and the drip edge. Someday we may add shed gutters, but for now- it’s all sealed and waterproofed. I actually like the way it looks… nice and minimal!
 Things really started to take shape once the windows and doors were installed! Both the french doors and windows are very nice, efficient, and functional.
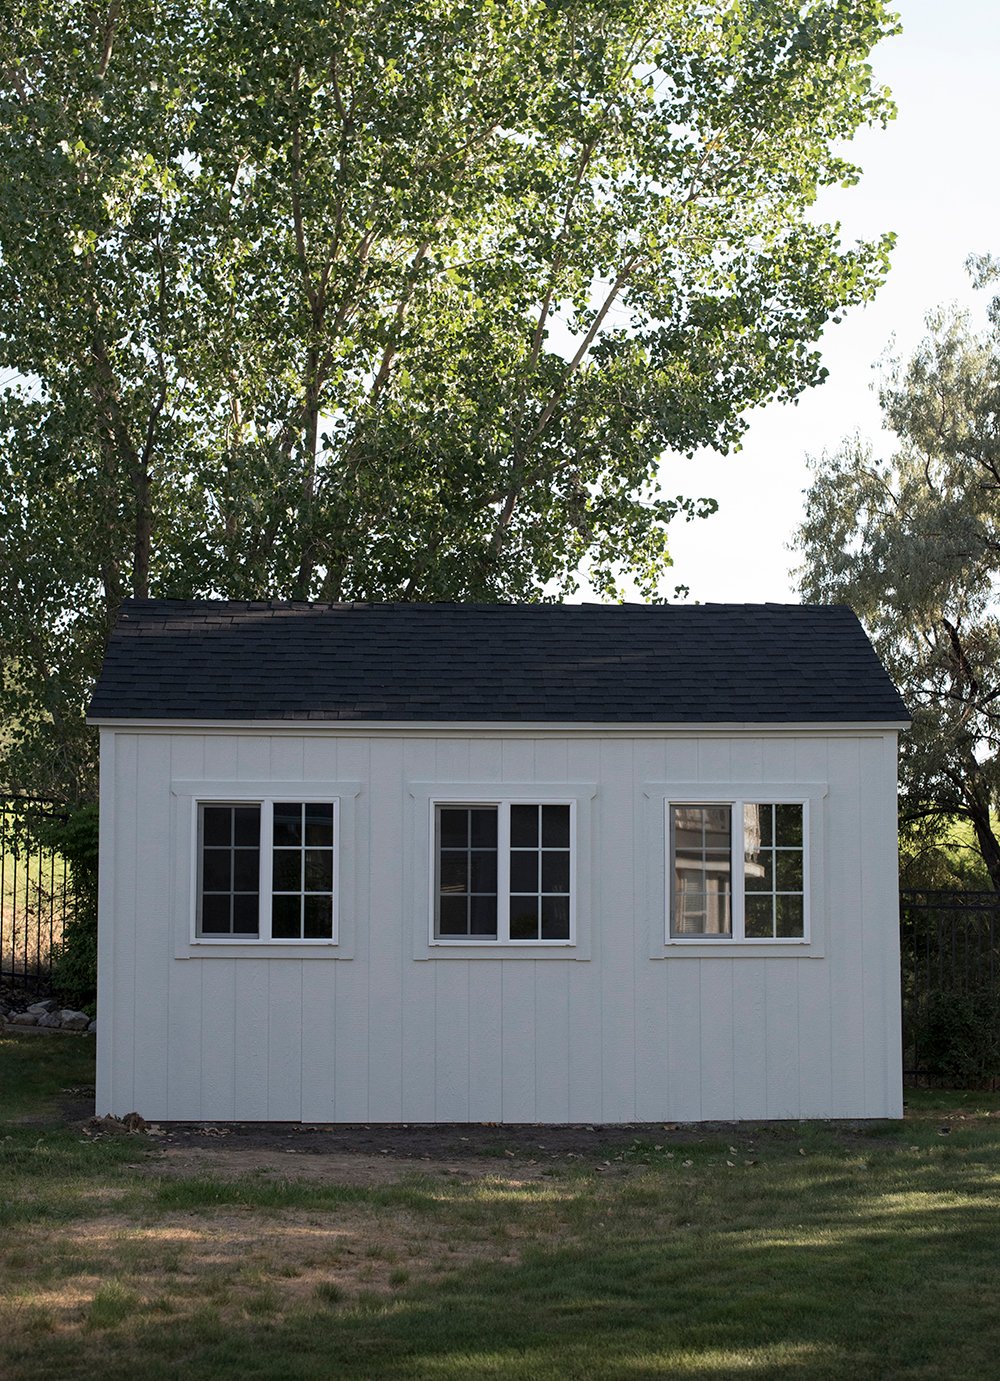
 Next, we painted… you can see that process in this post! We used a new paint product from Sherwin-Williams called Rain Refresh– which is a great exterior product that self cleans. This will hopefully keep our off white shed paint looking crisp and clean!
 My vision really started to come together when Emmett began landscaping! He is really great at that, by the way. I need to convince him to write more landscaping posts (check the archives for a few good ones, if you’re interested)!
 I planted the flower boxes, and we waited for the grass to fill in. Everything came together really beautifully, and this project took exactly two months from start to finish. From the design plan to the final landscaping, I actually thought this project moved pretty swiftly- despite the fact we worked on evenings and weekends, after our “regular” jobs.
COST
Our total cost was around $7,500 (with everything). If you’re hiring a contractor to build this- your total cost might be anywhere from $9k – $12k with labor. Obviously if you opt for the DIY route, you’ll save money doing the work yourself.
 Please let me know if you have any questions about this project in the comment section below! You can check out my initial design plan and before images here (some things definitely changed), catch the reveal tour here, and a bunch of landscaping posts here. Someday, we’d love to add a paver patio or sidewalk that connects to our driveway and makes the shed feel even more intentional. For now, I’m happy we have additional room in our fenced backyard, a functional shed for storage, and a beautiful, intentional side yard. Did you enjoy seeing the process and evolution of this project? I hope so! It’s crazy to think a couple months ago, this didn’t even exist.

Why is there no video of you driving the tractor?! As usual, you make everything look doable. It really does look so charming and intentional; that’s saying a lot for a shed. One detail I couldn’t find was the dimensions. If I counted studs correctly, it’s about 12 by 15? Did you make it the same or bigger than the existing shed had been? I love the idea of a loft for added storage; why waste valuable real estate? When you guys get around to removing the concrete pad in the backyard, I definitely want video of you with the jackhammer! (I assume Emmett knows a guy…with a jack hammer.🤣)
I hope everything is going smoothly in the guest bedroom! Still anxious to see that beautiful green…and the moody, Oregon coast-inspired touches!💜💚💙🖤
Haha!! That’s because I’m always the one with the camera in my hand or responsible for taking the videos. Laurie Anne was actually here visiting when I was driving the tractor for the concrete and she was also surprised to learn I do these types of things (because you never see it on IG). lol! As always, thanks for your kind words about the shed. We’re really pleased with how it came together :) Your math is impeccable! It’s just over your guess… almost 12 x 16. In comparison to our previous shed, it’s slightly larger (1 foot in each direction). I think the pitched roof makes it look much larger though. I feel like the concrete pad removal might happen next year, BUT- I’ll be sure Emmett gets some video of me jackhammering. Ha! You’re totally right- we do know a guy who will let us borrow his. We’re currently trying to get grass seed to take off surrounding the concrete pad, and have resorted to fencing it and pushing furniture haphazardly around the area, because Crosby keeps messing it up and trying to eat it. Crazy dog! I feel like the grass will never grow. The guest bedroom is coming along! This weekend it will really start to take shape with everything painted- can’t wait! Have a great Wednesday! xo
Love the shed Sarah! I am in the design process for our shed and you have definitely given me some awesome inspiration 😍
Like Peggi I couldn’t find the dimensions of your shed, I’m trying to figure out window sizes and styles to use as ours will be an 8 X 12 but I’m pretty sure your shed is much larger. I’m hoping I can get access to similar finishes but our selection in Canada is limited. Thanks for all the details you have provided and cheers to another fabulous project 🥂
Thank you, Colleen! I love hearing that. Sorry I missed adding the dimensions- it’s 12 feet x 16 feet. Luckily, we had plenty of space for a larger shed to accommodate our needs, but the design would probably work for a smaller option as well (perhaps 2 windows, instead of 3, etc). Fingers crossed you’re able to find the finishes you’re looking for in Canada! Hope you’re having a beautiful week :) xo
Just a note to anyone planning to build a shed or have a shed built — be sure to check your local building regulations. For example, in my town, a shed is defined as “an accessory structure not greater than 80 square feet used for the storage of tools or equipment.” Anything that fits that definition is good to go without any permitting. But anything bigger or with different intentions (such as a guest house or something) would fall under different zoning regulations and might not be allowed, so it’s always good to check first! We were planning to visit the local shed showroom the weekend that everything shut down for the pandemic, so maybe next year on our shed!
Yes! Such a great point, Deborah. In our area, most building codes allow sheds less than 200 sq.ft. with no permit. You should definitely check prior to building! Our shed is 12’x16′, so it was just under the regulation (192 s/f). Always a smart idea to research first- thanks for bringing that up! Fingers crossed you’re able to get your shed next year :)
What are your thoughts on the necessity of the concrete pad? Could you just build it on top of treated lumber?
Concrete is definitely the most durable and permanent option (but it’s also labor intensive and higher cost)… there are other types of shed floor / foundation options you could choose as an alternative: gravel, pavers, blocks, skid, plastic, piles (if it needs to be elevated), lumber, etc. Some shed manufacturers even have floor / foundation kits you can buy. It totally depends on your area and what look you’re going for.
What’s crazy is to think this project took two months, because it sure felt way faster than that!!! I was astonished at how quickly this came together, and am still envious of your gorgeous shed. I love your breakdown posts because it really helps capture the full scope of the work. You both did a lovely job on this, but I would love to see an interior organization post! I love that you incorporated the loft portion- so functional! I hope you’re having a great week Sarah!
Yeah! I feel like it went pretty quickly on our end, too. Per usual, we opted to tackle an outdoor project in the dead heat of summer. Remind us not to do that again. Haha! I’ll have to work on an interior organization post. We honestly don’t have it organized that well yet, because we quickly shifted to finish our guest room. I’m thinking Emmett will get around to installing peg board and organize it this fall once the weather is cooler (for good). I’ll be sure to share once he does! I hope you’re also having a wonderful week, Lauren :) xo
You two are the DIY couple! I thought you bought a ready-made or built shed and put it together but designing and building it with windows, etc. Great job!
I want to drive that tractor! Heck I want to move out with some land so we have a polaris or tractor! Ha! In all seriousness, your shed is awesome! The outdoor solar lights still blow my mind and the landscaping layout was meant for the space.
I laughed when I read that you are trying to block off your area to grow grass…this is us every spring when we put in a new bed or trying to grow grass. Love the challenges of dogs. Have a great day!
Haha! Thanks Danna :) The tractor really is fun! Emmett & I both grew up on farms, and someday we’d love to get back to our roots and have land (complete with horses and tractors). Thanks for your sweet words about the shed. We’re both happy with how it turned out! Ohhh yes- the challenges of dogs. We bought this product called GroTrax– basically you roll it out, water it, and grass grows. It turns out- the dogs think it’s absolutely delicious. Luckily, it’s biodegradable and they were fine after snacking on it, but our yard looks crazy with all the furniture pushed around “fencing” it off. Ha! We should’ve just spent the money on sod again. Yikes. Hope you’re having a good day too :) xo
I have to say, I’m in awe of your (and Emmett’s) ability to do all of this yourselves. I’ve been following for about a year now – ever since I found your beautiful kitchen on Pinterest – and I honestly think my favorite posts are these that show the work that goes into it and the cost of the project (along with how much you save by going the DIY route), instead of just the pretty pictures of the reveal. It inspires me to tackle some home projects myself, even though I’m far less skilled than you two! I get all these big ideas of what I want to do, but I’m terrified of screwing it up and costing ourselves even more money. Any advice on how to get over that fear?
A handy husband like that has to be a real treat to have! :)
Haha! Emmett is awesome. I’m lucky he enjoys projects and can bring my visions to life :)
Great Job! as always. I cant find details on the french doors?
Thank you, Rick! The french doors are linked in the post :)
Hi Sarah, it looks beautiful! Especially the finish details like lighting and landscaping that are so often overlooked.
I didn’t see any info on the trim prices you used-would you mind sharing? I’m having a hard time figuring that out for my own shed. Thank you!!
Thank you so much, Amy! Oops- I totally forgot to include the trim pieces… I just added those to the post, but you can find it here: https://bit.ly/2F5rpyU It’s the same LP Smartside material, just in individual / different sized pieces. Sorry about that!
Thank you! I appreciate it so much!
This is amazing, so beautiful! I’m entirely curious about the concrete truck. I didn’t even know it was an option to bring in a truck but do the work yourselves. We are wanting to concrete the bottom of our small barn. Do you know roughly how much it costs to obtain just the truck vs the crew coming along? Great info!
Thank you, Sarah! Yes- they actually brought the entire concrete truck (with the revolving drum). However, they can’t drive it on your driveway because of the weight (it would’ve cracked our concrete), so we used wheelbarrows and the tractor bucket to transfer the concrete from the edge of our cul-de-sac to the shed pad at the back of the yard. Unfortunately, since we did the work ourselves, I’m not sure how much extra it would’ve cost for labor from the crew. We just worked with the delivery driver- he stayed in the truck the entire time, filling up our buckets as needed with the mechanical slide.
I just realized you probably meant they brought you a truckload of bags of cement and you guys mixes them all yourself and poured. I totally took that the wrong way and thought they brought in an actual rotating concrete truck that they let you scoop from yourselves, that’s why I was shocked. Oops!
Did you draw the plans up for this yourself or have someone do it for you? This is STUNNING
Thank you, Rachel! I did the plans and my husband built it. A few years later, we still love how the shed looks and functions!
Hi! Did you paint trim the same color as the body? Thanks !
We did, Sheila!
Hi Sarah,
I really love your shed design and it’s perfect size for my backyard, have you shared the design plans before and open to selling it?
Thank you
Lovely! Can you tell me where you got your window boxes?
I know this was posted several years ago, but I’m in the process of designing my shed to build in a couple of months. Do you or your husband happen to know the roof pitch? I’m leaning towards a 7:12 roof, but I’m having a hard time visualizing this. Any insight would be appreciated!
Hi Jeremy! I’m sorry- I wish I remembered the pitch, but I tossed out my initial sketches and renderings.
6:12! I sent Emmett out to measure. Ha!