Designing Our Shed (+ Some Readymade Options)
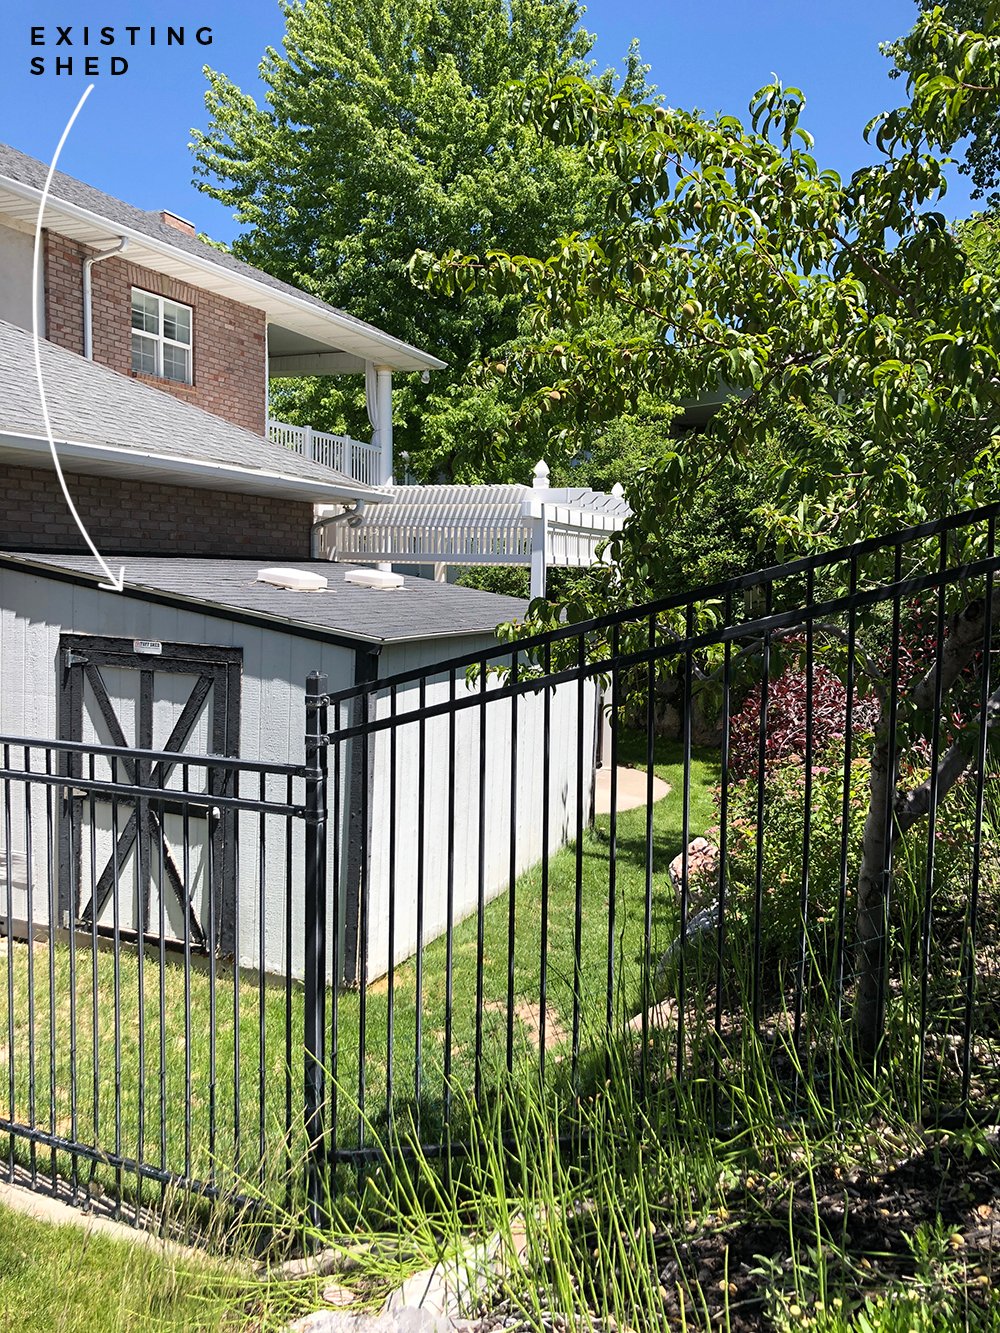
 If you follow along on Instagram, you probably already know (via stories) that Emmett and I are in the beginning stages of a shed build. This project was honestly a spontaneous one. In an effort to gain more green space in the fenced section of our backyard (gotta make the doggos happy), we decided to move our existing shed to another location in our yard, outside of the fence. After talking through the logistics, we decided our existing shed is pretty old, is beginning to show wear & tear, plus it’s not super aesthetically pleasing to begin with. Since the ideal location for the shed is at the back of our yard, with plenty of negative space (aka- all eyes on the shed because it’s no longer hidden), we decided building a shed that better fit our style and needs was probably a better idea and good investment. Click through to read all about it, check out our progress so far, see the rough design idea I came up with- and if you’re in the market for your own shed, I gathered up some readymade options as well.
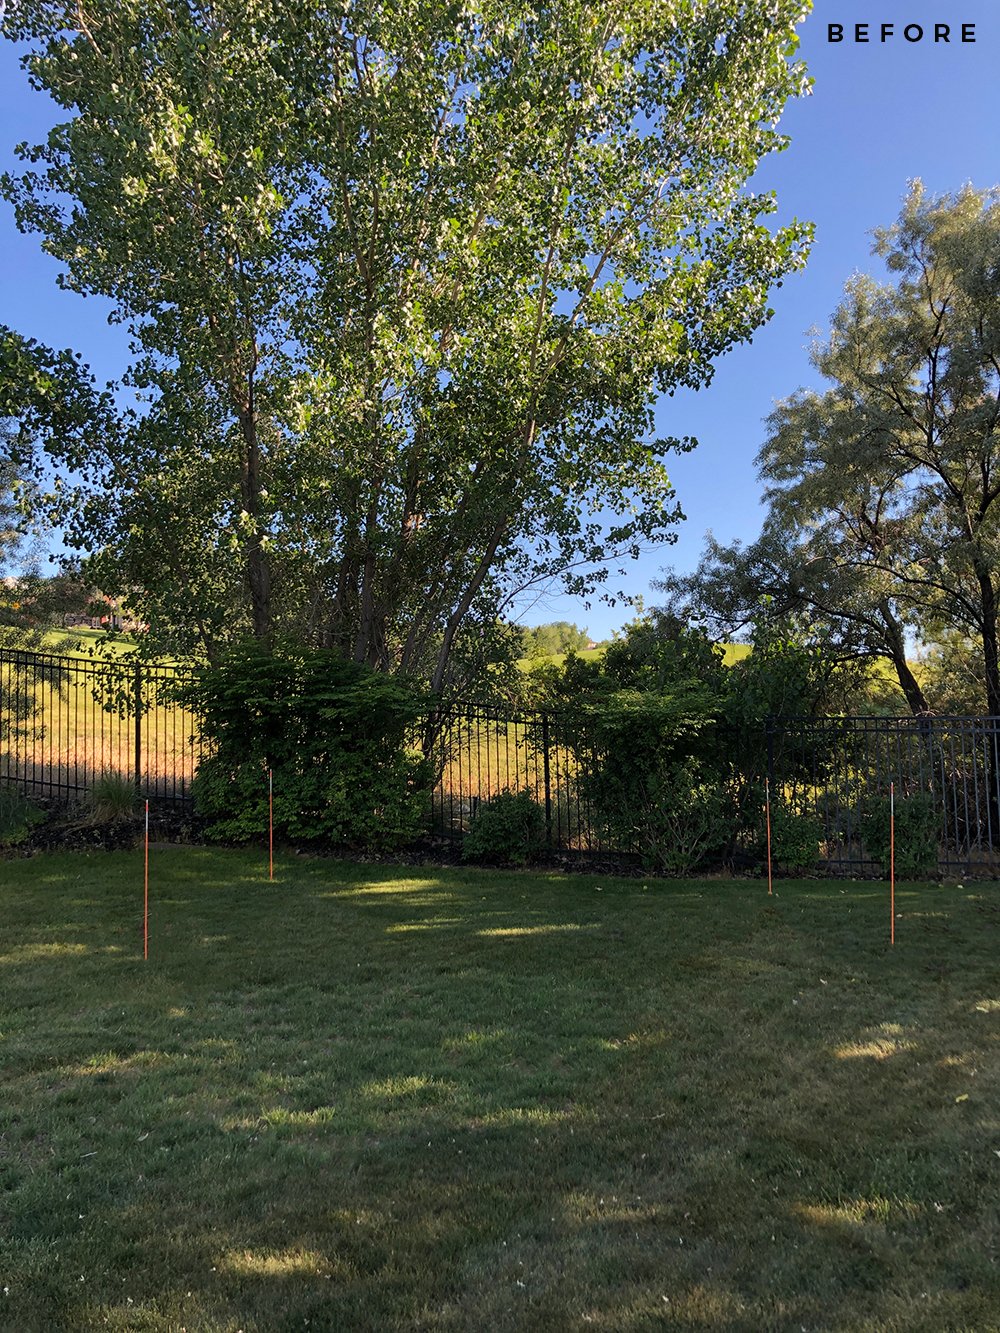 Funny enough, I was talking to the homeowners who built the house (and installed the existing shed), and their daughter mentioned it never fit quite right and always felt awkward stuffed into the fenced portion of the yard. Check out the image below to see how our setup currently looks. I know it will make our yard look much larger and will be better use of space.
 Here’s the plan… build the new shed over the course of the next month or so, lay a paver path, and landscape around it to make it feel like it belongs at the edge of our property. We don’t want it to feel like an afterthought (even though it was exactly that). Once the new shed is installed, we’ll be removing the old one, and will install sod in its place!
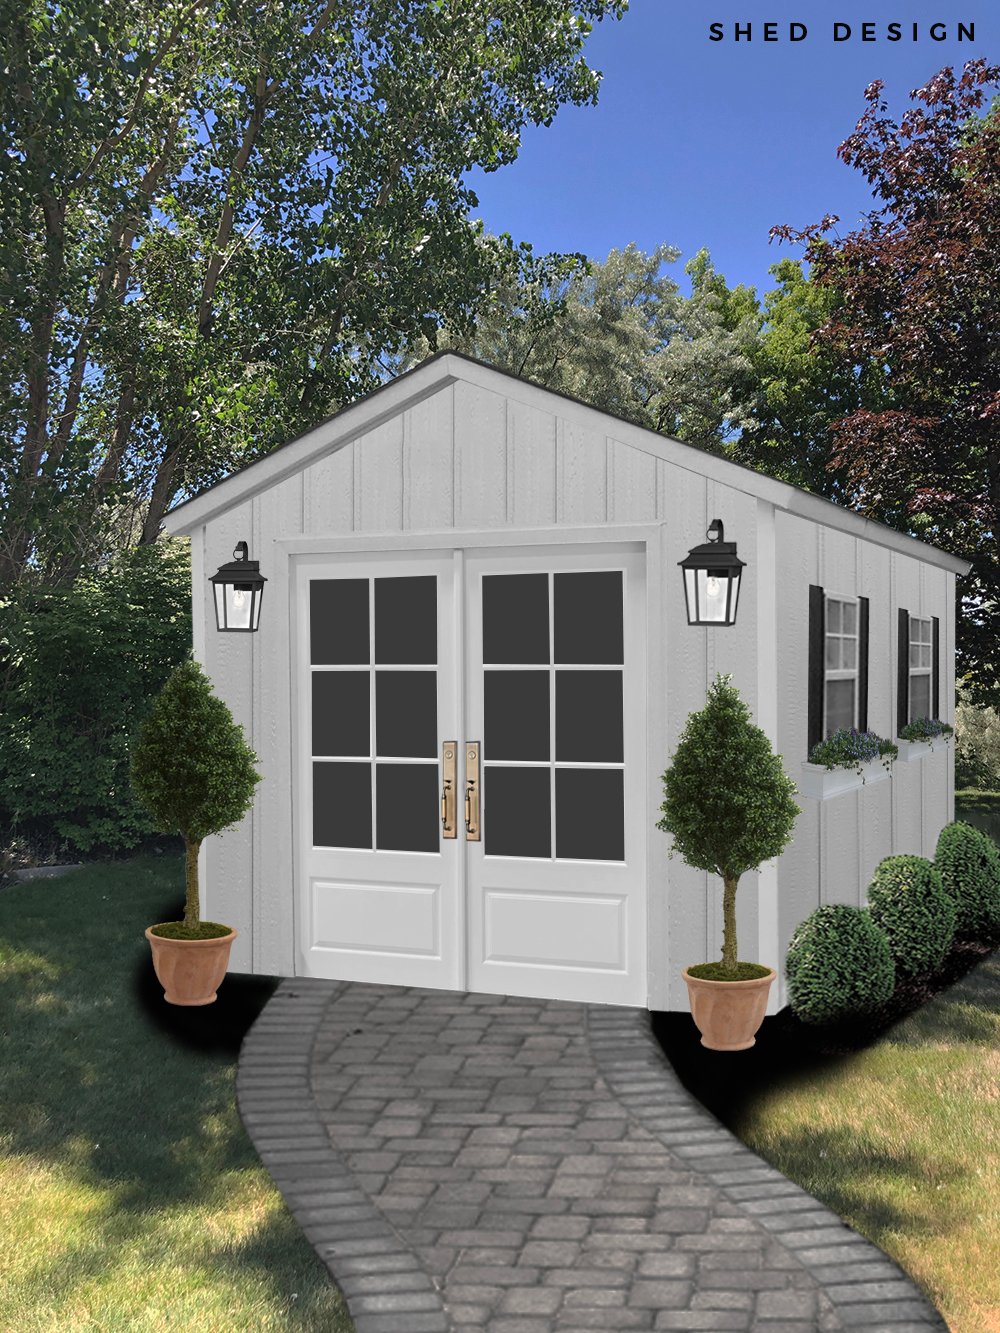 As for my quick design plan, sheds aren’t something that really excite me (go figure!), but Emmett is really pumped about this project. We honestly use our current shed all the time. It houses garden, patio, and seasonal items… as well as landscaping tools and equipment. I wanted to design a shed that felt cohesive with our home exterior (or at least our future plans for it), met Emmett’s size requirements to store all our aforementioned items, and felt integrated into the landscaping. This is not a “she shed”, studio, or any type of fancy living space… it’s strictly for outdoor storage, so we didn’t want to make it too over the top. We’re also doing this on on a budget, so we tried to stick with basic materials. Obviously things will evolve as we get into the project, but for now- this gives us a good starting point. We’ll also add gutters, figure out better landscaping, and really try to make it feel intentional.
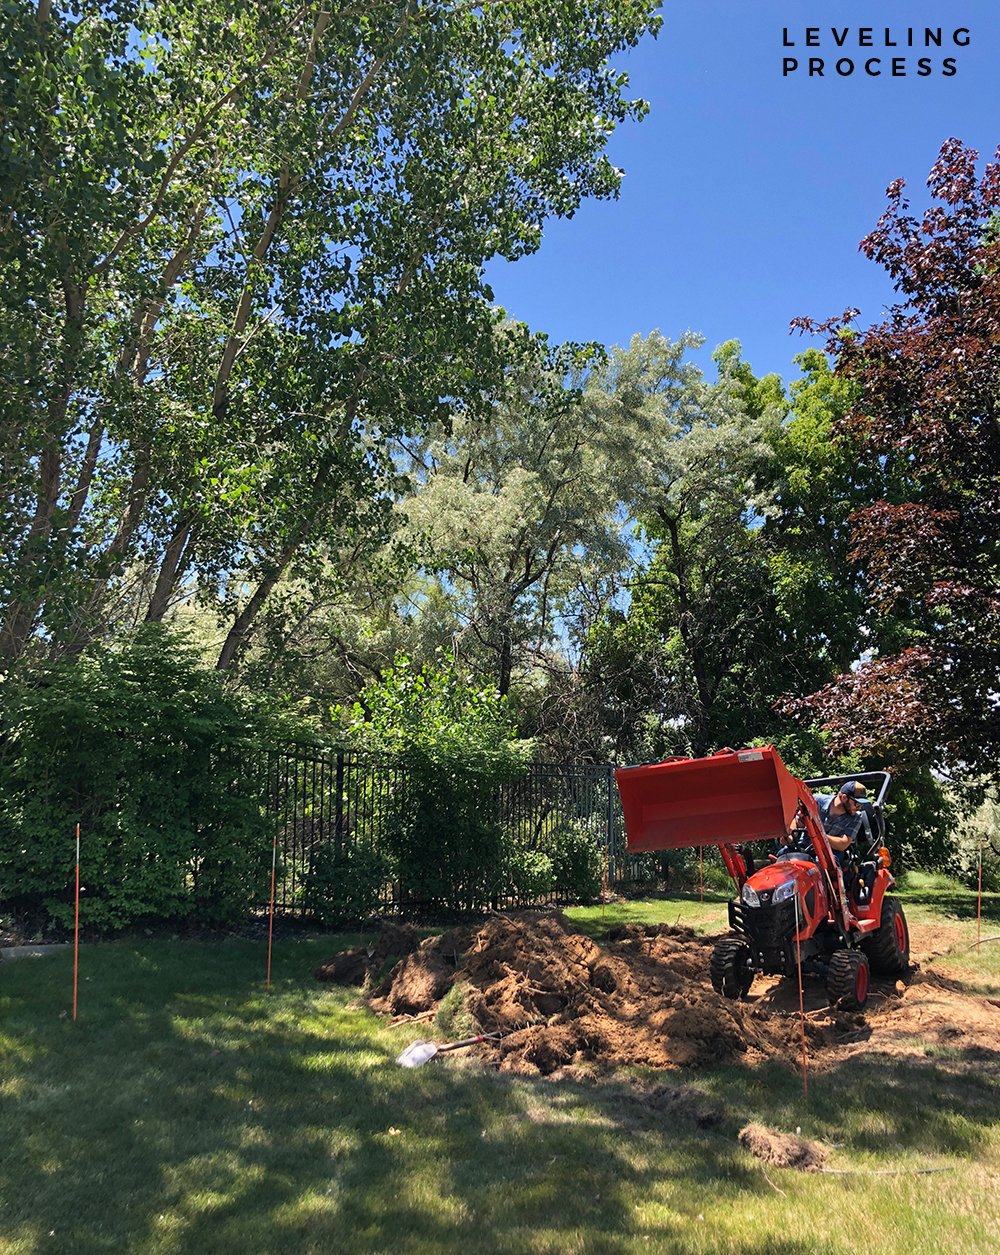 Emmett marked everything and has started digging and leveling the ground. Next weekend, we’ll pour the concrete pad that it will rest on. Can you tell this was totally his idea? I think he just likes playing around on the tractor… and here we are- building a shed. Haha! Although I’d rather be working on interior projects, I know this will actually be really nice once it’s finished and will make our fenced backyard feel so much better. It’s all good!
If you’re in the market for a shed, I had no idea there were readymade options you can buy online?! It’s too bad I just discovered this before he started digging. They come in all price points, but you’ll have to use your imagination for the color… many of these could be painted in a really nice way! Visualize some landscaping, exterior sconces, and a neutral paint job- and it just might fit your exterior and budget. Hope it’s helpful for someone- especially if you’re not interested in taking the total DIY approach, like we are.

Hahaha. A Man and his Tractor. Whadda ya gonna do? Honestly though, that photo reveals the current awkward use of space. An expanse of lovely green will be much better! While I can’t get too excited about a shed, I know you will maximize the design factor.😎 For instance, are you really going to use doors with windows and fancy hardware? Will Emmett run electricity for exterior lighting? Even though you’ll use it for storage, your shed seems like it will be nice enough for other potential uses. Landscaping will be fun too! I can’t resist new plants.🌿. Now that I think about it, maybe this IS a little exciting! Hopefully, the temperatures won’t be too brutal for all this outside work. I think we’re finally hitting the 90s this week for good.🔥 Here’s to a lovely week!💜
Right? It’s not even our tractor! Now he is insisting that he needs a “dump trailer” since we rented one. Haha!! He’s not winning that battle. Isn’t that side of the yard awkward? The existing shed is seriously sandwiched between our house and the boulder retaining wall. It’s tight. If I’m being honest, I’m not that excited about the shed either, but I am excited for a better use of our yard… so I’m on board. It’s not a bathroom or office renovation, but I’ll take it. Haha! The weather here has been wonderful lately… mostly 70s and 80s. Cheers to a great week ahead :) Loved Joe’s photo today… and YOUR LAMPS. xo
We had been planning to go to a local shed showroom back in March, but then that was the week that everything went nuts (NBA and baseball cancelling, my office moving to work from home, etc.), and we’re just going to wait until things have calmed down a bit for our shed plans. Our lot is on a hill, and we’ll definitely need the professionals with real equipment to do things like dig an electrical trench and level the upper area above our retaining wall for the shed to sit on. The main reason we want a shed is that because of the hilly lot, our garage is basement level, but the yard is first-floor level, which means we have to carry the (battery-powered, so not as heavy as a gas-powered) lawnmower up the stairs whenever it’s time to mow the lawn. An eventual shed will be great!
Ugh, the timing. I’m sorry Deborah! I think you have the right idea in waiting until things calm down a bit before proceeding with the shed plan… especially if yours requires professional help. I could definitely see how having that storage on your lot would be really helpful! Carrying the lawnmower and heavy equipment upstairs certainly isn’t ideal. Hopefully you’ll get the shed soon and won’t have to deal with that anymore :) Have a great week!
I’m into the shed! Your design plan looks incredible, and honestly, I think it will look fantastic. I never knew there was more to your yard; I just thought it ended at the fence. How great for the dogs, and the house!! We need a new shed as well. Ours sits at the back of our lot; bordered on the backside by the fence, and the block wall on the left. Unfortunately Jeff was in a hurry to get it up, and didn’t remove the shrubs in front of the wall…now they’re overgrown and the shed looks like it’s in the middle of a jungle. We plan on tearing those shrubs out, and getting a new shed, probably next spring. My problem with ready made sheds is that they all have the same aesthetic. They’re either all basic, or they fall into the same architectural aesthetic if they’re better than basic. I feel like there isn’t a shed out there that will fit with a Mediterranean home and look cohesive. So I eventually give up the search. Lol. It doesn’t help that Jeff has his heart set on one that looks like a barn🤦🏼♀️🤦🏼♀️#icant 🤣😂Yours will definitely add aesthetic to your house and give so many more benefits. I can see why Emmett jumped the gun! Can’t wait to see the end result!
Thanks Lauren! Isn’t it strange how the fenced section splits the yard? I’d love to rip that out and fence our ENTIRE yard because we have even more lawn on the other side of our house. I feel like it’s a missed opportunity, but also very expensive to adjust the wrought iron fence at this point. Maybe we’ll tackle that in the future. Having a shed is really nice though! You’ve got the right idea- putting yours at the back of your property (even if it’s jungle-y). Sheds are pretty boring and basic (Emmett would also like a barn / shed… eye roll). What is it with husbands and weird design choices like that? haha! I wish you could do a terra cotta roof on your shed… more like an out building instead of a “shed”. Hope your week is off to an awesome start :) xo
Holy cow, you just gave me ideas!!! I never even considered the option of doing that, but now I’m all-in!! And if I build my own I can trim out windows that look similar to mine, and have a beautiful warm wood…ok, I see why Emmett is excited!! You had me at terra-cotta roof! 😂🤣
Woohoo!! That would be so beautiful! I want a Mediterranean or casita style home, just so I can have a terra cotta roof… someday, maybe! ha.
Hahaha!!! I went down a pinterest rabbit hole…and then I mentioned this to Jeff, and he’s totally on board! We’re both scheming in our heads. Thank you for giving us the idea!! We would have never thought of this, and we likely would have ended up with something we both felt wasn’t right for our home. Now I’m super excited!
YAY!! Best news ever :) Can’t wait to see the end result someday.
As soon as I read, Emmett and I are in the beginning stages of a shed”, the commercial popped in my head (and can’t get it out) of Sheryl’s She Shed. I am sad it will not be Sarah’s She Shed! Ha!
With Emmett’s engineering and building skills, and your design and creative eye, this will be a great addition to the backyard and one you will use many many times. Have fun building you two!
Hahaha!! So funny. This is definitely Emmett’s project. I’m more excited to finish the guest room, but having the added storage and free yard space will be amazing! I hope you’re having a good week and had a restful weekend, Danna :) xo
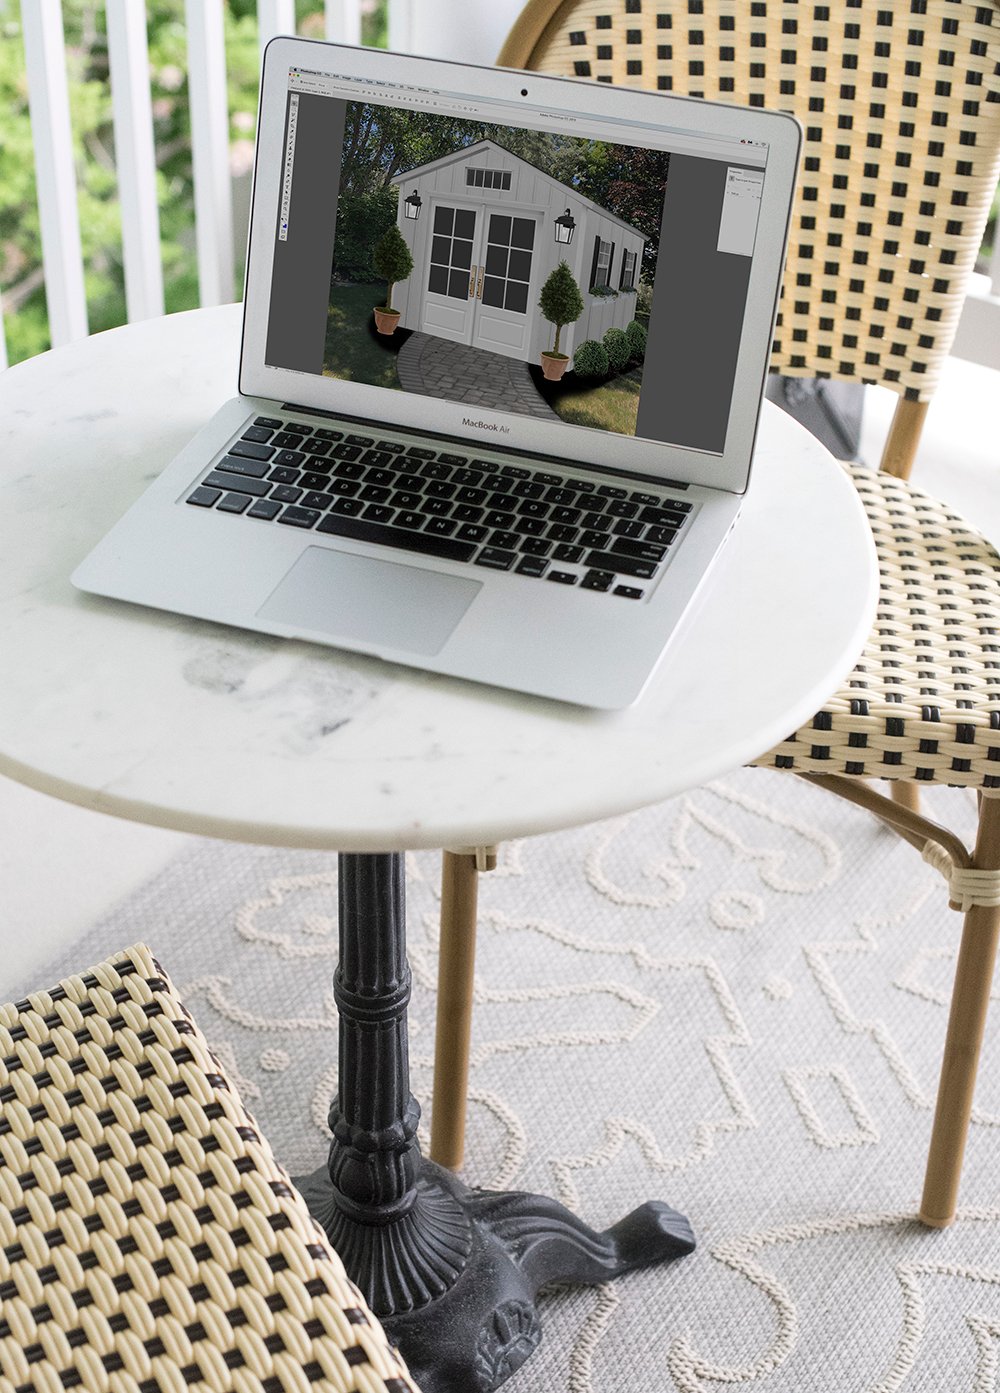
Love the design for your shed! I’m excited to follow along and watch the process! How did you create the beautiful rendering? Looks amazing, I can’t wait to see it all come together!
Thank you, Anne! I did the rendering quickly in Photoshop (for the sake of time). It’s not to scale, but it’s close-ish. Have a wonderful week :) xo
Looks lovely! Who knew a shed could look like a little cottage?
Sarah I know you have discussed this before, but would you mind sharing the software program you used to design the shed?
Thank you Leslie! I just used Photoshop for this one because I was in a hurry (and not as excited about the shed as other projects, haha). I have some video tutorials here on the blog, if you’re interested :)
Thank you Sarah! I will check out the tutorials! You did such a nice job with the shed that I want to learn. Certainly gives an excellent proximity to the real life result.
Thank you so much! xo
Your shed design is lovely! Going to look really beautiful in the spot chosen 👍 We are in the same boat at the moment as we need a shed (as we don’t have one currently and only a single car garage 🙄) It’s has to be a she shed on the outside but a he shed on the inside 😉 given its location in relation to our new pool. It will be nice to have the extra storage but if we need to transform it to a bar in party mode I would like to have that flexibility. There is a local company here that will customize it to anything you want which is extremely helpful.
Can’t wait to see Emmetts handy work. Going to be great!
Thank you Colleen! I love your mentality, haha :) It really would be nice to have all of that extra storage for your pool and new dreamy backyard… and of course the option to be transformed into your party bar for serving & entertaining. What fun! It sounds like the local company is the way to go. I’ll keep you posted as our shed progresses. Have a great week! xo
If anyone can make a backyard He shed beautiful, it’ll be you, Sarah! Definitely doesn’t look an afterthought at all. I, too, thought your yard ended at the fence-those lucky doggies! Also, so cool you’re in touch w/ the previous owners. I would imagine they’re in awe of how “their” home is looking these days. Watch out, they may want to move back in! ;-D
Haha, thank you Anne! It will be really awesome for storage and I’m looking forward to gaining more green space in the fenced portion of our yard. Yes! I chat with the daughter (who grew up in our home). It’s pretty awesome to hear stories about the house back in the 90s and learn about this place. They’re a really wonderful family. Hope your week is off to a great start :)