My Home Office Lighting Plan (+ Lamp Makeover)
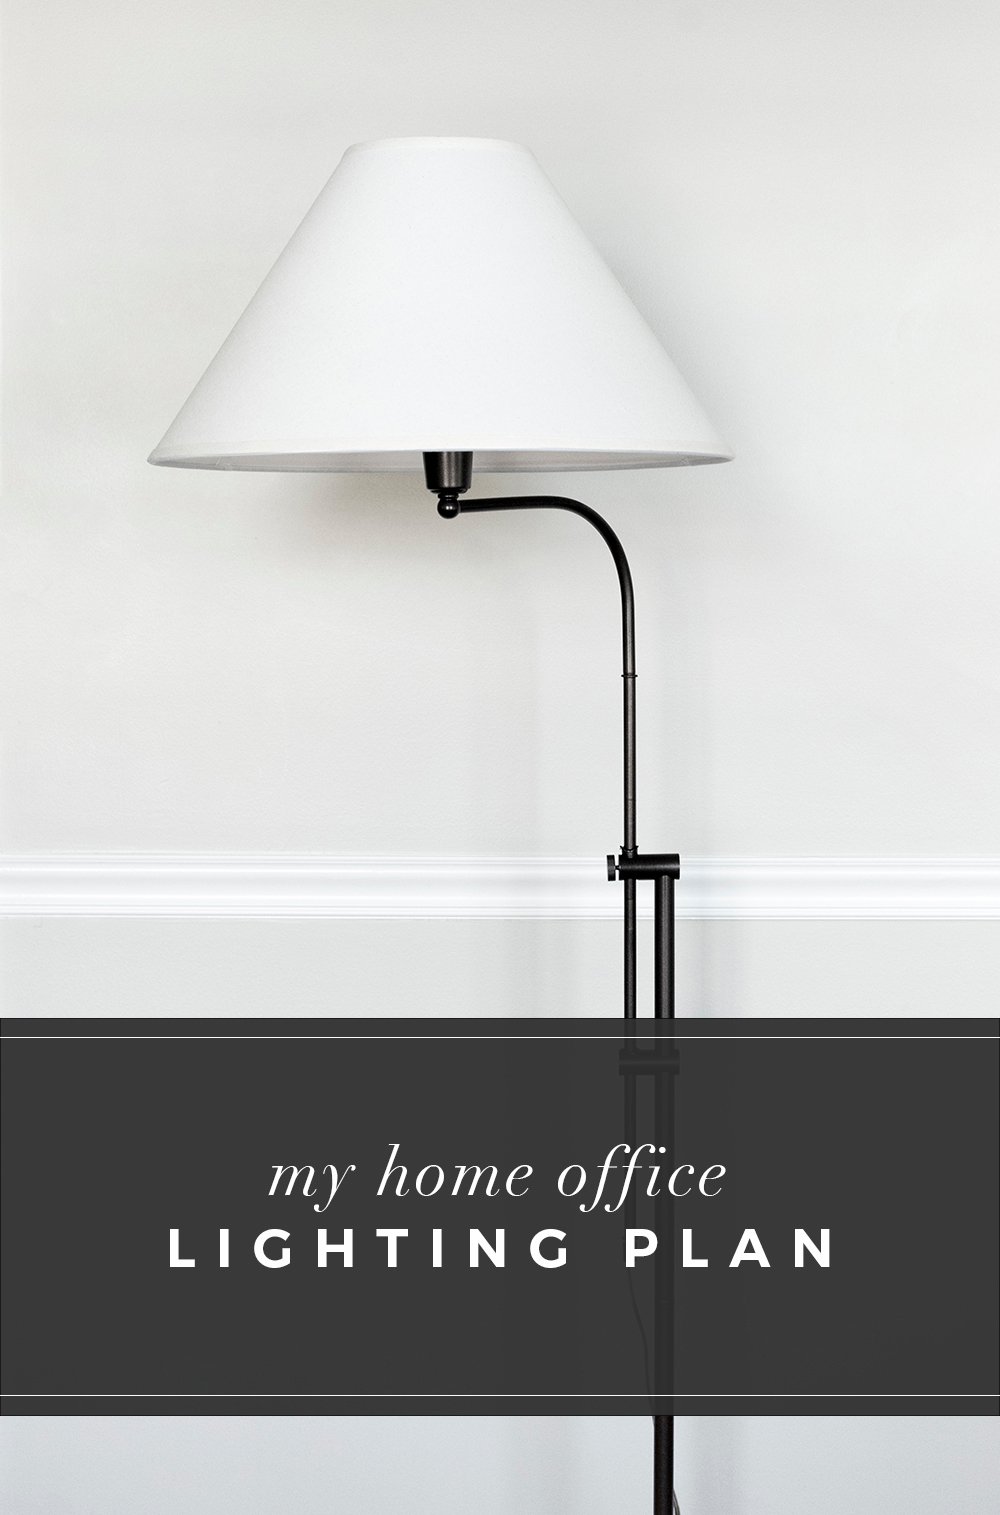 Things are moving right along with my home office renovation. Emmett has been making awesome construction progress, and I’ve been working behind-the-scenes to get everything ordered (lead times are kind of crazy right now). This week has been focused on ordering lighting for the space. Luckily, everything I ordered is in-stock, so fixtures should be to us within 3-4 weeks. Per usual, I did a little splurging and saving in regards to the lighting plan. You know I’m all about mixing high & low. Click through to check out my lighting design plan, as well as a fun floor lamp makeover. I feel like I’ve painted a lot of lamps lately, but this one might be my favorite yet.
*This post is sponsored by Krylon. All content, ideas, and words are my own. Thank you for supporting the brands that allow us to create unique content while featuring products we actually use & enjoy!
First up- the quick lamp DIY. I actually included this floor lamp in my Tips for Layering Lighting Like a Designer post, and couldn’t stop thinking about it. It fit the budget, but the color didn’t work with my office renovation vision. I’m guessing you can predict what happened next. I bought it anyway and painted it! It has a gorgeous designer shape with a tapered shade, and I feel like it looks far more expensive than it actually is.
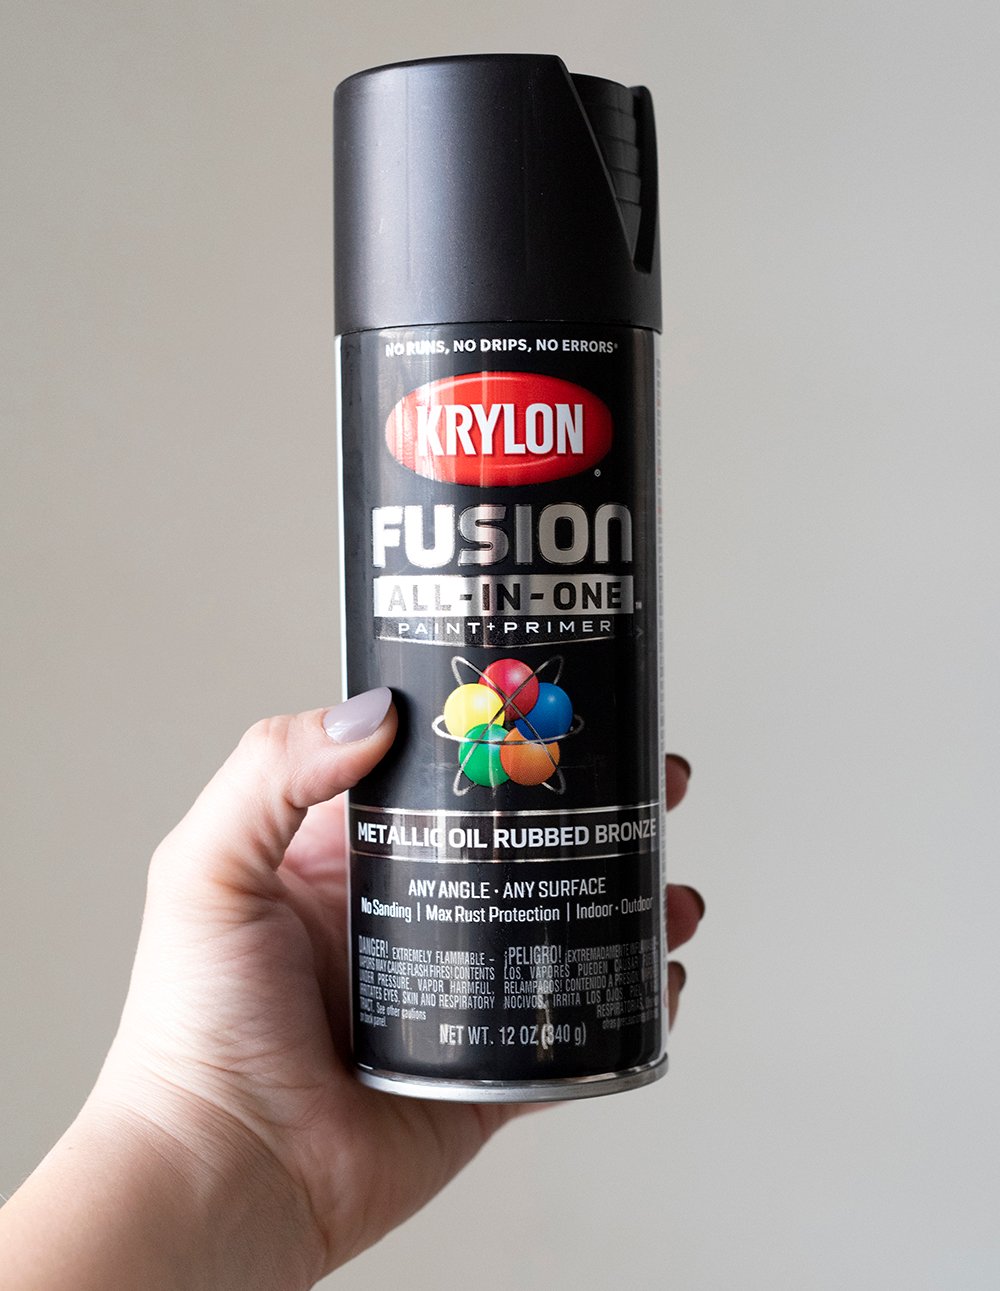
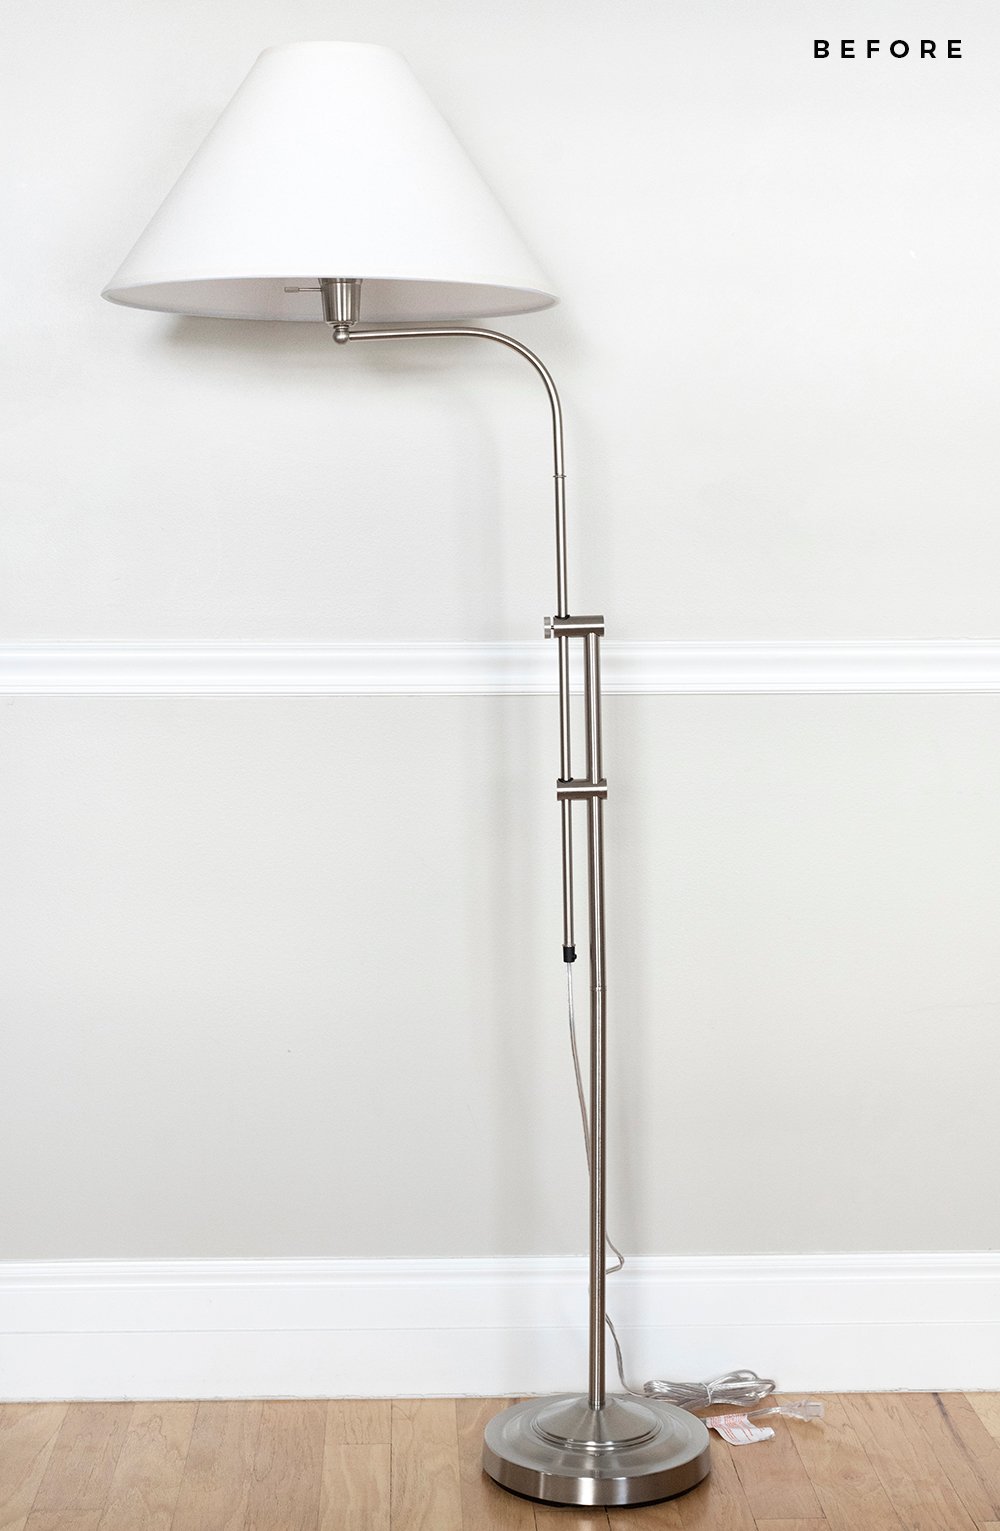 I’m primarily sticking with oil rubbed bronze fixtures, and antique brass. You already know it’s one of my favorite classic combinations, and that’s the direction I’m headed in my office. The only problem? Replicating a high-end oil rubbed bronze finish that looks convincing is easier said than done. I felt like painting the lamp matte black wouldn’t have that same metallic effect that nice, higher-end lighting usually has. I ended up testing a few different paints and landed on Krylon’s Fusion All-In-One spray paint in Metallic Oil Rubbed Bronze. The color is really good and I’ve used Fusion in the past and know that it’s super durable and includes rust protection. I also knew that it would easily bond to the surface without priming or sanding, saving me some time… so it was an easy pick!
 I sprayed (well technically I asked Emmett to spray for a couple of photos- insert man hands instead of my own) the lamp in VERY thin coats because it has a sliding mechanism- as in, the height is adjustable. I wanted to ensure the paint wasn’t so thick, that the slider would scratch into it. Spoiler alert- it still functions great and hasn’t scratched the paint… just apply multiple thin layers and be gentle when sliding, if you’re planning to tackle this project.
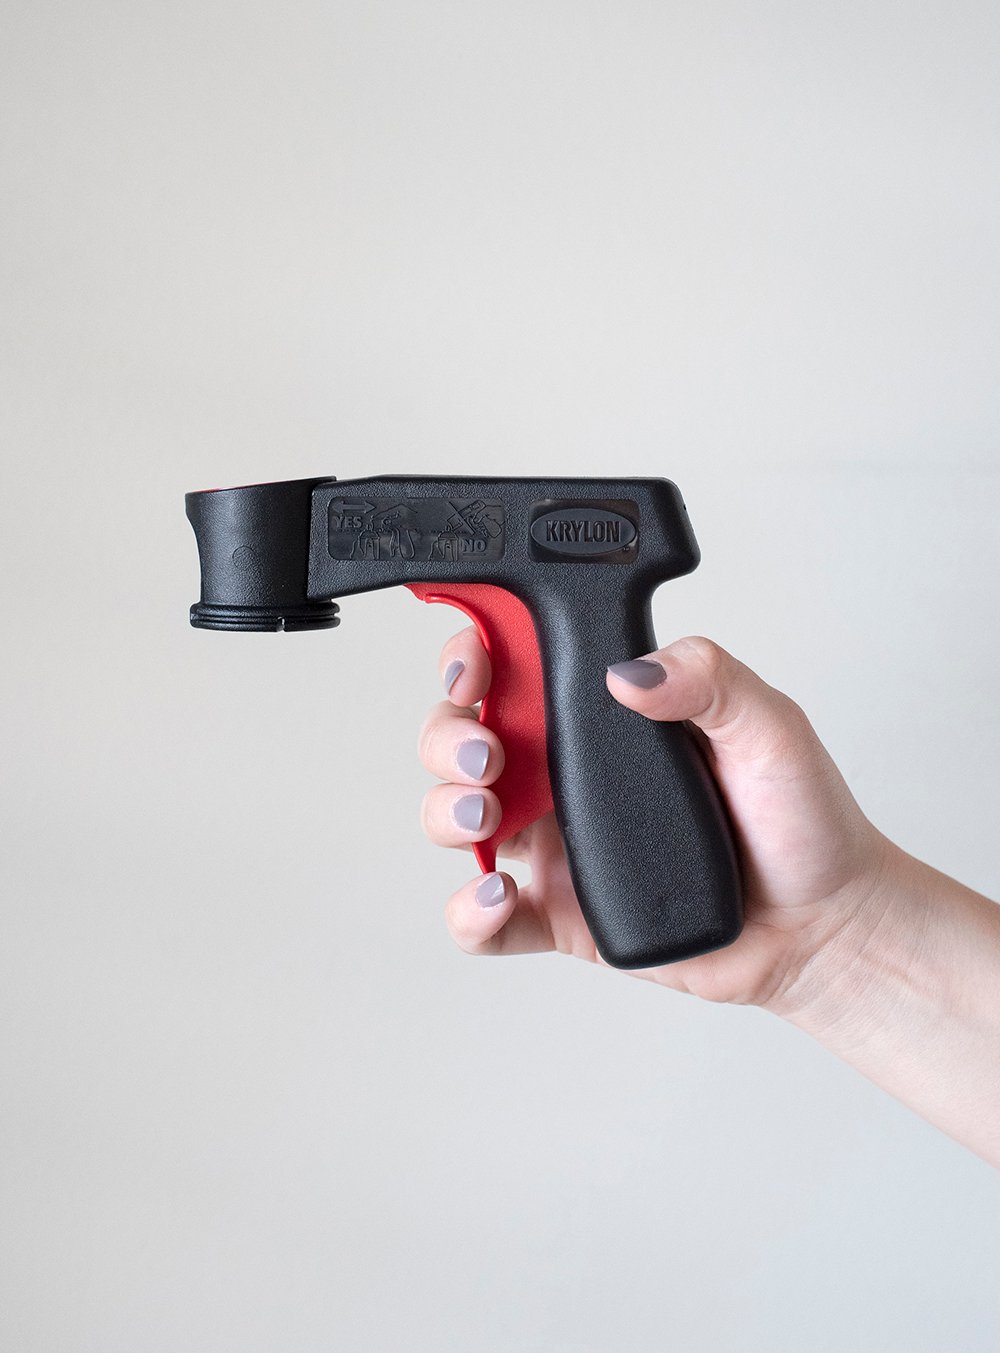
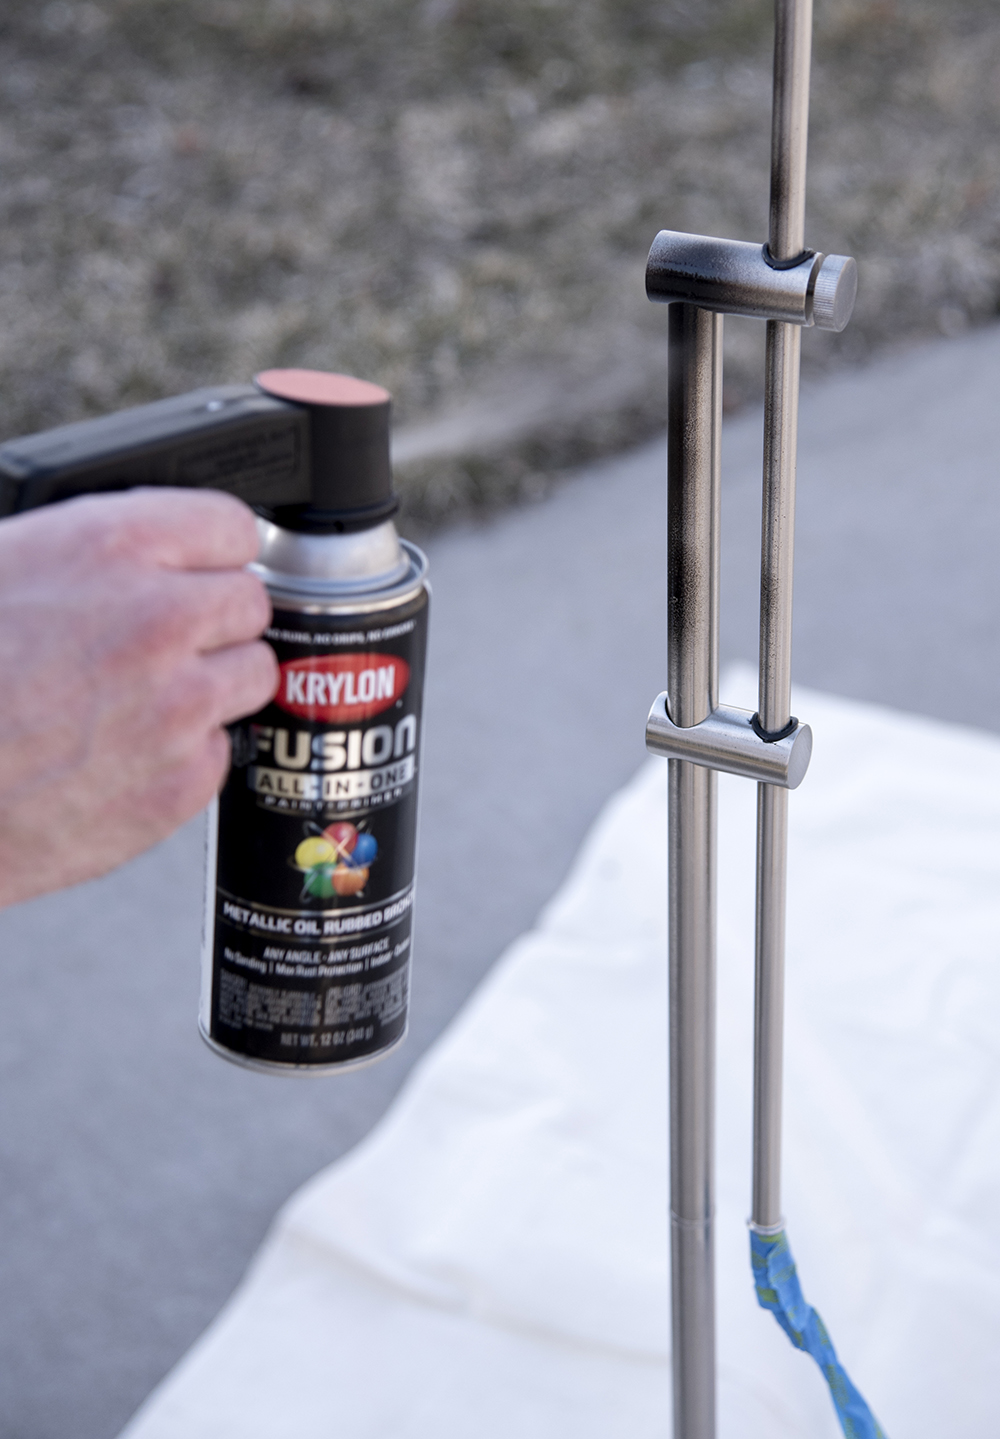 Another good tip for spraying thin, even layers… I refuse to spray paint without my snap & spray handle. Go grab one of these handy $8 tools and thank me later. It’s much more ergonomic, making it easier to spray consistently, without getting a sore index finger.
 Back to the paint- it’s a nice dark black, with a metallic bronze undertone… that looks just like oil rubbed bronze. It has some sparkly bits mixed in, without looking glittery or cheap. It just gives it that iridescent color that true metal light fixtures have.
 This is how the floor lamp looked after it dried! I’m really liking the high contrast, that helps to show off the thin shape and subtle curve beneath the swing arm shade.
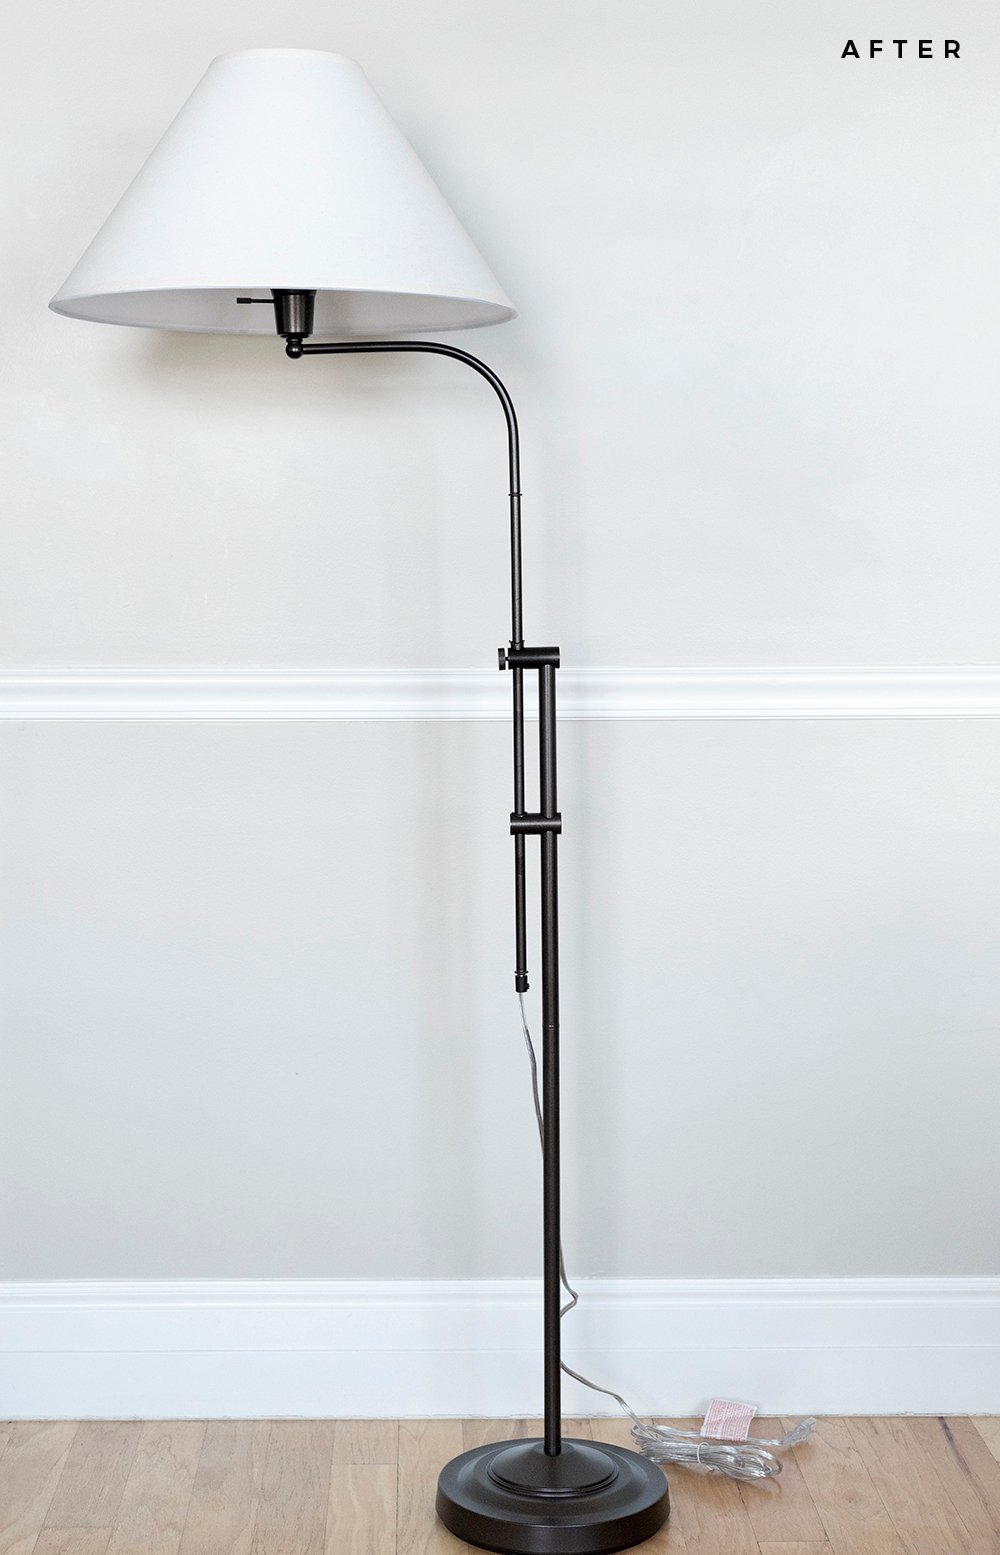 For $115 and a can of spray paint, I’m quite thrilled with the outcome. I think this will be perfect in my home office, although it’s currently living in our basement while things are under construction. Which version do you prefer?
 Ready to see my lighting design plan? I ordered a stunning chandelier that will hang above my desk, as well as some picture lights that will live on switches and act as sconces. This is how things are currently looking…

01: chandelier // 02: ceiling medallion (check out this post for an installation tutorial + more options) // 03: picture light // 04: task lamp (click here for the designer version) // 05: floor lamp (+ krylon bronze spray paint) // 06: plaster pleaded lamp DIY
This space had zero hardwired lighting when we moved in, which was kind of depressing given the amount of hours I spend in my office. I knew when working through the design plan, I had to incorporate overhead and wall mounted fixtures. I work late hours and I’m never motivated to push through when it’s dark.
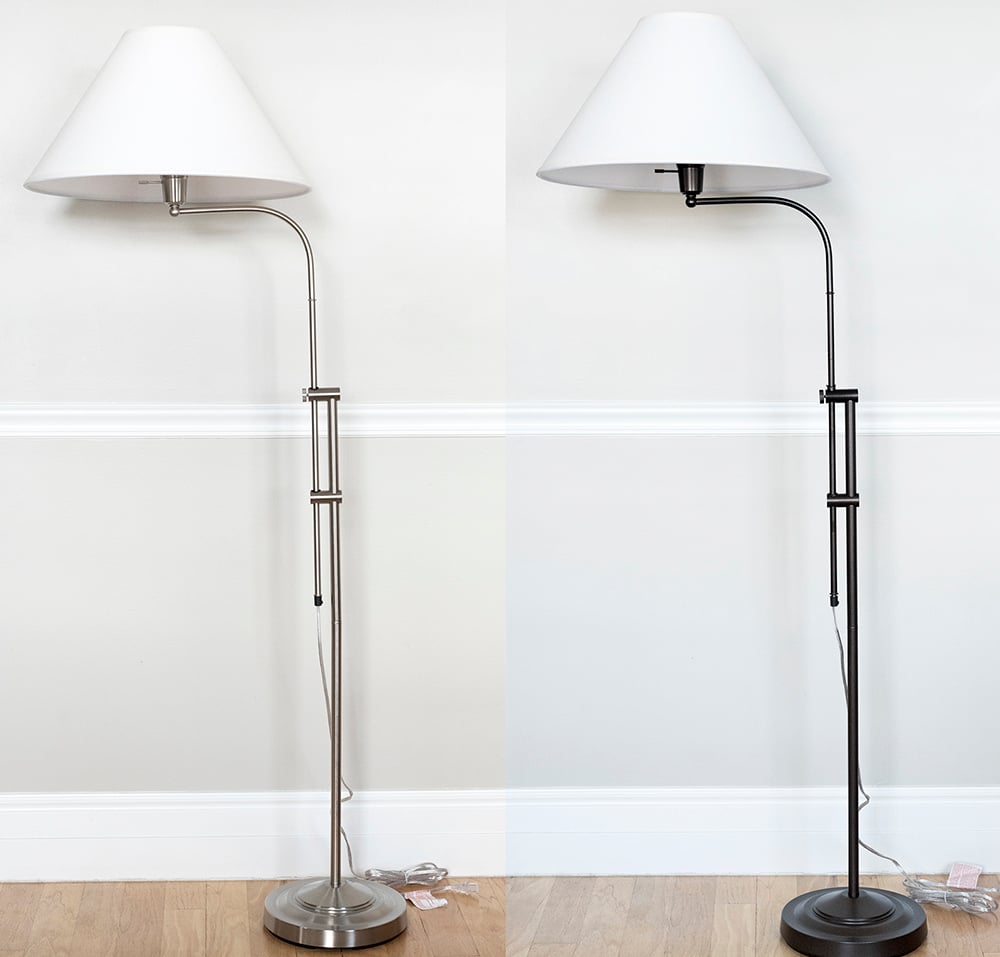
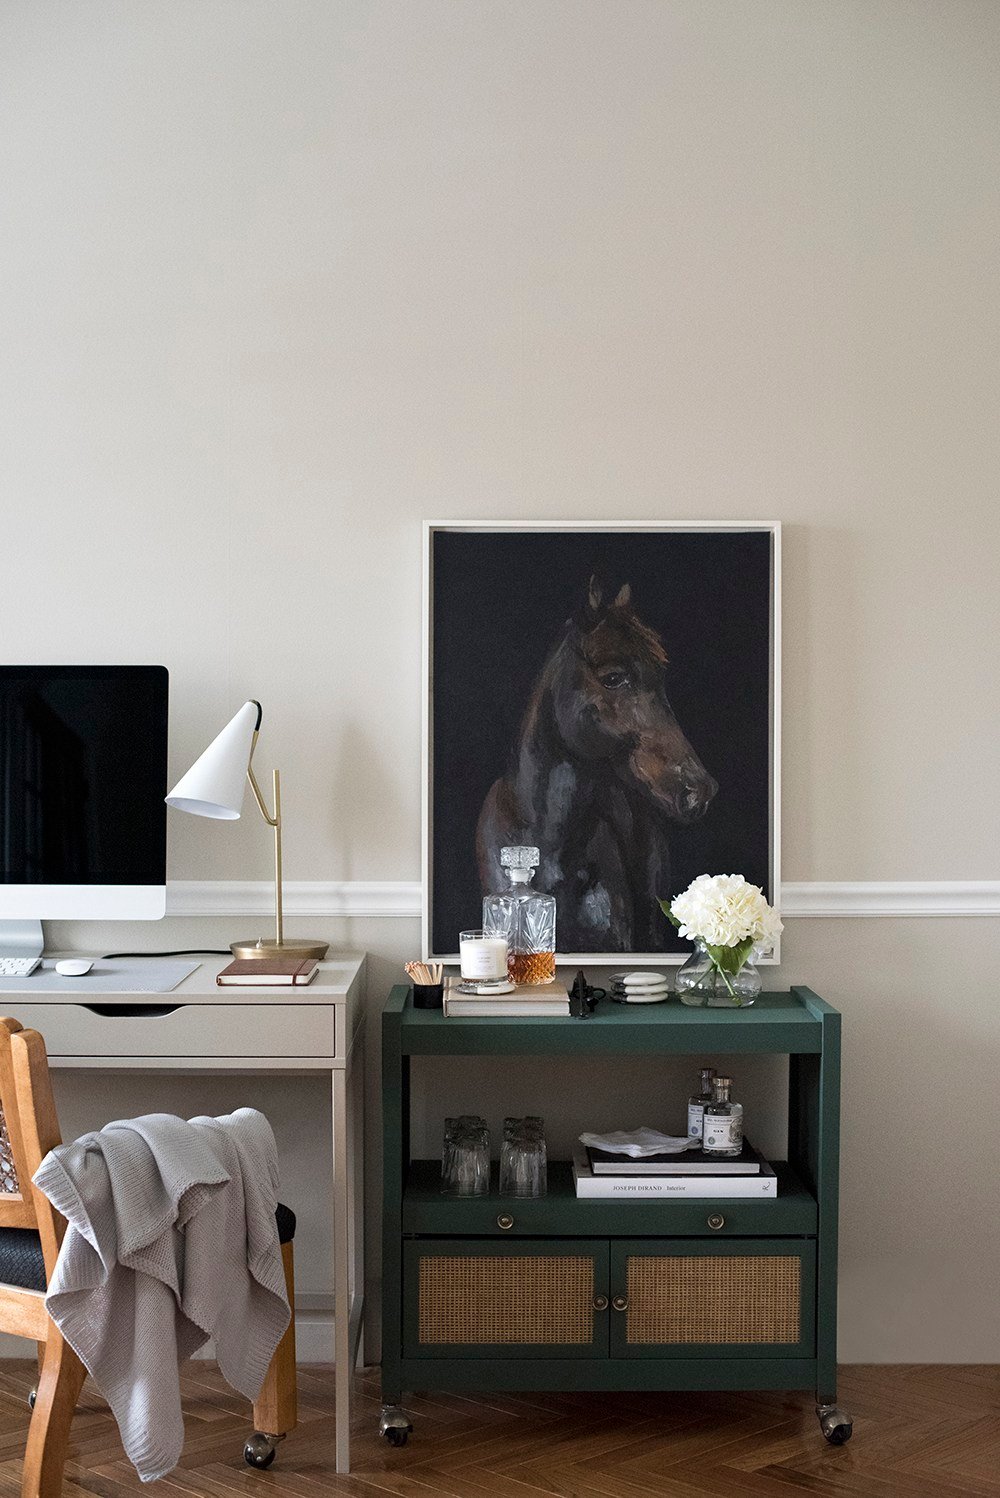 Of course, I also integrated some plug-in options, like the budget-friendly floor lamp, and I’m hoping to use a table lamp or two that I already have on hand. Speaking of… I bought this $30 task lamp a few years ago, pictured above. I’m thinking it will live on my desk once again. The designer version cost $570! Can you tell the difference, below? Any guesses which is which?
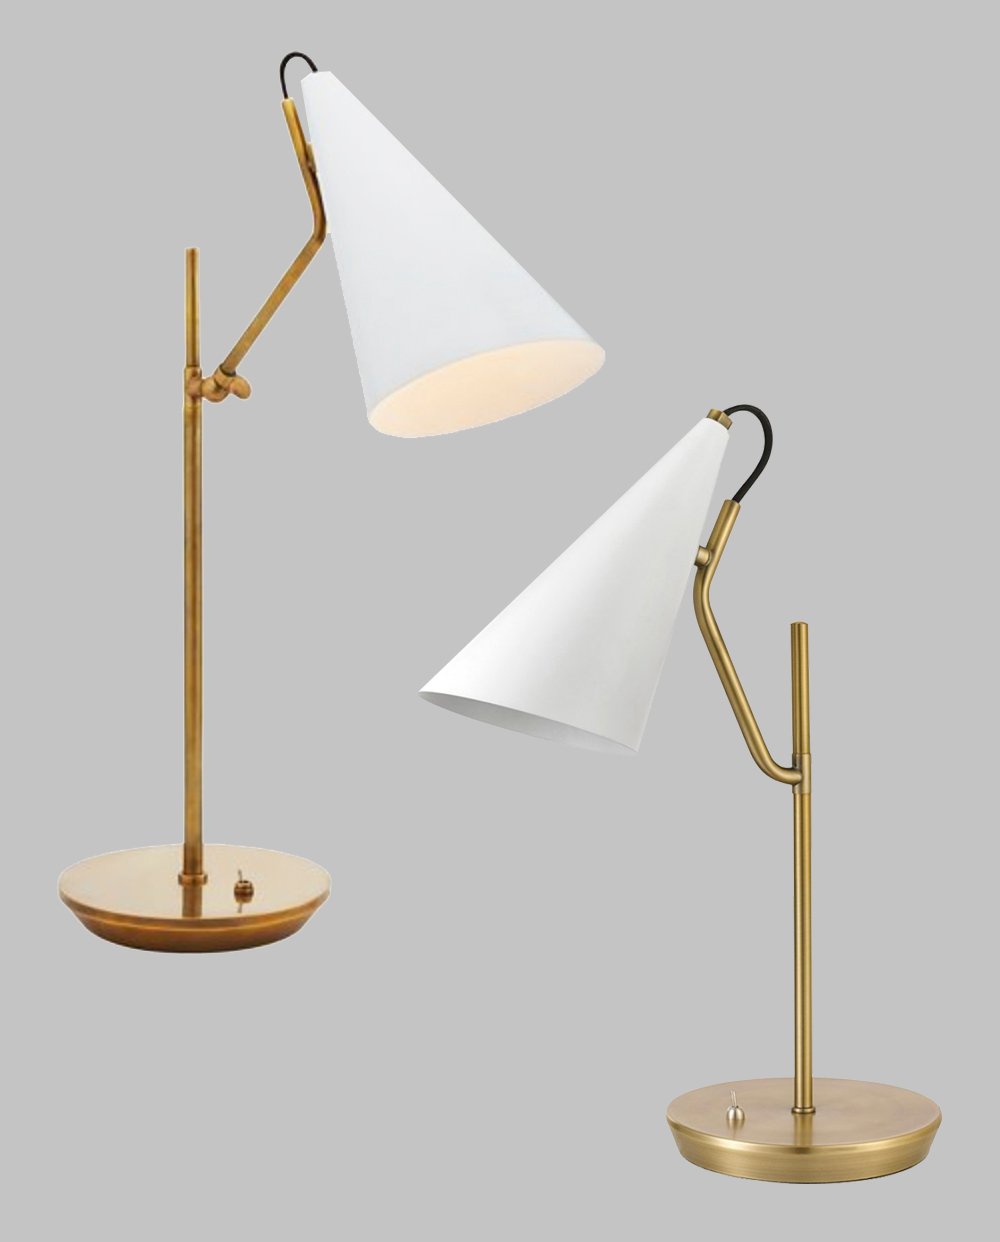 Ok, ok- I’ll tell you… the designer version is on the left, and the budget version is on the right. Did you get it right?! Have any questions or thoughts for me? You know I loving hearing all the things in the comment section below! I’m also happy to answer any spray paint or lighting questions you may have. Things are starting to feel real in my office and I couldn’t be more excited! For more Krylon inspiration, click here.

Gah! That chandelier!! The wavy bottom and the brass rings? Stunning. Now, I would never have called myself an oil rubbed bronze fan, but maybe I’ve not seen quality examples. Your lamp and your description of the color are lovely! I definitely prefer the high contrast version. (BTW, I’m trying to train my eye while thrifting to look for spray-paintable items. I’m still not over your mushroom lamp redo!😍) Speaking of lamp makeovers, I forgot about your plaster lamp and that perfect pleated peak! I’m interested to see the picture lights as sconces! I’ve always admired your task lamp; I didn’t realize there was a designer version. A respectable likeness, for sure! Are you getting SO excited for your office?! How are the pocket doors coming? Have you got an “art plan?” Is that a thing? Can’t wait!!
I got snowed on yesterday in the garden, so that was the start to my week!😱❄️😭 Fingers crossed for a sunnier Tuesday!
I cannot wait until that thing arrives!! It’s so gorgeous and was definitely a splurge for the space. Spray paint projects are probably my favorite because it’s truly instant gratification (and I don’t have a ton of patience, haha). The mushroom lamp is still living its best life in the guest room… just waiting for guests. Want to come visit?! I also still love my little plaster lamp, and even my Walmart design dupe. I am getting SO excited fro the office, although it feels like it is moving at snail speed. The pocket door track is installed and looking nice! It will be a bit before the doors are finished (we ordered them from a local company), and Emmett still needs to re-run electrical and hang drywall before that wall starts to take shape, but progress is happening and that makes me happy! The built-ins and the custom credenza are in the works… Emmett has them all ready to cut out at his work, and now it just feels like a waiting game. I need to get together an art plan. I’ve been putting it off, because I know it’s going to take me forever. Ha! I’m envisioning plenty of horses. We woke up to snow this morning!! I’m nervous about our roof now. Argh. Fingers crossed for better weather for the both of us! xo
I’m sorry, WHY don’t they make this lamp in a darker finish? It looks so much better and shows off the beautiful shape in a way that I feel like the nickel finish just doesn’t do!
P.S. I also love your nail color in these photos :)
Right?! That’s what I was thinking. The shape is so gorgeous and it really needed a little contrast. I think the darker finish makes it feel more designerly and high-end. Thank you, in regards to the nail color! I jumped on the press-on nail trend (Red Aspen) that everyone has been talking about, and would NOT recommend. They were pretty while they lasted but my nails are ruined now. Maybe I did it wrong? This is why I could never be a beauty blogger. Ha! Have a great day, Stacy!
It looks SO much better in black!! Such a good call!
Thank you!! I feel like it really needed that contrast.
I’m very excited to see the lighting plan come together! I’ve never seen you use oil rubbed bronze, and it’s a finish I gravitate to; lately I’ve been talking myself out of using it because I never see it used anymore. Let’s just say I’ll be taking notes! Your floor lamp looks so much better in the high contrast version-and I was correct in my guess on the designer task lamp. That chandelier!!! 😱😱😍😍 I am in love with the shape! You somehow seem to find the most incredible lighting-truly I don’t know how you do it. I already have a vision forming in my head, and I’m excited to see the end result. How are the pocket doors coming along? Your office is going to be stunning! The lead times do sound crazy, even for in stock items, but wowza-it will be worth the wait for sure! Have an awesome Tuesday Sarah!
I haven’t used it awhile, but am excited about it! I feel like the floor lamp was meant to be a dark color or would also be great in a darker or aged brass… the nickel or stainless just gets lost. The chandelier was definitely a splurge, but I feel like since I saved on the other fixtures- I was able to justify getting that statement-making beauty. Haha! The pocket door track is up and is *almost* finished. Of course we won’t see doors hanging from it for awhile because Emmett still has to rework electrical and drywall, but so far so good :) Lead times are bananas right now! We lucked out with the fixtures. Hope you have a great day, Lauren! It’s snowing here. xo
Love the lamp makeover! I also have a few lamps that I’ve been thinking of painting, and will definitely be squirrelling away that Krylon finish suggestion!
Thanks, Charlotte! It’s a beautiful finish. I’ll definitely be using it again in the future :)
SO much better in the bronze! You’re right – the graceful and interesting shape totally gets lost with the silver nickel. Plus, to my eyes, the bronze makes it look MUCH higher end, too. I did get which was the designer version of the desk lamp right. Yea, me! Can I ask though, what really makes the designer version so much “better” and more expensive?? That is a crazy difference. That was fun though – love these Designer/Dupe type quizzes!
Also, can I just say how lucky you are to have E? Well, for many reasons, obviously, but I love that you’re able to tackle these projects from literally inception to finish AND on your timeframe! (Except for those damn lead times. I’ve been experiencing that, as well and thought it would get better by now, but I guess now the pandemic is really catching up with companies. Ships getting stuck in canals certainly don’t help matters either. 😜)
Lastly, this has nothing to do with this post, but I wanted to say how much I (likely we all) appreciate your thoughtful replies, even when we don’t have a question! I know it takes a good chunk of your time, but there’s not much worse (ok, that’s a lot much worse, but…) than commenting on someone’s blog and never getting an answer to a question, let alone any response at all. I know people are busy, but the fact that you answer most every comment shows how much you care about your audience. I would think most bloggers would love to have “conversations” about something they’ve written (I know I do), otherwise why blog?
Anyway, off soap box, but you two are truly a dynamic duo and the real deal. Thank you, Sarah.
The bronze was definitely the way to go! I think it feels so much higher-end. I think the designer difference probably has to do with the material and construction (because obviously the design has been replicated). The finish is probably much nicer, too! Fun fact: we’re not supposed to say “dupe” or we could get kicked out of affiliate programs that helps us keep the blog going. Isn’t that kind of crazy? We’re not supposed to use words like: dupe, knock-off, replica, etc. Isn’t that kind of weird?! Although, personally I also like seeing the side-by-sides and seeing if I can choose the high / low! I usually choose correctly which makes me feel good. Hahah!! Emmett is really amazing and the office is moving right along. LOL at “ships getting stuck in canals”. That definitely doesn’t help. Thanks so much for your kind words, Anne! This week I was definitely playing catch up (the reasoning for my later-than-usual reply), but I really love chatting with everyone. It’s definitely my favorite part of blogging! Sure, it takes a lot of time, but it’s also the most fun time I put into this space, and I feel the same way as you- the conversations that follow the post are really gratifying… otherwise, I feel like I’m just talking into space and nobody is reading or listening. I appreciate you taking the time to comment as well! Connecting here is what has kept me at it all these years :) Anyway, THANK You again. Hope you have an awesome weekend with beautiful weather, my friend! xo
Had NO idea there were words you couldn’t say to keep your affiliations!?! That is crazy. Ok, my lips are sealed – no more “dupes”. Ok, well, after that one, no more. 🤣Thrilled to hear commenting and the conversations are so fun for you, too, but also not surprised-your excitement and love you have for your readers definitely comes through.❤️ Happy Pizza Friday, Sarah! Hope you have a cocktail on deck, too.🥂
Isn’t that wild?! I know most people don’t follow the rules, but I’m not trying to get kicked out. Ha! Rule follower over here. Hope you had an amazing weekend, Anne! We definitely had some cocktails outside :)
I really want to try this with a brass swing arm lamp I just got at an antique mall. I was worried that it will chip, any tips to avoid that issue?
The key to avoiding chipping is to apply the paint in very thin, even layers! The type of paint also helps. Fusion has primer mixed in, so that also helps it adhere to many surfaces, including metal. I hope that helps, Lindsey :)