Laundry Room : One Room Challenge – Week 3
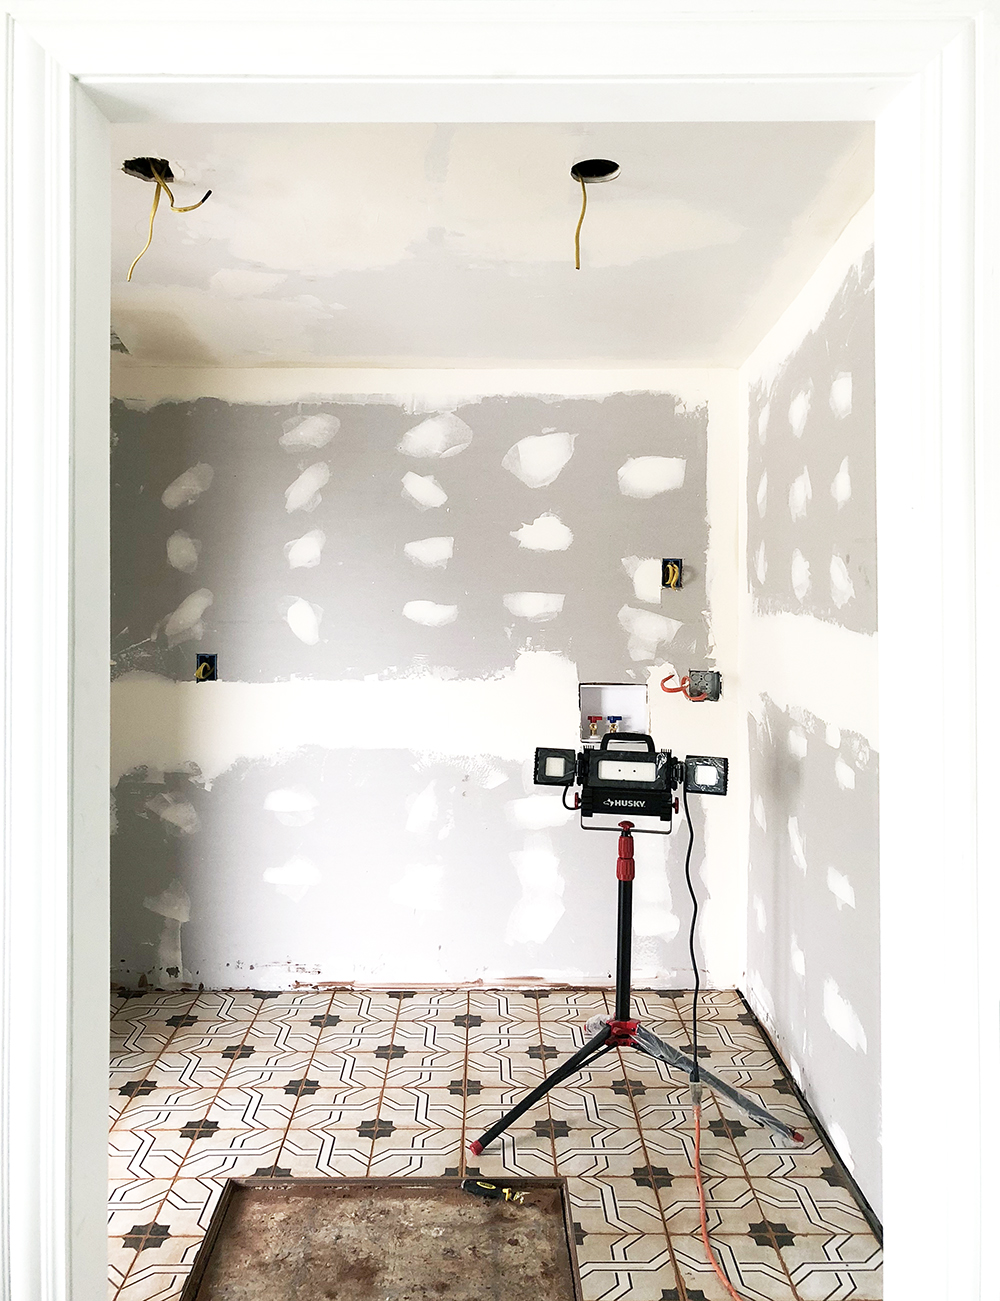 We’re into Week #3 of the One Room Challenge and things are moving right along. The room is actually looking like a room again (thanks to drywall), and the brand new subfloor has been covered in cement board and beautiful tile. Click through for the latest update and to see process images / exactly where we’re at!
In case you missed the first two weeks, don’t worry! Catch up here: Week 1 (before images and the design plan) // Week 2 (demo, subfloor, plumbing, electrical, designing the dog crate)
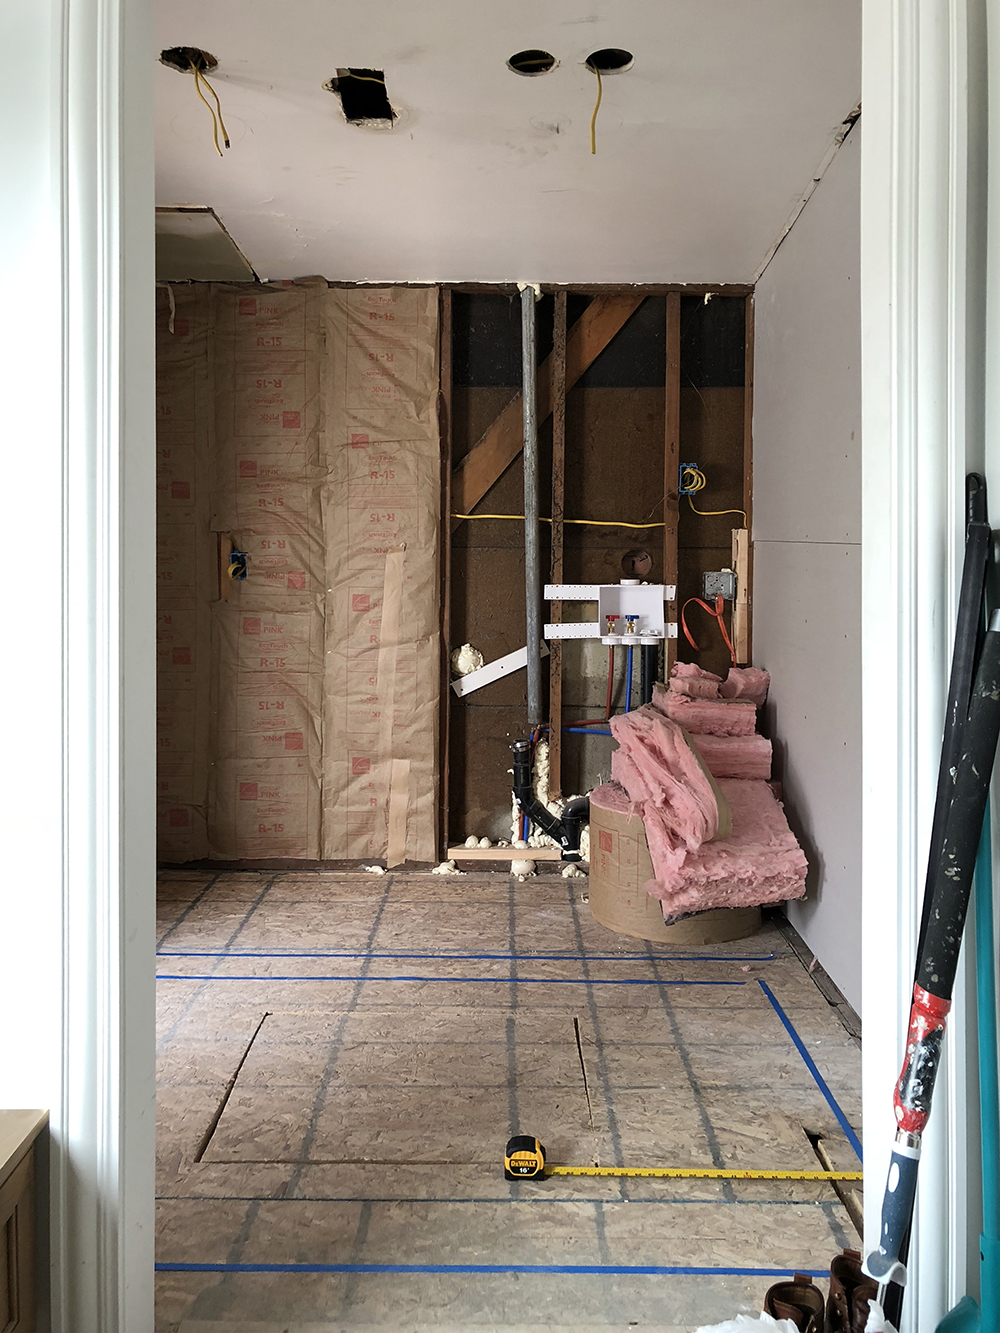
Behind the new drywall, we added insulation, as well as updated plumbing and electrical. Everything is now up to code, brand new, and working more efficiently. Even though these items aren’t noticeable, they give us peace of mind knowing things are done correctly from the inside out.
 Emmett recruited help from of our friend Brad again this week to speed things along. They enjoy working on projects together and often help each other out… that means I get to focus on the design to-do list (like accessory shopping) and stay out of their way.
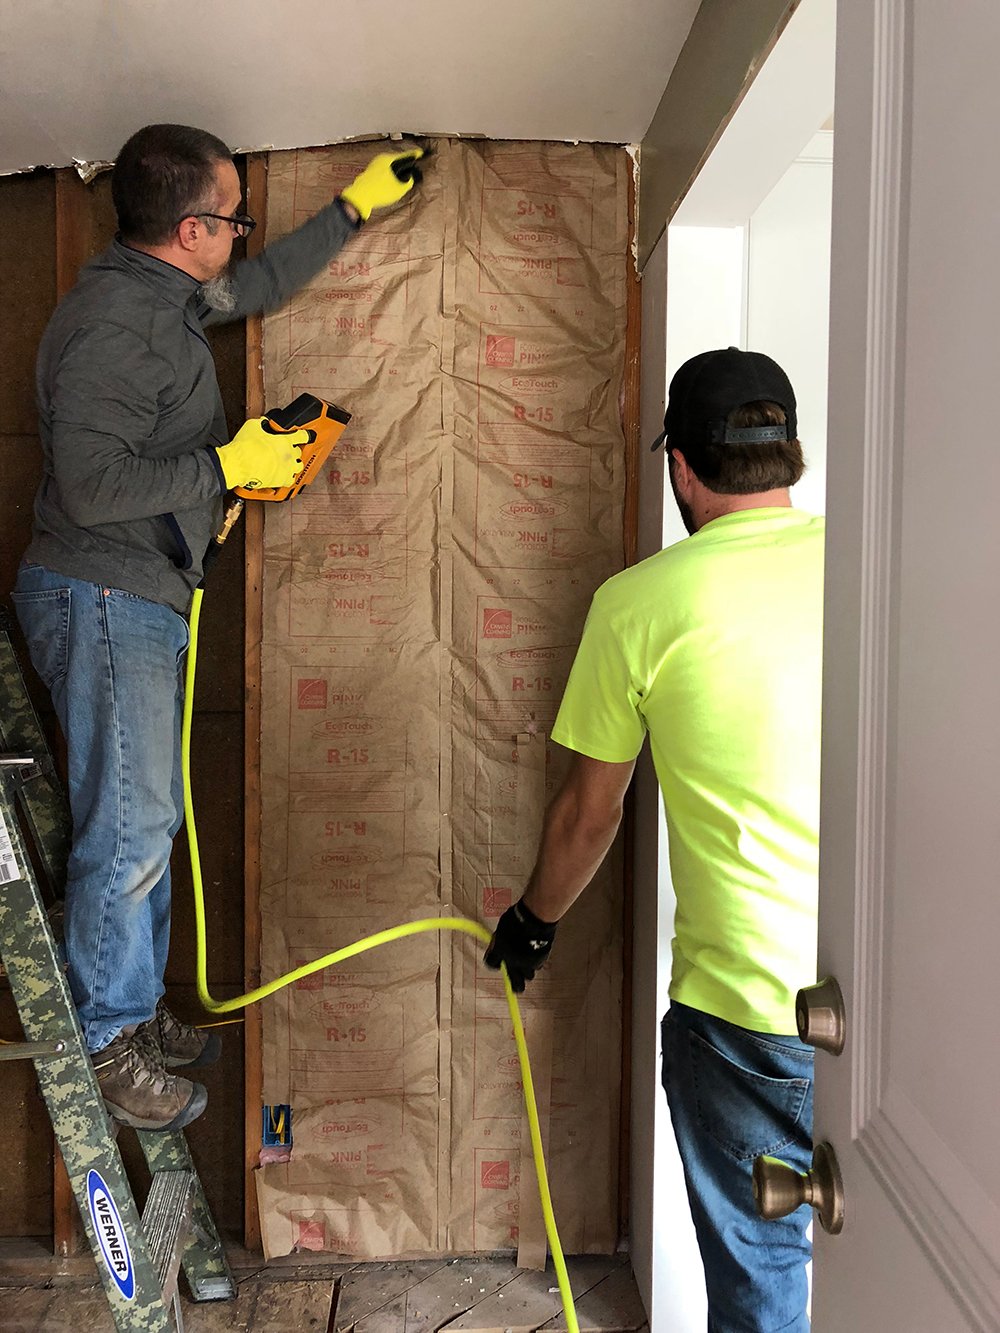 The space is so small, there’s really not room for a third set of hands. I was perfectly content selecting paint colors and finishes this week anyway. No hard feelings here, ha! Thanks Brad!
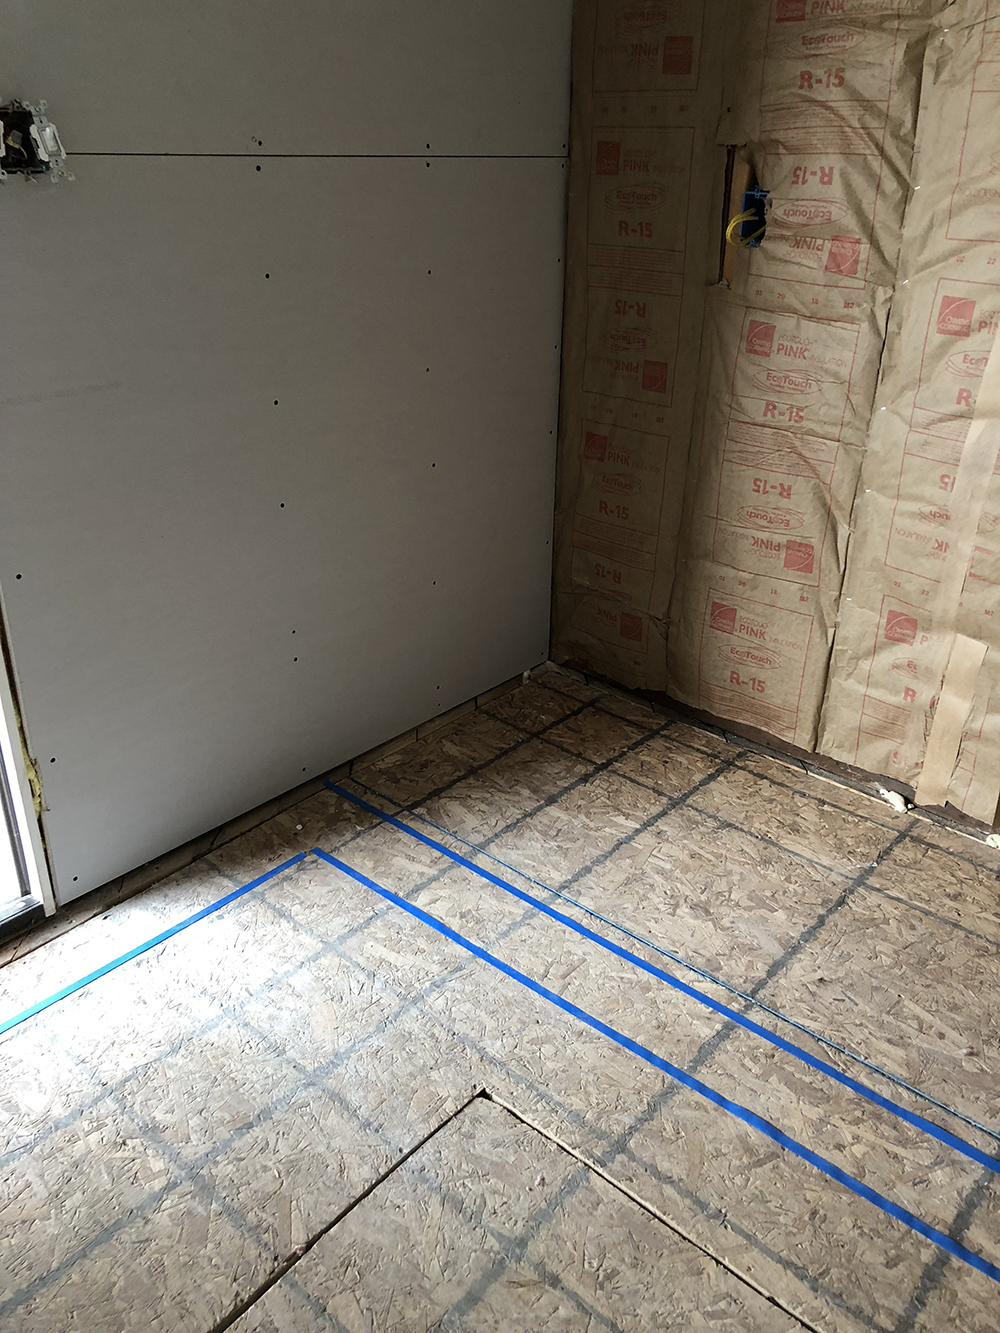
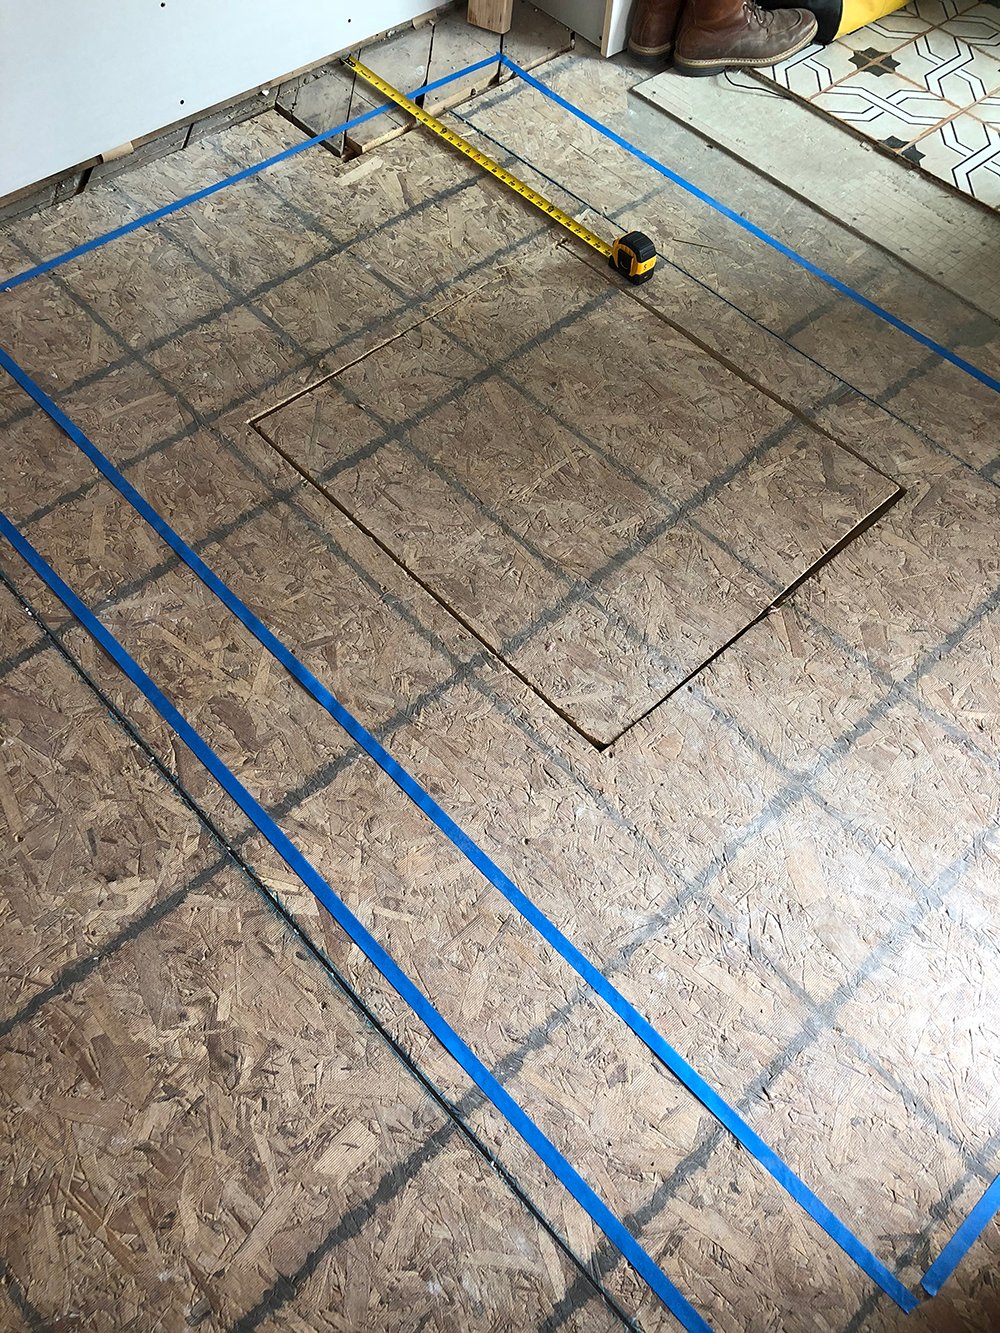 If you’re wondering about the blue painter’s tape on the floor… I also had to make a decision on a rug this week. I always tape out area rugs and art to see how they’ll fill the negative space. I opted for a custom sisal rug. I had a lengthly criteria for this particular rug… it needed to be outdoor / wet-rated, super durable (because of the dogs), it couldn’t compete with the floor tile pattern, and it had to fit an odd sized space (aka custom size). Check out my top four swatches below…
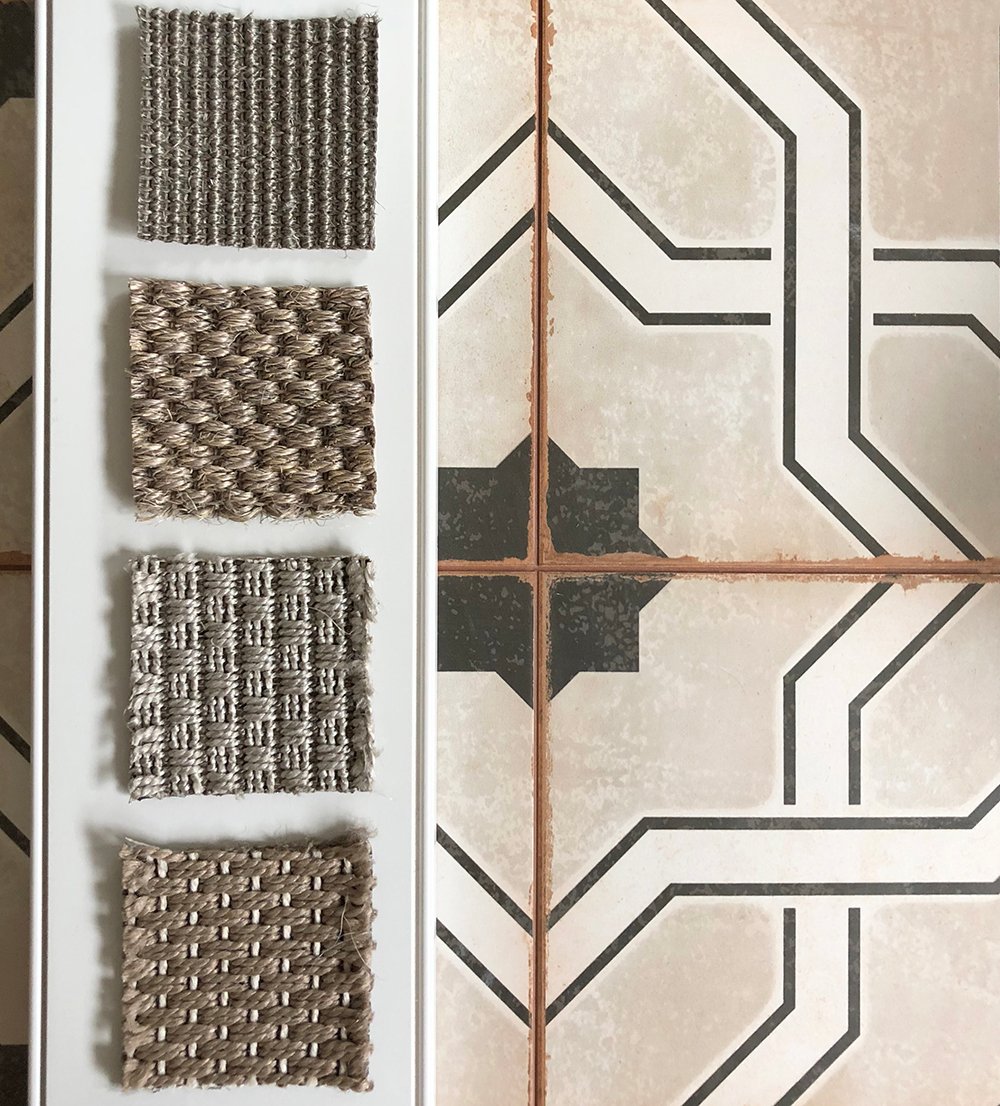 Can you guess which one I landed on? I actually polled Instagram and went with the popular vote because it was a toss up. The bottom option won! The rug should be here this week and I couldn’t be more excited to see it in the space. You can see the area it will fill based on the tape in the below image. My main concern was covering the crawl space access door. You can also check out this stair runner project we completed in the past, using the same company. Their rugs are top notch! Now I won’t have to worry about muddy paws running in and out of the back door. I can literally clean this rug with a water hose and it will look perfect again.
 Speaking of the floor… as I mentioned last week, Emmett replaced the entire subfloor because it was rotten. After rebuilding that, he layered on cement board in preparation for tile, and this week you can see the completed floor tile (that matches the kitchen)! He stayed up until 1am grouting last night, bless his heart. The things we do for the ORC.
 If you’re wondering about that giant rectangle in the center… that’ll be the crawlspace access door- which will be tiled at the very end and will blend perfectly with the floor. It will also be covered by a rug. You’ll notice it’s framed out with metal schluter strips to keep it looking nice, even, and neat. We did relocate the access door to a more centric part of the room, to ensure a rug would cover all four sides of it. Smart, right? That was actually Emmett’s idea.
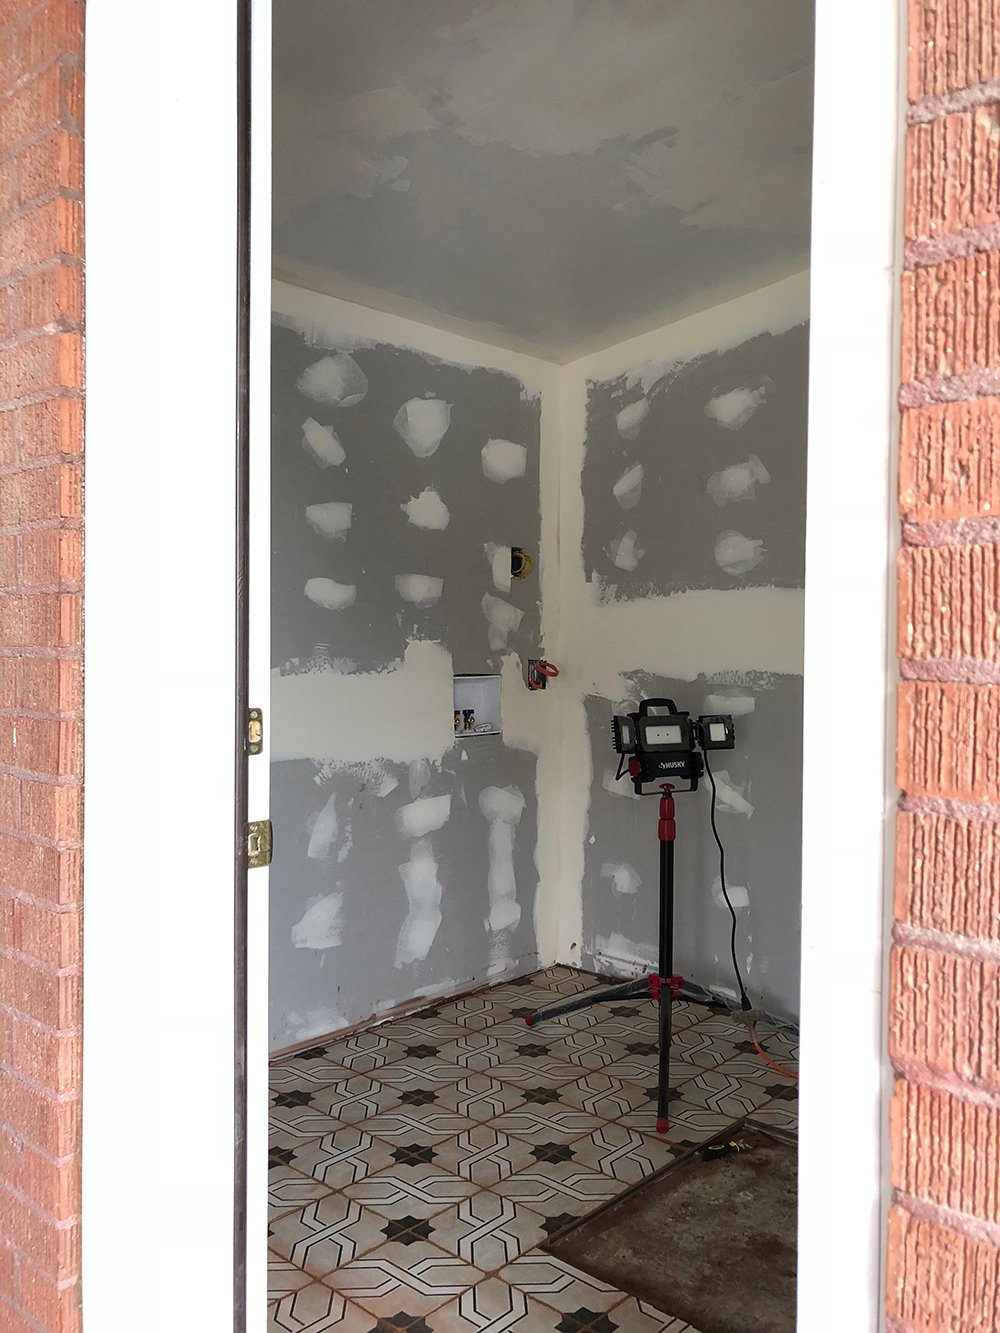 The drywall is also coming right along. Everything has been mudded and is ready for sanding. We’re hoping to get that finished and primed this week. As you know, painting is my very last step… so that will occur at the very end.
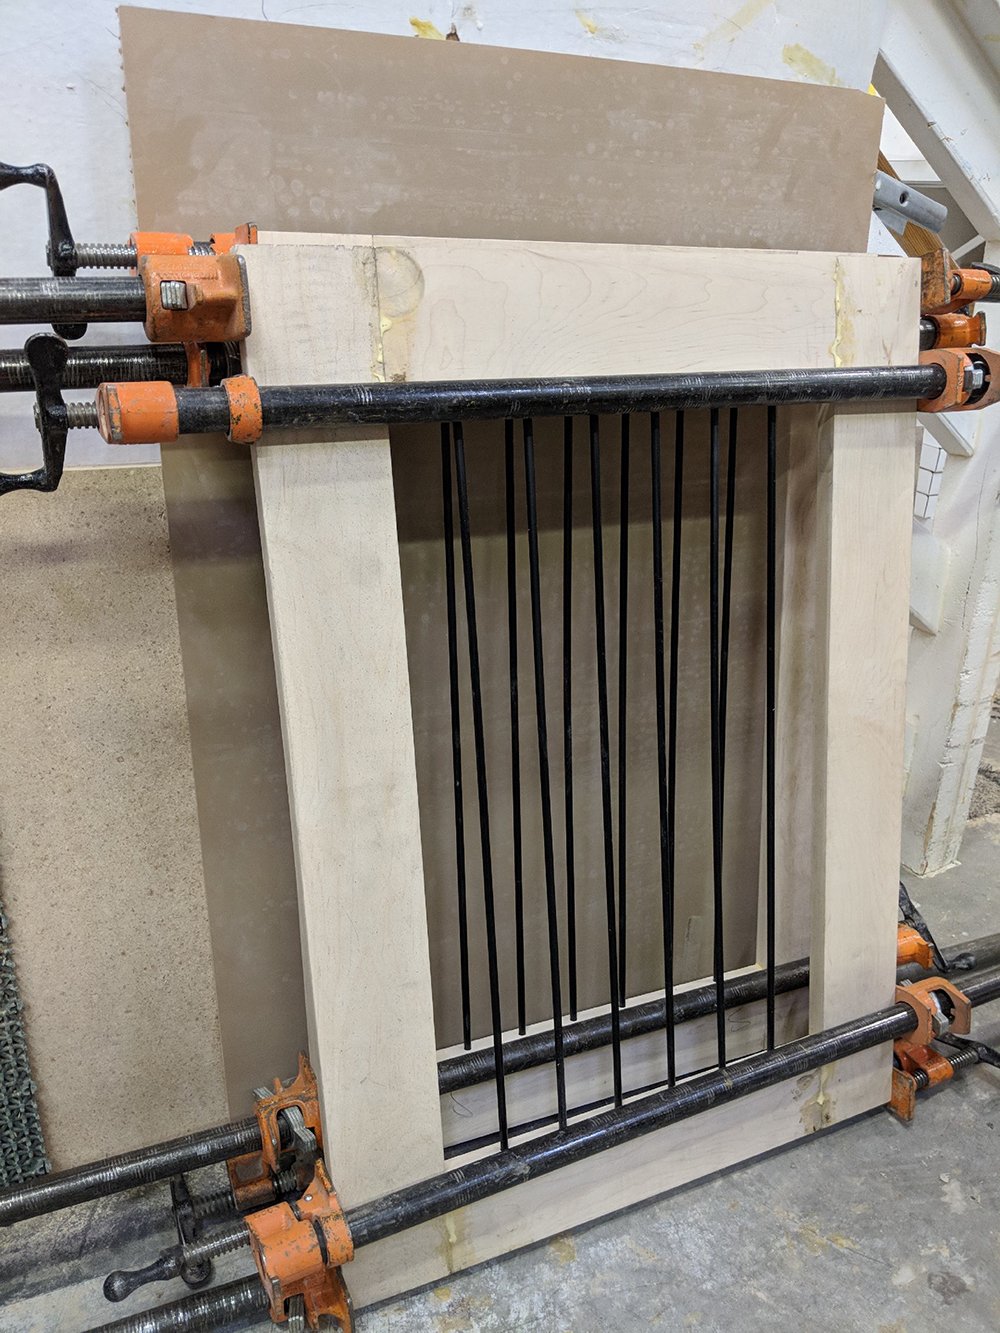
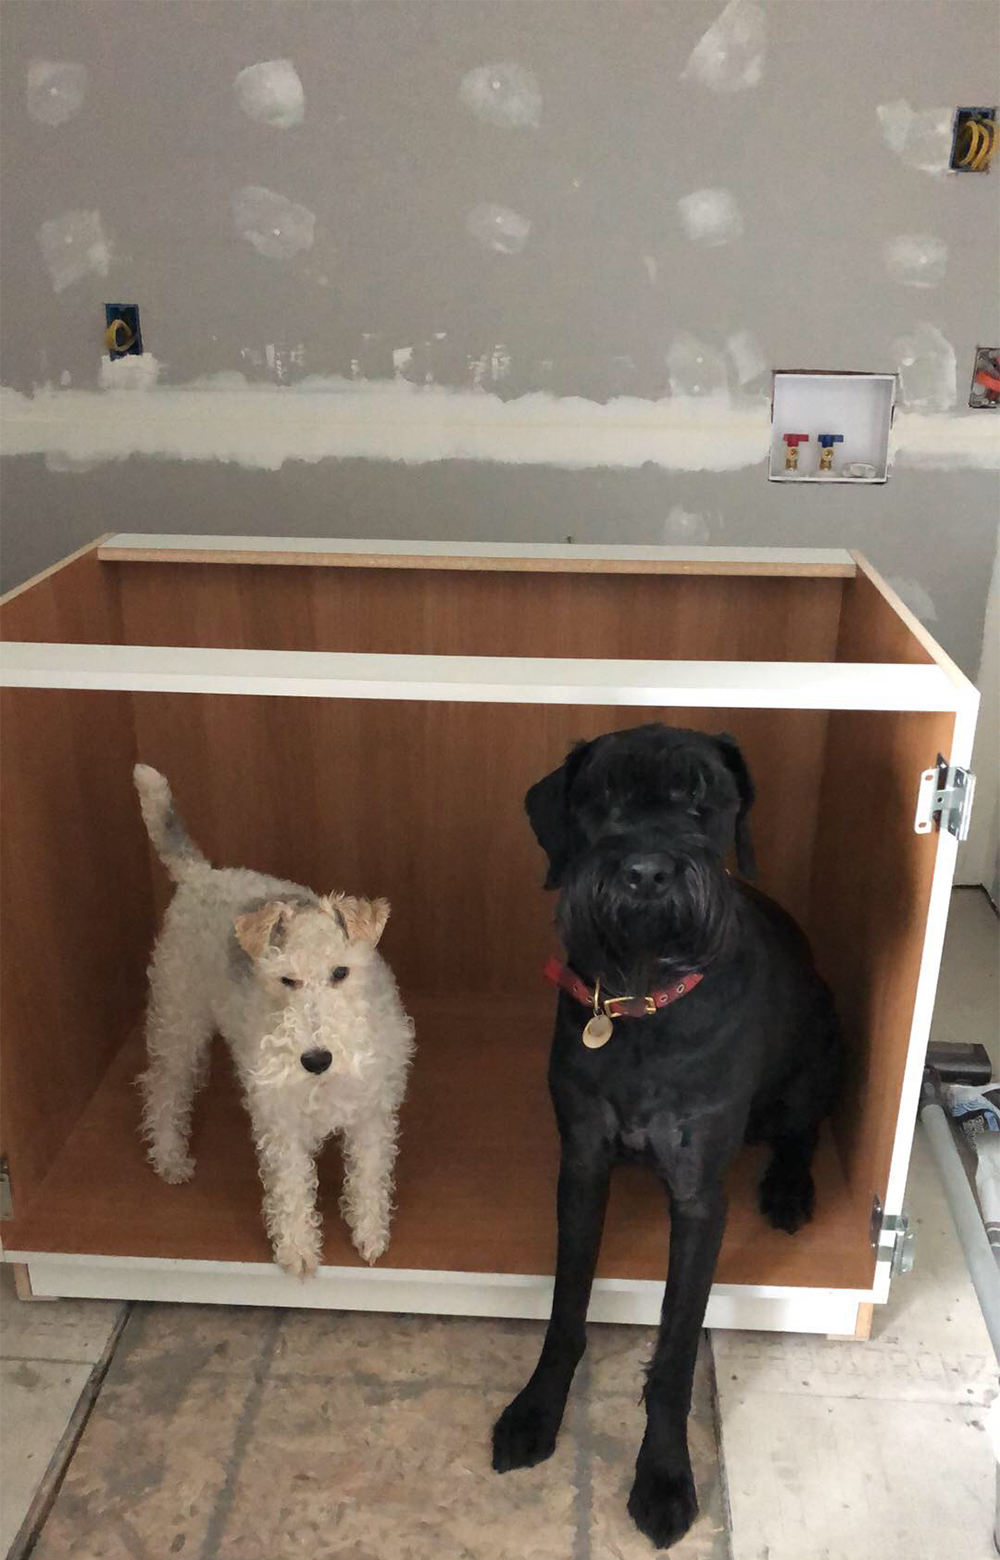 I swiped this image from my Insta story (the reason for the blurriness), but the cabinetry has arrived and the dogs are already testing out their custom crate. I swear I didn’t tell them to get in there… they did this on their own. Obviously, I think they’re perfect and adorable, but they look so stinkin’ cute in there!! The inside is wrapped in a super durable wood-looking laminate. We’re still waiting on the doors to arrive, but Emmett sent me this progress photo from the cabinetry shop, so you can get a visual…
 We still have a long way to go, but we’re crossing things off the to-do list pretty quickly…
demoreplace subfloorupdate electricalupdate plumbingadd insulationcut new crawlspace accessreplace drywallcut new exterior exhaust vent for dryer- sand drywall
- prime drywall
lay cement boardlay floor tilegrout tile- seal tile
- install cabinetry
- install cabinetry doors
- paint exterior door
- repair exterior (where vent was moved)
- install exterior / back entry porch light
- countertop installation
- install stacked laundry units
- tile backsplash
- install cabinetry hardware
- install decor / hooks / etc
- style space
- organize and restock cabinets
I’d love to hear your thoughts and feedback of our progress so far! To see the other guest designer spaces in the challenge… click the logo below:

I love the custom crate- your dogs are adorable! The tile is gorgeous and I can’t wait to see this all come together in a few short weeks.
Thank you, Monica!!
Love that tile! It’s gorgeous! And your pups are so cute!
Thanks so much, Emy! xox
I love custom pet projects—can’t wait to see the finished crate. Getting right in the new box is a very cat-like thing to do.
I can’t wait to see it unfold! We removed Finn’s crate when starting the project and I think he’s missing “his home”… so he knew to jump right in and test it out. haha! xo
That TILE!!! I absolutely love it!!!
Thank you!!
LOVE your tile choice! It looks beautiful!
Thank you Kate!
Sarah that tile is amazing!! And I can’t wait to see that rug. Looking forward to next week!!
Thanks so much! Xox
WOW! Love the tile!!! And really anxious to see the rug. I actually like all of the samples so much. What a great job yall are doing. Hang in there!! You’re half-way there! ~~ Susie from The Chelsea Project
Thanks so much, Susie!
Oh how I just love your tile!! It really is stunning!
Thank you!!
It’s looking so good! Of course I love the tile and your pooches are just the best. They are so lucky to have their own special place.
Thanks Leslie! I’m excited to have a designated place for them. They’re currently taking over our guest room. Haha!
We are living very similar ORCs! I had new insulation, plumbing, and electrical done, too! Not so pretty, but definitely necessary. It was great to get my room back to the studs to see what mess was there after 30+ years.
Definitely necessary! Great job on renovating your space from the inside out :)
That crate is for both of them? It seems incredibly small for two dogs of that size to use for any length of time. Is the photo deceptive?
The little guy has his own crate hidden in my office, but they sometimes enjoy snuggling. I think the photo is deceptive because it’s huge in real life. It’s the same size as XXL colossal crate they sell in pet stores.
We can tell this is a lot of work – and well done. Love your tile choice, it is gorgeous!
eekk…so much progress in one week! I love how I can see all your design ideas coming together. This space is going to be rad!
danielle
clarkandaldine.com
Thanks, Danielle!! I feel like this week it really started to come together :)
I love your floor tile! And drywall makes such a big difference doesn’t it? Can’t wait to see how everything comes together :)
It really does make a huge difference. The floor tile is also one of my favorites. Thanks, Casey!
Hi Sarah, just wondering what the dimensions of the crate are please as we are about to build something similar
Hi Ruth! It was around 32″ x 48″… larger than a standard cabinet. At the time, our largest dog was over 100 lbs, so we had to build something large enough for him to fit in. Haha!
How did you make the doors for the crate? I am considering doing a built in with an open bottom slot where we can slide out the tray that would usually go in a wire kennel (easier for cleaning). So basically I just need to built a cabinet with doors and no floor.
We drilled holes for the dowels. You could easily make a modification to an existing cabinet, depending on your needs, Jessica!