Laundry Room : One Room Challenge – Week 2
 We’re already onto Week #2 of the One Room Challenge and so far we’ve made A LOT of progress. I feel like this time around it’s going more smoothly than the bathroom (I’m over here knocking on wood after saying that). So far, so good. Click through to see our latest progress and take a peek at the custom cabinetry rendering.
In case you missed the first week, don’t worry! Catch up here: Week 1 (before images and the design plan)
This week we focused on demo and repairing the things that people won’t notice, but are imperative to the integrity of the house…
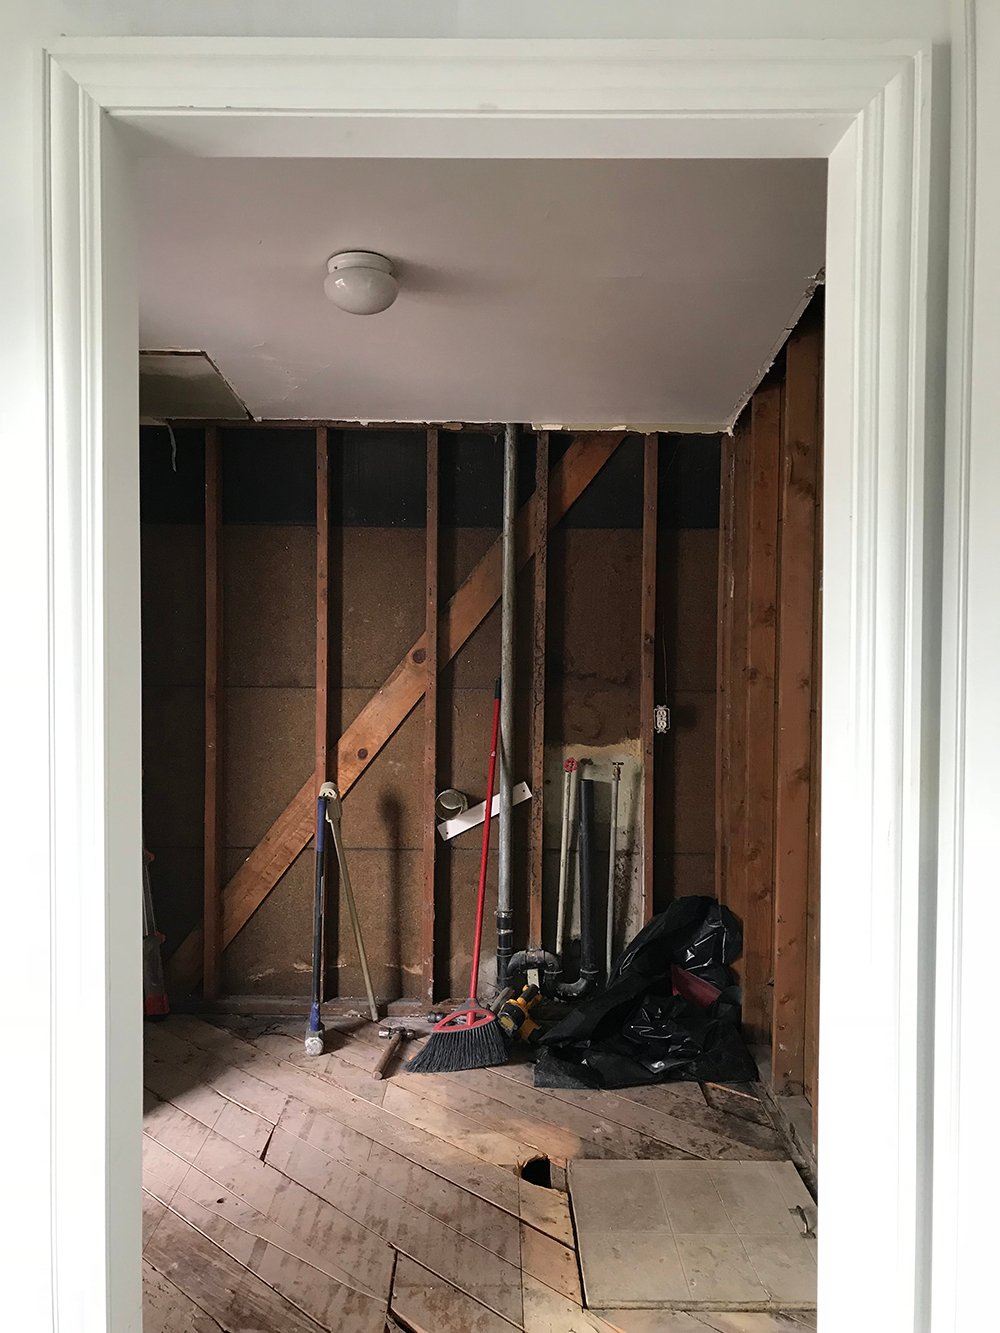 Just like the kitchen, Emmett ripped up the existing linoleum to find a rotten subfloor (shown below). It all had to go!

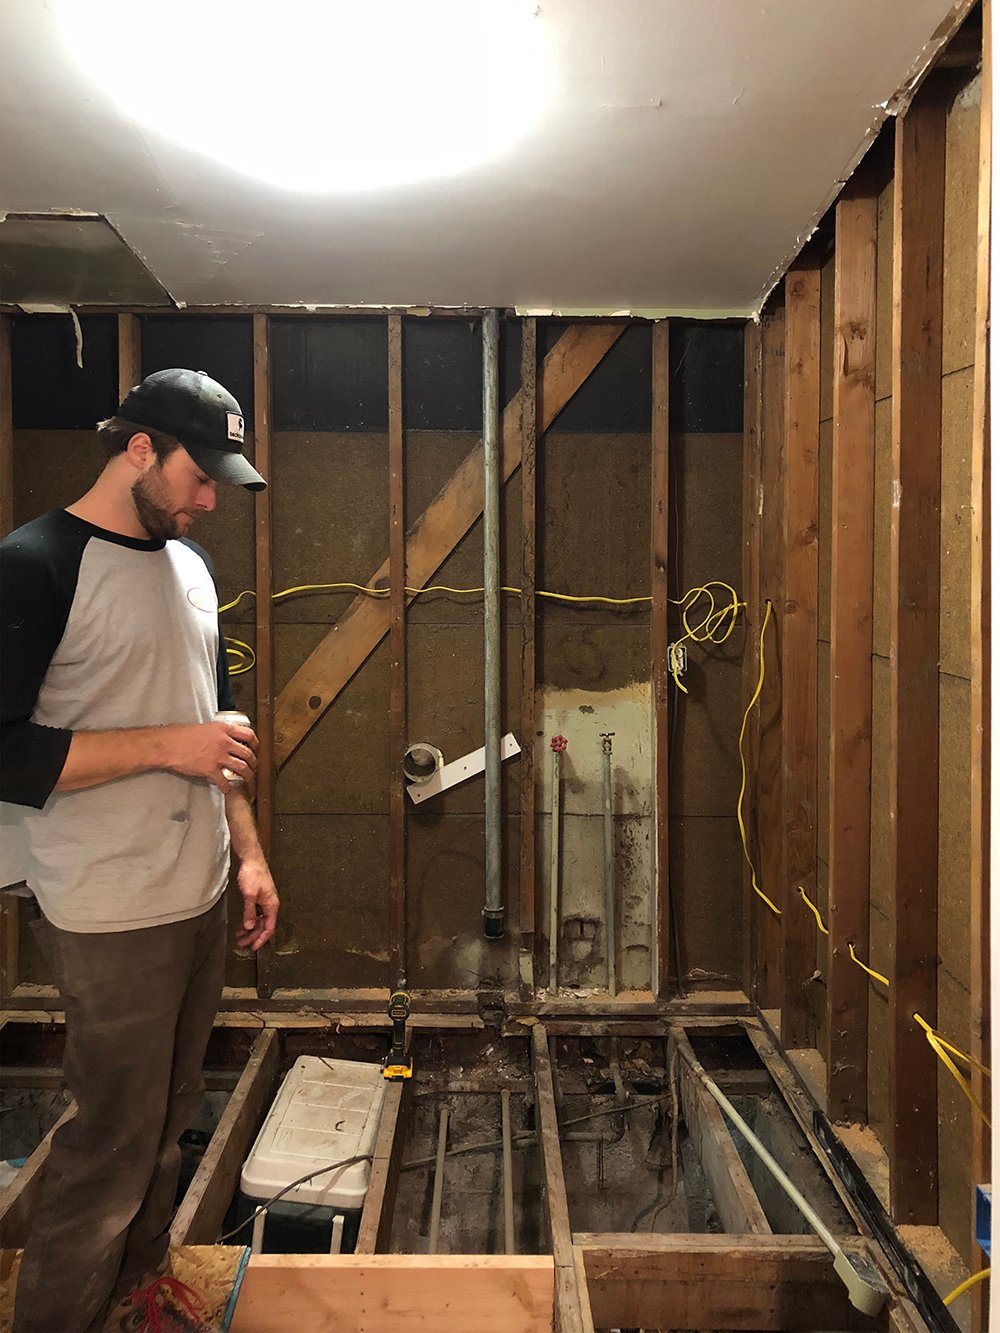 Thankfully, Emmett recruited our Brad to help this weekend (he was a HUGE help), and they made amazing time getting the floor done. I was serious when I said we’re moving right along.
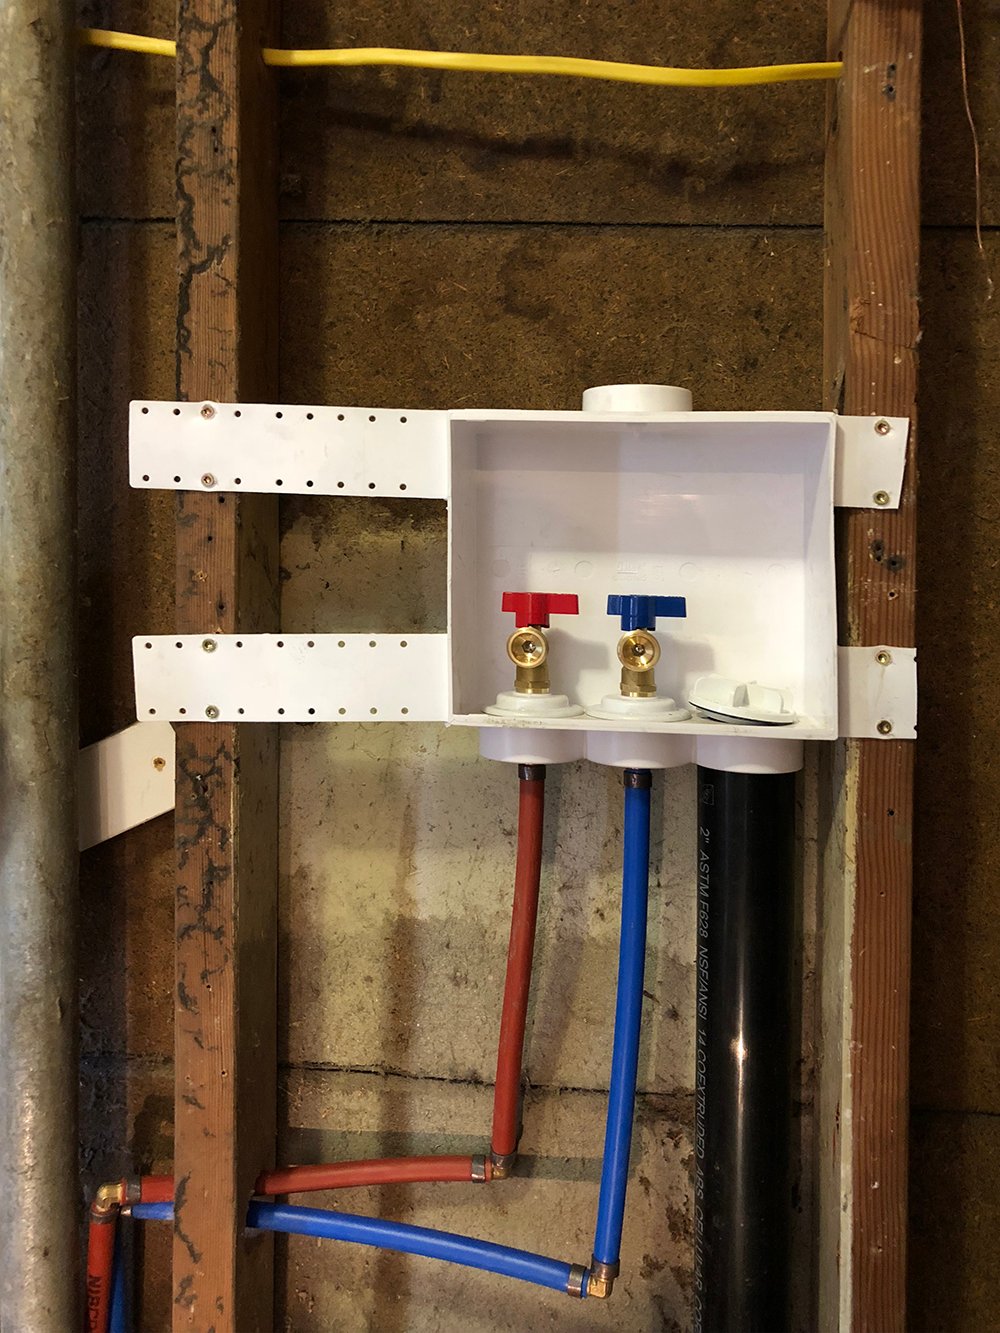
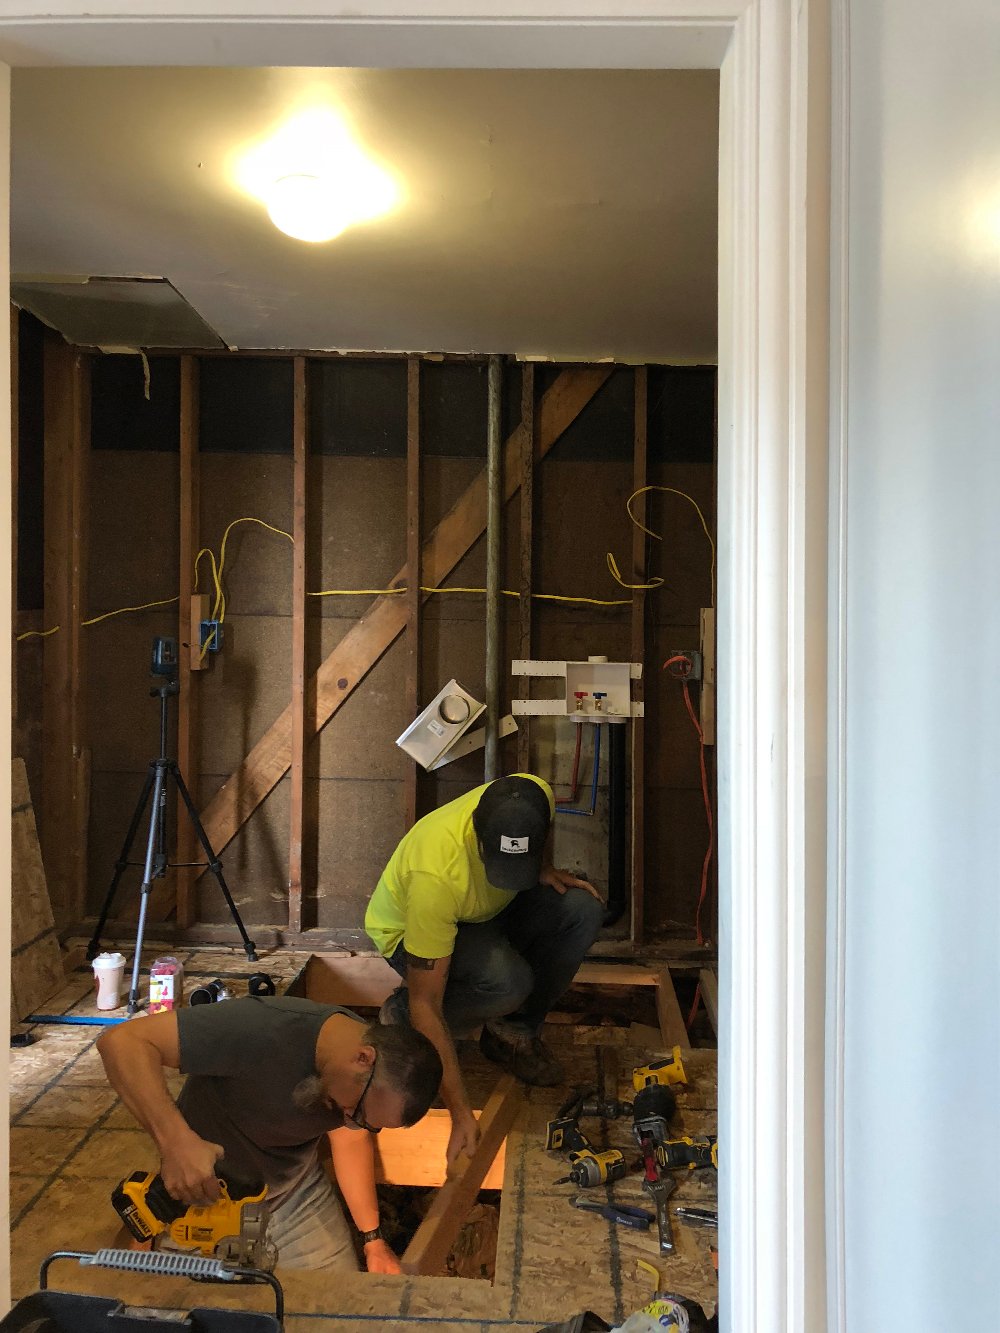 In addition to the subfloor, they also updated the plumbing and electrical. Again… it’s all the junk behind the wall that nobody will ever see, but if we’re going to renovate, we make sure to do it the right way from the ground up. You guys already know that’s how we roll.
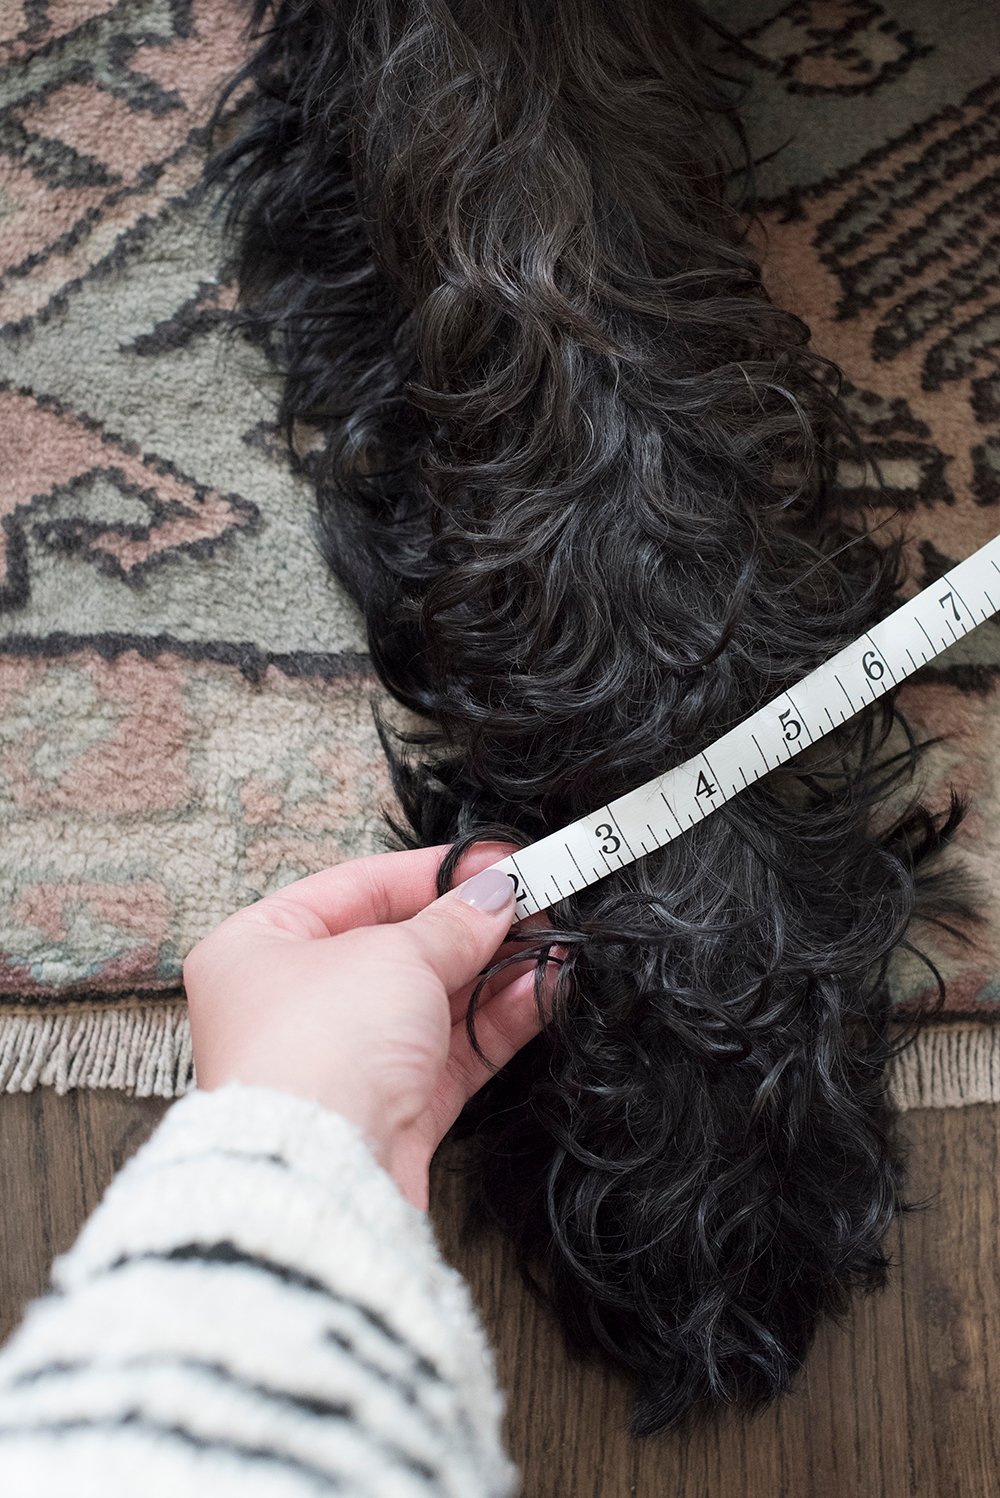
 In other news… I finally finished designing the dog crate- you know, the item on the checklist that was one of my biggest concerns. You don’t realize what goes into a custom cabinetry / dog crate design until you have to do it. After speaking with vet friends and readers, we measured both of our dog’s paws, muzzles, mouths, heads, etc. I’m serious! I know that sounds crazy, but we want the crate to be a happy and safe place for them.
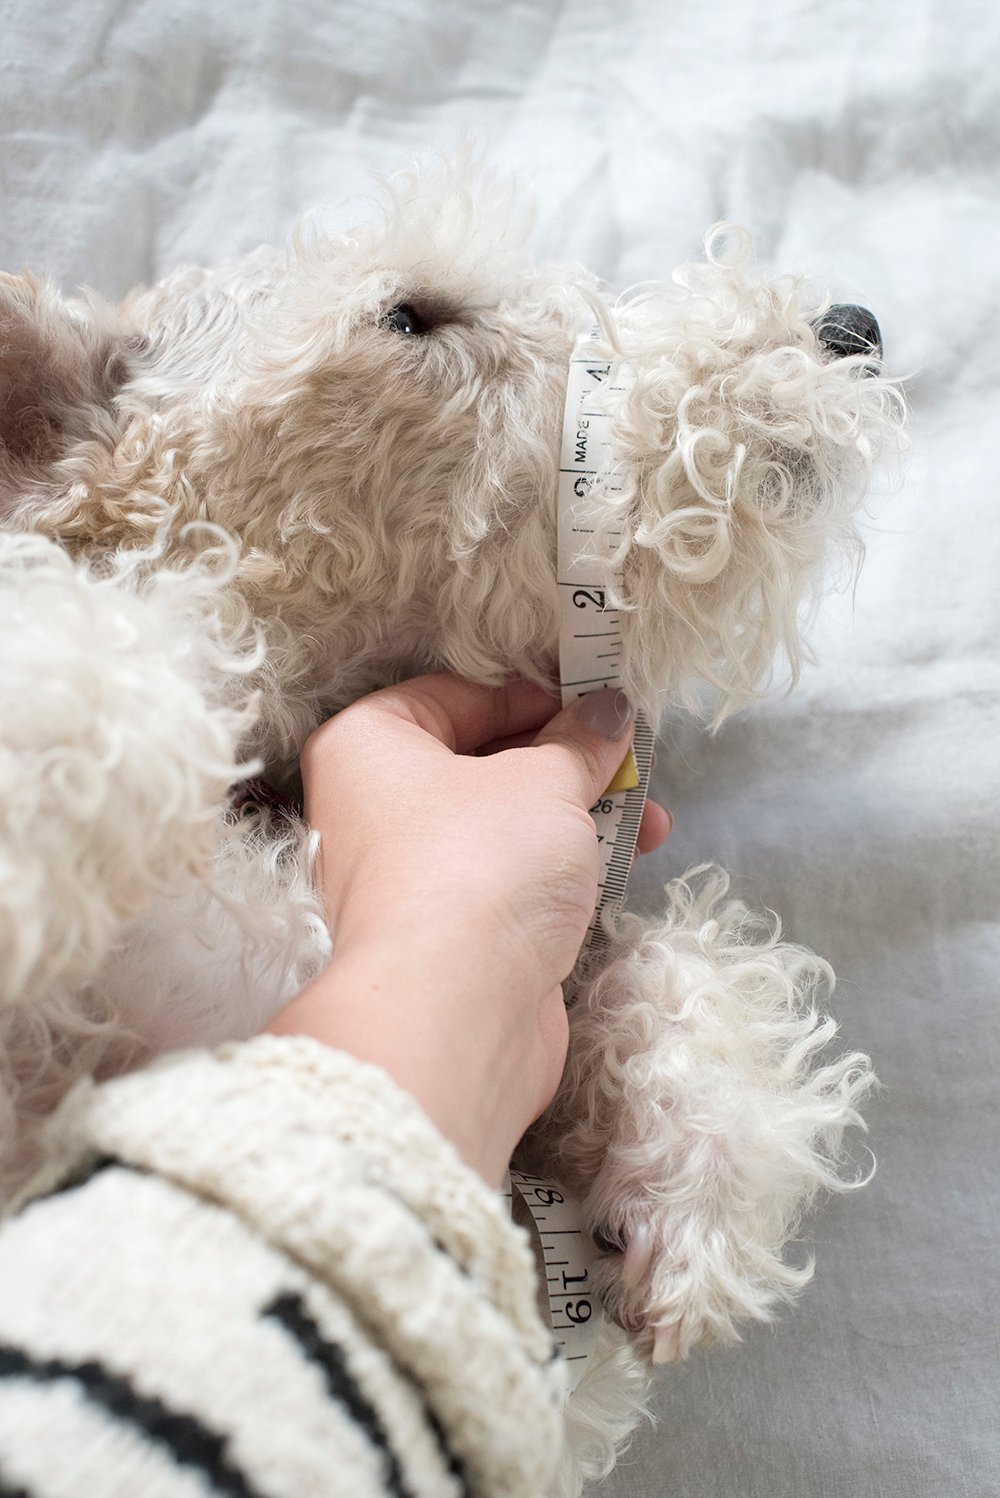 Neither of them were super stoked about being measured, but it had to be done. Given they are both high energy (aka rambunctious) dogs that chew, we opted for steel dowel bars that fit into the custom cabinetry.
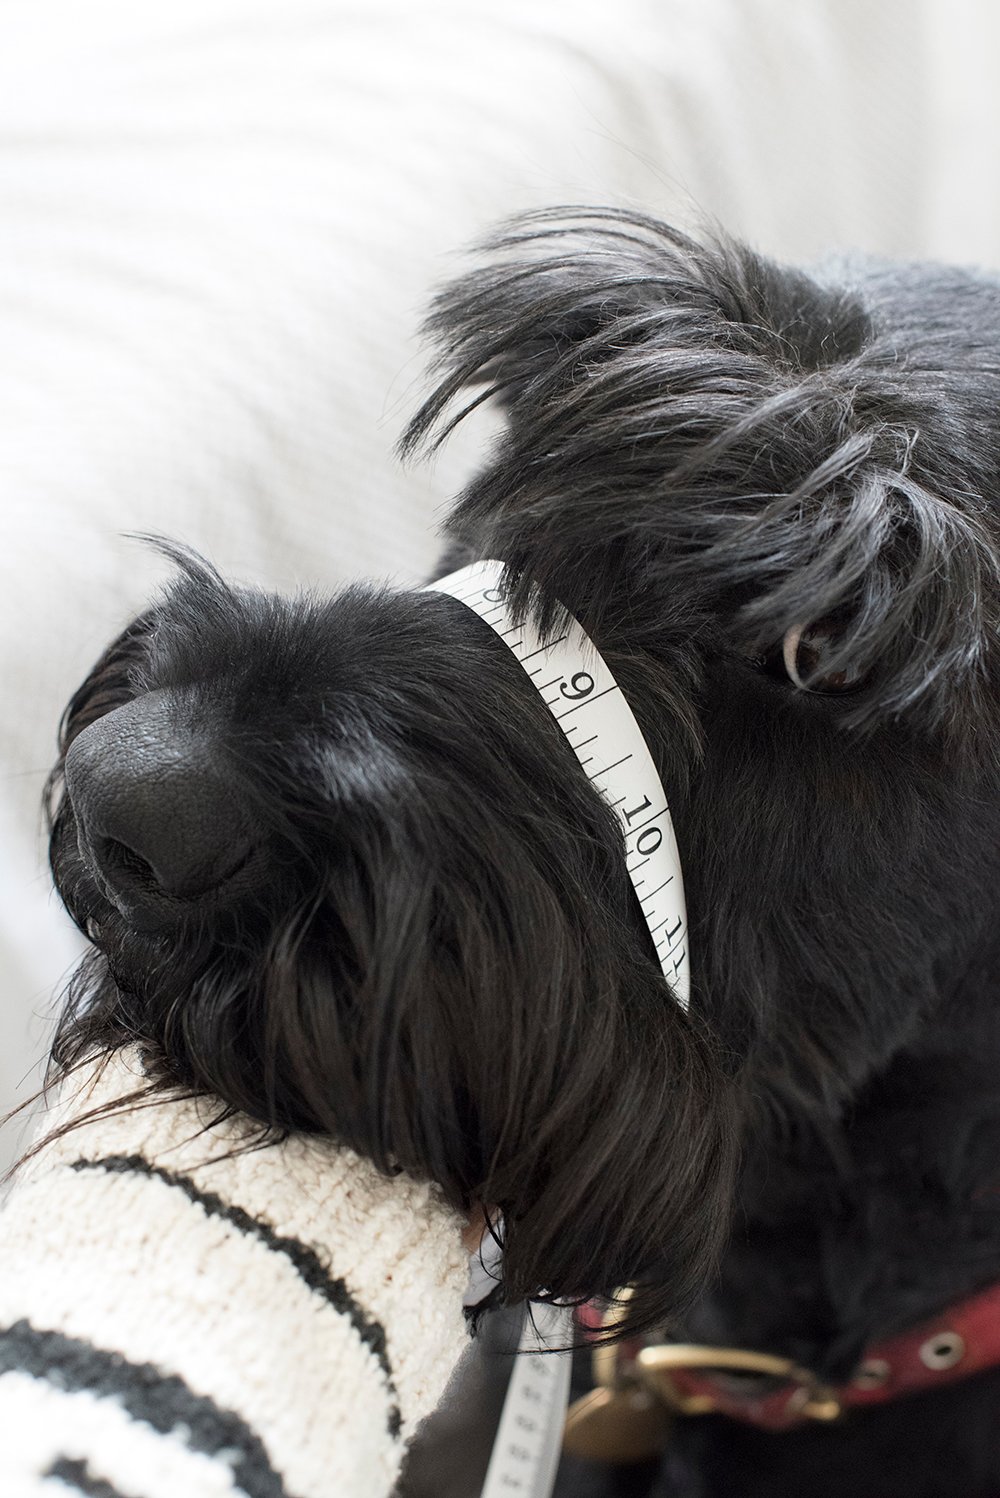 It was imperative to get the spacing right between each dowel so that the dogs can’t get their mouth around it to chew. The professionals (our veterinarian friends) were worried about their teeth breaking if they tried to chew the steel, and that would absolutely break my heart (and wallet). To avoid that, the spacing was IMPORTANT (hence the awkward measuring).
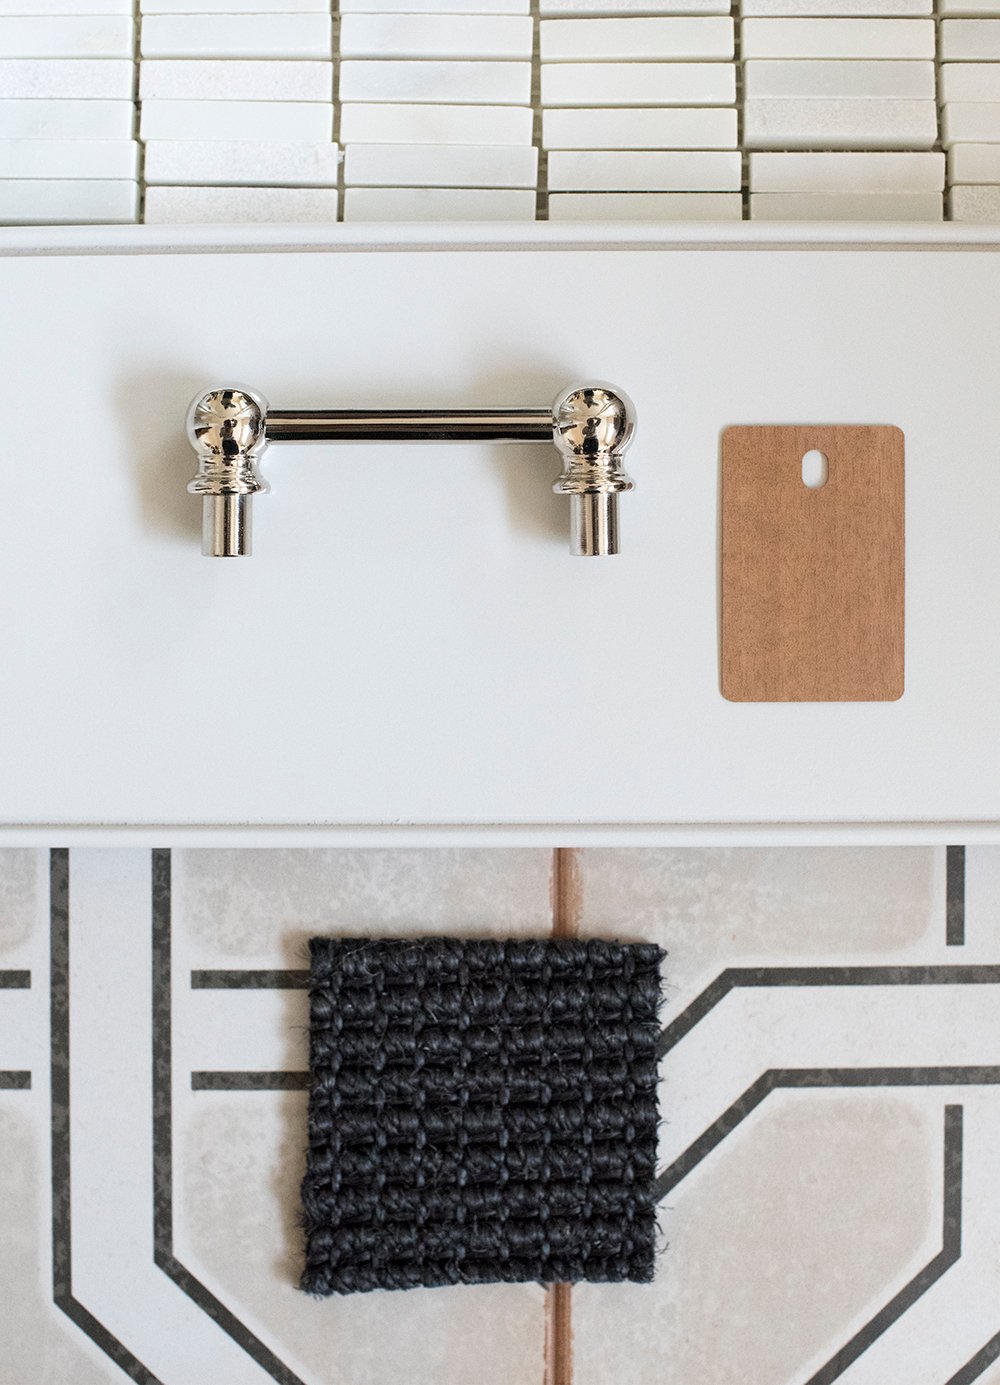
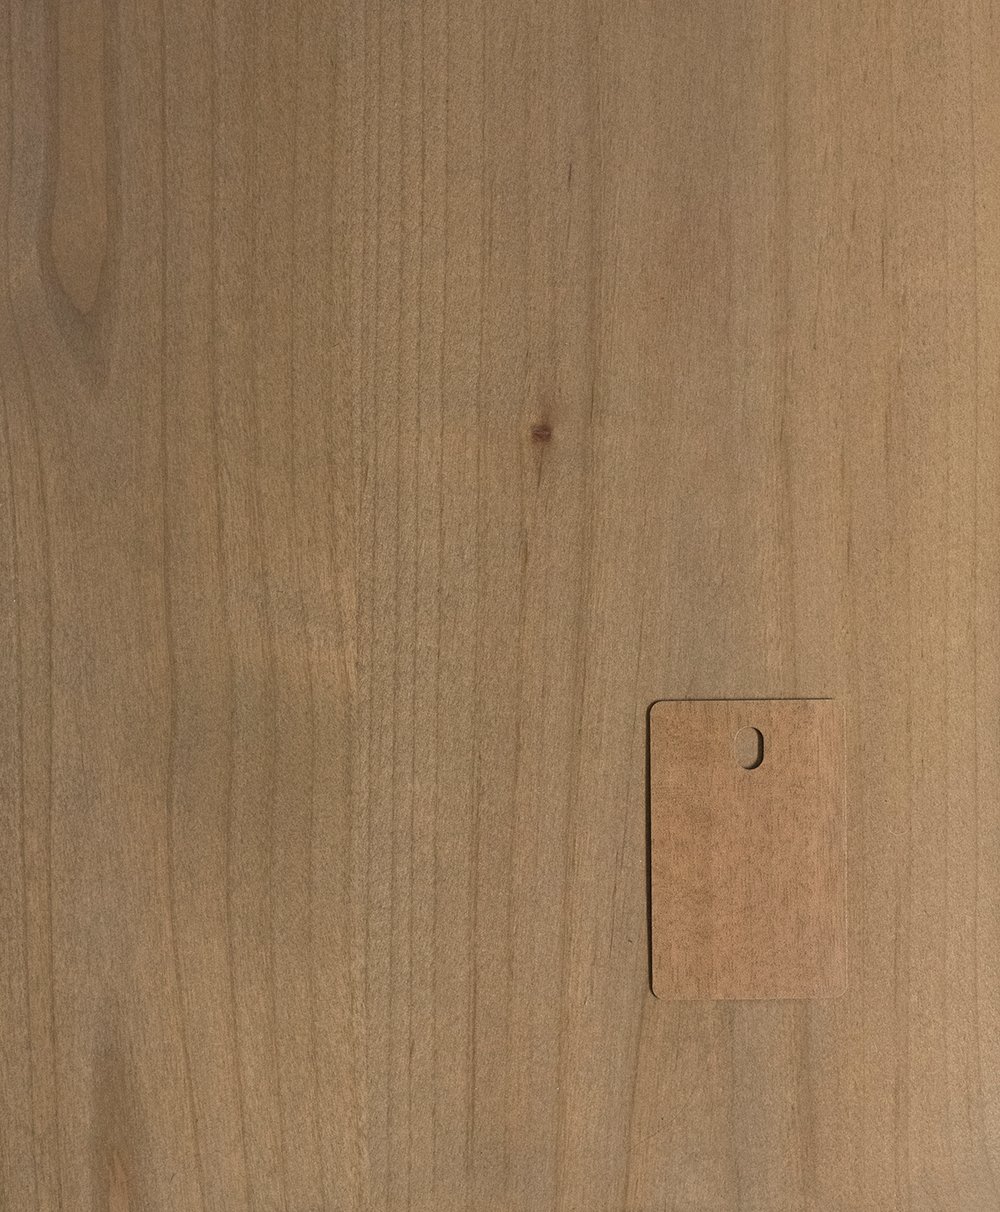
 Along with the steel bars, I opted for the interior of the dog crate to be wrapped in laminate. The cabinets are solid wood and the last thing I wanted was the dogs to destroy expensive custom millwork. Therefore, laminate is a more durable choice that will be resistant to scratching and chewing. It will also be easier to clean and is much more sanitary. I colored matched our stain-grade wood cabinetry in the kitchen and selected a laminate that is almost an identical match, so the two spaces look cohesive- even if they are made of different materials. The laminate is the smaller swatch, shown below… and the solid wood cabinetry is the background piece.
 I’m guessing you’re ready to see the cabinetry rendering by this point in the post? It looks exactly the same as my realistic rendering from Week #1, but with accurate measurements.
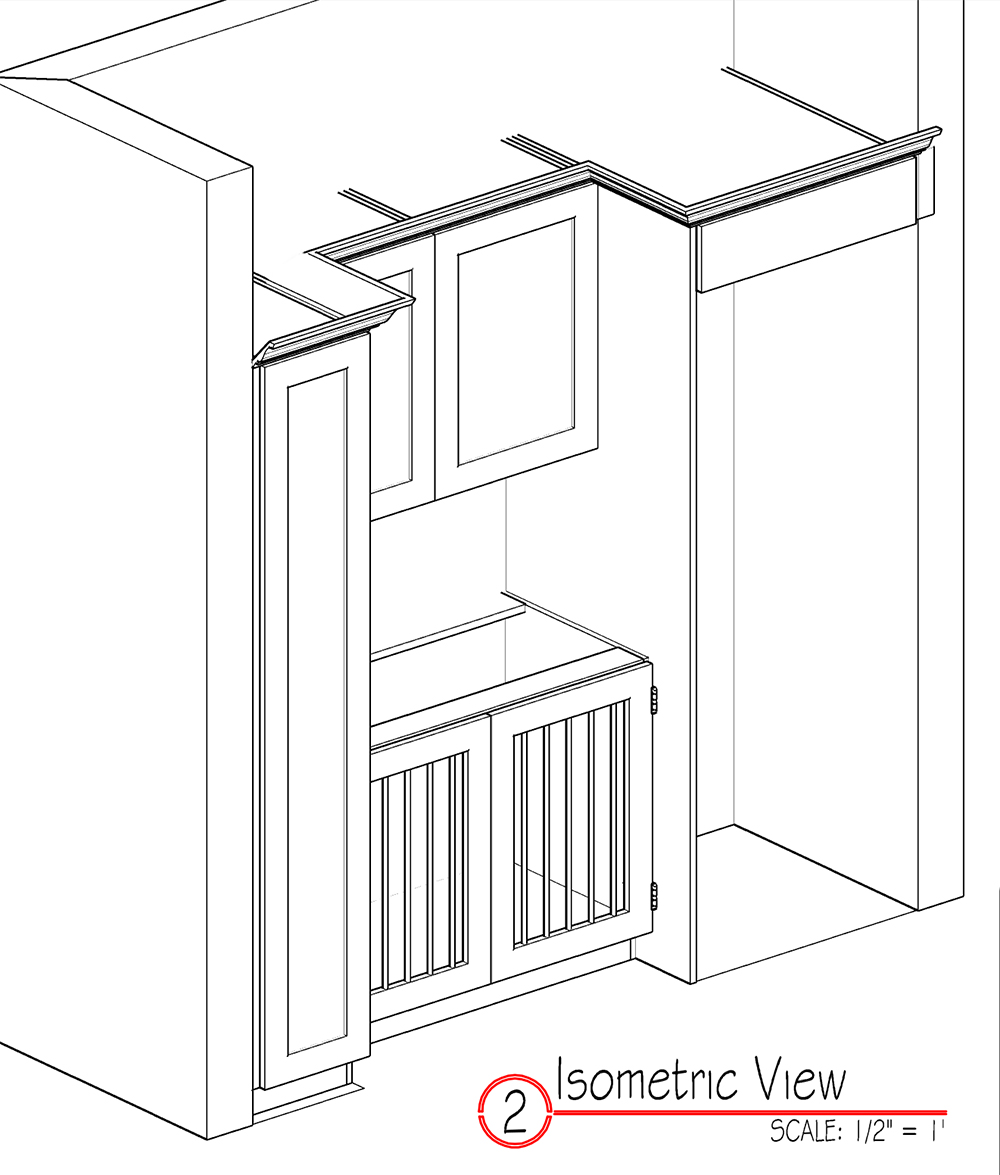 There will be a tall closet cabinet to the left, upper cabinetry storage, a countertop surface, the dog crate is sandwiched in between the two “towers”, and the laundry units are built in with closed storage above them. I’m really excited about how things are coming together.
I really realllllly wanted this dog wallpaper for the laundry room, but was afraid it would be overkill with the patterned floor tile. It took everything I had not to hit the buy button… seriously, it’s SO pretty. I opted for dog art instead. If you’re wondering about the art, I shared a sneak peek on Instagram over the weekend (it’s saved on my story). I’m painting portraits of each of my boys (the dogs, obviously), and plan to have them framed. I’ll share a close-up of the first one below. I haven’t really painted since art school, so it was a nice creative break away from the computer!
 Cabinets are scheduled to be delivered this week, so I’ll share more as soon as soon I can… otherwise, that’s all for this week! I’d love to know your thoughts and feedback. I’ll be back here next Wednesday with another laundry update that will hopefully include the installed cabinetry!!
To see the other guest designer spaces in the challenge… click the logo below!

Your dog portrait is fabulous. I knew you were talented, but giiiiiiiiirl…
Haha!! Thanks so much, Jacqui! xox
Hahaha. Dog pix are the best! If I tried that muzzle measuring move with my doodle, I’d get more than a side-eye! (Also, love the bow tie.) This room is going to be smashing!
Haha!! He was not happy about that. Thank you so much, Peggi! Xo
Wow! This is a MAJOR reno! Amazing!
This is how our entire home reno has been…. down to the studs. Haha!!
Wow, so much going on with your renovation, can’t wait to see the final reveal! Good Luck!
Thanks so much!
Your doggos are so cute!! And I’m seriously amazed at your talent! Beautiful work!
You’re so sweet and the boys say thank you! haha!! xox
Oh my stars! That poor floor. Thank goodness for the extra help. The dog portrait is AHmazing! #sotalented Hang in there…yall are rockin the hard stuff. ~~Susie from The Chelsea Project
Thank you, Susie!! We kind of expected the rotten sub floor- that’s been the story of our entire home reno, but extra hands was definitely SO helpful and sped things up. xox
It will look gorgeous but I do ADORE that dog wallpaper and wish that you had used it. It would look divine with a simple black and white floor tile.
It’s definitely beautiful, but it would’ve been so busy with the floor tile- especially in such a small space.
Yup – it has to get messy before it gets pretty! I wrote a similar week 2 post – my space was down to the studs, too. Floor torn up for new plumbing. It can only get better from here!
Exactly! It only gets better from here. Kudos to you for stripping it down to the studs as well. It makes a big difference to fix all of the issues and do things from the ground up! xo
Sarah my pups would love those custom made beds! So happy for you that you had extra help with the sub floor and all is moving forward. I can’t wait to see what you do this week!!
Thanks, Susanne! It’s starting to come together, and hopefully the dogs will enjoy their new space. xox
Looking great! Can’t wait to see it finished! I love the built-in doggie crate and the art! So adorable!
Thank you, Becky!!
That dog portrait is so great!! It just makes me smile. Can’t wait to see those two cute guys snuggled in their crates
Aww thank you Lindsey!! I hope they love their new spot after I’ve invested so much time in designing the custom crate. haha!! xo
Looks like you got a lot done this week! I’m so excited to see it all come together!
Thanks so much, Ruthie!
Your love for your dogs is like my love for my cats. (One is on my lap now enjoying some time before the baby gets up, and I keep them in mind on pretty much every project!)
Awwww!! Life wouldn’t be half as sweet without pets. They make my day! Give your cats some snuggles for me :) xo
I think I would have cried to find rotten subfloor! It is nice to get all the “behind the scenes” work out of the way though, and I imagine it gives you peace of mind knowing the floor is now solid and secure! Your pups are adorable and I am really looking forward to see how their crates turn out!
We pretty much expected it, Maureen! We’ve renovated enough rooms in the house to know what’s hiding underneath the floor. Haha!! Thanks so much for following along :)
I love that you measured your dogs for their safety! You’ve made so much progress with these major things getting checked off the list.
Anything for the pups, ha! xo
Oh my goodness, your dog painting is perfect. This is going to be one fabulous laundry room!
Can’t wait to see that dog crate! I’ve been thinking about making one for our dog too. Love your idea to measure it your dog. So smart!
Such a talented artist – love your painting.
Aw thank you, Caireen! xo
This is amazing. I’m looking to build a similar dog kennel cabinet. Can you provide more info on the laminate that was placed inside of the cabinet to protect the wood?
Thanks, Jacqueline! We purchased that from a local company. I wish I had a link, but it may be best to see what’s available near you, since they’re available in large sheets.