Faux Fireplace DIY & Styling Tutorial
Hi again, Jordan here! I’m back to share my DIY faux fireplace – how I designed it, how it was built and installed, and how I’ve styled it for the season ahead. Immediately upon purchasing this home, I knew this wall needed a focal point. It’s the first thing you see as you walk into the house, and in a small space, I needed it to be both beautiful and functional. Read on to see what we came up with and how we made my dream of having a fireplace come true!
When we moved into this home, we owned absolutely no furniture other than our bed and nightstands. For the first couple months, our living room was furnished with two camping chairs and a $15 secondhand table, ha! We eventually added trim and window treatments- similar to the one’s we installed in our dark green office makeover, and I found a sideboard on Facebook Marketplace that lived on this wall for over a year. It was beautiful & offered a little bit of storage, but when the holidays came around, I was sad to not have a mantel for my stockings, and my husband, Todd, was eager to have a TV in our main living space. As you may know from my holiday home tour, I love to decorate for the holidays and knew I was going to have to figure out a way to build a fireplace.
Planning & Designing
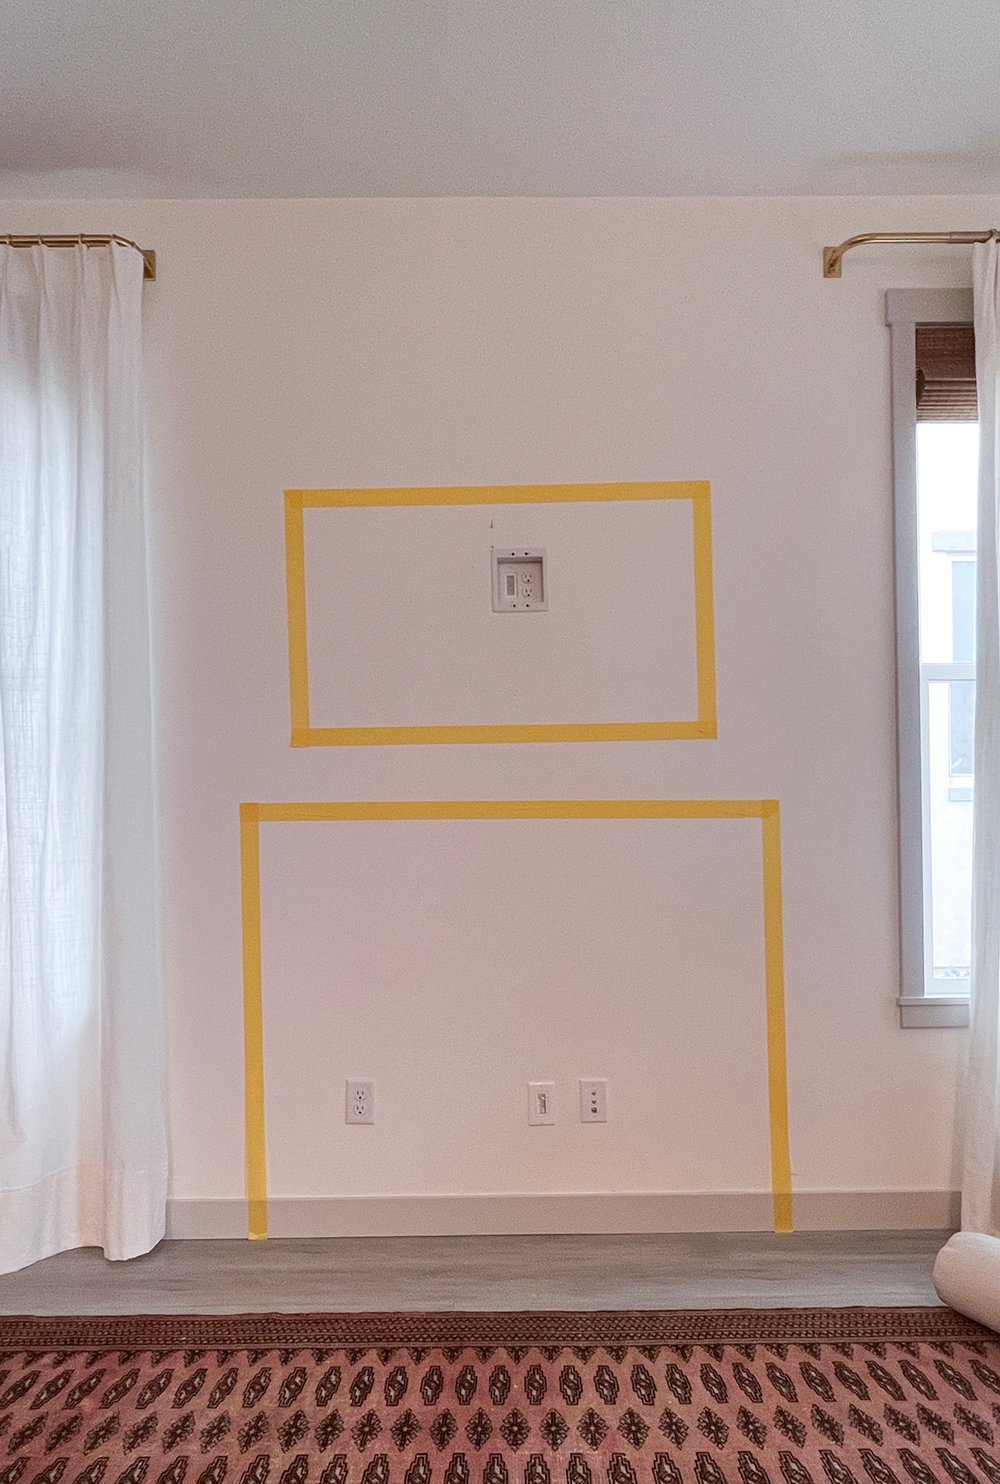
While I wasn’t originally planning to share this process, I hope these photos and my descriptions offer enough explanation for anyone hoping to tackle this project! I started by measuring potential fireplace and TV sizes with tape. This wall has two windows on either side, and I wanted to maintain symmetry in the fireplace design. I left some room for our drapes on either side, and we ended up with a fireplace that is 45″ tall and 58″ wide. Todd and I discussed (argued about) TV sizes, and decided on the 50″ Samsung Frame TV, which we snagged during a sale. As you can see higher on the wall, our home came with an outlet for a tv, which made things quite easy when it came to installation!
Selecting Materials
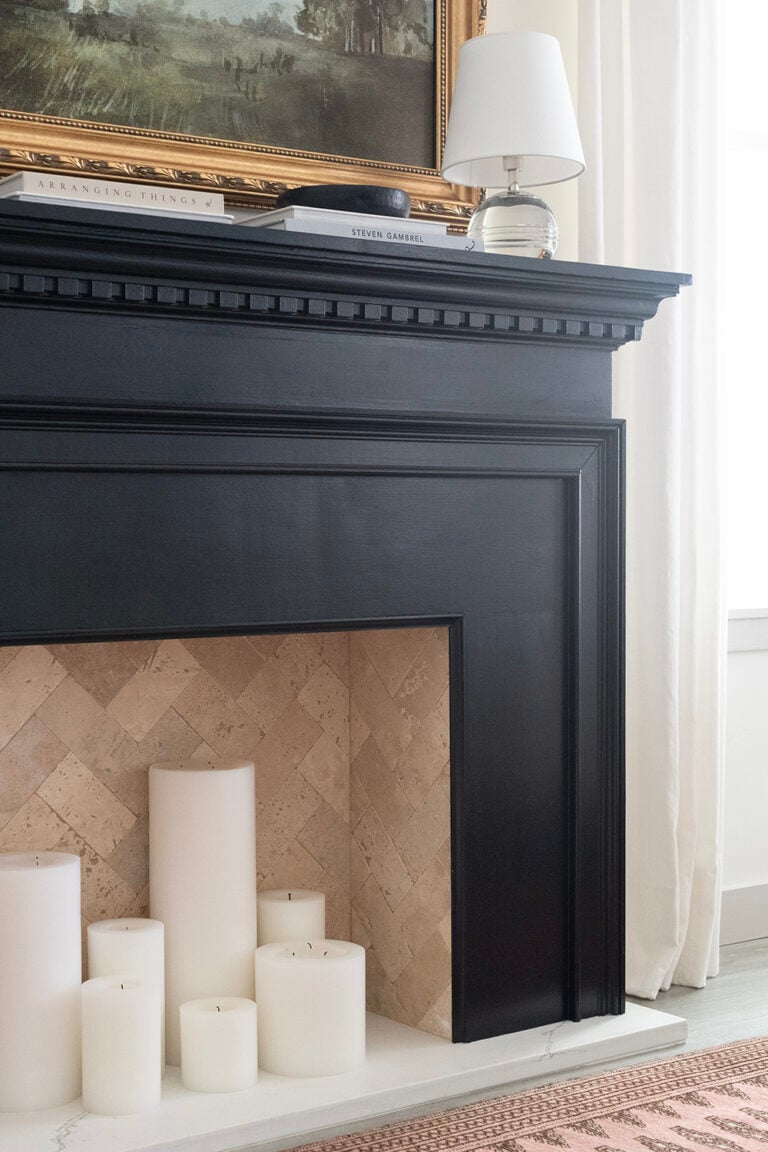
Our next step was to plan the construction and select materials. I got the idea to source a stone slab to act as the hearth. After searching some local stone fabricators, we found a neutral colored quartz remnant that could be cut to the size we wanted. While I would have preferred a natural stone such as marble or soapstone, we couldn’t beat the price of quartz. We got the whole piece for around $60! Thanks to my Dad’s extensive tool collection and expertise, we were able to cut and hone the stone at home, on a freezing cold winter day.
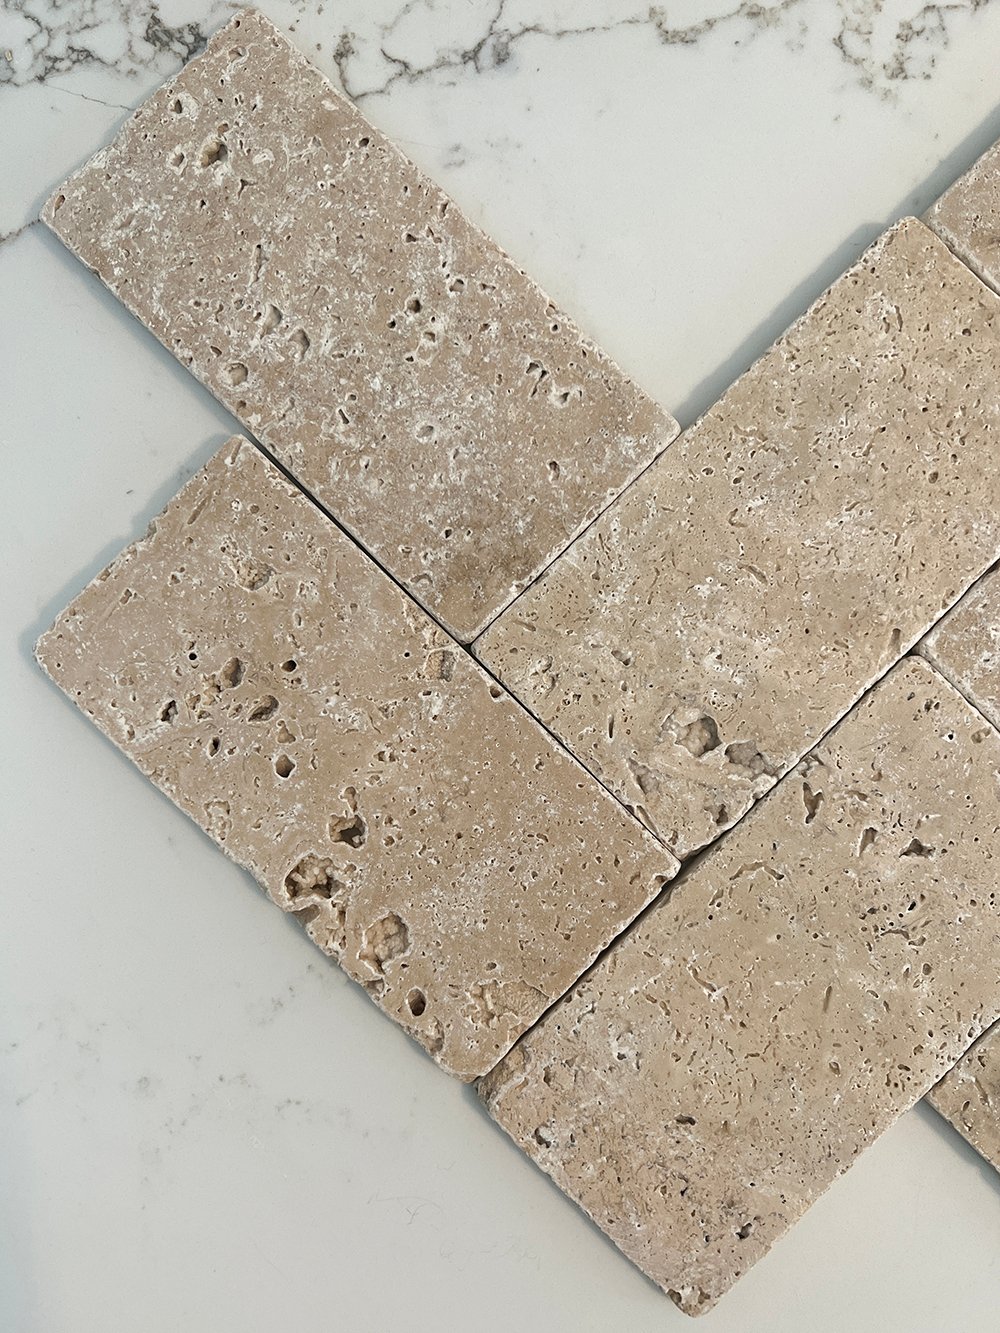
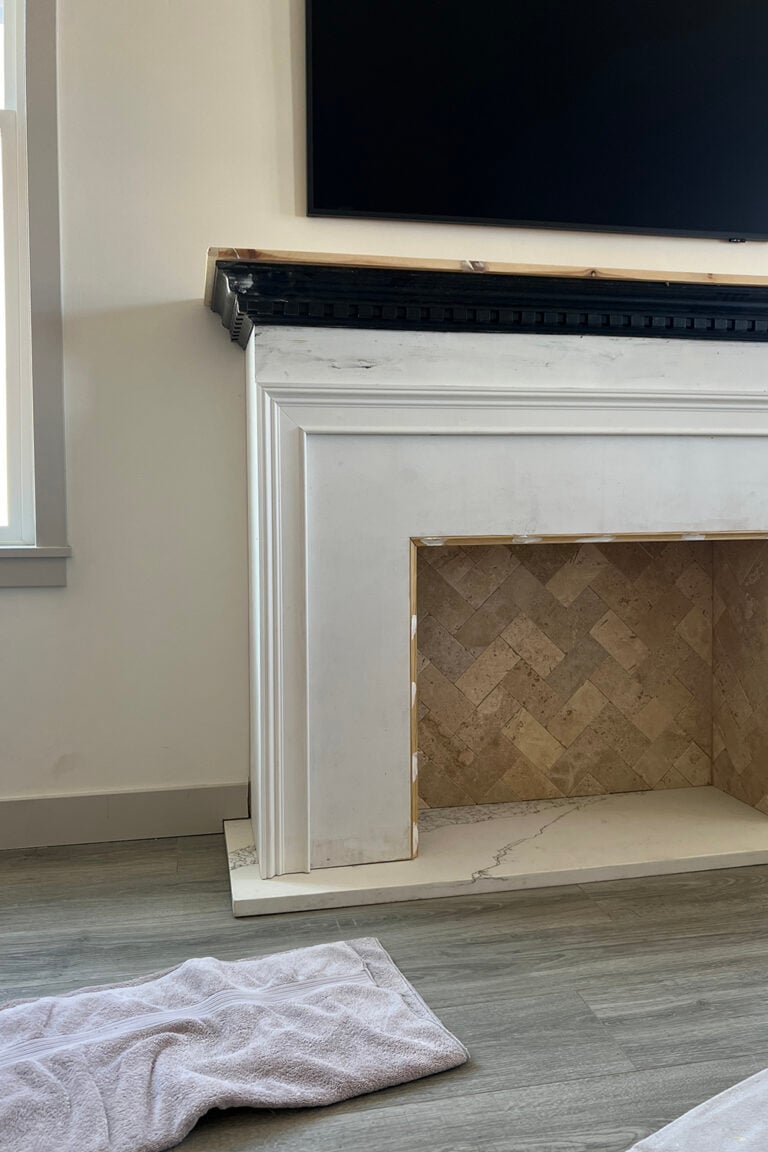
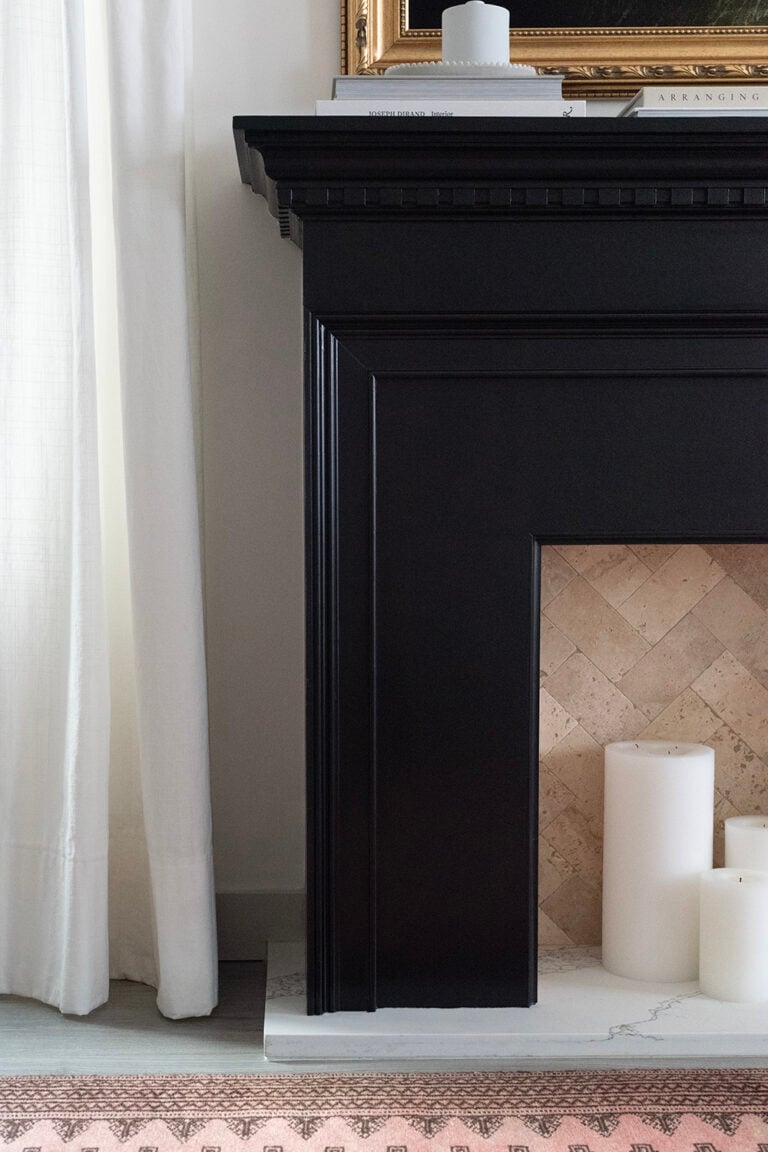
For the fireplace interior, I wanted to mimic the look of a classic brick firebox. I found some tumbled travertine tile that we chose to lay in a herringbone pattern.
Construction
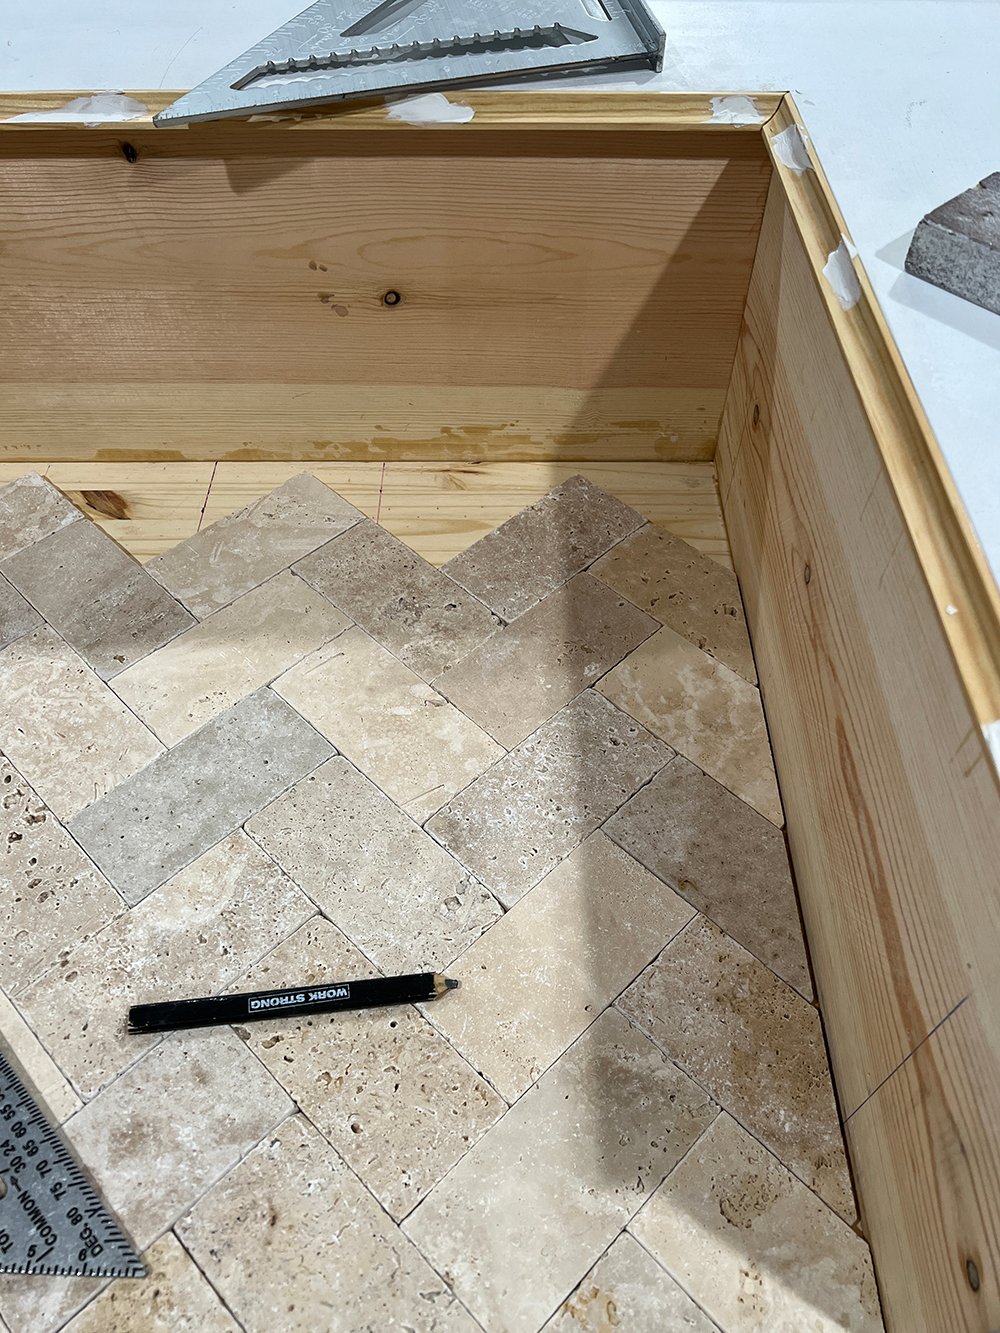
Frankly, I am not the expert craftsman in the family… and neither is Todd (sorry, Todd). That title belongs to my dad. I came up with the design, and my dad worked out how to make it a reality. The best way to describe how the mantel is built, is to say that it is a box-within-a-box. We built the face frame to the dimensions I drew up (height, width, and the size of the firebox cutout), attached the two sides, and then attached another inverted box to the face frame where the tile would be installed. We didn’t attach a bottom piece, so the hearth would show. The pencil marks on the right that you see in the photo above show where we attached support pieces within the fireplace (a couple on either side) to provide more stability. Then we added a top and decorative moulding. We attached a thin cove moulding to the inside front of the cutout to hide the edges of the tile that would eventually be installed. Then we got to work laying out the tile, adhering it to the back, sides, and top of the firebox, and then grouted it all.
Installation
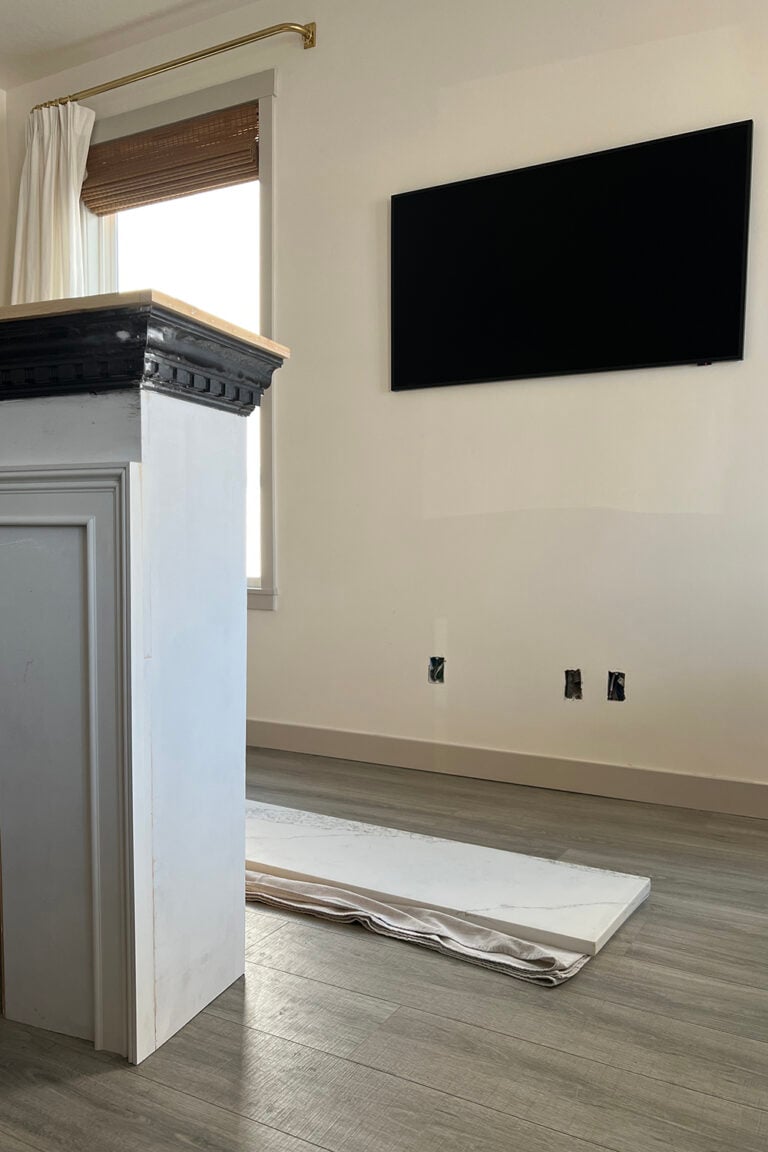
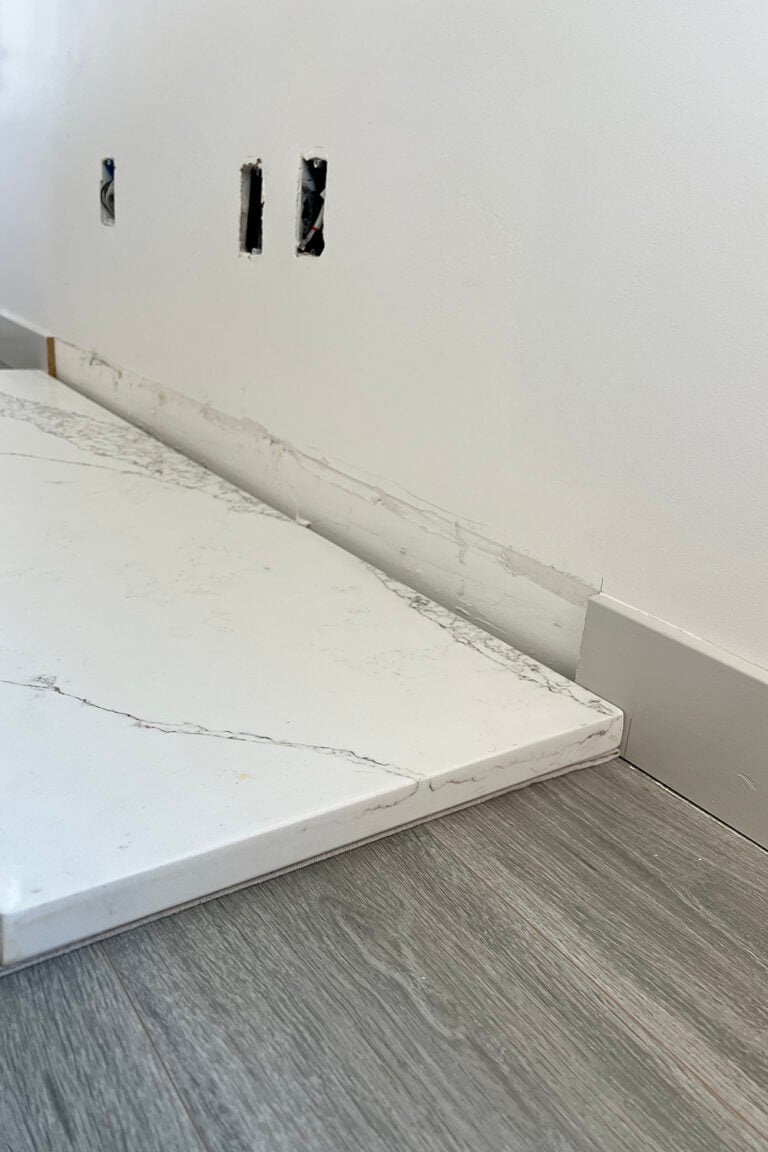
By the time the fireplace was ready to be installed, we had already hung our TV with all the cords hidden, which made our fireplace installation quick and easy. First, we removed the baseboard that was in our way, and laid the quartz hearth on the floor, centered between the windows. I’ll let you in on a secret… that’s pretty much all we did for the hearth. We cut a piece of laminate flooring underlayment to go beneath it, pushed it against the drywall, and caulked it to the floor. My wishlist for this home includes eventually replacing the cheap builder-installed gray flooring, and this will make it easy to take out and put back when that time comes.
We then attached three 2x4s to the wall (one horizontal to the floor at the height of the mantle, and two vertically along either side), anchored in studs. This allowed us to place the fireplace on top of the hearth, then shoot some nails in through the sides and top of the mantle to attach it to the wall.
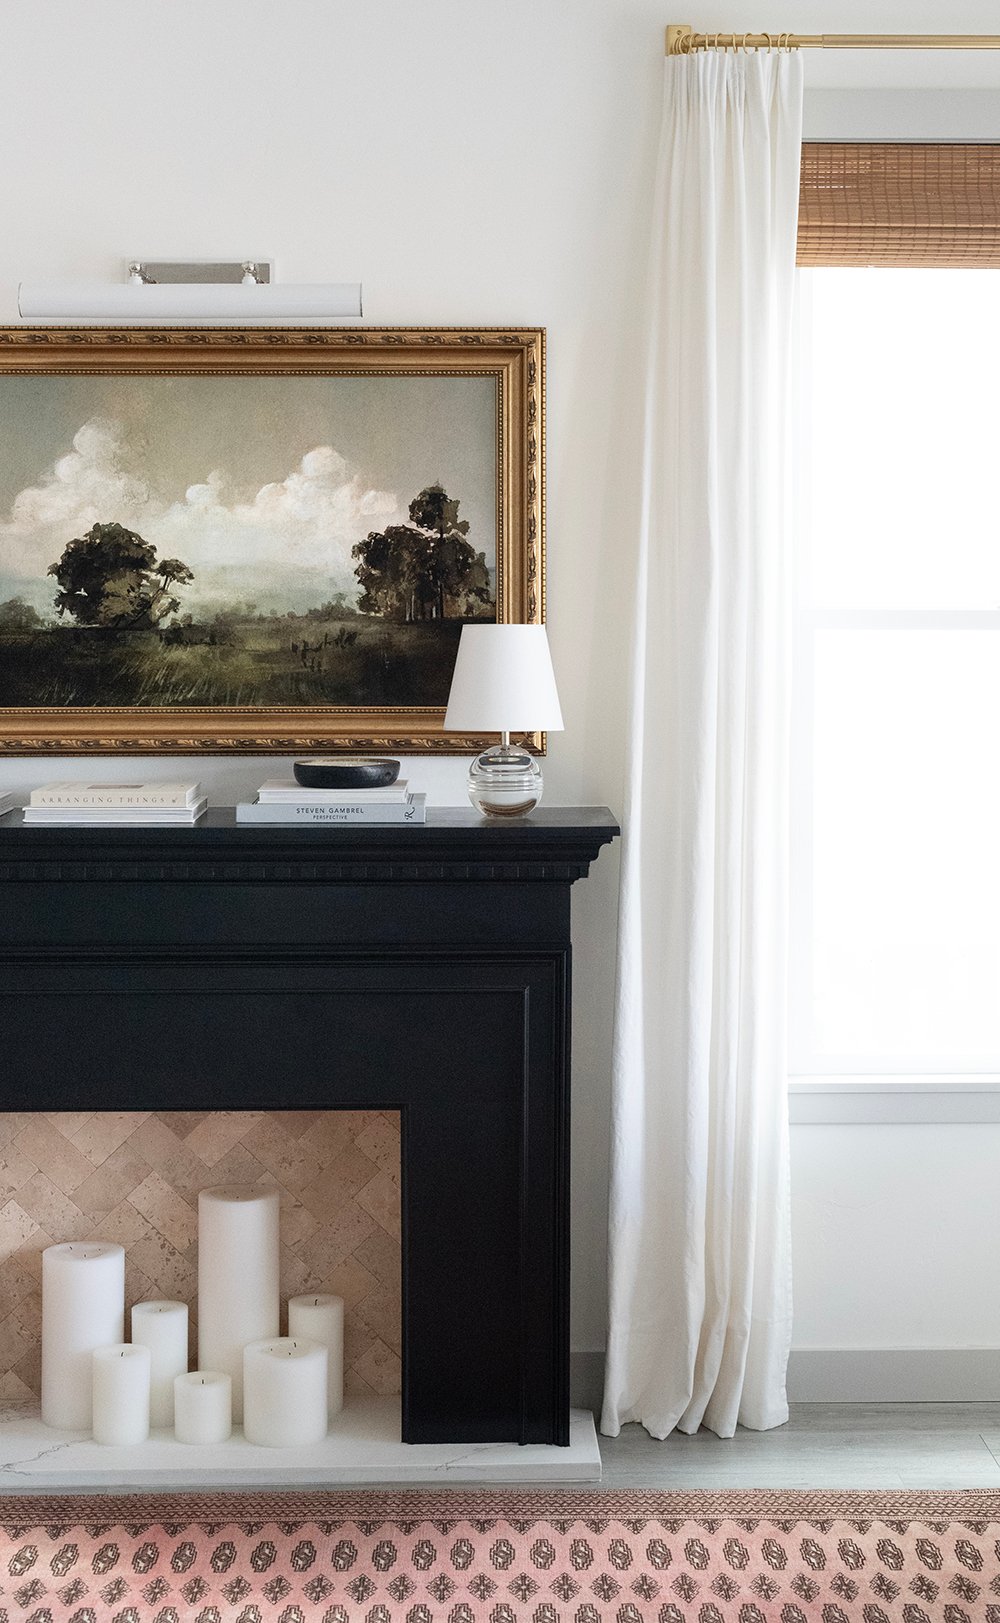
All that was left to do was fill holes, caulk (I ran caulk along the base of the mantle where it meets the hearth), and paint! I selected Sherwin Williams Tricorn Black in semi-gloss.
The Final Result
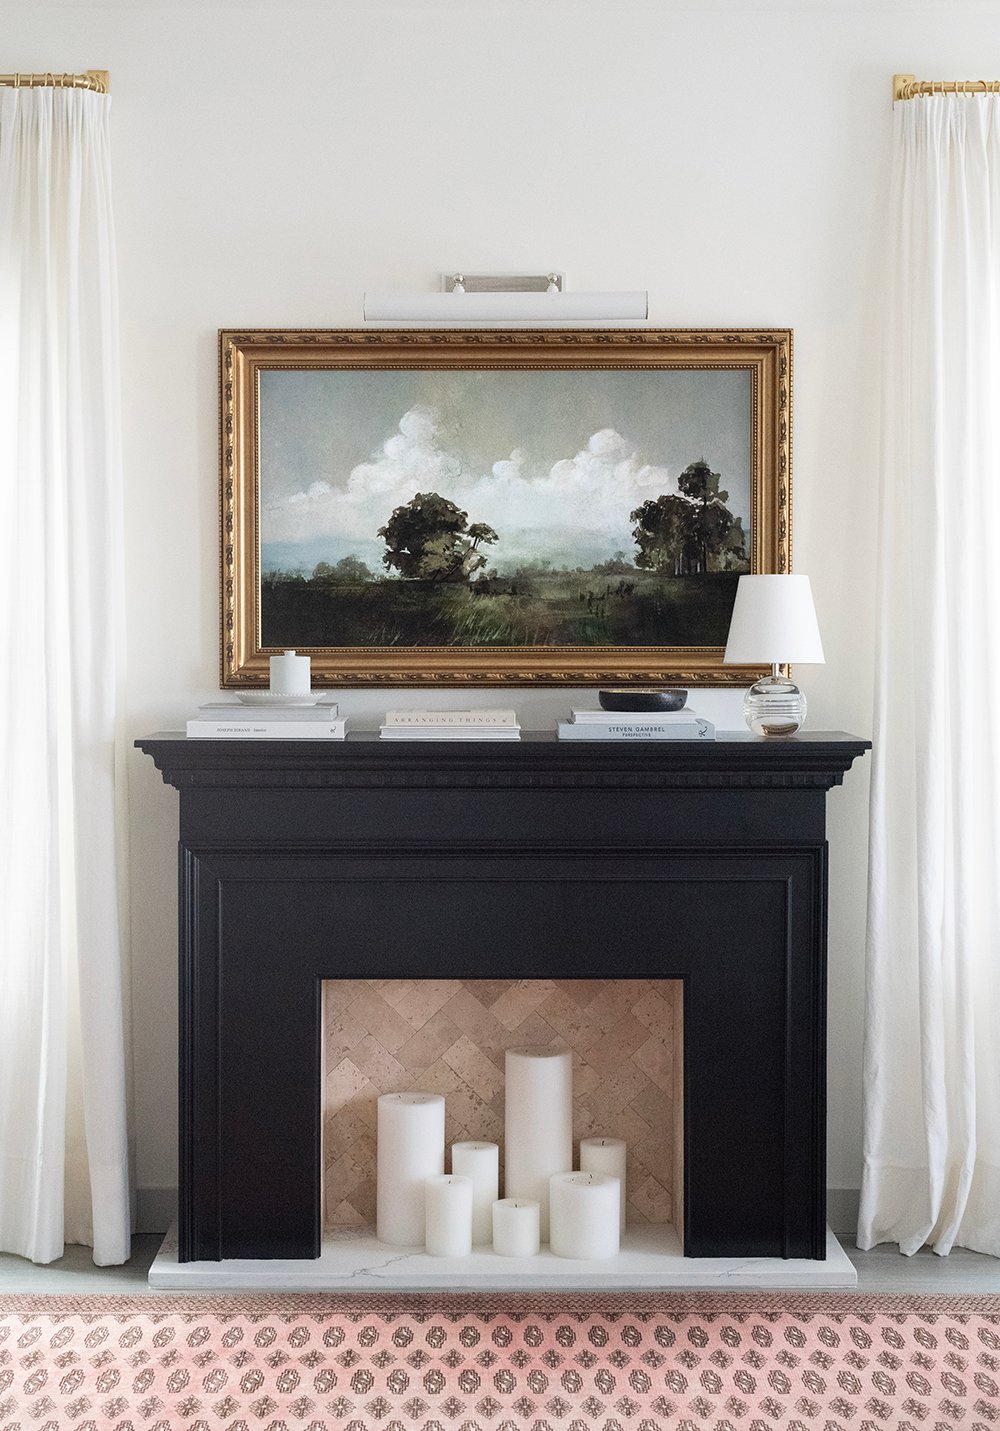
Once everything was painted, I selected a TV frame, picture light from Tuesday Made, and some oversized pillar candles from Crate & Barrel. The tallest candle is 16″ tall, and when they’re all lit they actually do warm up our main living space!
Faux Fireplace Styling Ideas
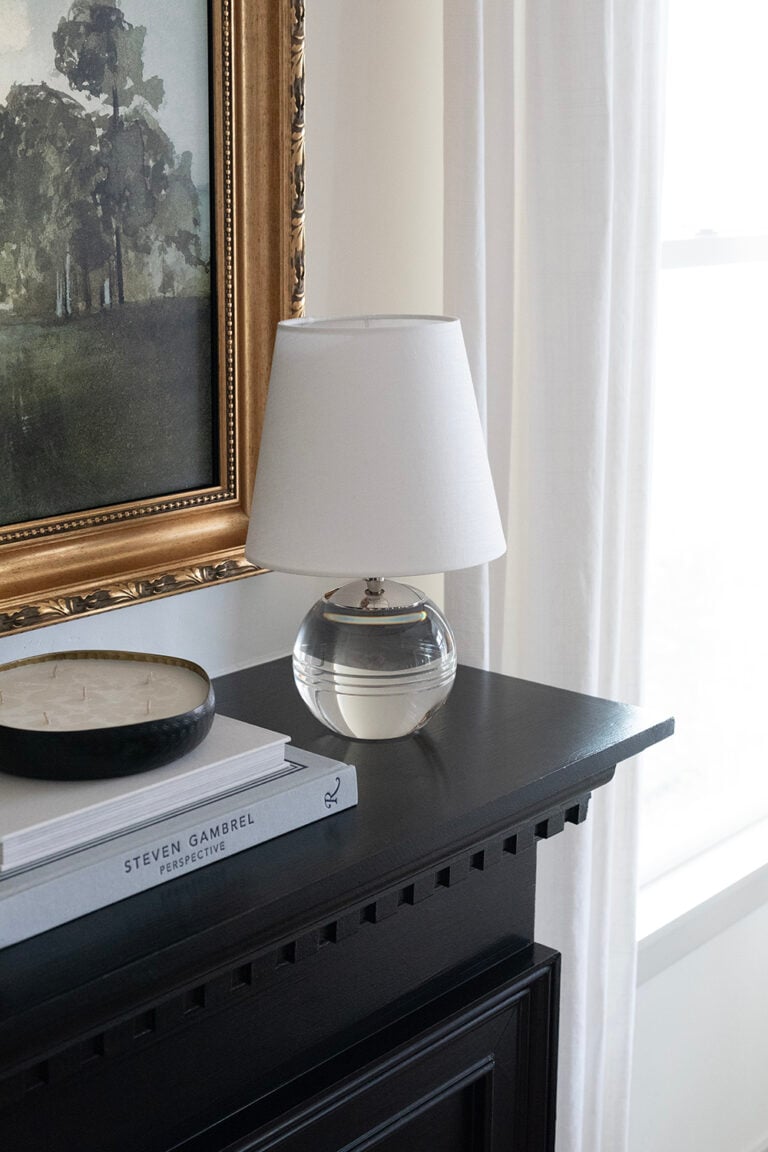

The last (and most fun!) step is styling. I generally kept it pretty minimal, so as to not block the TV screen, and I of course lean heavily on Tuesday Made for my decor (shop perks). A few stacks of books, a couple scented candles, and my favorite Nicole lamp were my choice this time around. I also have fun swapping the TV art each season – I found this pretty landscape from Juniper Print Shop.
Get the Look: Sources
Click directly on each item below to be redirected.

picture light // tv frame // tv art // curtain rod // drapes // woven shades // crystal lamp // 6-wick candle // pillar candles // vintage rug (similar) // lidded candle // stoneware tray // travertine tile // border moulding // crown moulding // book 1 // book 2 // book 3 // book 4
FAQ
It actually took me a while to decide on black for the fireplace. I have always loved the look in other inspiration photos, but wondered if it was too bold for our space. I ultimately decided that black would balance the full space nicely. We have black counter stools in our kitchen opposite the living room, and a black metal railing to the left, heading up the stairs.
This was very much a stop-and-go project. It took a while to source all the materials, find time on the weekends to build it with my dad, and then install and paint. Although I originally hoped to have it done for the 2022 holidays, we finished it in the early months of 2023. And then it took even longer to select and purchase a frame for the TV. All in all, it took around 5 months! We didn’t have a blueprint for this project, so it took time to nail down all the details (no pun intended).
This came down to the fact that we don’t plan to live in this home forever (and therefore don’t want to invest a ton of money into it), and we have an HOA that limits what we can change about the exterior of the home. That means we couldn’t install a real chimney, and after shopping around for electric fireplaces, I decided that I didn’t care too much about adding actual heat to our home (it’s new and very energy efficient). So taking into consideration the budget for and ultimate purpose of this fireplace, I decided that design and cost efficiency were my main goal.

Thanks for reading about my faux fireplace project – I’ve been so happy with the end result and have lots of fun switching up the styling every so often. Let me know in the comments if you have any questions; I’ll do my best to answer them!

Good morning, Jordan! How have you been? I love that you had a vision and then BOOM, made it reality. (Due credit to handy Dad!) The final result looks fantastic and suits that spot perfectly, adding a lovely touch of warm, traditional charm…and a place to hang your Christmas stockings! FWIW, I think black was the way to go-classic and grounding. Plus a little punch. Your current season styling is so clean and pretty. And I know that oud noir candle deliciously scents your entire space! Shop perks, for real. Nice work on the tutorial also. Your reasoning and process were clear and logical, and the progress photos provided helpful context. The *only* thing missing is Margo lounging in front of the hearth!🤣 Adorable dogs enhance every scene, says I. Thanks for sharing your project. Oodles of folks pining for a focal point just found their inspiration! Have an amazing Wednesday!💜
Hi Peggi! I’m doing well, and I hope you are too! Thank you so much for your kind words. I’m glad we tackled this project, and that my dad was willing to lend his skills & time. And noted…more Margo!! Haha!
It looks so good!! I love the TV frame and art, too!
Thanks so much, Brenda!
Good morning Jordan! Lovely to have you back on the blog this morning. What a creative way to create a classic, elegant, focal point for your living space. It was definitely meant to live on this wall, and the end result is stunning. Shout out to your dad for making your vision come to life! I love your selection of tile and hearth- they compliment each other well, and make this faux fireplace look as though it could be a real one. I’ve gotta say, this is genius on a whole new level- and the tutorial is easy to follow. All in all this project seems like a relatively low cost, high impact addition to your space. It’s gorgeous, and your styling is perfect (as always). The frame you selected for your tv is *chefs kiss*- that detail!! Thanks for the fun peek into your home, and thought process! This is a fun one, and the pay off can’t be beat. Cheers to Wednesday!
Hi Lauren, and thank you so much! It has definitely made the impact that I hoped it would, and it was well worth the effort & low cost.
This adds so much character to your living room. Every choice you made feels natural and inevitable for the space. It is lovely, and such a great option for a home without a chimney!
Thank you so much!!
I really like all of the details you put into this – it looks great!
Thank you, Monica!!