Dog Feeder DIY
If you take your dog parenting as seriously as we do, you’re going to love this post! We’re always trying to find ways to make our pups happy, while keeping our homes looking tidy and visually pleasing. There’s always a fine line between your home looking like your dog runs the show, or intentionally creating well thought out spaces for your pets.
We’re always happier when our dog’s toys, food, and bed are in their designated spots. You might remember this post… a little corner just for Finn. Well, we’ve decided to take it a step further- in a more practical direction.
We’ve teamed up with Solid Gold, America’s first holistic pet food with more than 40 years of experience developing transformative nutrition for pets, to bring you two DIY projects that make feeding your dog easier, and certainly looks better than most alternatives. The best part? Both of these options require zero nails or screws… it’s all done with wood glue.
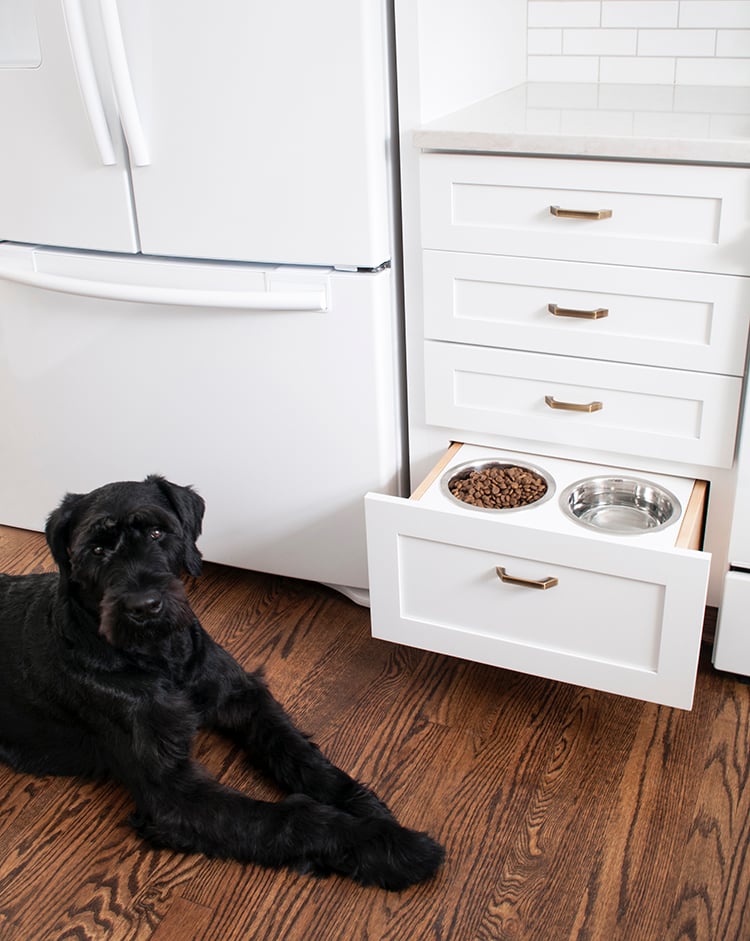
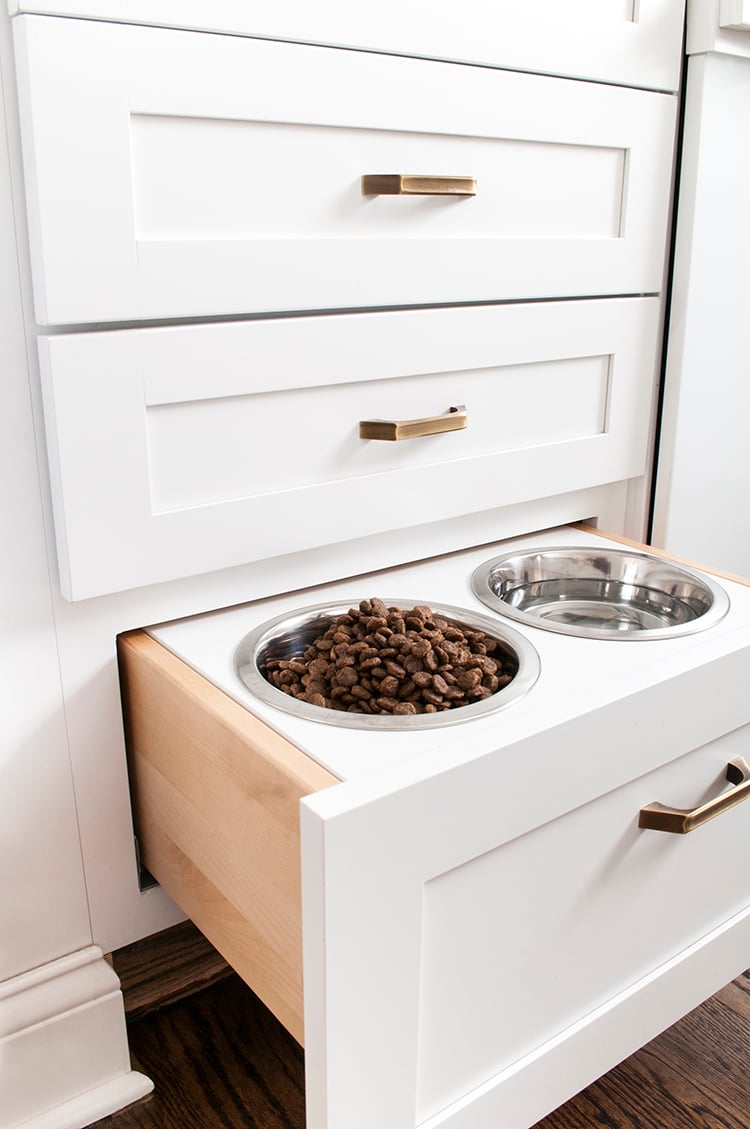
D I Y # 1: Recessed dog dishes built into cabinetry.
Our dogs are both large breeds, so they’re taller. We’ve seen a lot of these types of feeders built into the kick plate under cabinetry, but that’s too low for our big pets. We opted for a deep drawer that was tall enough for Finn to comfortably eat his favorite food. Please ignore his choppy beard in these photos- someone pretended to be a groomer last month and it’s slowly growing back, ha! Poor guy.

Ok, let’s get started on option one. Here’s how to build it:
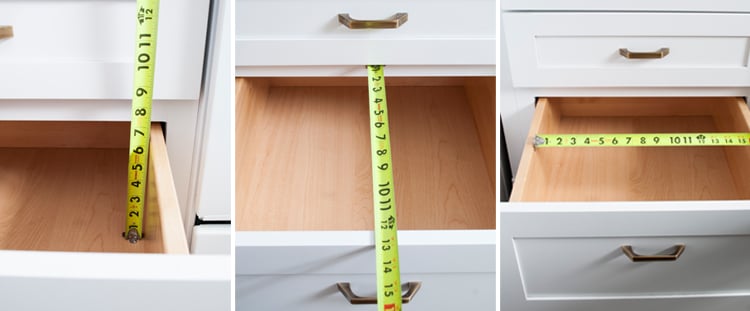
1. MEASURE: note the depth, length and width of the drawer you’d like to fit. You’ll need a 1″ thick board (we used poplar). Mark four legs that are measured using the depth of the drawer, minus the thickness of the board you plan to use for the top.
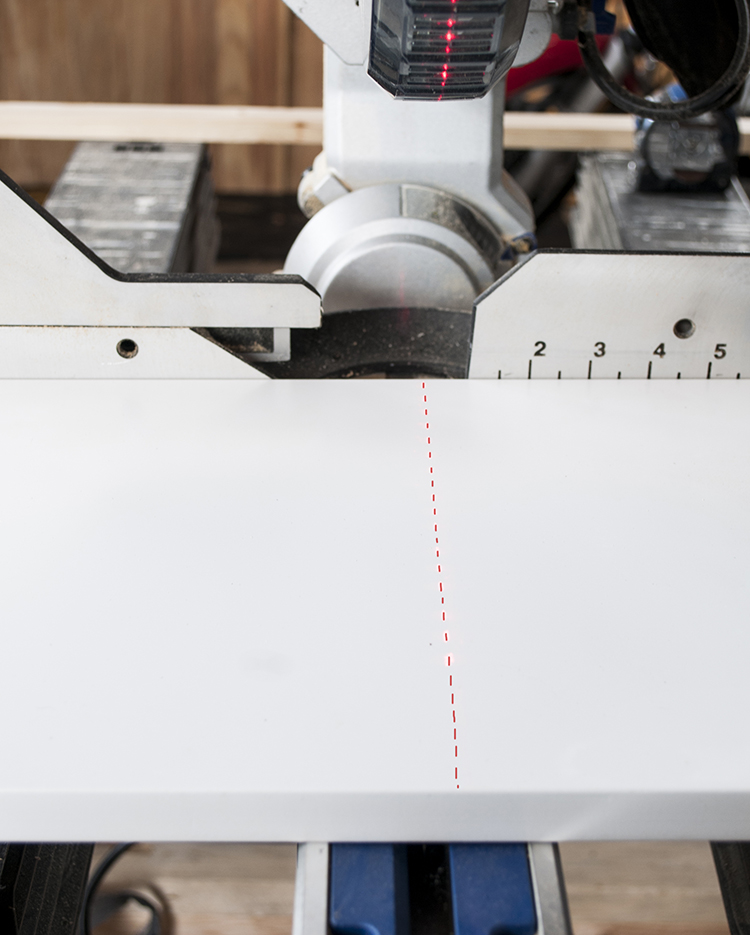
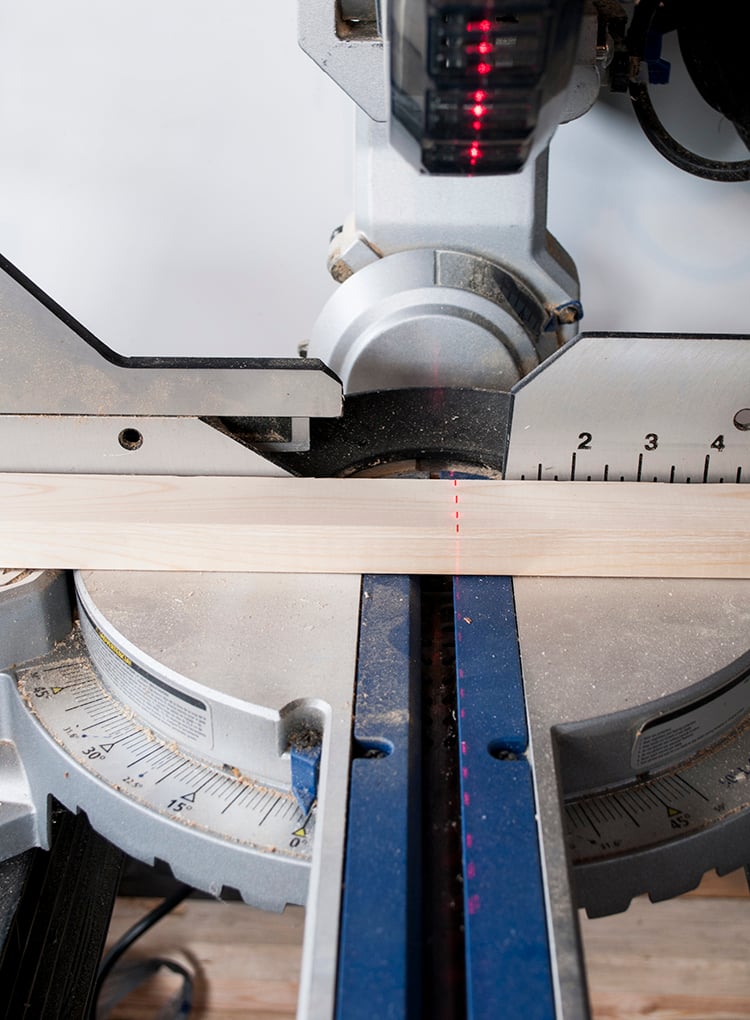
2. CUT: begin by cutting four legs and four cross braces, followed by the top piece. Cross braces are used to square the legs and should be cut to fit inside the legs (see image in step 3). Cut the top piece using the length and width measurements of the drawer (tip: cut 1/32″ larger than planned, then sand it down as needed, so it fits nice and snug).
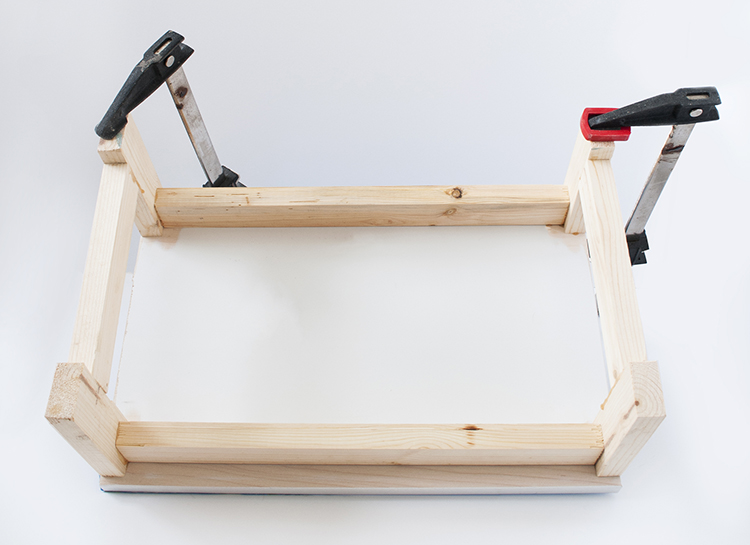
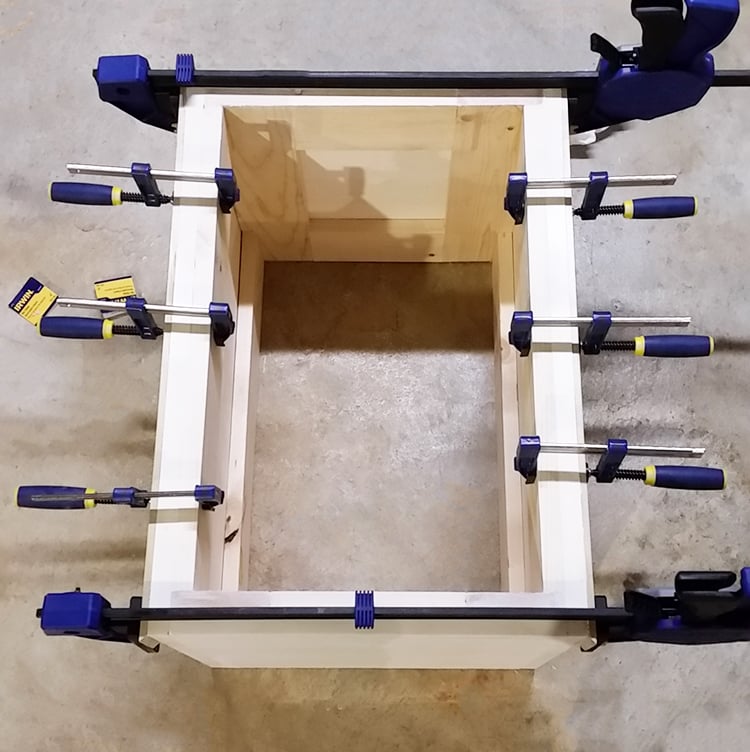
3. ASSEMBLY / GLUE: Glue the legs to the cross braces, which forms a rectangular frame. Use a square and clamps to ensure true corners without shifting during the drying process. Once the legs and frame are set, glue the frame to the top piece.
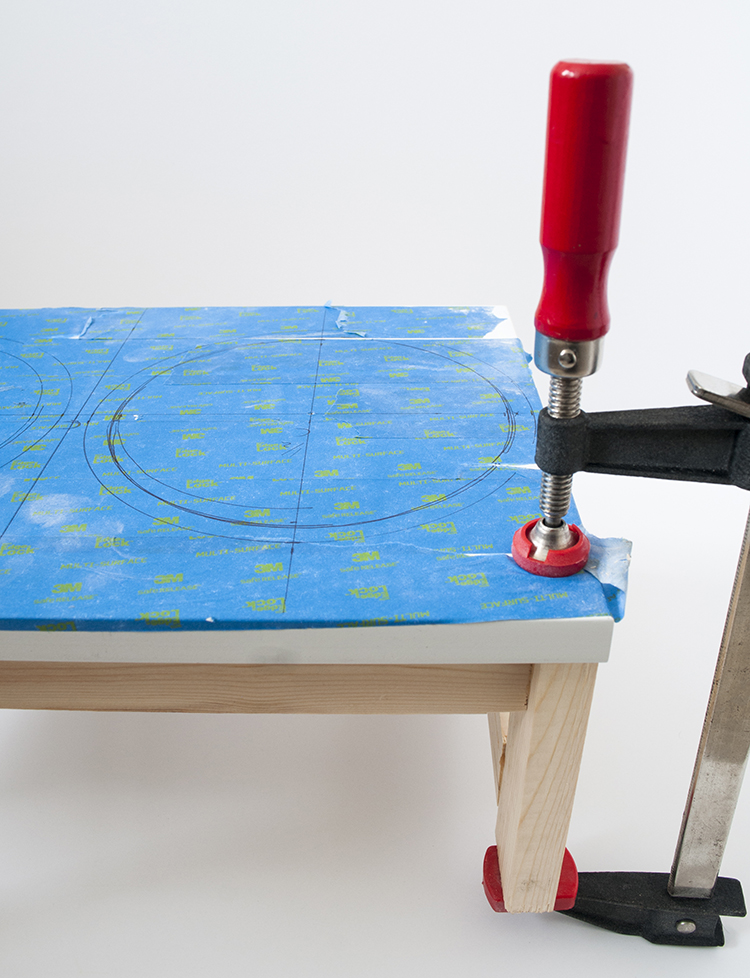
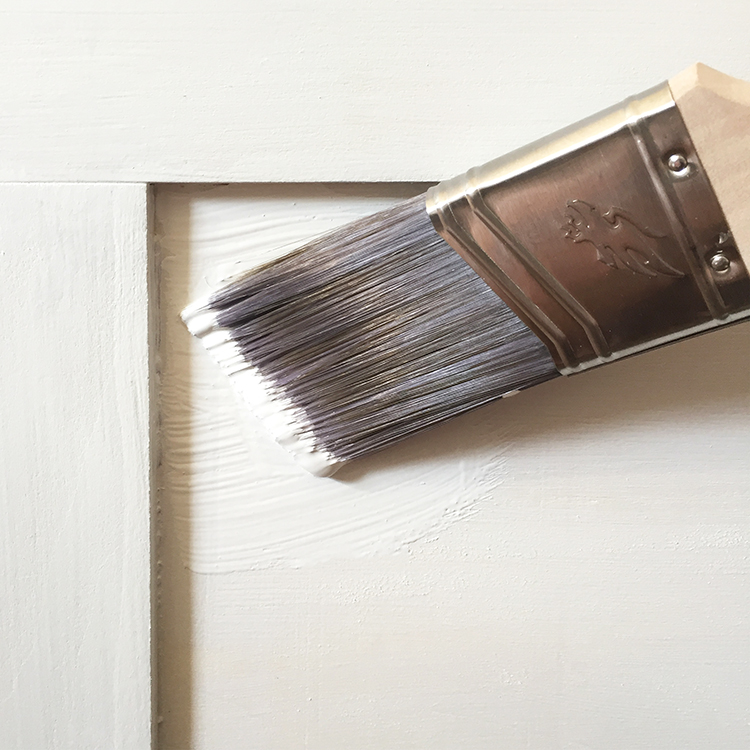
4. INSERT BOWLS / PAINT: Measure the placement of your bowls, draw a template (these bowls have a lip- so take into account the holes will actually be smaller than the dishes), use a jig saw to cut two continuous circles (tip: cut 1/32″ smaller than template, then sand it smooth). Paint the top (ours was pre-painted) and insert dog dishes.
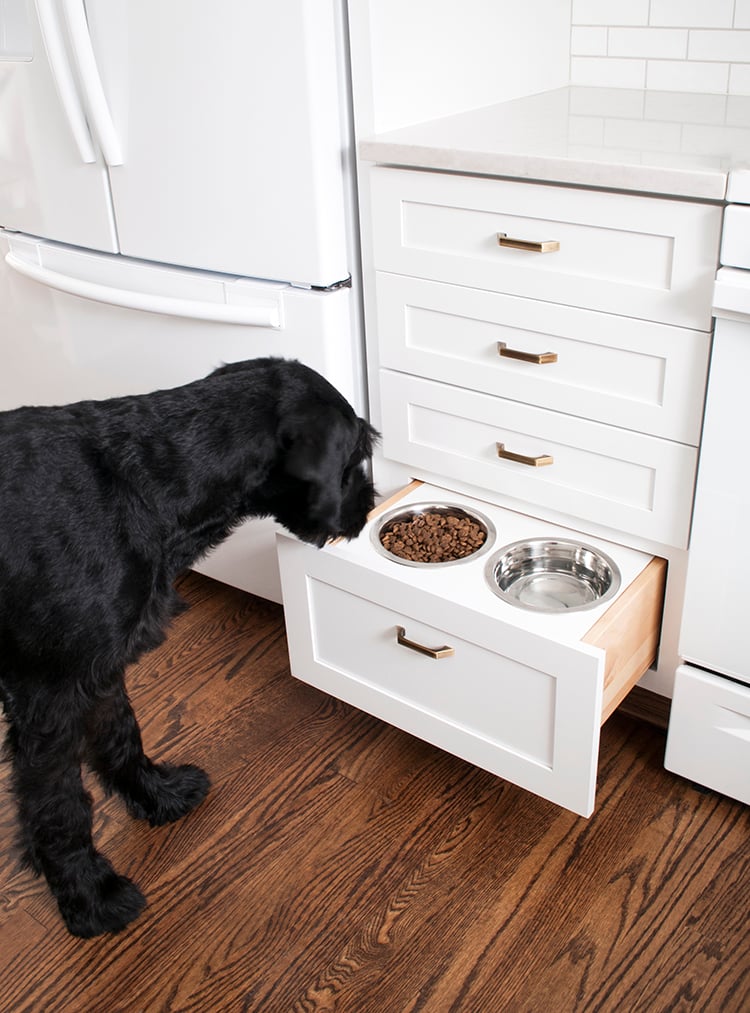
Your frame should fit snuggly in your drawer, flush with the top- so it’s easy to open and close. I love that it’s not a permanent cabinet alteration, but looks and feels custom.
Odds are if you’re interested in your pet’s your well-being and you’re going out of your way to build a new eating area for them, you also find their nutrition pretty important. We take our dog’s diet very seriously because we want them to live a long, healthy, and happy life.
They’ve been eating grain and gluten-free since they were puppies. We would never feed them any animal by-products, corn, wheat, soy, sugar, artificial preservatives or flavors. So we were both very happy to find Solid Gold, made right here in the USA and packed with high-quality proteins and a blend of 20 nutritious superfoods. Finn and Piper both eat this food, a grain & gluten free option crafted with cold water salmon and hearty vegetables. What do you guys feed your dogs? We’d be interested in your feedback! Ok, onto the next DIY…
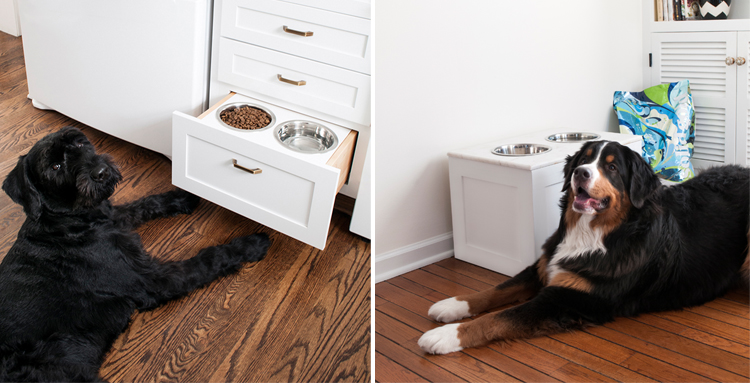
D I Y # 2: Free standing, marble top dog feeder.
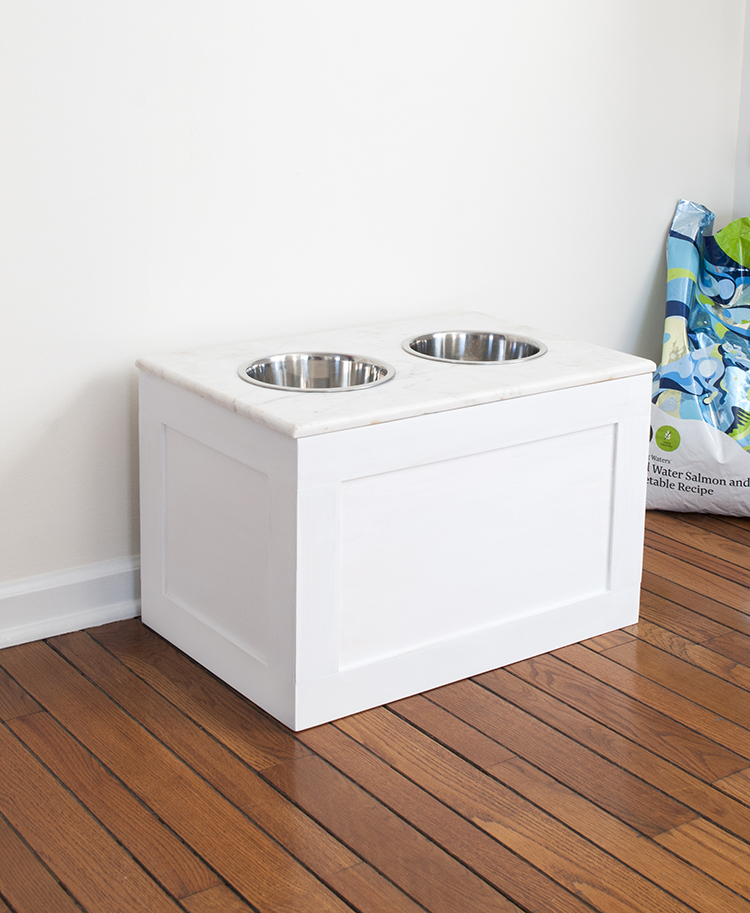
This might be our favorite DIY to date. This pet feeder is anything but an eyesore and we actually don’t might leaving it out and exposed. Who doesn’t love marble?! Plus, the interior can be altered and used as food storage… in the case you don’t have one of these nifty cabinets close by.
1. PLAN: Determine the appropriate size for your dog and source a slab of marble. You will be able to cut the circular shapes into the stone, but finishing a marble edge is much trickier. We found a slab that already had a finished edge… or you could take the easy route and hire a fabricator to take care of all cuts and finishing (if you do this disregard step 5).
2. CUT: After determining the desired overhang around the marble, it’s time to begin cutting and building the frame accordingly. We used 1″ x 4″ pine boards for the frame. Much like the first DIY, you’ll need legs and cross braces. Cut 4 legs of equal length, followed by 8 braces- 4 horizontal for the length, 4 horizontal for the width.
3. GLUE: Glue the frame together using a square and clamps (just like DIY #1). Once the frame is completely dry, it’s time to close it in. Our frame is wrapped in aspen panels. These pieces came from Lowes and were already sized as needed; we only had to make one cut. Glue the aspen panels to the frame, two sides at a time… allowing it to completely dry in between (tip: keep all pieces flush with the top, so marble will sit level).
4. BASE FINISHING: use 1/4″ x 3″ poplar planks to trim out the base. Miter the edges, if desired. Apply horizontal trim around the top and bottom of the base using wood glue. Next do the same with the vertical trim pieces. Your base is reading for sanding, priming and painting!
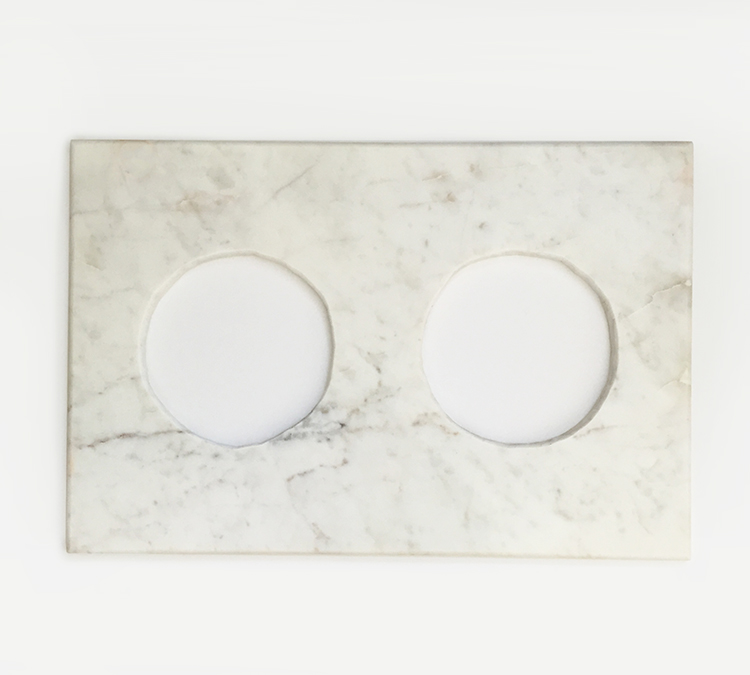
5. CUT / AFFIX MARBLE: Position and draw your circle templates onto the marble. Using a Dremel SAWMAX with a diamond grit blade, begin to cut circles. Be sure to stay 1/2″ inside the template when cutting. Once the bowls are close to fitting and the circles have been rough cut, switch to an abrasive 60 grit sanding/grinding wheel and sand circles to a finished look. Once the bowls fit, adhere the marble slab to the base with an epoxy appropriate for tile and stone.
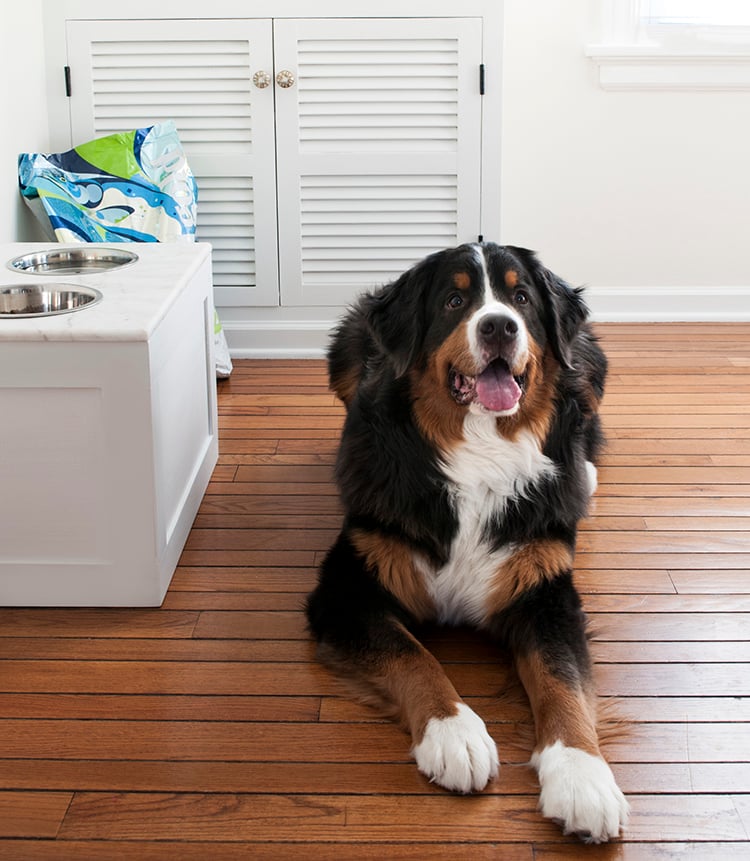
This is the perfect height for both of our breeds, Bernese Mountain Dog and Giant Schnauzer…. it ended up being about 15.5″ tall. Did you know that elevated dishes aid in a dog’s digestive health? Finn and Piper are definitely happy eating from their new feeders, and we’re happy they look nice in our homes!

We’re giving away a customized package formulated by a Solid Gold Pet Nutritionist based on your pet’s profile.
It will include:
One month’s supply of holistic pet food (of your choice or nutritionist’s recommendation)
Expandable pet travel bowl
Tote bag
Enter to Win (CLOSED):
1. Like Solid Gold on Facebook
2. Like Sold Gold on Instagram
3. Comment below with your pet’s name and their most mischievous moment!
One Room for Tuesday reader will be selected at random and will win the bundle of products mentioned above. Giveaway closes in two weeks. Good luck!
UPDATE: This giveaway is now closed. Thank you for entering and congratulations to Melissa for winning the bundle!
High fives to all the boss dog moms and dads out there! Let us know if you try either DIY or if you have any questions. If you’re not into DIYs or have a small dog… these bowls are very cute. Regardless, we’d love to hear how you keep your pets happy and healthy!
*This post is brought to you in collaboration with:

All content, ideas, and words are our own. Thanks for supporting the sponsors that allow us to create unique content while featuring products we truly use and enjoy. Special thanks to Kalyn Gibson for fabricating & creating these DIY projects on behalf of Room for Tuesday.
what wonder ideas! The Doggie Daddy is very handy and know he could make this
And Solid Gold pet food Rocks!
Hope I’m the lucky winner.
Paws Crossed!
Licks and Sniffs,
Jan Todd
Love the idea.
Counter surfing when our poodle is upset with us.
Buddha and Ama have turned our canoe into their little clubhouse. The way it leans against the backyard fence, as soon as we let them out to use the restroom, they haul it for their clubhouse (until they miss the couch of course!). Love the pups!
Congratulations, Melissa!! You’ve been randomly selected as the winner of our giveaway. Please email info@roomfortuesday.com with your address to claim your prize.
Hi Melissa, please email us your info within 24 hours to claim your prize, or an alternate winner will be selected. Thanks!!
I have an 8yr old Pitbull named King, and a 4yr old Chocolate Lab named Texas. When King was younger, before we had Texas, he suffered from really bad separation anxiety. At the time I shared an apt with my sister and I came home to find probably over 100 of her cosmopolitan magazines ripped to shreds!!! There was a good foot of shredded magazines on the floor all throughout the living room! Ha! I almost died! My sister wasn’t too happy. But once Miss Texas came into the picture he no longer had to stay in his kennel while no one was home, his separation anxiety went away! THANK GOD :)
Haha! That is so funny! Thank goodness Texas came along… otherwise you’d have no more fashion magazines to read ;)
liked solid gold on fb, no instagram. my youngest who is 5 now, Harley, her most mischievous moments were climbing on top of the cover of the pen, walking across and jumping out. i could not figure how she was getting out, when the other girl was still in the pen. so i watched and saw as she jumped on the cover of the pen, i kept one part covered from the sun, and she would walk across it and jump out. then there were other times when i would come home and she and her 1st cousin, who is 6, Tressa, had destroyed the house, the covers were taken off the furniture, the puppy pads were shredded, plants taken out of the planters, pillows on the floor, took me over 4 hrs to clean up the mess.
What an awesome gallery! Finn and Piper are lucky to have such attentive owners, and they’re both very attractive dogs.
One day several years ago when my family was grilling out in our backyard, our black lab, Gizmo, managed to sneak away with an entire package of hot dogs from our picnic table! We had given him one or two as a treat just a few minutes before, and then we found him nose-deep in the package a few feet away. It seems that dogs can always find a way to make their owners laugh and smile!
I wasn’t sure if cats counted too…! I have two felines, Tupelo Honey & Trixie. I walked into my bedroom one day to find a lump in my bed. Trixie had crawled into my bed (so under the coverlet, but on top of the sheet — not sure how she managed that) and was happily snoozing away, entirely covered by blankets! I’m not sure how she was breathing. But she loved it!
p.s. Liked on Facebook and Instagram! ;)
Haha! That’s so cute. Thanks for sharing! Of course cats counts, too :) We’re fans of all four legged pets.
my dog’s name is oreo. the most sneakiest thing my dog has done is when i went to the door because i thought someone was outside and my dog eats my salad. he just sat there like i dont know what happened as he licks his lips.
Haha! That sounds like something Finn would do. Thanks for sharing and entering! xo
This is fabulous! Kudos. We’re hoping to renovate our kitchen this year and I would love to incorporate this project. I always have to move my dog Nell’s bowls when we have anyone extra gathered at our table. She’s a giant- a Great Dane mix so the elevated height is key.
I’ll be pinning this for sure. Well done!
Thanks, Erin! Obviously we’re big dog lovers over here… Nell sounds adorable! We’re having guests stay this weekend, and I had the exact same thought: it’s nice to not have to move the dog dishes to the basement.xo
Oh and Nell’s most mischievous moment: It’s a tie between chewing my leopard print (favorite) heels and trying to “hide” under the kitchen table at dinner time. She’s a moose and couldn’t figure out how to get out.
Haha!! Piper does this with Jacqueline’s dining table and it’s hysterical. Big does who don’t realize how big they actually are… lol
Our 110lb great pyrenees lab mix Emma Jean had bad anxiety when firework season rolled around she was at home with my husband. He was up in the shower and she came barreling through his door and jumped through the shower curtain to get to “safety”. Mike thought it was an intruder!
our shop dog seth stays with me a lot of times and when I go to feed him at night he lets my cat eat his food with him between his legs so its like a two-er at feeding time lol
I love Seth!! ha :)
We’re new puppy parents and are looking for way to integrate our Icelandic sheepdog pup Skyr’s feeding bowls into our home. The DIY marble stand is perf — our home has a matching marble console and coffee table.
Our mischievous pup is a chewer – the minute you take off your socks, she darts for it. Great post!
P.S. Liked Solid Gold on Facebook & Followed on Instagram (@skyrtheicie)
Thanks, Anisha! So glad you like the feeder. As new puppy parents, you’re in for a lot of fun!! xo
Liked on Facebook and liked on Instagram. My dogs most mischievous moment? Hmmm there are SO many! My five year old Dalmatian Mila is bad to the bone but so dang cute. She’s chewed phones, shoes, sunglasses and even chewed a hole in our leather couch. She’s ate raw chicken breasts, protein bars, a bag of un cooked rice and even stole a foot long sandwich right off the counter. Even though there have been many mischievous times for her I would say that the most mischievous would be when she brought a dead lizard in through the doggy door and brought it with her into my bed. I had no idea That she had brought her dead lizard with her to snuggle in bed with me and you can imagine my shock and surprise when me boyfriend walked in and pointed out her hidden treasure in the bed!
Ohhhh my gosh! It’s a good thing Mila’s cute! haha ;)
Liked and followed! We’ve only had our silly 3 yr old shepherd/collie mix for 6 months, but she is quite a character. Her most mischievous moment so far was this past Christmas season. Unbeknownst to me, my fiancé had been home and fed Luna dinner earlier in the evening. I came home late from work and she acted like she was starving. I fed her, only to learn that it was her second dinner (in a 1/2 hour)!
Thanks for entering. Ha! Maybe Luna considered that her Christmas dinner (or feast). So funny!
My girl Sable is mischeivious when I leave if I dont put trash can in kitchen behind the kitchen door. I will come home open front door and she will run out with her head down past me to the porch. Sure enough their will be a trail of trash all through dining room and kitchen. I have tried everything to keep her out of it but nothing works. She doesn’t do all the time either but when she does she knows its wrong too with her head down running on porch.
My dog’s name is Nova and she is always getting into something! We are finally getting out of the puppy stage though I hope! She has eaten kid’s toys, chewed on a table, eaten the carpet when it was 3 weeks old…. I could keep going but this makes her look bad! lol
She really is a good dog and saved my heart when we lost our other one. I am going to have to attempt this project for her. It looks amazing! Thank you for the chance to win some goodies for my baby!
Nova sounds like a sweetheart! Thanks so much for entering. xo
My dog Talou would love to win this prize! He is a Malamute mix and when he was younger he was VERY mischievious and would chew and destroy lots of things when he was home alone and bored. He chewed holes in the couch and then when he destroyed other things he would stuff the remains of them in his holes in the couch. One time I found a whole bagel and a stick of butter in the couch :) Naughty!
Haha!! A bagel and a stick of butter in the sofa?! What a bad (but hilarious) puppy ;) Thanks for entering!
Finn would love to win this awesome prize! Always looking for new and healthy foods! Finn is a miniature double doodle who just turned 3. As he has gotten older, his mischievous self has been extremely well behaved. But when he was a little over a year, he was always at my feet wondering what I was making in the kitchen. I decided to boil chicken to shred for a dip I was making, when Finn decided to be sneaky. I placed the cooked chicken on the counter after it was cooked to cool. Ran to the other room, and before I knew it….the chicken was gone! Ate the entire chicken breast in seconds!! This was only one out of many times he has pulled this fast move. Silly pup but wouldn’t trade him for the world!
Ha! I’m still waiting for my Finn to become extremely well behaved ;)
Hi Lindsay! Our first winner’s time has expired, so you’ve been randomly selected for the prize! Please email sarah@roomfortuesday.com with your address, so we can schedule your items to be delivered!
Our white schnauzer Baxter is so incredibly smart. When we had an apartment we kept him in a room with a gate when we would leave. We came home one day during the holidays and our Christmas tree was moved quite a few feet from where it was. At first we thought someone broke in but then we walked over to his room the gate was down on the floor but he put himself back behind it as if to say “it wasn’t me”. I just about died laughing because normally when anyone comes over he runs to the door barking up a storm but he played it so cool. We couldn’t even be mad for a second.
A white schnauzer?! Baxter sounds adorable… then again, I am a bit biased ;) Love the story!
Hi! I have two dogs, a Lab named Finn and an Australian Cattle dog named Rocco. They are great and terrible at the same time ;)
I could say a lot of things involving the destruction of furniture, shoes, wooden spoons, etc. but who wants to reminisce about hard times?
Finn loves to talk back, gather all the toys in the yard in one area which he claims as his own (usually by peeing around the territory…frequently), and stand on his back legs and beg when he wants something…a trick he can only remember when he wants something, naturally.
Rocco is well behaved, a bit clingy, and super protective of his momma. His mischievous side is usually taken out on, directed toward, and involves setting up Finn because, well, he’s smart.
Finn and Rocco sound like quite the pair!! :)
I have two dogs – Jock, a Cairn Terrier, and Piper, a Westie. When Jock was just six months old, we mistakenly left a Christmas cheese ball on the kitchen table and went to another room. Jock quickly figured out how to get on a chair, then to the table to eat the entire cheese ball. Needless to say, although we make sure to NEVER leave any food on the table and push in our chairs he never fails to find a way on to double check all food is gone. Jock is completely driven by food. Piper is a complete love bug and although she loves a treat she just wants love.
I have a 6 month old Puppy, his name is Reuben! He has such a personality, but his naughtiest/ cutest escapade so far was one morning when I was in the shower, my cats knocked my knitting project off the counter and the puppy had a blast with it! I came out of the shower to find yarn spanning across three rooms of the house and Reuben was sitting proudly with my dish cloth hanging from his mouth on the couch. It was a mess and the project was ruined but he was so cute I could help but laUgh (and take a picture)! Can’t wait for all of the other mischievous yet adorable messes he gets himself into through out our years as family! :)
We never thought our adult girl would settle down but she has while maintaining the joy and sense of adventure she had in her younger years. As a pup and adolescent it was daily that Lucy was into something to the point of complete destruction. She was crated when we weren’t home and one day she managed to dig through not just the bottom tray of the crate but through the carpet all the way down to the slab. Nowadays, she defaults to food thief and waffle burying. She sneaks away with the kids’ waffles and hides them in various closets, under furniture and in the dirty laundry. It’s always good for a chuckle to come upon one of her treasures. Lucy has become the perfect playmate for the kids and companion to our entire family. Her naughty deeds as a pup have us cracking up today.
Aww, love Lucy girl (and her waffle stealing)!! xo