Designer Trick : Floor Planning
 It’s time for another Designer Trick post and this one comes by popular request – floor planning! So far we’ve covered… How to Examine a Room in 2-D, Tips for Getting Scale Right, How to Choose the Perfect Paint Color, and Making Moodboards to Conceptualize a Room. We’re moving right along in the series, and I’m hoping this one will be mega helpful. I pretty much create a floor plan for every room I design. It’s a great practice for maximizing function in a space and ensuring everything will fit as planned, TO SCALE (that’s the biggie). Click through for my tips, tricks, the software I use, and a peek into my floor planning process.
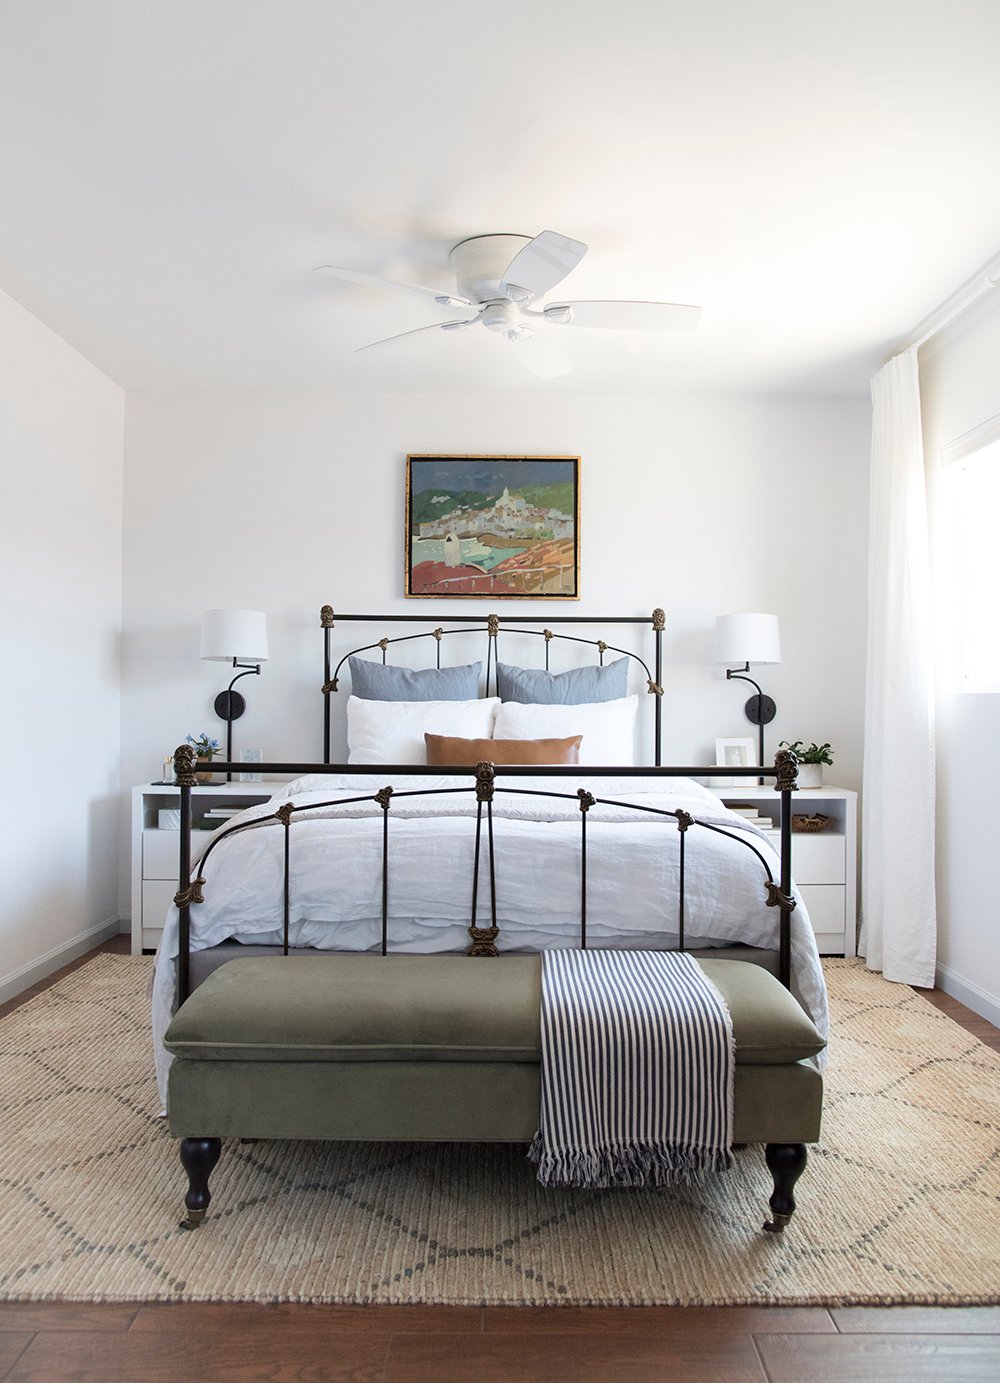
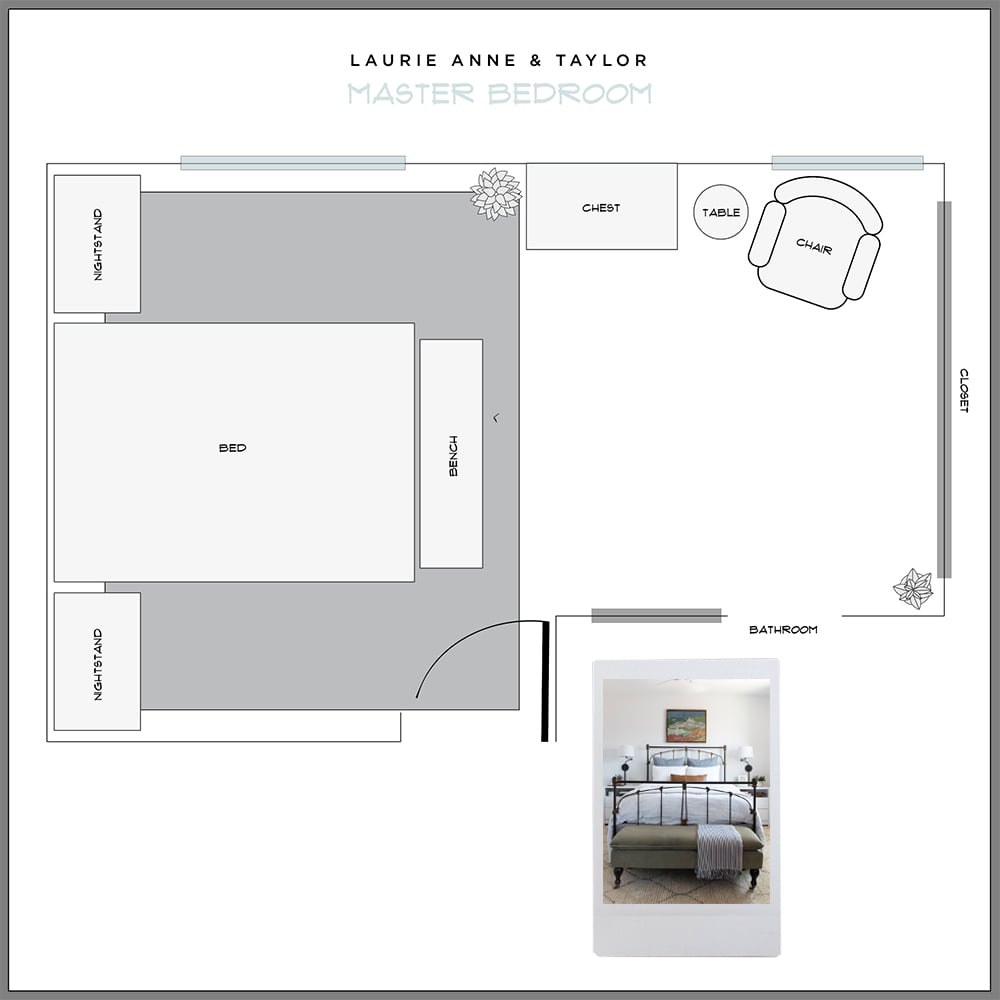 Throughout this post, you’ll see lots of floor plans of differing types and the rooms that resulted from them. First up- Laurie Anne’s bedroom. I flew to Phoenix to makeover my bestie’s master suite last summer. Of course, I began the process with an updated floor plan to increase the functionality of her bedroom and create better traffic flow. Above you’ll find what my floor plan looked like and the finished result below…
 Let’s get some quick basics out of the way… floor plans don’t have to be complex. A floor plan is different than an “elevation” or “rendering”, which are other project resources / materials found in interior design that are usually much more complex and flashy looking (3-D, colorful, super realistic, etc). Floor plans are typically sketched in 2-D and can be very simplistic, straightforward, and easy.
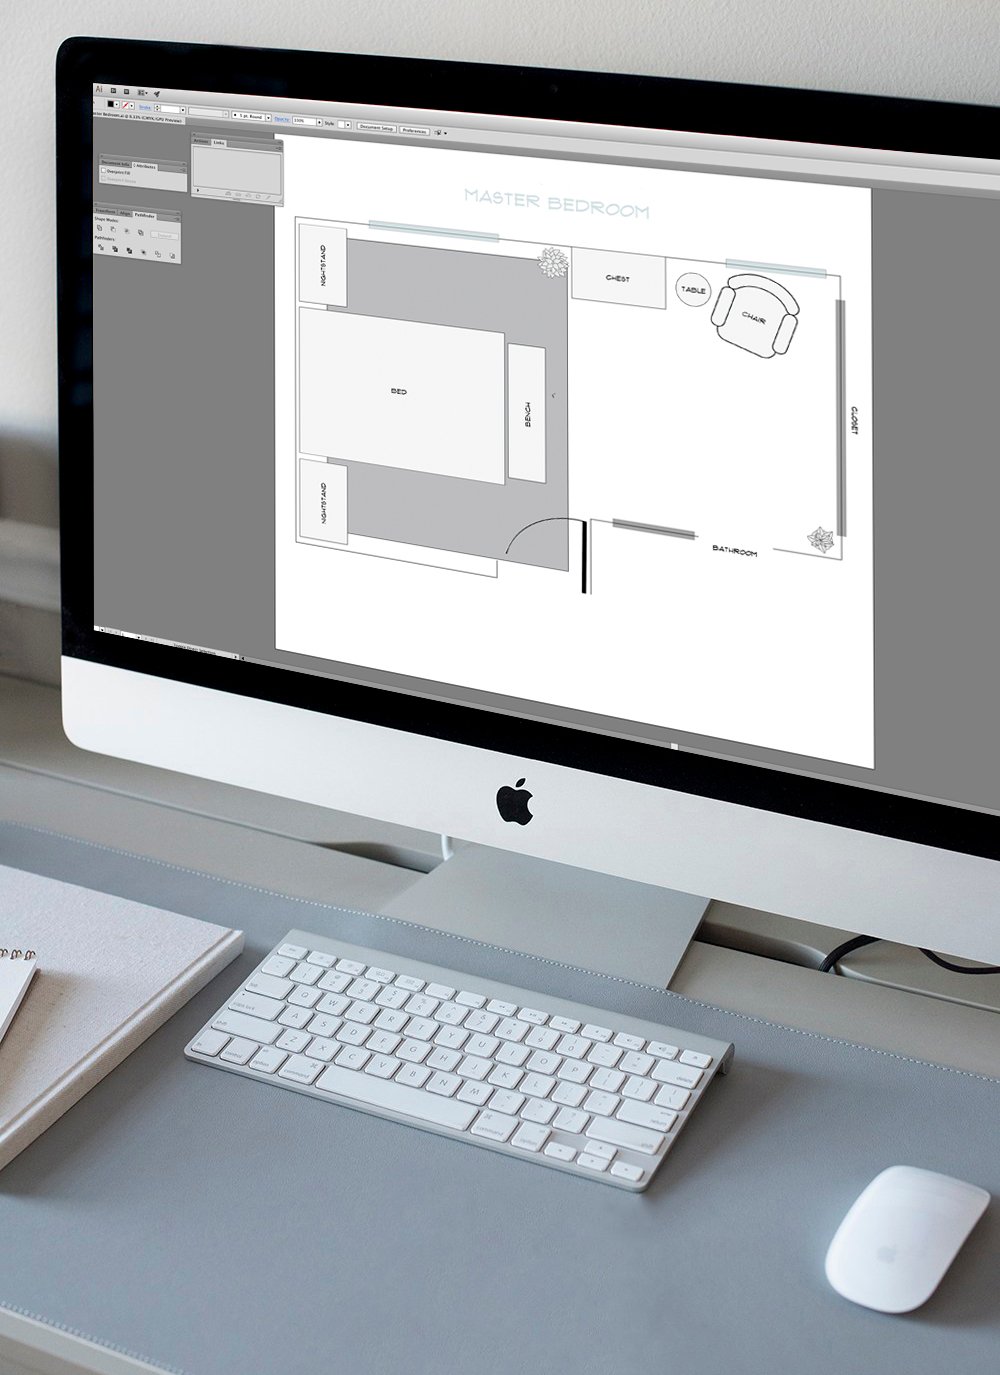
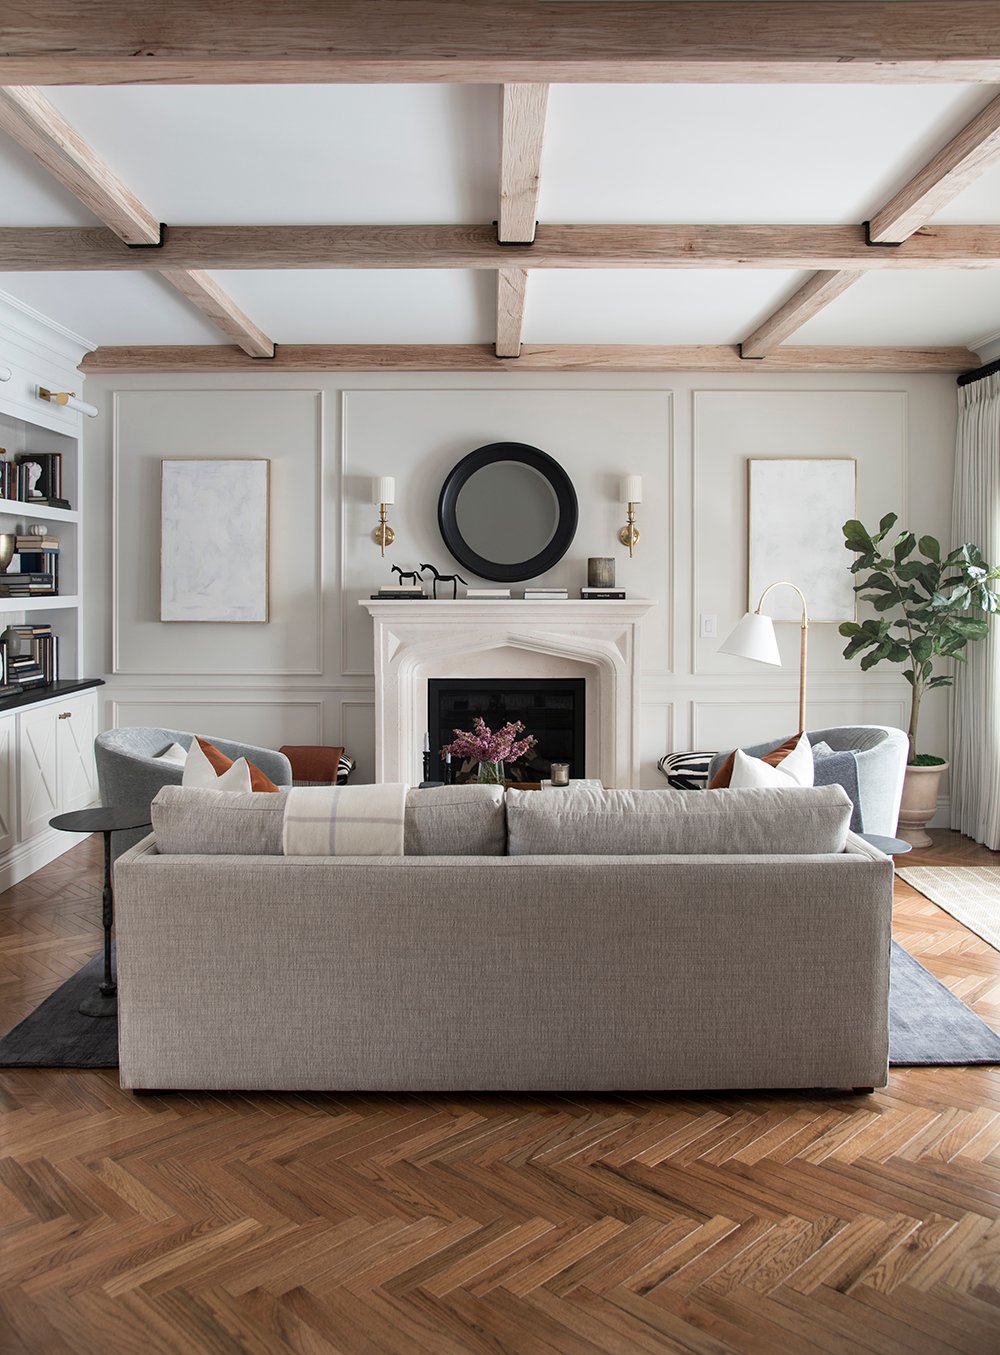
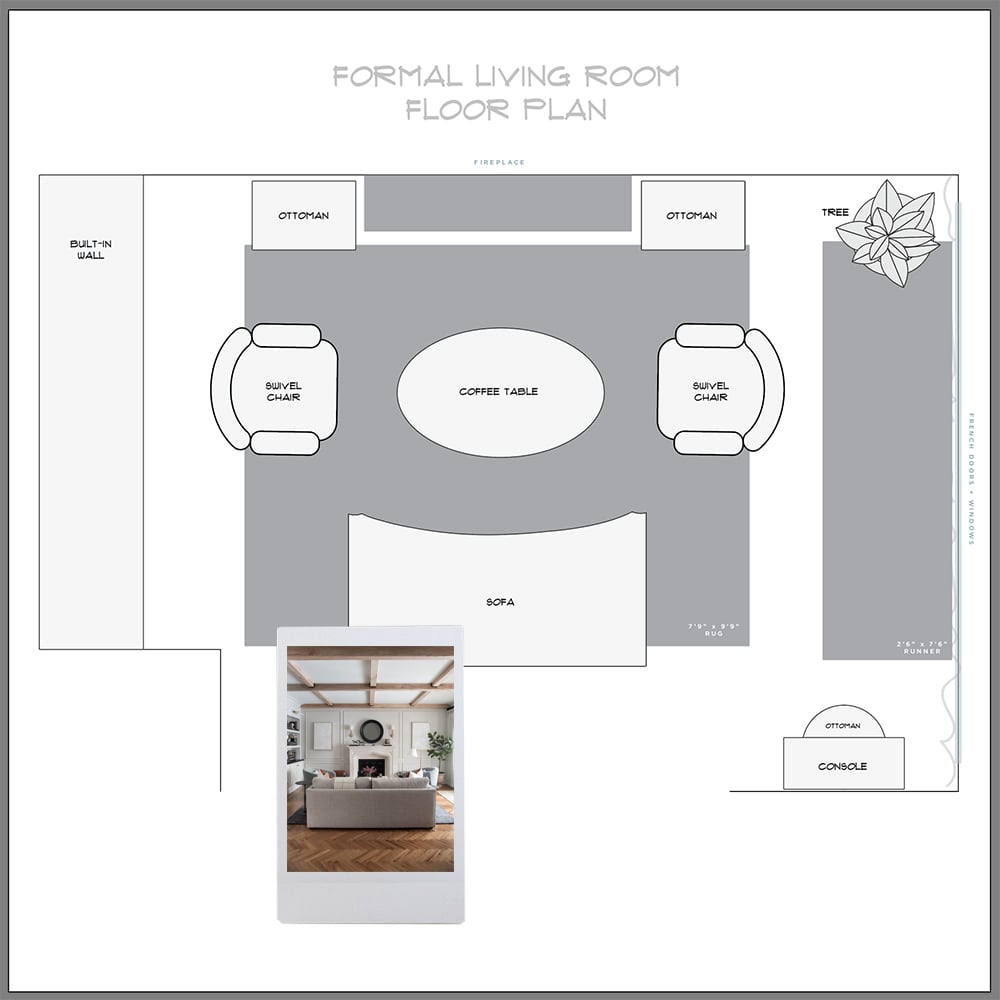 The floor plans I create are rudimentary, basic wireframe, line drawings. I use Adobe Illustrator to draw my plans digitally, which is honestly unconventional for floor planning and interior design, but that’s what I’m fast and proficient in (remember- I graduated with a BFA in graphic design, so Adobe software is second nature to me). If you’re not sure how to use software (BTW- I share alternative and popular software options later in this post), grid paper, an erasable pen, and a ruler work just as well! You don’t have to be tech savvy to create a good floor plan, I promise! When designing our formal living room, pictured above and below, I used basic shapes and the floor plan took me less than 30 minutes to create.
 I like floor planning because I’m not a mathematical person, but I am a VISUAL person. Floor plans help me visualize a space and “do the math” without actually having to do math. Ha! I punch the numbers into the software and it essentially measures for me. I’m easily able to see the distance between furniture, the width of traffic paths, and much more.
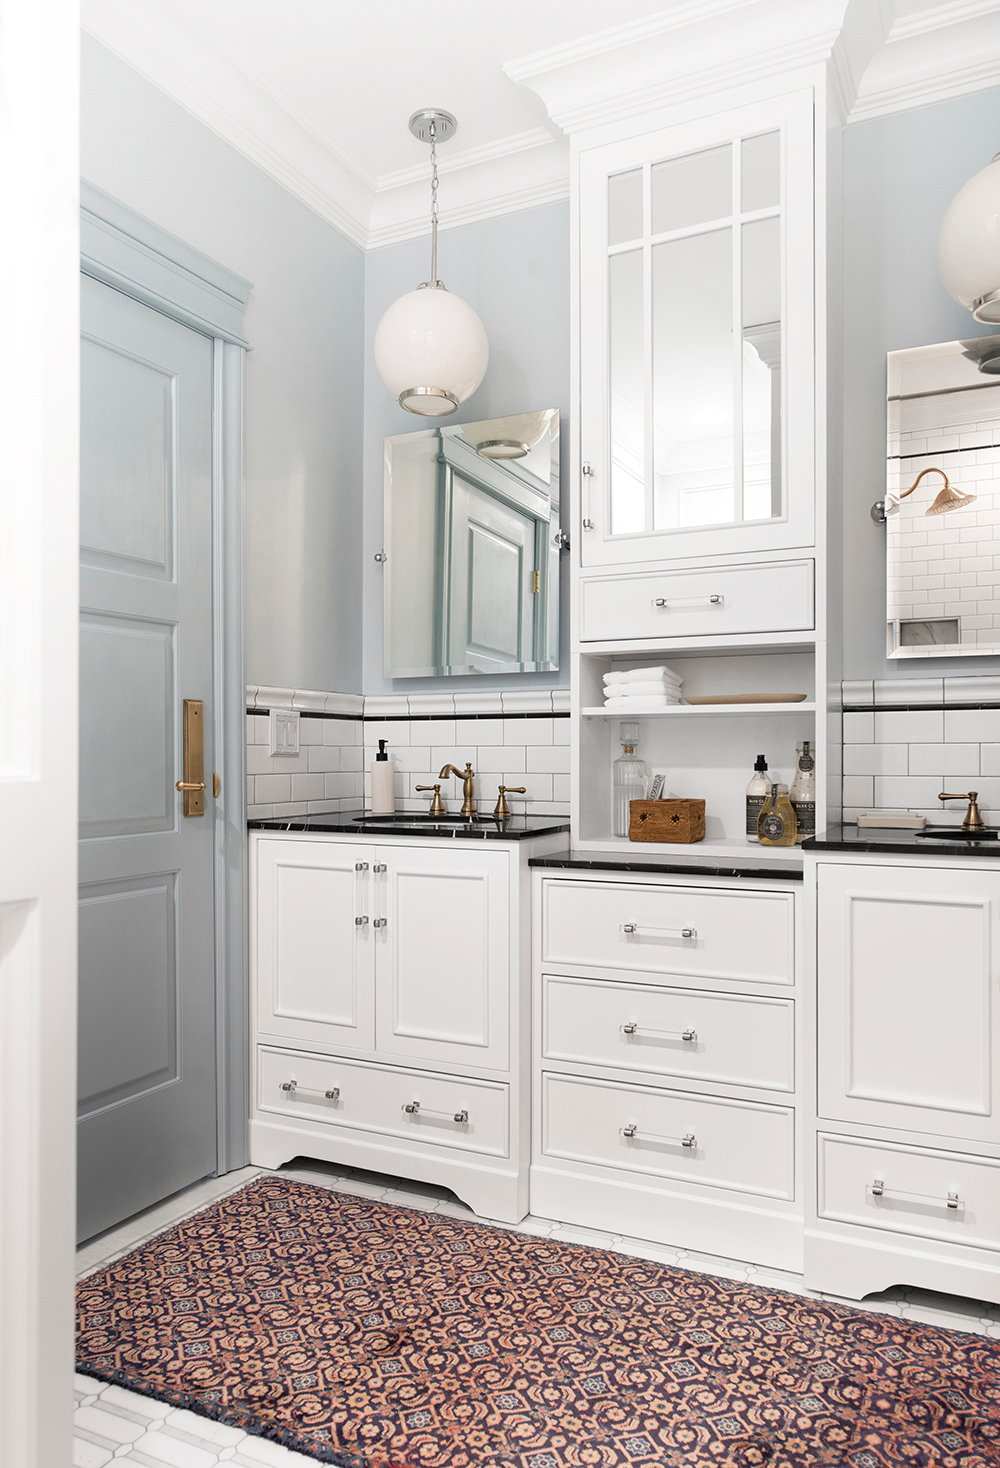
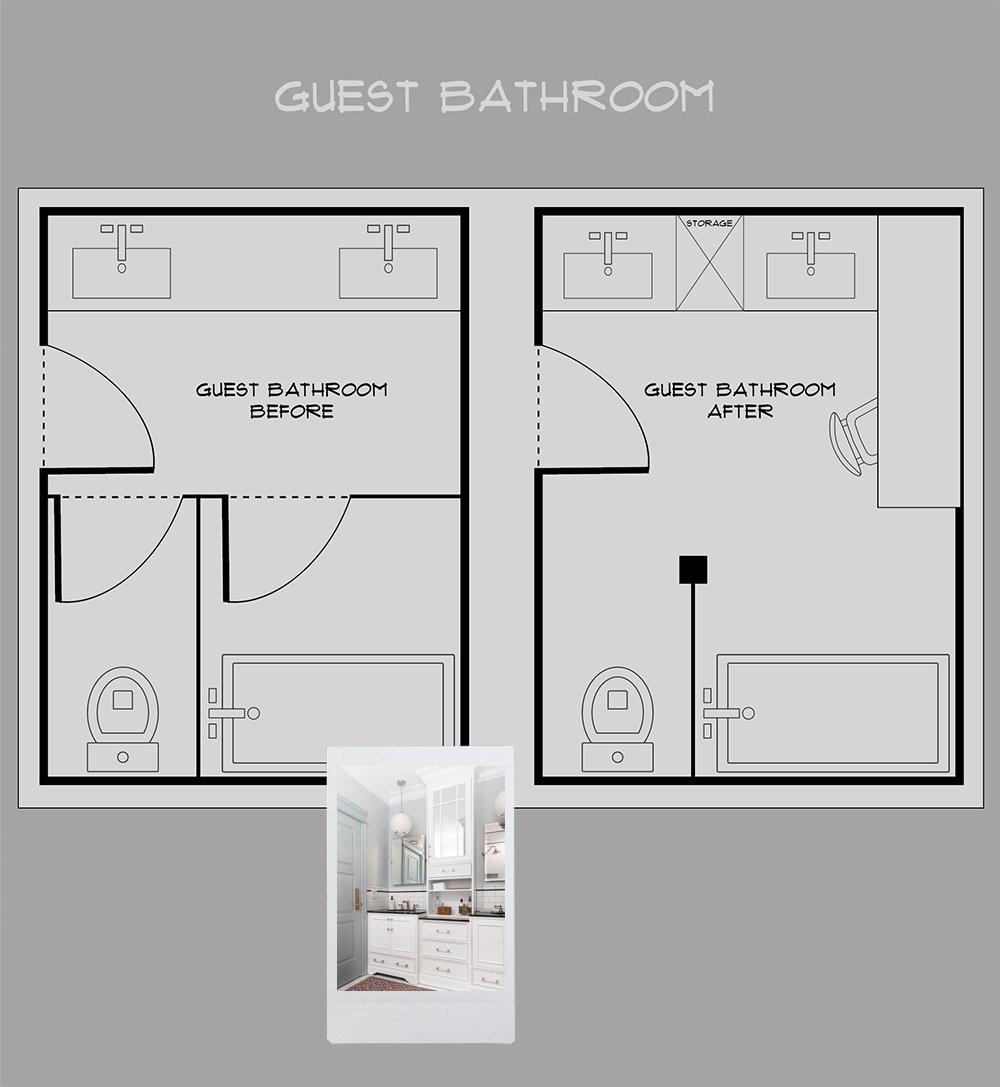 My floor plans are super quick, but you can get as detailed as you like, depending on the software you use. Back when I used to take on interior clients, if I were presenting a plan, I’d go all out and make it look very nice (add color, pull out digital swatches, include furniture specs, etc). These days my floor plans are just for me and since I’m great at visualizing, basic plans work well for my needs and take up less of my time. I also like to plug-in the existing floor plan, so I can compare the before & after… it helps me visualize my changes, how to get from point A to point B, and allows me to justify heavy demo (aka- knocking down or opening up walls) with actual measurements. I can then say, “we’ll gain two feet of usable space.” That is exactly how I tackled our guest bathroom, pictured above and below.
 In terms of the best software for floor planning, I use Adobe Illustrator– which I mentioned is kind of unconventional in interior design. In the past, I’ve used Icovia (now called 2020) and Sketchup. I’m going to drop a list below of software that makes floor planning quick and easy (and comes highly recommended). Some of these are very fancy in comparison to my basic floor plans in AI. It really depends on what you’re looking for and how you’re planning to use the software- for yourself or for client presentations.
- SmartDraw (FREE trial)
- HomeStyler (FREE)
- Lucid Chart (FREE and paid plans, depending on your needs)
- 2020 Spaces / Icovia ($20 / month)
- SketchUp (FREE and paid plans, depending on your needs)
- Floor Planner (FREE and paid plans, depending on your needs)
- Sweet Home 3D (FREE)
 I’ve used a variety of programs in the past and always come back to Illustrator because it’s the fastest way for me to visualize a space, with accurate scale. Remember our previous kitchen? I created renderings and floor plans for that one and it took me quite some time in Microvellum. It’s an expensive cabinetry specific software I was able to use, courtesy of Emmett’s workplace. I spent hours figuring it out and while the elevations were impressive… I’m not sure they were worth the time since I already had a good idea of how the kitchen would look (thanks to my sketchbook). If I were pitching the kitchen design to a client, that would be a different story! My point being, your design situation (personal or professional) definitely influences the software you’ll want to use.
 We’ve talked about why floor planning is helpful, different software platforms available to use, how floor planning varies for personal and professional use, and I’ve shared plenty of examples. Next, I’d love to quickly break down my personal step-by-step process for floor planning…
- Take measurements of the space, including permanent features within the room (windows, fireplace, doors, etc).
- Draw the exterior walls to scale in software or on grid paper (depending if you prefer a physical or digital copy).
- Add permanent architectural elements to the floor plan (windows, fireplace, doors, etc).
- Add furniture, rugs, and accessories to the floor plan (chairs, sofas, plants, etc).
- Play around with furniture layout, swapping items to see what best fits, and shift things around until it feels balanced and functional.
- Double check the dimensions for furniture, traffic paths, and overall scale to make sure everything fits and functions accordingly.
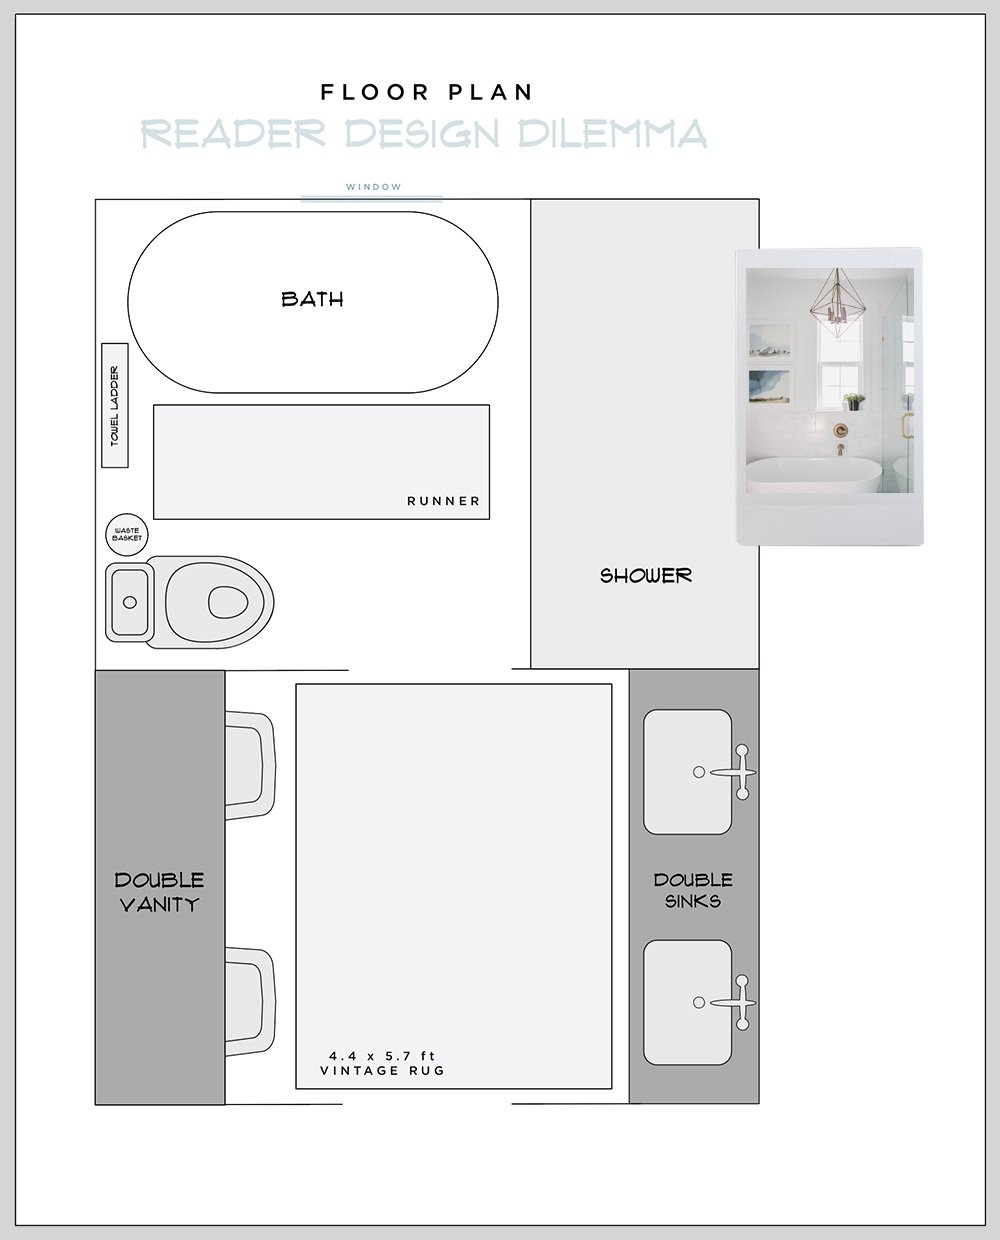 Does anyone follow Jess on Instagram? Before she started her IG design journey (BTW, she has far surpassed me on IG… now who is the pro?!), we first met when she submitted her reader design dilemma project. It was a giveaway for free design services (from me), and I helped her figure out some key components in her master bath- including area rugs. Floor planning was key in determining what size rugs were most appropriate for her bath. Here are a some key dimensions to remember when floor planning with functionality in mind…
- Major traffic paths or entry ways into a room should measure anywhere from 30-36″.
- Secondary traffic paths or spaces between furniture may vary, depending on the space… 22-24″ is a standard minimum.
- 36” is the standard opening for doorways and passages.
- 24” is the minimum amount of space you should leave open behind a dining chair… 30-36” is best.
- A rug under a dining table should be at least 24″ longer and wider than the table (again, 30-36″ is best)… that way chairs stay on the rug when they are pulled out.
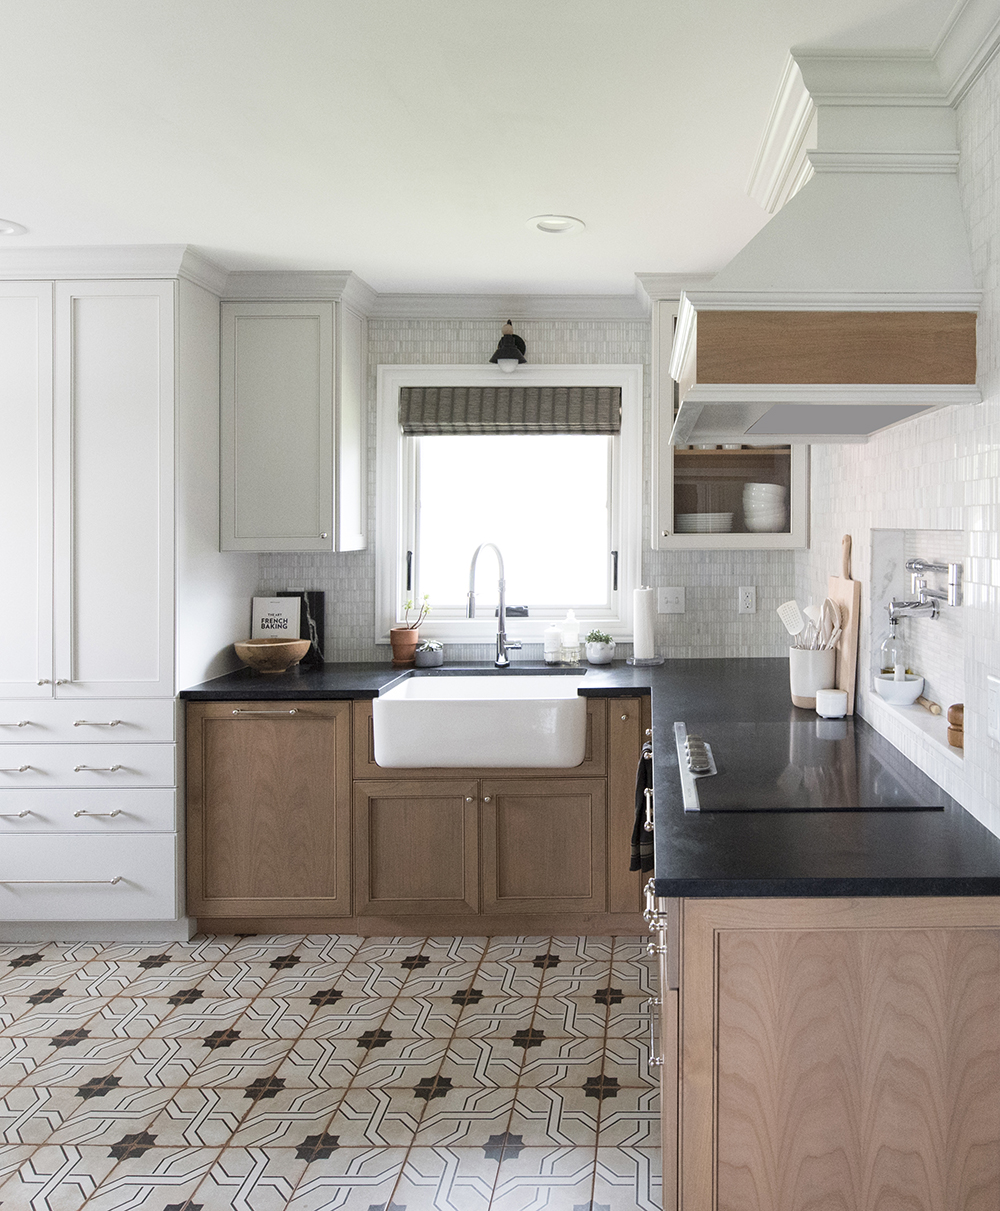
- Consider the “work triangle” when floor planning or designing a kitchen. This imaginary triangle connects the three main work areas in the kitchen: the sink, the range or cooktop, and the refrigerator.
- 14-18″ is the optimal amount of negative space between a coffee table and sofa.
- You should have at least 30″ from the front of your bathroom sink or vanity to the wall or nearest architectural element (or 30″ minimum traffic path).

Floor planning is honestly very easy… it’s more about seeing things to scale, double checking important dimensions, and getting creative with layout to maximize functionality in your home.
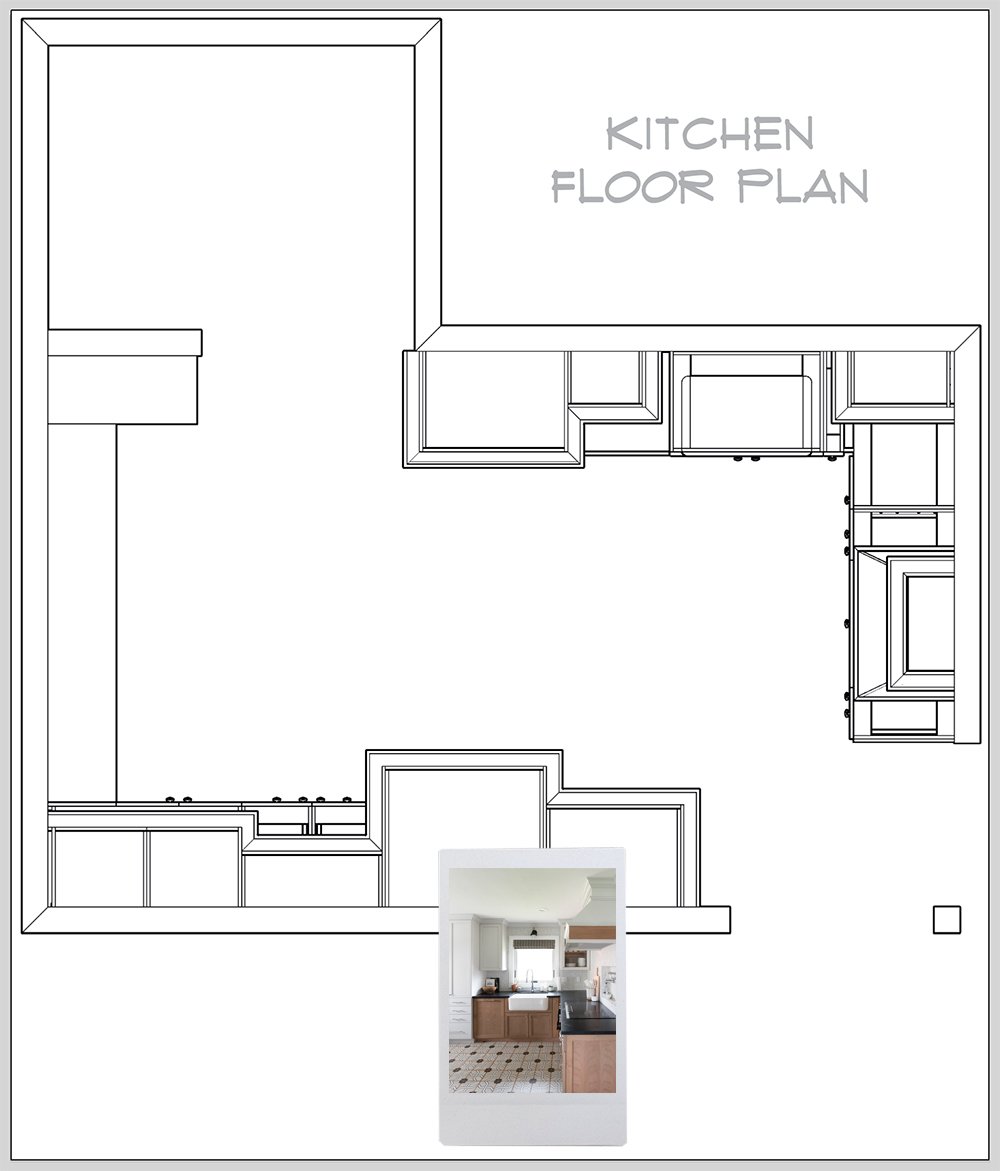
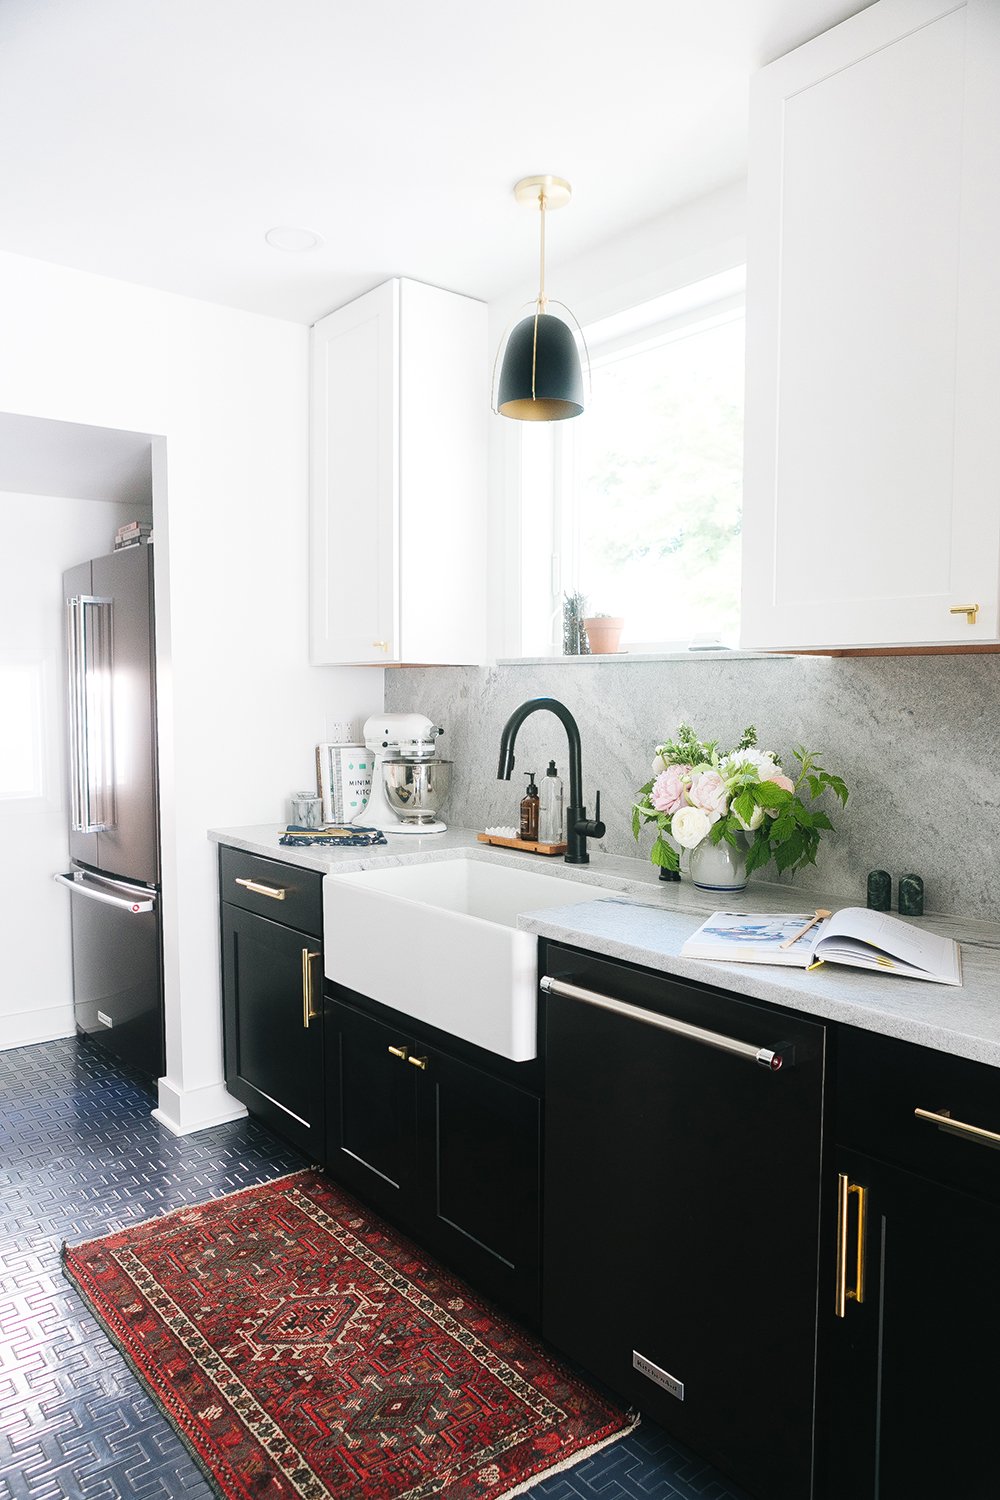
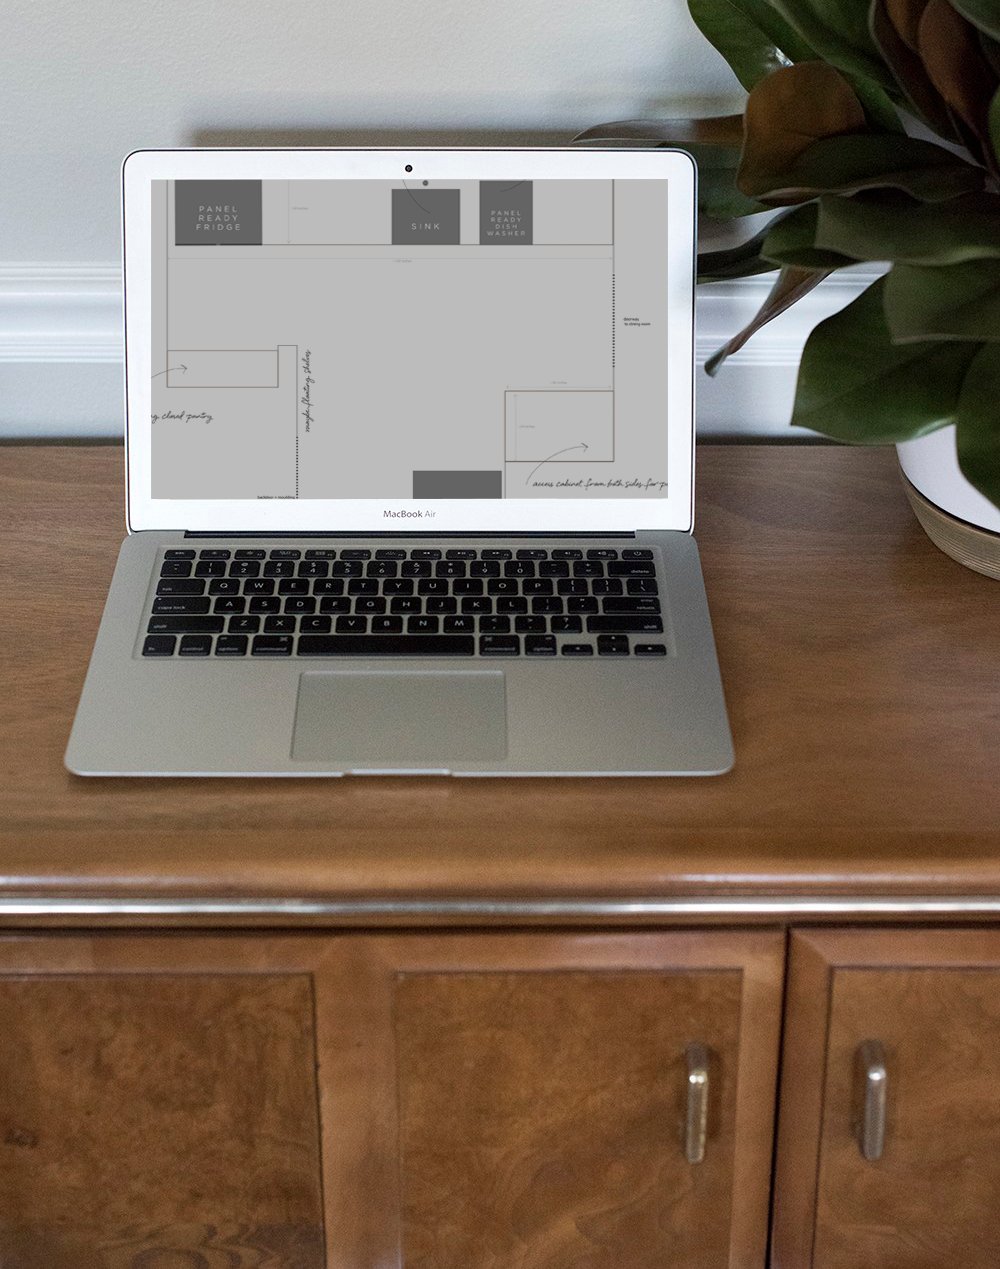 Speaking of functionality… remember when I designed Joanna, of Jojotastic’s, kitchen last year? I totally switched up her floor plan. I made SO many renditions and jotted notes in my files along the way (as shown above). Don’t be afraid to make multiple floor plans- compare them and weigh the pros & cons as you go. See the layout changes in this post! When it came time to reveal the space, lots of readers couldn’t believe how big it looked. Thanks to seeing the floor plan and many different scenarios, I could easily see that knocking down a wall and relocating the fridge into their old mudroom made perfect sense. It also allowed for a built-in pantry. The reveal ended up looking like this…
 This post was much requested, and I really hope it was helpful! Be sure to leave me any questions in the comment section below. Would you guys be interested in seeing a video tutorial on how I floor plan in real time… in Adobe Illustrator? I figured it was worth asking, although- it may or may not be beneficial since most people don’t use AI for interior projects. It’s not a free software either, as it’s part of Adobe’s Creative Cloud. Before I spend a ton of time editing a video, I figured asking beforehand was a better idea. Are there other softwares or ways you enjoy floor planning (old school sketching, anyone)? Do you typically create a floor plan for the home projects and renovations you tackle? If not, maybe you’ll give it a try next time? As long as you know the basics, you should be good to go. Let me know what you think! Oh… and I’d love to hear more ideas for the next Designer Trick post.
Thanks Sarah, great post. I use Illustrator too — glad to hear I’m not the only weirdo who uses it, ha!! It’s just so quick to draft things up.
Yes!! I love hearing that, Brianna! It’s such an awesome, easy tool :)
Wow. A goldmine of information here. I realize it’s too late to rename your series, but calling these tricks undervalues your talent and knowledge. I appreciate the detail, flow and examples in your posts; you’re also a great teacher!😉 My floor planning is more intuitive and ummm… “muscle based.” Furniture might have to get shuffled until I’m satisfied. I love that you included all the recommended clearances; that is so helpful! Weirdly, I hate to measure, but I am also terrible at estimating size. Imagine me trying to fit enormous items in my trunk, through a doorway, down a hall…Don’t worry, nobody gets frustrated with me. When I am trying to be a grown up about this, I resort to graph paper and sketches. I can imagine the ease of software translating my measurements into a perfect rendering would be lovely. Maybe someday I’ll try and learn some new tricks for fun!
Thanks for the lesson and happy Monday, friend!
Thanks Peggi! You know… you’re right. Thank you for that :) I’m channeling my inner you and am pretending to be a teacher. Ha! I hope that a tidbit of my knowledge is helpful for someone out there. It’s fun to think I could help someone love their home a little more. We used to have a “muscle based” floor planning system (LOL!!), but Emmett would’ve killed me if I would’ve continued along that path. We own a lot of heavy furniture. haha! I have the same problem of visualizing scale. My friends make fun of me because I ALWAYS have a bulky tape measure in my purse, but hey- I never know what I’ll find something cool… it’s always nice to measure to make sure it fits. Happy Monday night!! xo
Your ‘Designer Trick’ series is one of my top favorites! I’ve implemented using tape for scale of pictures, sconces, etc. And mood boards or going to Lowes to look at cabinet color and tiles was so much fun! Thank you for these tricks!
When we remodeled our master closet, we used Ikeas planning tool to design the room. I spent hours putting together 6 different layouts. So much fun…not the best graphic tool but doable.
I am curious and excited to try some of your software suggestions. Yes to a video! My husband and I typically use grid paper to plan out our ideas but I really want to try a software approach. Thanks again!
I saw your instagram post on making chocolate cookies…yum! How cool is that mixer lift? I would give up a cabinet just to have that! If I added that to our kitchen that would require this momma to make cookies from scratch instead of buying the dough..oh no! It’s still the best invention for cabinets!
Happy Monday!
Yay!! I’m so happy these are well received because I love putting them together. I get to pretend to be a teacher, which is kind of fun. Haha! I used the Ikea software for my friend Brooke’s kitchen. It’s not very intuitive and wasn’t the easiest, but it got the job done!
The cookies turned out great… not going to lie, Emmett and I had those with our coffee for breakfast this morning. Haha! Our kitchen is literally a dream come true. I still can’t believe I get to cook in there everyday. I crammed as much function as I could into that space and it makes me so happy to use those cool features :) xo
I would LOVE an illustrator tutorial. I already know that program from calligraphy and paperwork, and this is another interest of mine so I’d love to be able to use it for this!
Done deal! I’ll work on it. I love hearing that so many of you share my appreciation for Ai. It’s such a wonderful program!!
I’ve used graph paper to do to-scale planning a few times, once in particular that was VERY helpful.
I admit your use of various floor plans here sent me back down the rabbit hole of Joanna’s kitchen that you designed for her . . Still one of my all-time favorites, so many elements I love about that kitchen (and its size is more relatable for me). Love that!!
I used to use graph paper back in the day and sketch everything by hand (when I was in school). It’s equally as helpful! Joanna’s kitchen was SO much fun. I love getting random texts from her about how much she still loves the space. It makes me so happy knowing they put it to good use and it made their home more functional. It was a tricky one to floor plan! I like thinking in unconventional ways… like moving her fridge into the mudroom, or moving Laurie Anne’s dresser into the closet. It’s amazing how much space you can free up by thinking outside the box :) xo
Great informative post. Thank you.
So happy you liked it, Linda! xo
I use Illustrator as well! Glad I’m not the only one, but it’s the quickest and easiest for me too!
I think it’s super intuitive! I didn’t realize so many people used it for interiors- I think that’s amazing. I always do what works and what is quick, so it’s a win/win.
Fellow graphic design major and Illustrator user! Thank you for this post! I would love to see the tutorial. Right now I’m wondering how you properly scale the actual dimensions (of a room, piece of furniture, washer/dryer, etc) into illustrator dimensions.
Yay!! I’ll work on a tutorial. I had no idea there would be so many Ai users out there- I love it!! :)
Fellow graphic design major and Illustrator user here! Thank you for this post. Would love a further tutorial. I’m curious how you convert actual dimensions into Illustrator dimensions.
Woohoo!! I love hearing that, Melissa! I’ll work on a video tutorial :) I use actually dimensions and create a scale system (since the art board size only goes up to 200 inches or something).
Hello! New follower here. Love your work and love this post! Thank you for sharing your process. I’m a self taught fan of Adobe Illustrator and probably use it for all the wrong things. I have used it for small print projects, visualizing frames on a real photo, creating mood boards & (like you) laying out furniture dimensions in a floor plan. My husband is in the Army so whenever I can get my hands on the dimensions of the next house, it’s game on. Anyways – The answer is always yes! I would love to see how you use AI for floor plans. Especially the math piece. I think I’m doing it right with the inch to a foot thing, but maybe not?
Hi Katie! So happy you’re here :) I love that you taught yourself how to use Ai. That’s amazing! I’ll work on a video tutorial for how I use the software for floor planning- it’s really easy. xo
I would love to see your process using AI! I use it for floor plans too but I’m positive you could share some great tips and tricks!
Happy to share, Karissa! I added it to the blog calendar :)
Hi Sarah! Thank you so much for this post! It is SO helpful! I would be very interested to see a video of you space planning. The design tricks series have been incredibly insightful! I am curious to what the minimum dimensions would be around a toilet either for a water closet or for a wall like you did in your guest bath?
Thank you again!
So happy it was helpful, Emilly! I’ll definitely work on the floor planning video. To answer your question about the negative space around a toilet… most building codes require a MINIMUM 15-20″ (measured from the center of the toilet).
I am new to illustrator and am learning it on my own. I’m very interested in how you get the scale right in your drawings! I would love a video tutorial personally.
I added a video tutorial to my calendar :) Stay tuned, Lexie! xo
Loved this peek into your floor planning process, Sarah! As a DIYer, I always struggle with scale. Your tip about using basic grid paper is such a relief – I’m definitely not tech-savvy enough for fancy software. The before/after plans really show the impact! Maybe I’ll finally tackle my awkward living room layout now. Though I wish there was a free Mermaid tool for quick mockups too! Thanks for making this feel achievable.