DIY Pedestal Makeover
 You know I have a thing for pedestals! I’ve talked about them here on the blog in this post! A few years ago, I pulled five or six pedestals out of a dumpster at Emmett’s work. They were made of HEAVY oak wood, were great varying sizes, but definitely had a modern 90s kind of vibe, which doesn’t quite fit my personal aesthetic. I rescued them anyway, knowing they had potential, and with my office renovation underway– this felt like the right time to give one a much needed makeover for my vintage marble horse (we’re just waiting around on other materials right now). Click through for a fun DIY, to scroll through the process, and to see how one of my dumpster pedestals got a glow up…
*This post is sponsored by Minwax. All content, ideas, and words are my own. Thank you for supporting the brands that allow us to create unique content while featuring products we actually use & enjoy!
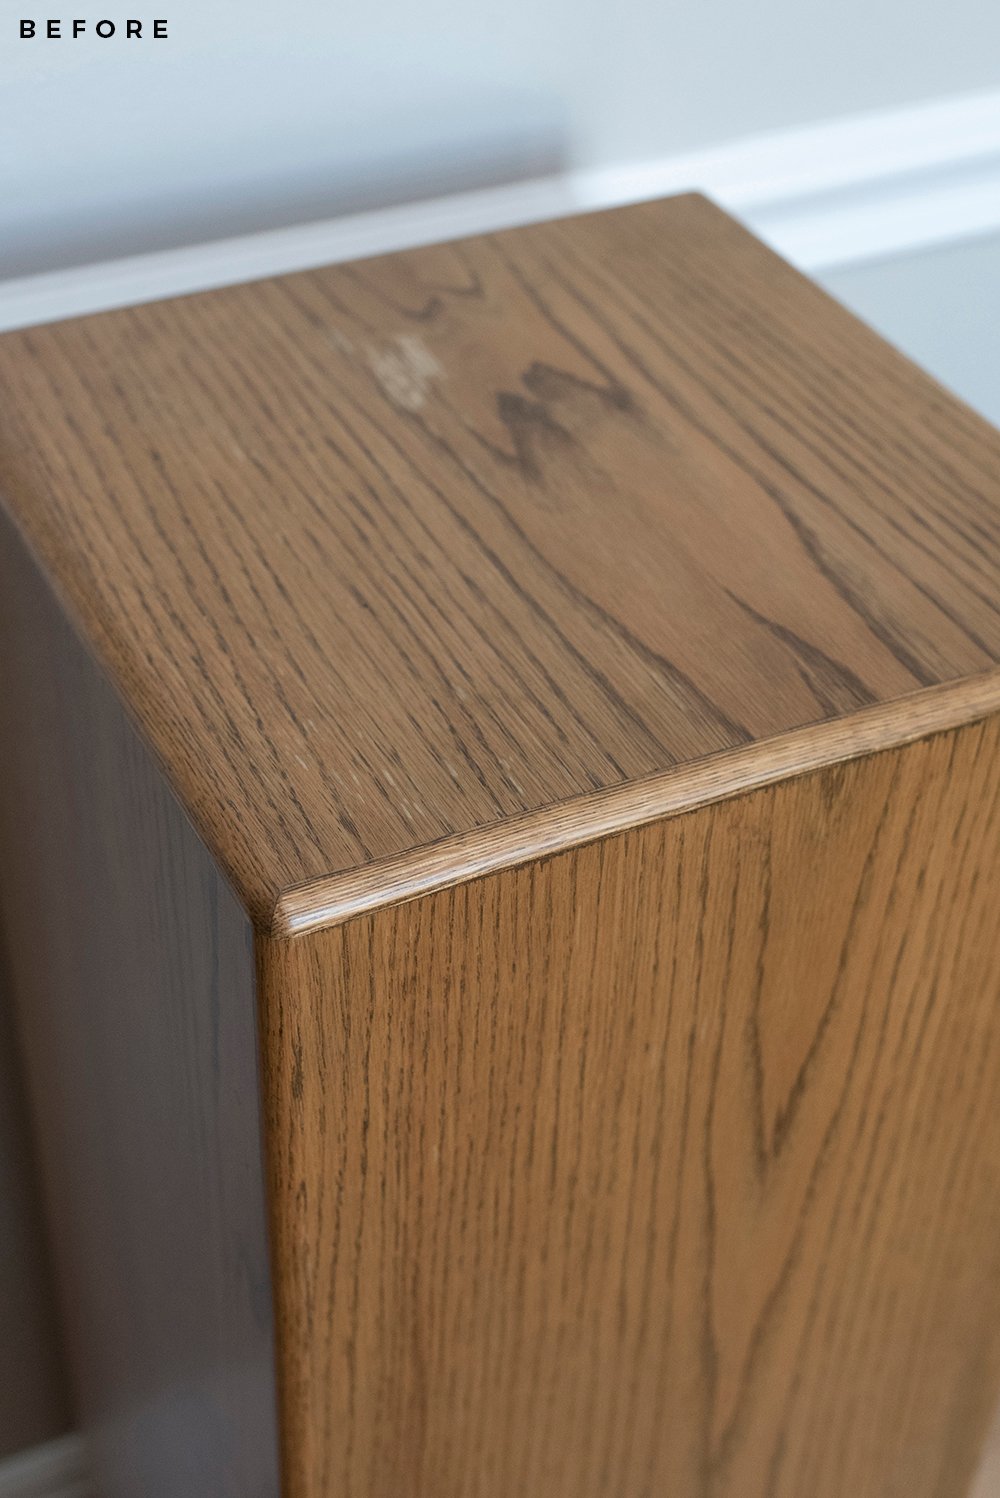
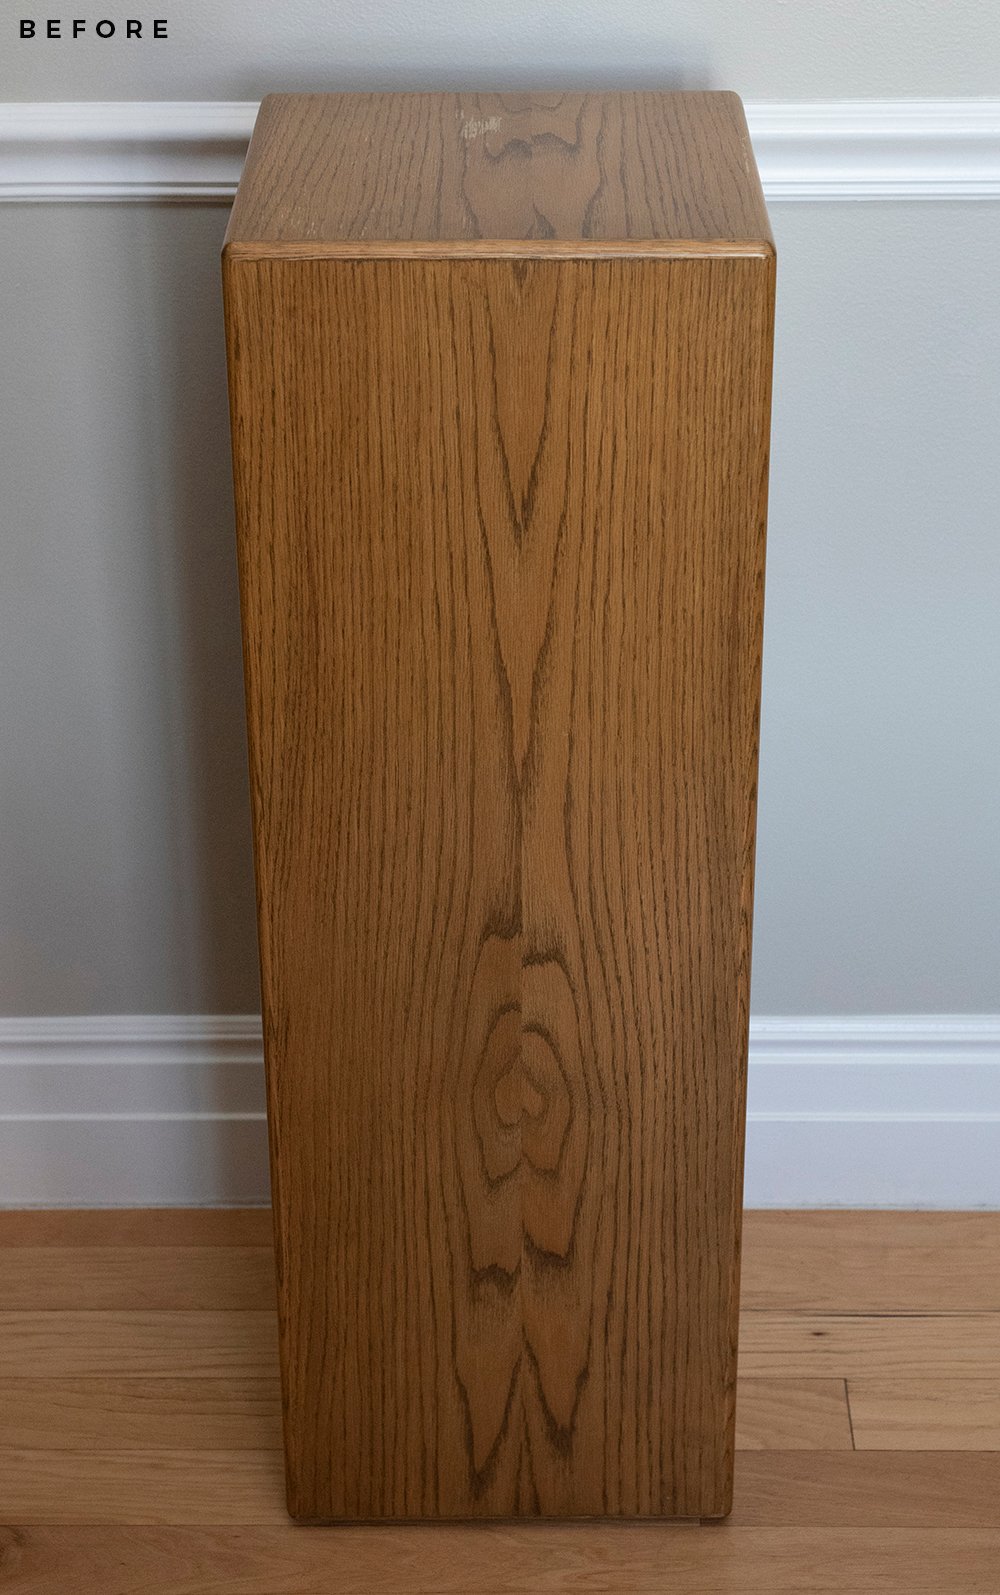 This is actually my largest pedestal from the batch, and this is what it looked like before. It was showing some wear and tear, had radius edges, and felt pretty basic.
 I knew with some added millwork pieces and an updated finish, it could be really lovely. This is what we used for this project…
SUPPLIES + TOOLS:
- Minwax wood finish solid color stain (in pure white)
- 18 gage nail gun
- wood glue
- wood filler
- clamps
- cove moulding
- tape measure
- miter saw
- table saw
- red oak lumber (1 x 3s)
- orbital sander
- 120 & 220 grit sand paper
- gloves
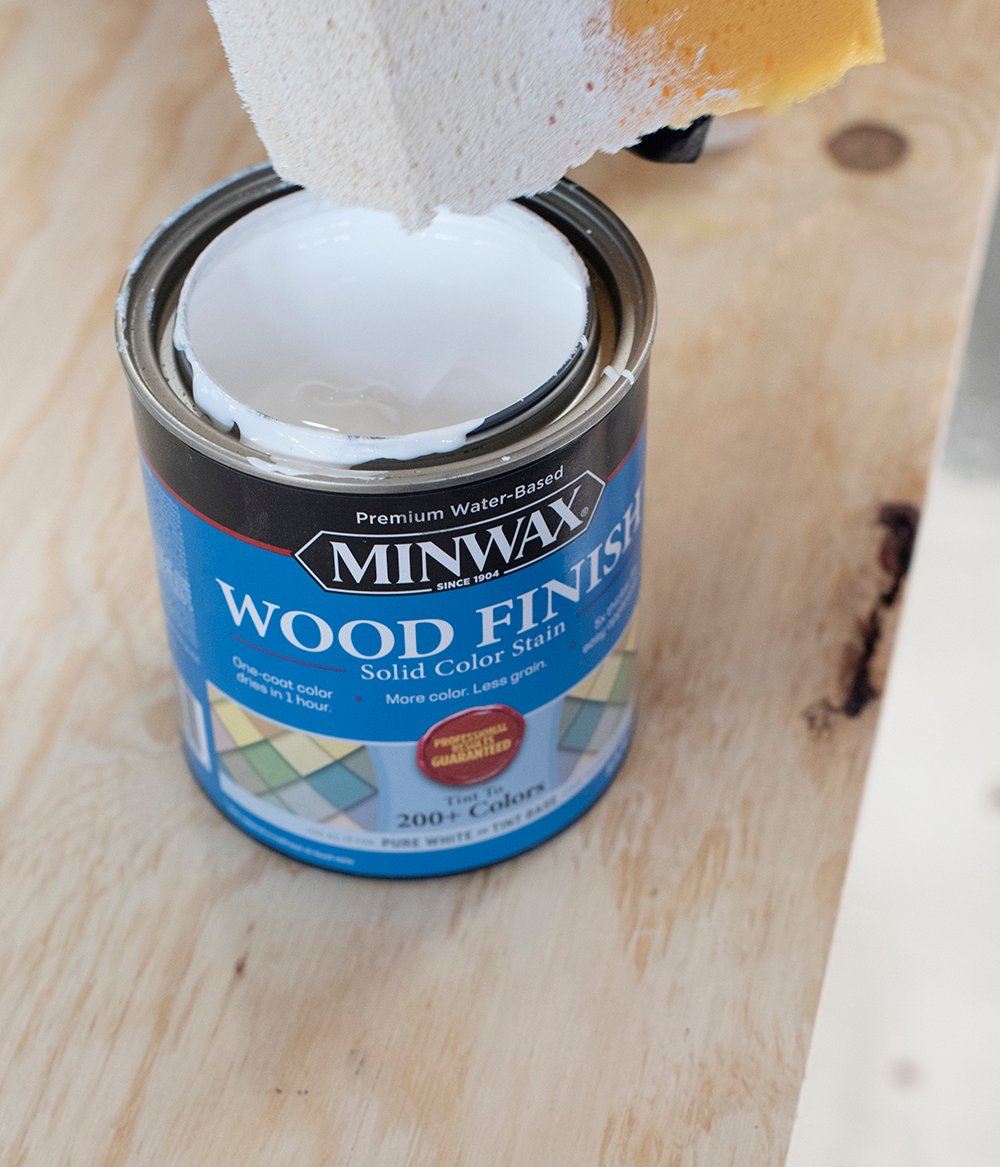
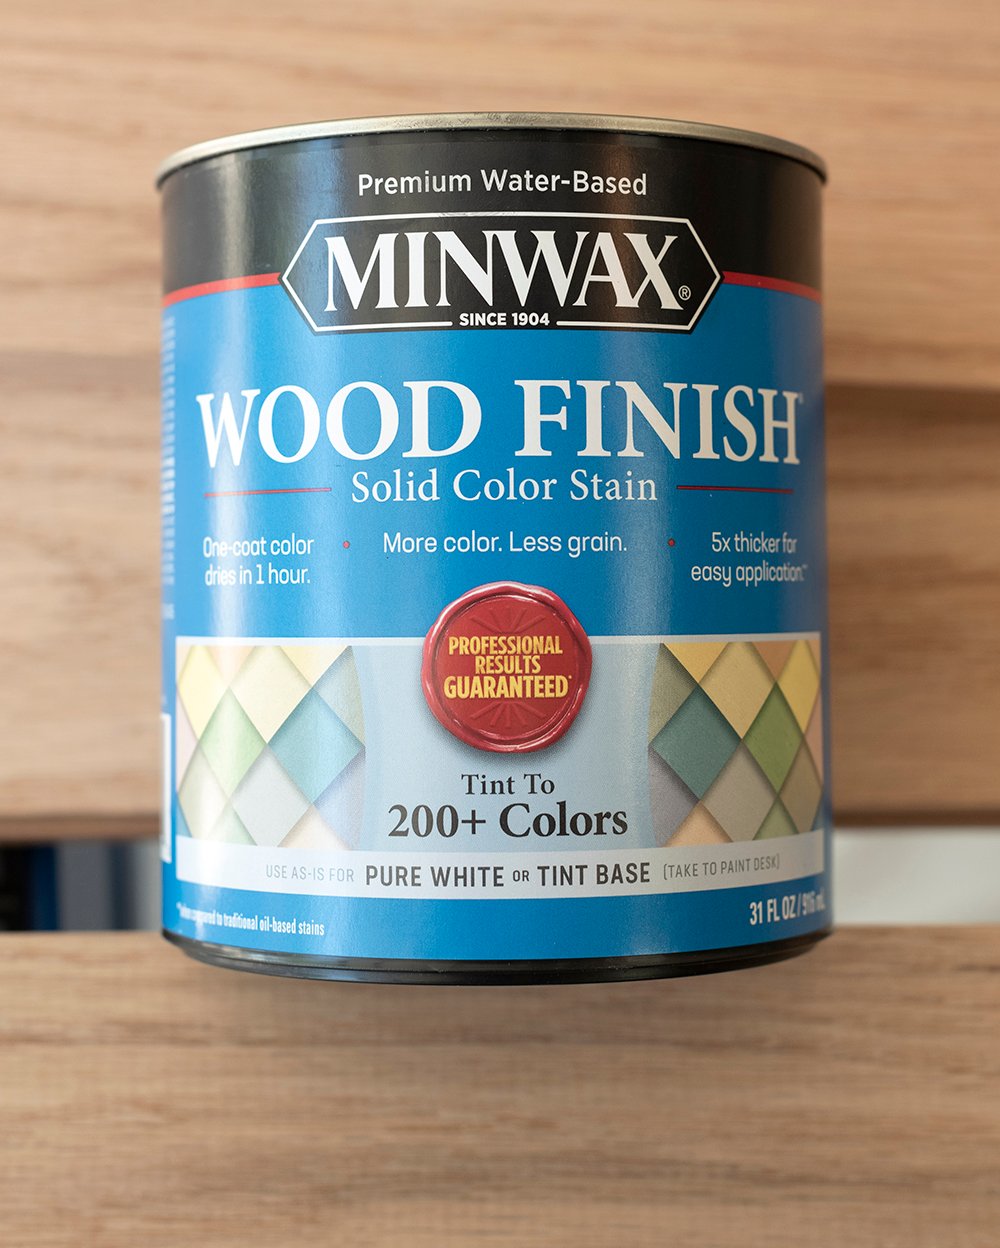 I really wanted to try a different type of stain for this pedestal- something that was more opaque, but still allowed that beautiful oak wood grain to shine through, creating a nice texture. There will be a lot of visual interest happening in my office once it’s finished… custom built-ins with intricate millwork, a custom wood credenza, and of course we have our herringbone hardwood floors. There will be quite a few wood tones in the space and there will also be lots of dimensional millwork. I thought it would be best to keep the pedestal simple and let the sculptural horse take the spotlight. That’s how I landed on the minimal, yet traditional design, as well as the opaque stain finish. I bought a can of Solid Color Stain by Minwax in Pure White (which matches our pocket doors).
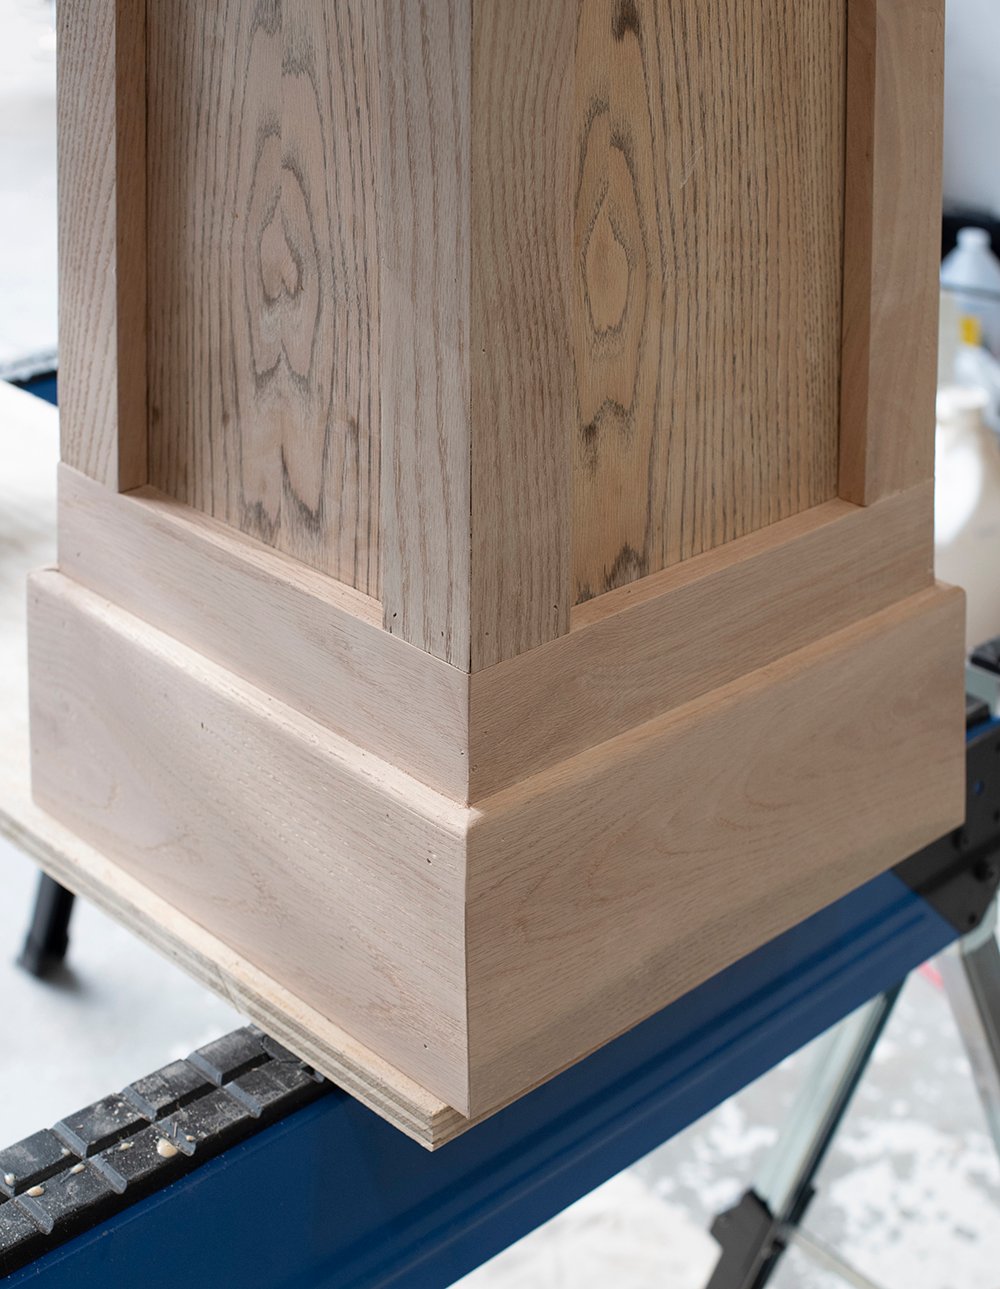
 Our first step was to sand the pedestal down, removing the existing finish, and plan our millwork pieces. I knew I wanted a heavier base and symmetrical, clean lines with a simple edge profile.
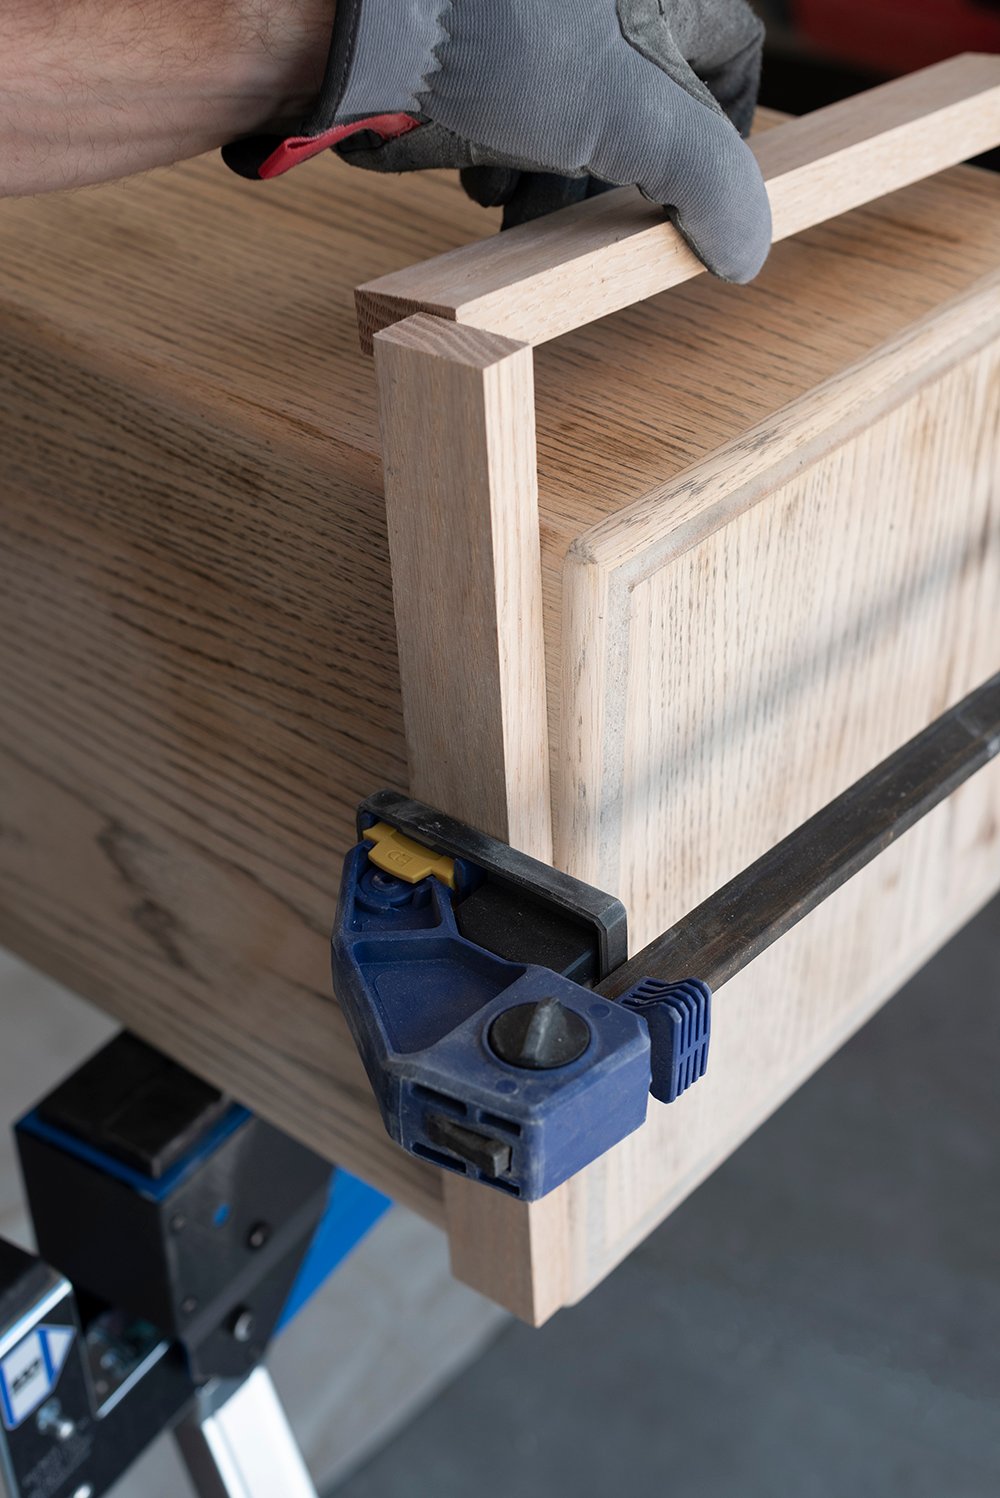
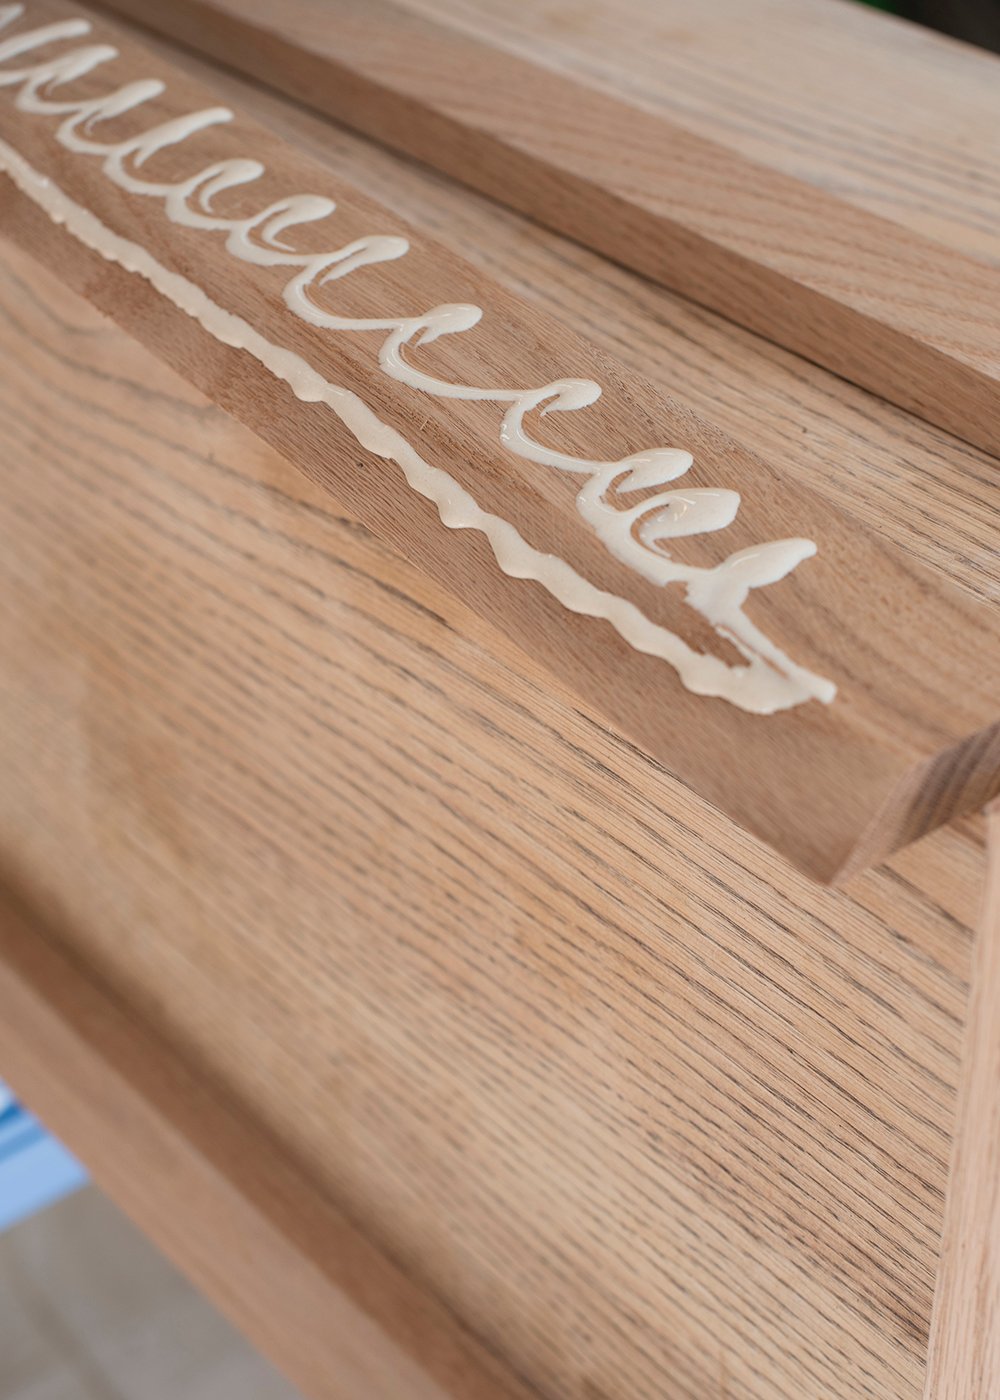
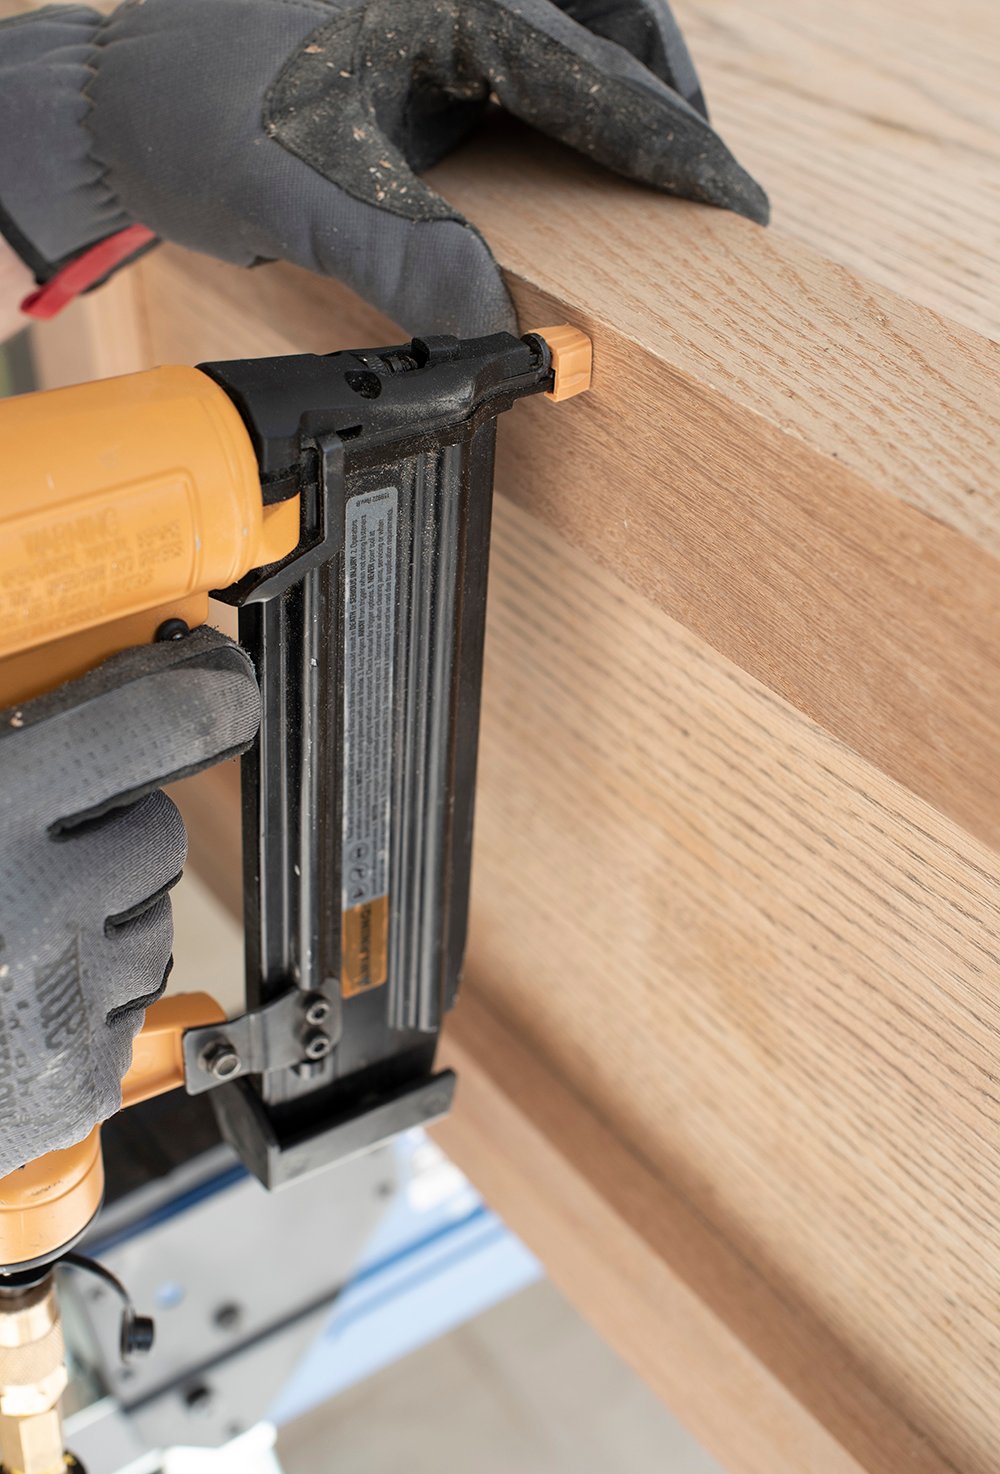
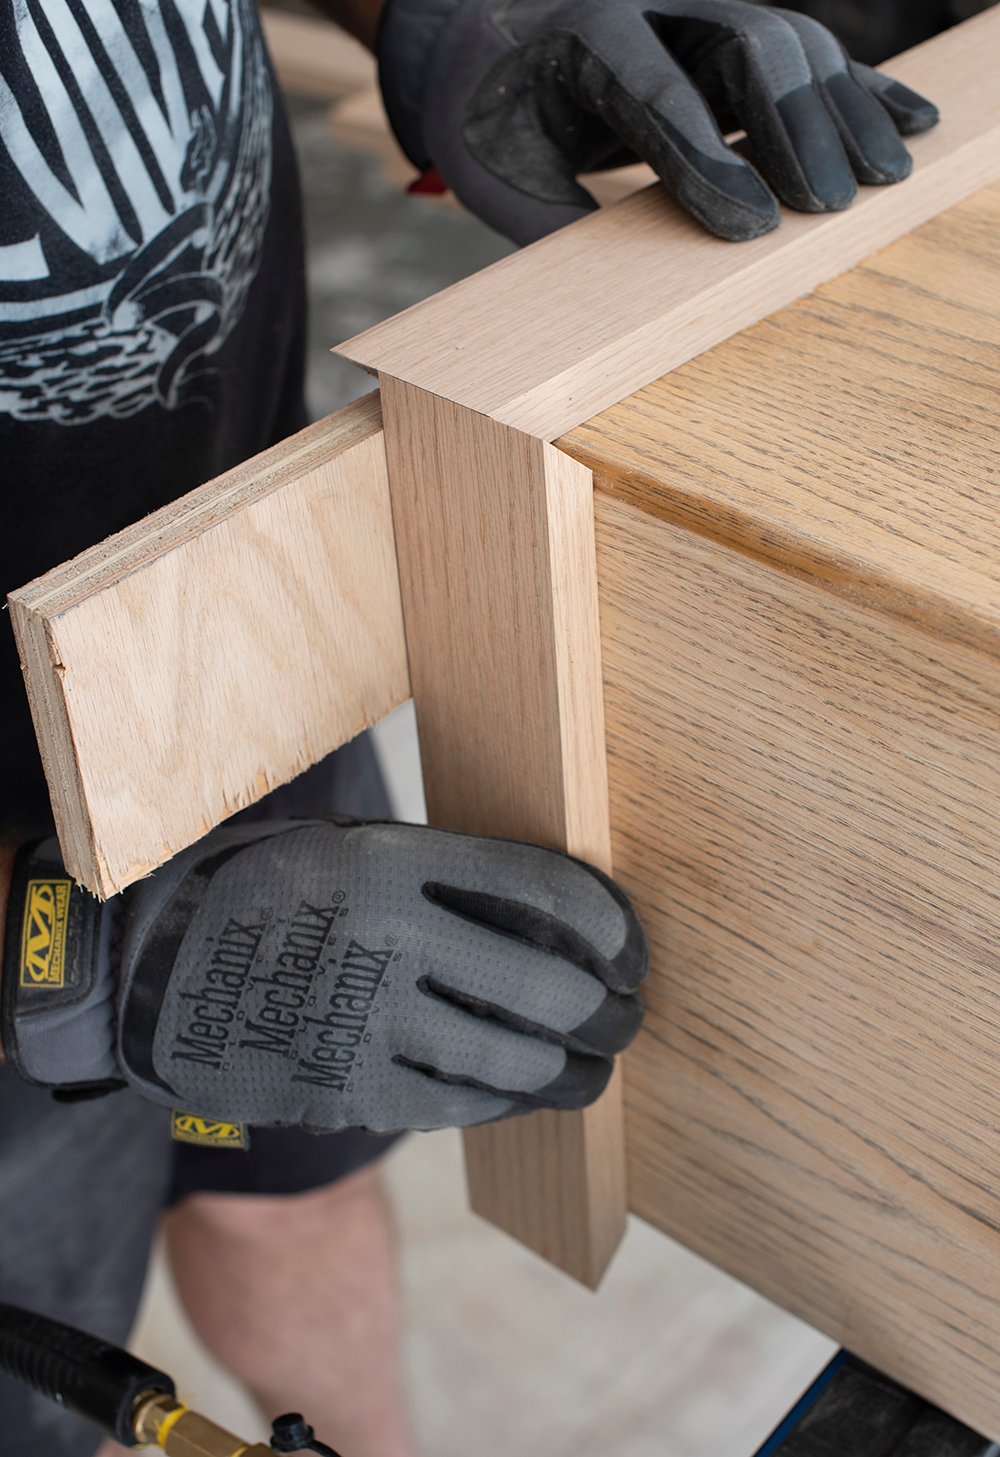 Emmett cut all of the pieces and test fit them, making sure the miters were perfectly aligned. Next we applied wood glue, and applied the pieces to the existing pedestal.
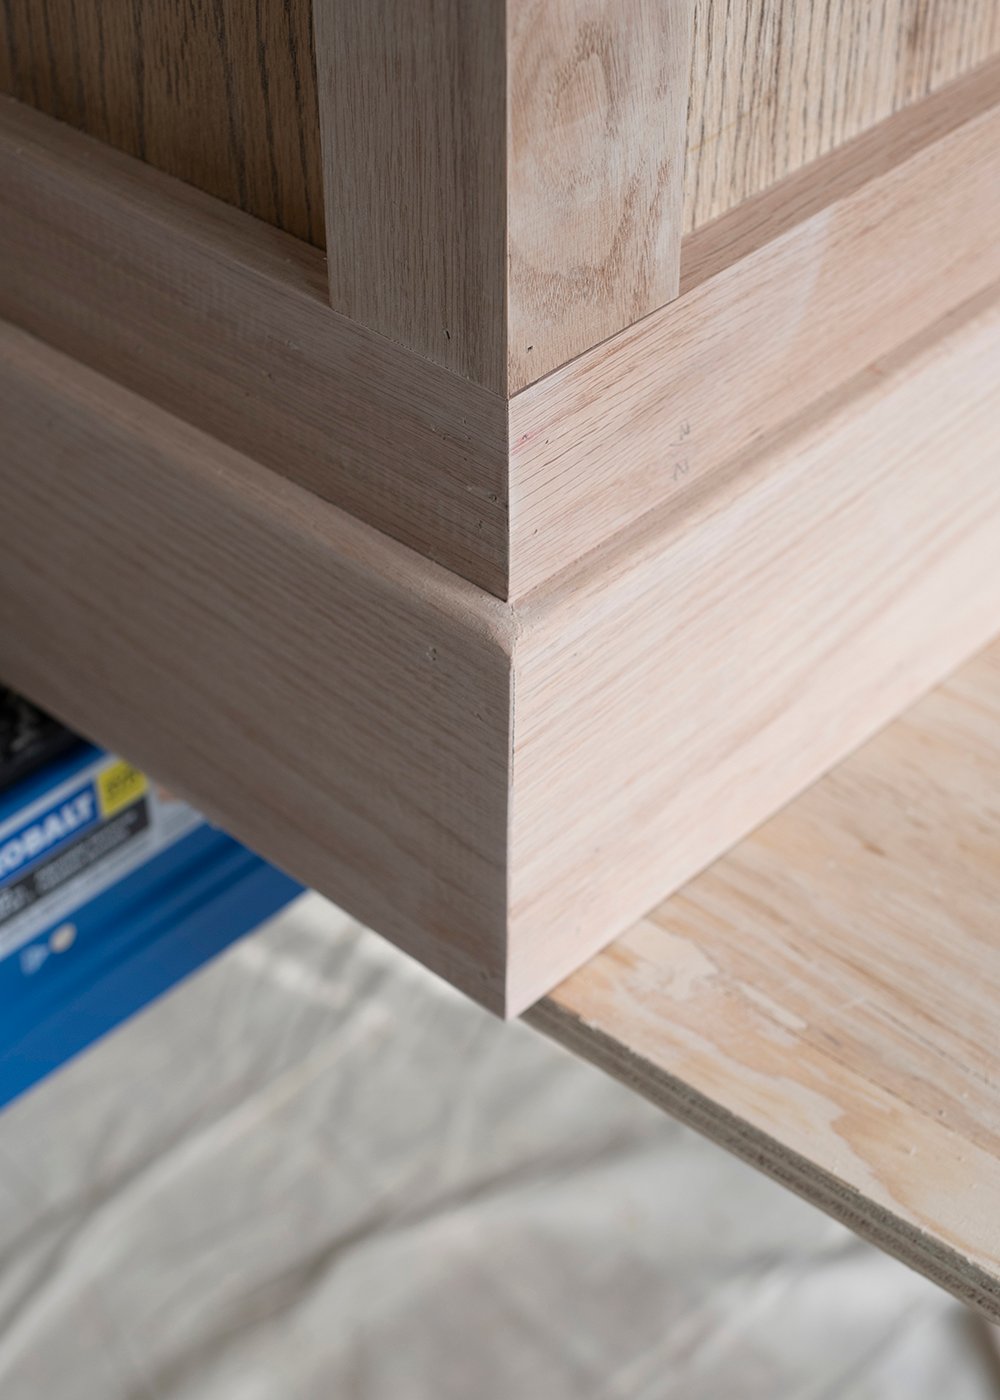
 We adhered both vertical and horizontal pieces- ensuring to hide the radius corners. I really wanted the edges to be a sharp 90 degree corner that felt more timeless and had better staying power.
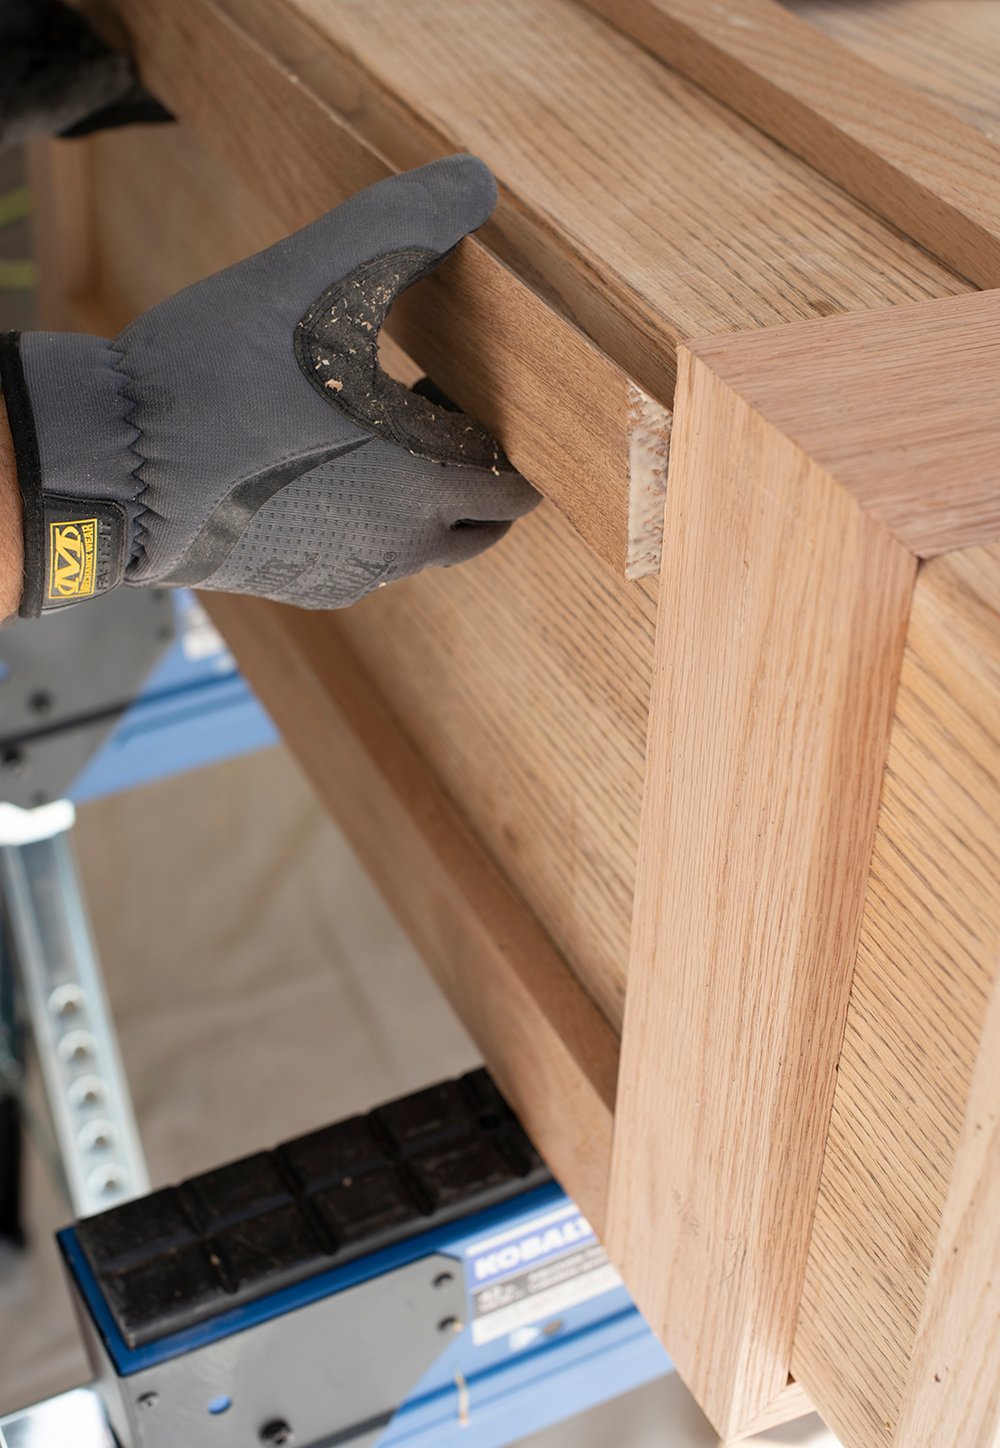 As we glued the pieces on, we followed up with our 18 gage finishing nailer. This pedestal is HEAVY and we wanted to make sure everything was solid and well secured.
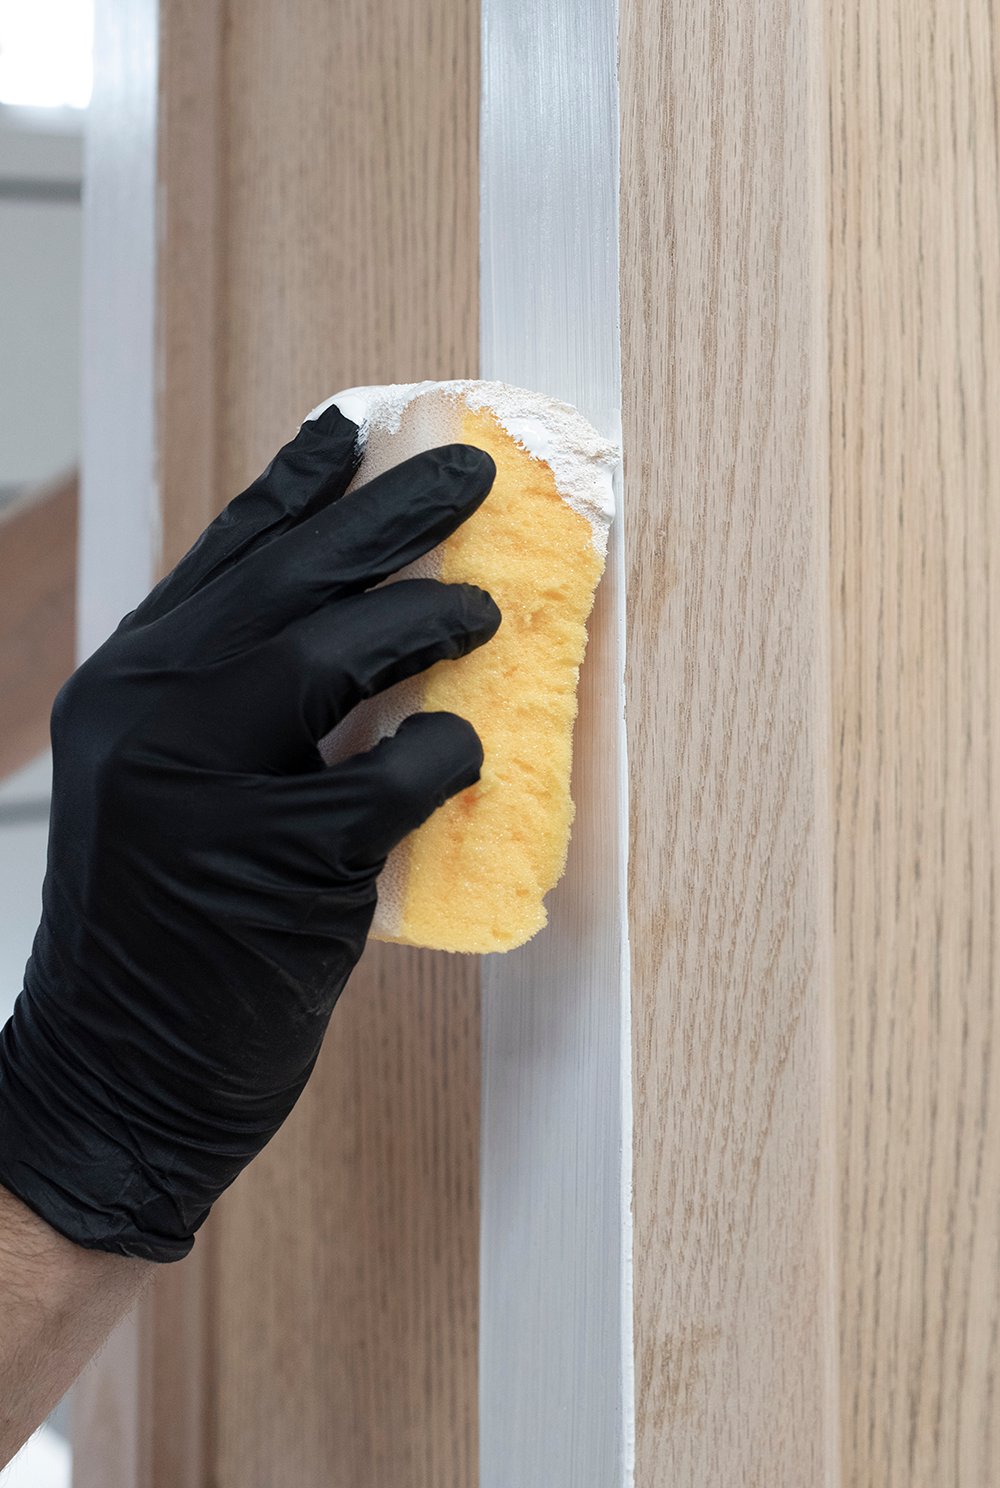
 Once all of the millwork or trim pieces were installed, we used Minwax Stainable Wood Filler to fill all of the tiny nail holes.
 We proceeded to sand the pedestal until it was perfectly smooth, then we carefully wiped and cleaned it in preparation for the fun part… stain!
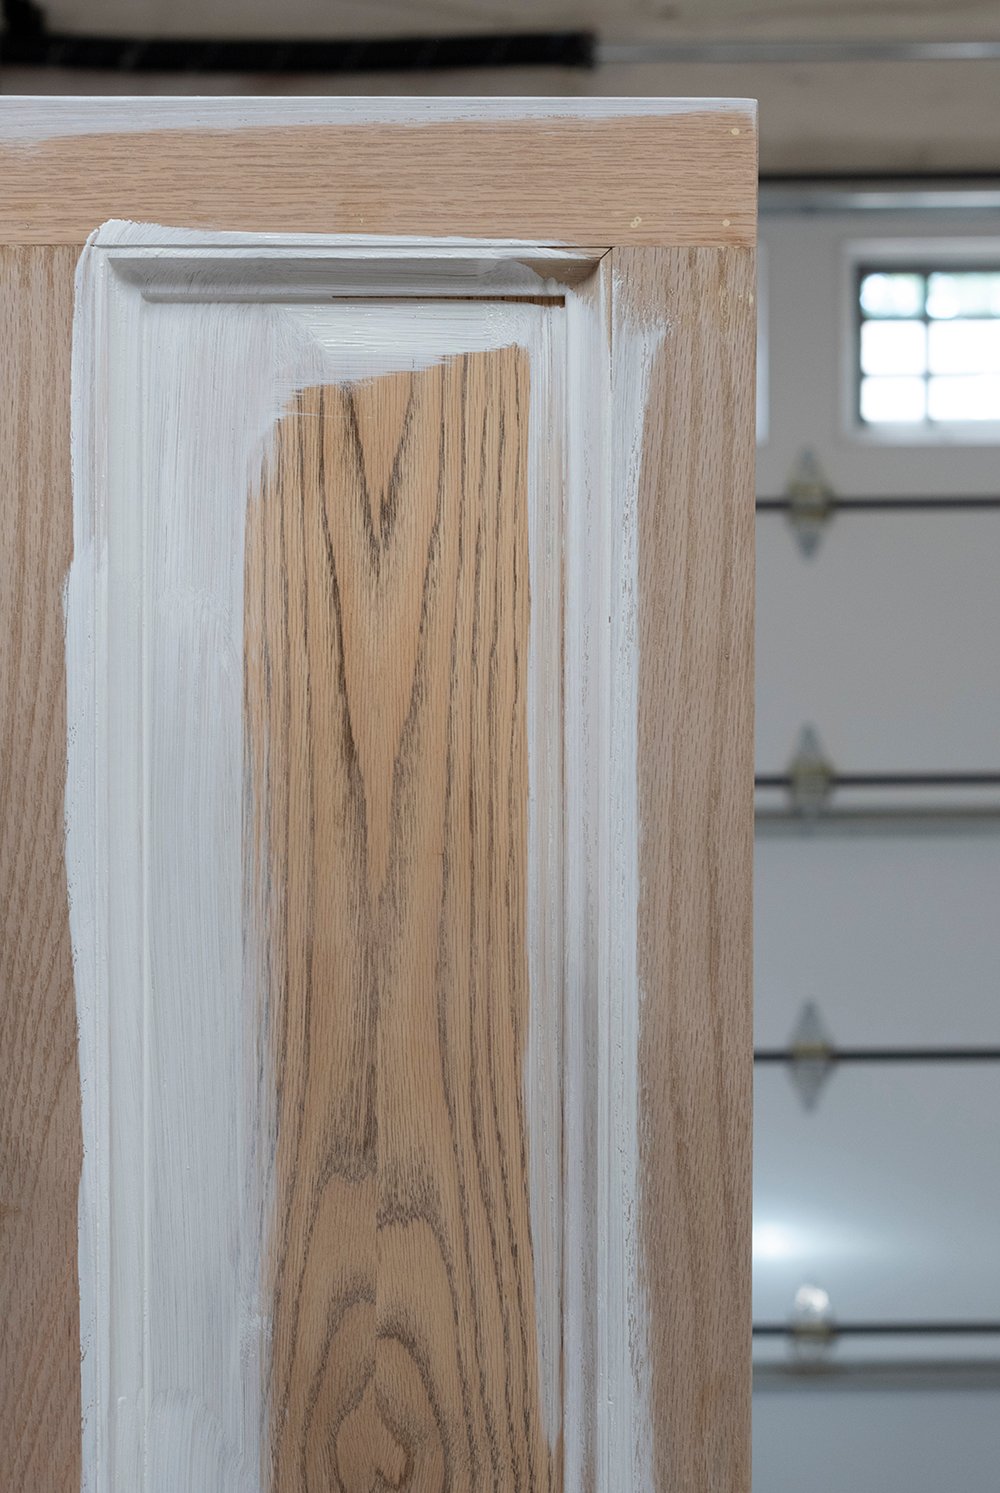
 We used a sponge to apply the stain (because we had it on hand), but I’d recommend using a stain pad! It’s really a thick product that goes on nicely. Since it’s opaque, you can easily see where you’ve stained thanks to the high contrast. You’ll want to apply an even coat, ensuring to get in all of the intricate corners and edges.
 I would definitely suggest tackling this project indoors, in a shaded garage, or in cooler temperatures. We were set up in our garage (with the door open, sun beaming in) and it was a 100+ degree day, which made the stain set quickly. We ended up closing the door, which really helped make the process easier. My point? Keep it out of the sun, and make sure you’re not in crazy temperatures trying to apply stain!
Once the stain is applied, simply wipe off the excess immediately- using your paint pad. It’s really an easy process. We started with the top of the pedestal, and followed with one side at a time for the sake of consistency.
 This solid color stain is actually tintable- there are over 200+ color options. We applied two coats, and gave it an hour to dry in between coats- which was more than enough time.
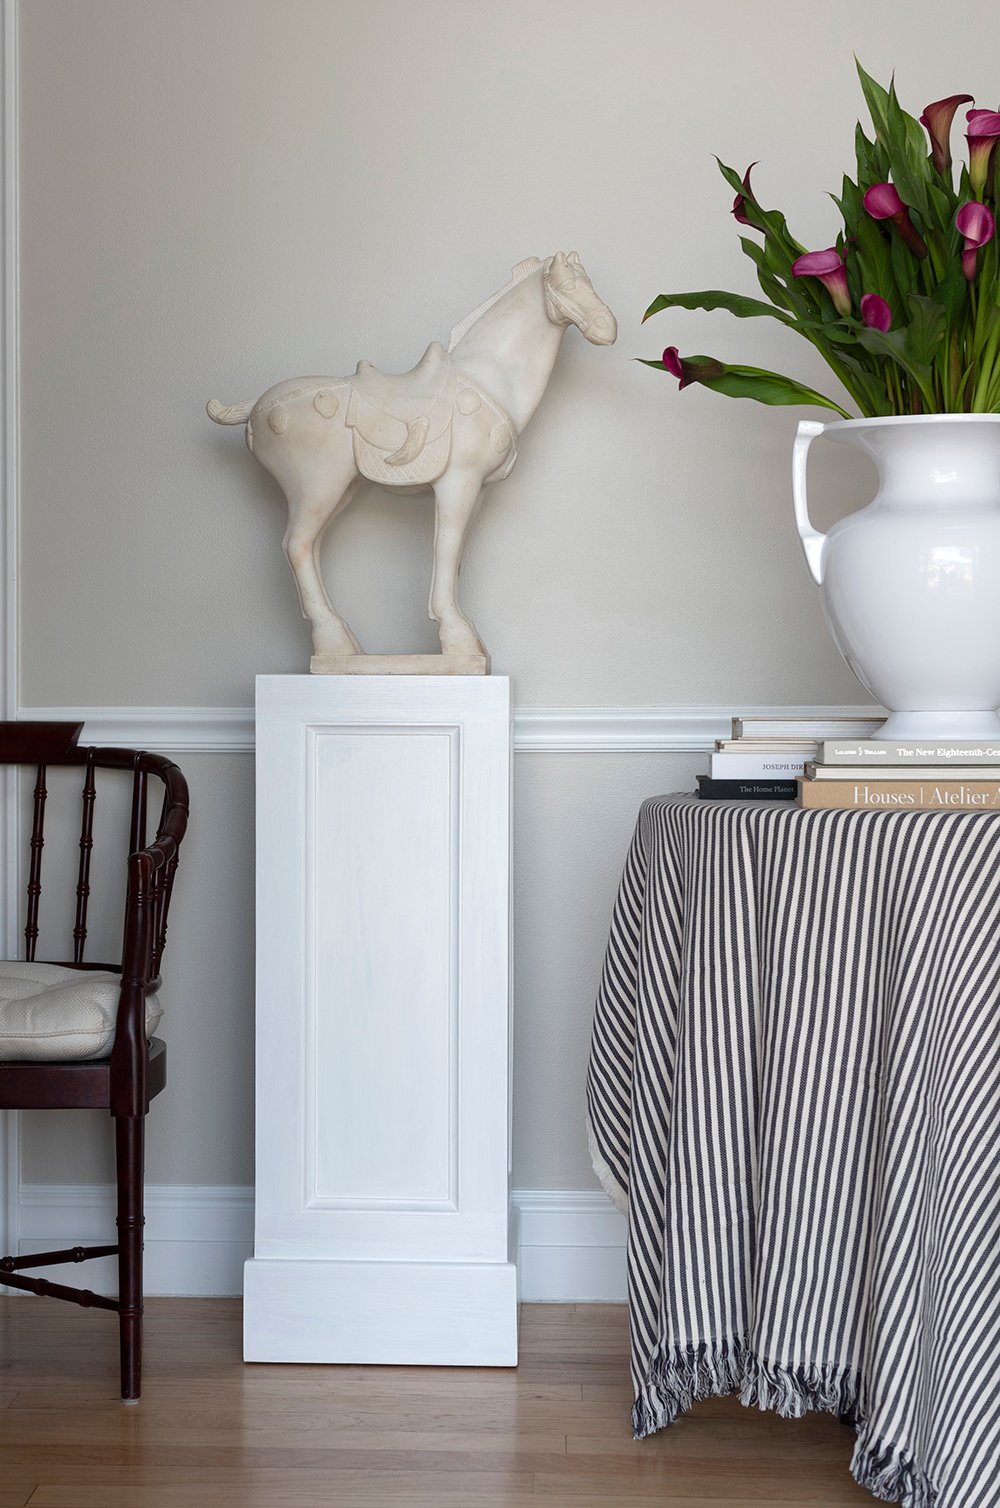
 Ready to see the before and after? It’s pretty right?! It feels more representative of our aesthetic, and the finish turned out really nice.
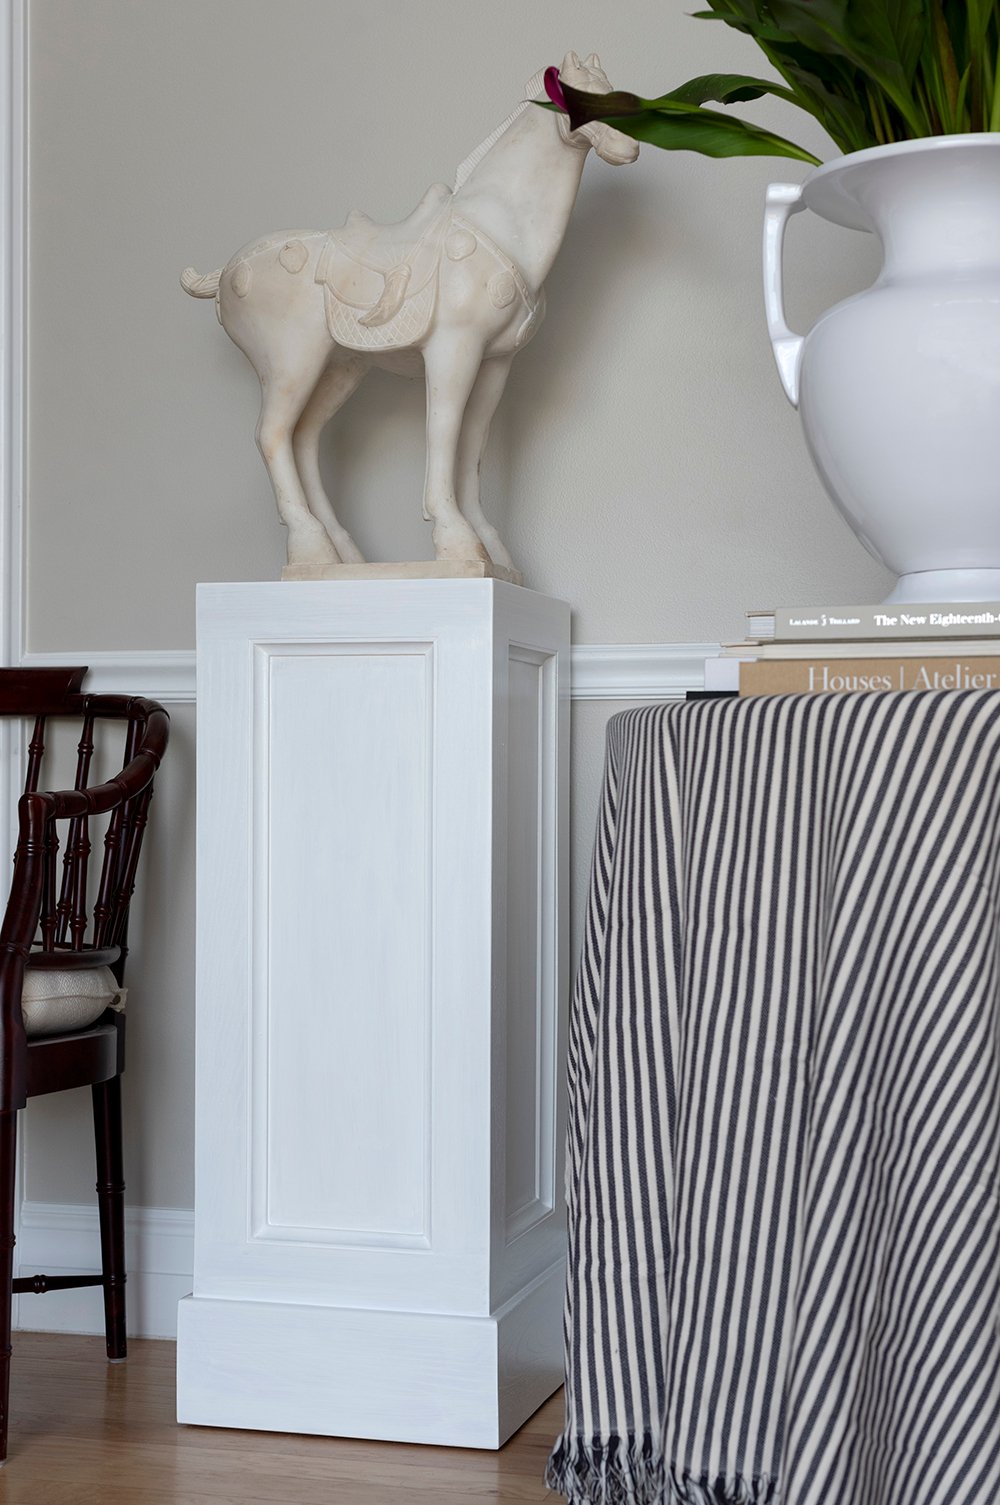
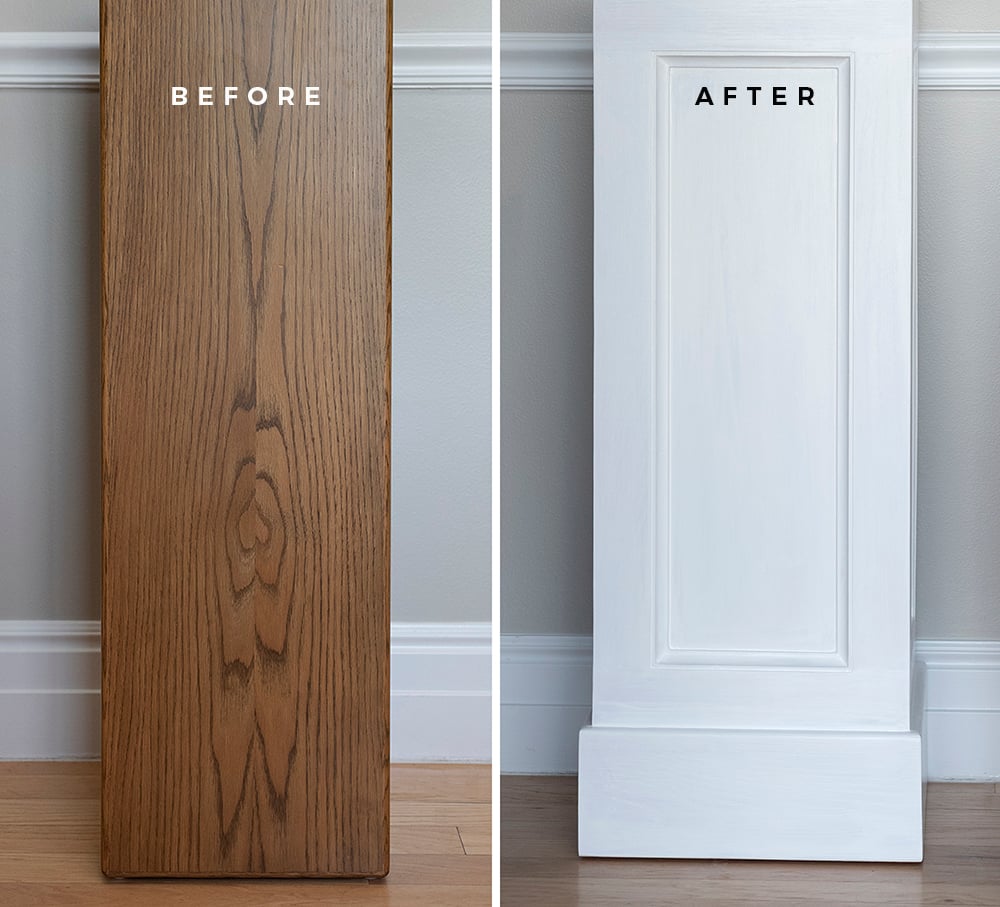 For a piece I pulled out of a dumpster three years ago, I’m thrilled with this pedestal! I think it makes a gorgeous and functional display for my vintage marble horse, which will eventually live in my renovated home office.
 I’m happy we didn’t lose that beautiful woodgrain altogether. The stain really enhanced the texture and gave it a downplayed cerused sort of look. It was difficult to capture in photographs- but it’s beautiful in person! Here’s a better closeup…
 Sometimes these small projects are the most fun. They’re quick, easy, can be tackled in a day, and feel very rewarding. It certainly has me excited to style the office someday and fill it with my favorite things! These pieces that Emmett and I tackle together are always super special to me. Not only do we make memories together, but it’s something I know I’ll keep forever because he made it for me.
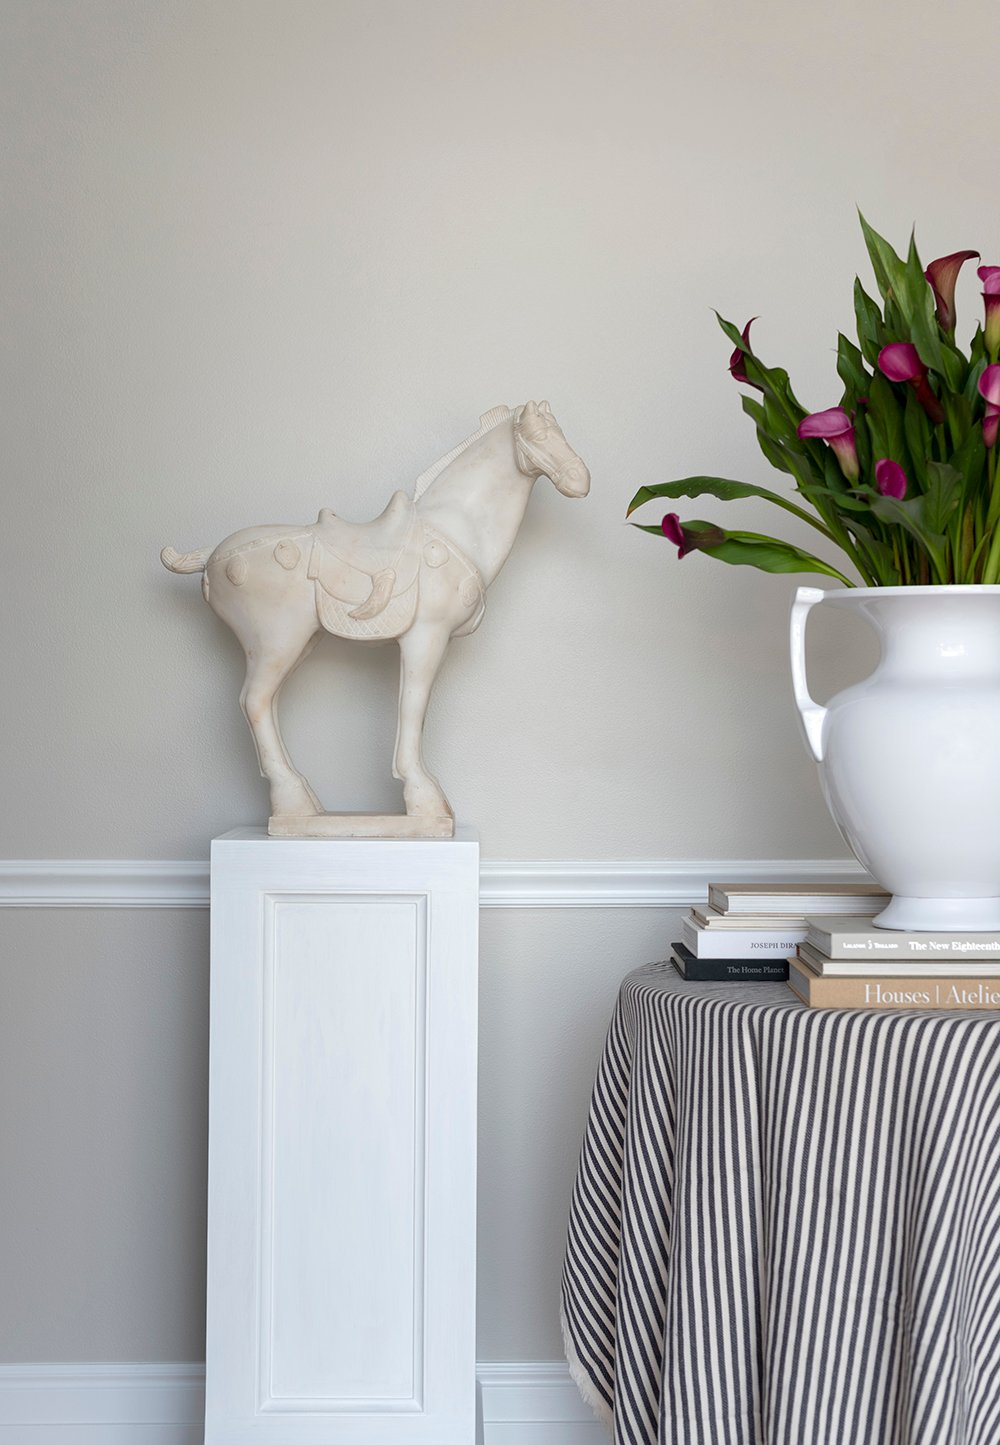 I’d love to hear your thoughts on our little pedestal makeover! I also tossed a blanket over our entry table to create a temporary skirted table look. It’s scratching my itch until the one I bought arrives. Let me know if you have any woodworking or stain questions, and we’ll do our best to answer them!

Wow! That is quite a transformation! I’ve always loved that you dragged those pedestals from the trash. Why waste absolutely functional solid oak furniture?! With those radius corners banished and a subtle new stain, the piece perfectly displays your prized horse. The scale is fantastic. You are such a visionary! I adore how the bright white highlights the patinaed marble, and I can just imagine the tactile contrast of the smooth horse’s neck and the muted grain. Pet-able. I have long admired cerused oak, and this stain provides a less dramatic take on that. You know I’m intrigued by the 200 color options! I suspect there could be a gold mine of dated oak furniture just begging for new life. *adjusts thrift goggles* Speaking of thrifting, hadn’t you snagged a pedestal with storage a while back, or did I dream that? My personal search for a pedestal continues… I confess, though, that this heatwave (and now smoke!) has sapped a lot of my ambition. Leave it to the Gibsons to provide that spark of inspiration! Thanks, friends!💜
I couldn’t believe they were throwing them away! Our basement credenza came from that same dumpster situation (it’s also solid oak). Thanks for your kind words, Peggi! I so appreciate them. I wanted to keep it light, but I knew the pedestal had to be bright enough and hold enough contrast next to the horse… I really wanted the beautiful patina on the marble to be highlighted, so I’m thrilled you noticed that. The horse is the same size as Cash, and he was very confused when the horse was sitting on the floor (pre pedestal). Haha! I do have another pedestal I thrifted, that I need to paint or stain. I thought it was going to work for the horse, but the horse is HEAVY and it had a little sway to it. I was worried a dog would knock into it and everything would come crashing down. I think I may need to reinforce that one before using it. It has been hot and hazy here too. I bet you’re counting down the days until you leave for Alaska!
Wow, talk about a glow up! The new look is updated and flows well with the other pieces in your home. I love the cerused look, and how that subtle texture combines with the patina of the horse. What a display! This will look fantastic in the office, and I’m anxious to see your other styling plans.
I’m intrigued by the process that goes on in your head when you come up with these modifications. Oh to see someone else’s trash through your eyes! I wonder how many items I’ve passed up that could have been incredible additions to a space. When you’re thrifting items, what percentage of your thought process considers what you can do with a piece, versus the piece itself? When it comes to making modifications to a piece, what factors should one take into consideration? I know you touched on some of that when you did your enameled desk makeover (when to paint versus refinish), but in this case, you’ve modified it in a way that completely changed the stylistic aesthetic while maintaining the integrity of the piece, *and* did it justice! I have to say, I see a ton of modifications done to vintage items here in California, especially in the realm of larger furniture pieces. Very few of those refurbished items would ever land in my home, simply for the loss of both aesthetic and structural integrity. So how do you do it Sarah? Is it simply a well trained designer’s eye? “I want to learn the ways of the force” lol.
It’s nothing short of fantastic, and I’m in awe of your vision. I hope you have a magnificent Tuesday friend!
Thanks, Lauren! I feel like I look at a lot of spaces and pieces of furniture or decor with “project goggles”. Haha! I’m always envisioning what it could be or how it might look styled in our house. In regards to a percentage, I think it really depends what I’m shopping for and what I find when thrifting. Some of the really nice pieces don’t require any touch ups or makeovers- sometimes it is best to leave certain vintage pieces as is… and other times there are factors that make project pieces more ideal: the budget, if I find something that is really cool but needs work I’m willing to put in the elbow grease, if I’m searching for something difficult to find, etc. It really varies room by room, and sometimes I just stumble across something that I think could be cool in the future (like the pedestals) with no real intention of using them anytime soon. I totally agree with you on loss of integrity for certain projects of pieces of furniture. Sometimes the original looks better than the finished makeover. I’d like to think a good makeover is the result of creativity, excellent craftsmanship, and trying to create something that feels true to aesthetic. I so appreciate your kind words :) You made my day! Hope you had a fun Tuesday, Lauren. xo
I’m intrigued! Do you think you could use this on oak kitchen cabinets? I’d love to do a little refresh to our kitchen while we save for a big renovation.
Definitely! You can also tint it a different color. The pedestal is made of oak, so you’d end up with a similar look!