Custom Window Treatments : The Process
 When requesting blog topics earlier this year, many of you asked for additional posts and information pertaining to window treatments- including custom drapery. If you’ve been following along for awhile now, you know that I like to mix all types of window treatments: readymade options, budget options, DIY options, designer options, and of course- my favorite is custom… I am a designer, after all! I had the opportunity to partner with Calico to share the process of tailored drapery with you, and I knew it would be the perfect time to chat about taking the custom route. Click through to learn about the process, the cost, and how I landed on these gorgeous window treatments for my home office!
*This post is sponsored by Calico. All content, ideas, and words are my own. Thank you for supporting the brands that allow us to create unique content while featuring products we actually use & enjoy!
 The most asked about window treatments in my home are the drapery panels in our formal living room that flank our french doors… and for good reason- they’re beautiful! I had those window treatments custom made. As a designer and a trade member of the design industry, I have resources and skills I know not everyone has access to. Specifying window treatments actually used to be a big part of my job as a designer. The firm I used to work for had our own studio workroom and talented seamstresses on staff to create whatever we could dream up with an array of designer fabrics.
 Most homeowners don’t have libraries of designer fabric at their disposal or a talented team to whip up custom window treatments. Unless you’re working with a designer, it can be an overwhelming process. That’s why when Calico reached out, I jumped at the opportunity- knowing it would be an awesome resource and a good educational post to share with you! I’ve actually had clients work with them in the past and can attest to their quality. I was excited to go through the process myself! Since we had planned to tackle my home office at the beginning of the year, I knew that was the room I wanted to get window treatments for. I designed these with that renovation in mind! Can you already tell what direction I’m headed with the design, based on the below image?
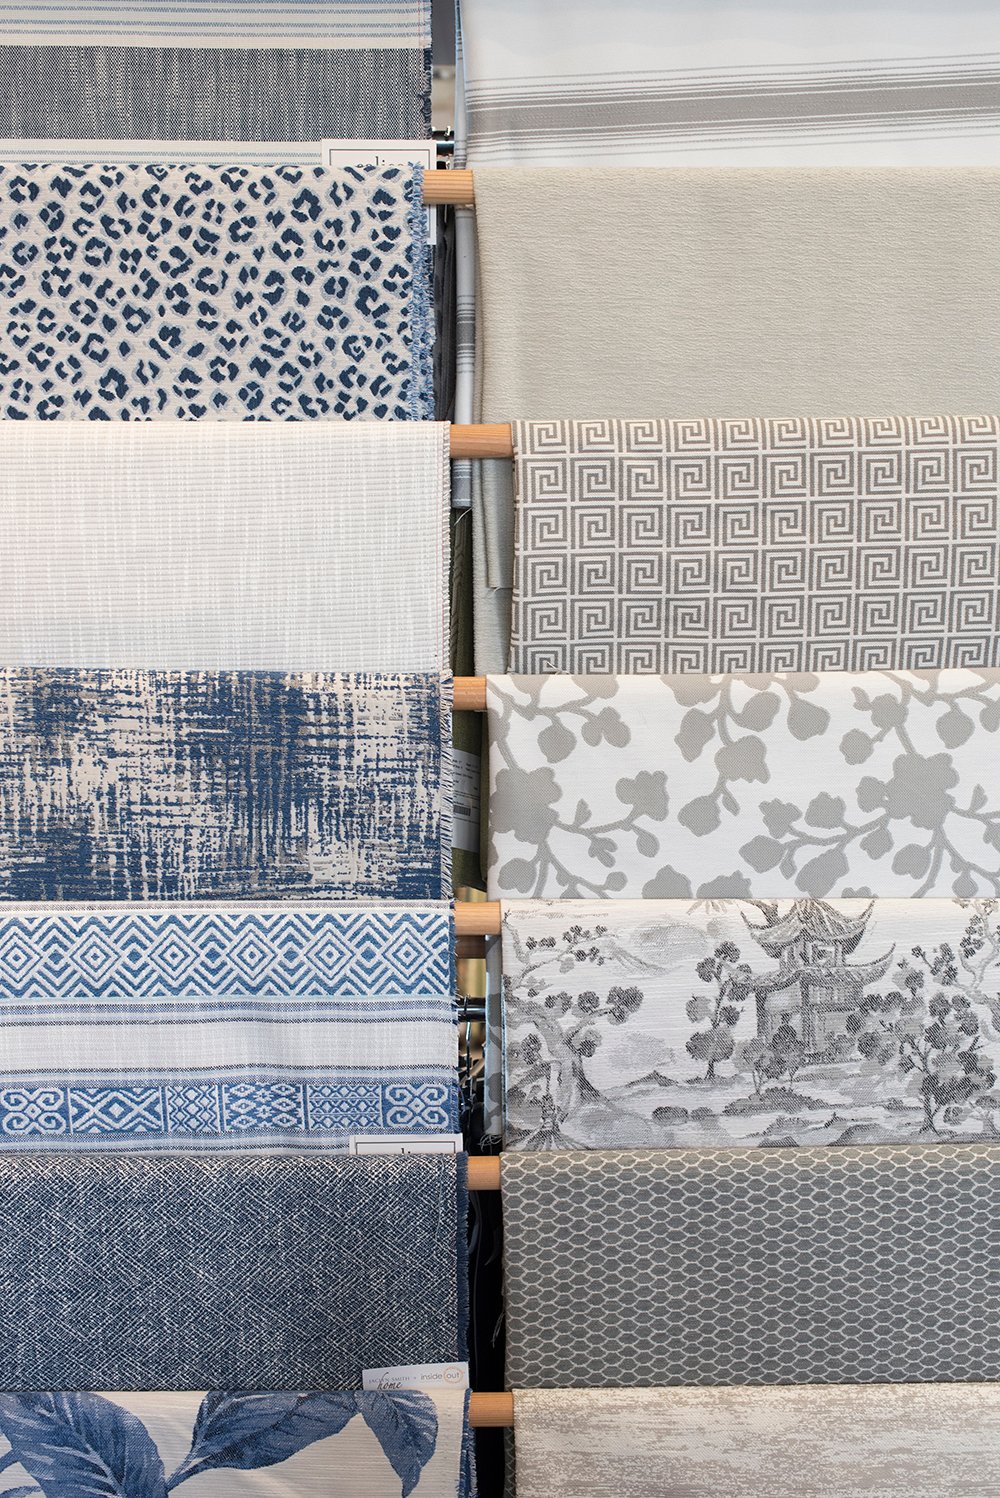
 Let me walk you through the entire process for these window treatments. First, I made a private appointment with my local Calico store, here in Salt Lake City. Since this used to be part of my job, I went in knowing what I wanted, BUT the beauty of the process is… you don’t have to know! Your Calico designer can walk you through all of the options, choose fabrics, help you hone it in, and will design your window treatments for free. Kaye was my designer (who is the sweetest), and I had the best time brainstorming with her! Most days I miss being apart of a design team and bouncing ideas. I shared my vision with her, she grabbed a ton of fabric choices for me, and we sketched it out together. It was really a fun morning.
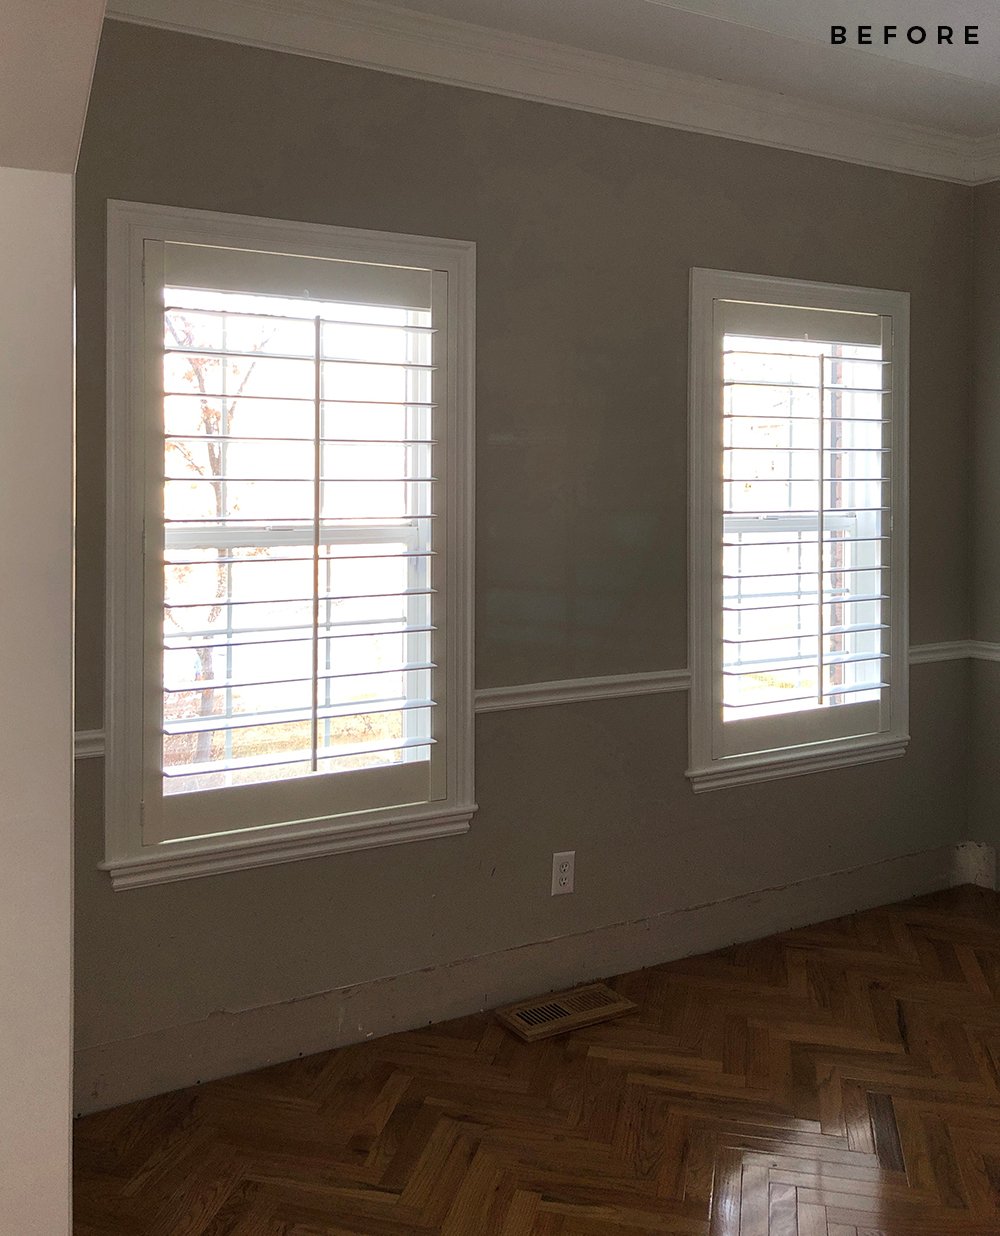
 The next step was scheduling a professional at-home measure. Given we’re social distancing and I used to do this sort of thing for a living, I actually opted to take my own measurements. However, this is another service that Calico offers with their custom window treatments. They’ll come to your home (safely masked up) and take measurements for you… that way the end result is perfectly tailored to your windows. Once the measurements are submitted, your window treatments will go into production. This is what my office windows looked like BEFORE (please remember- my office has been in progress for two years, haha)…
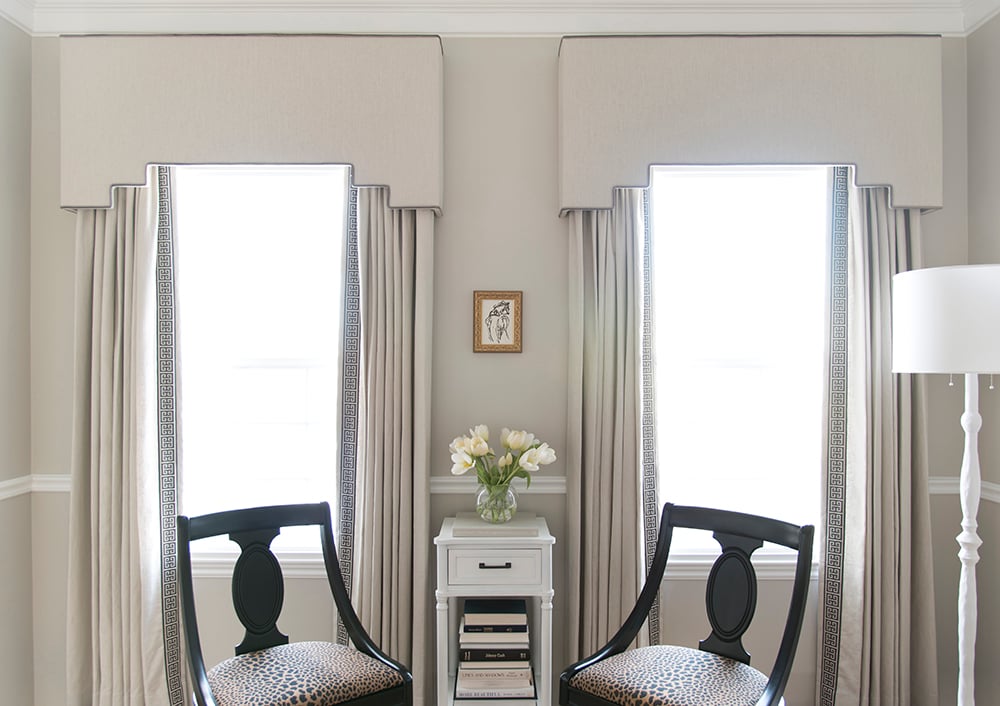
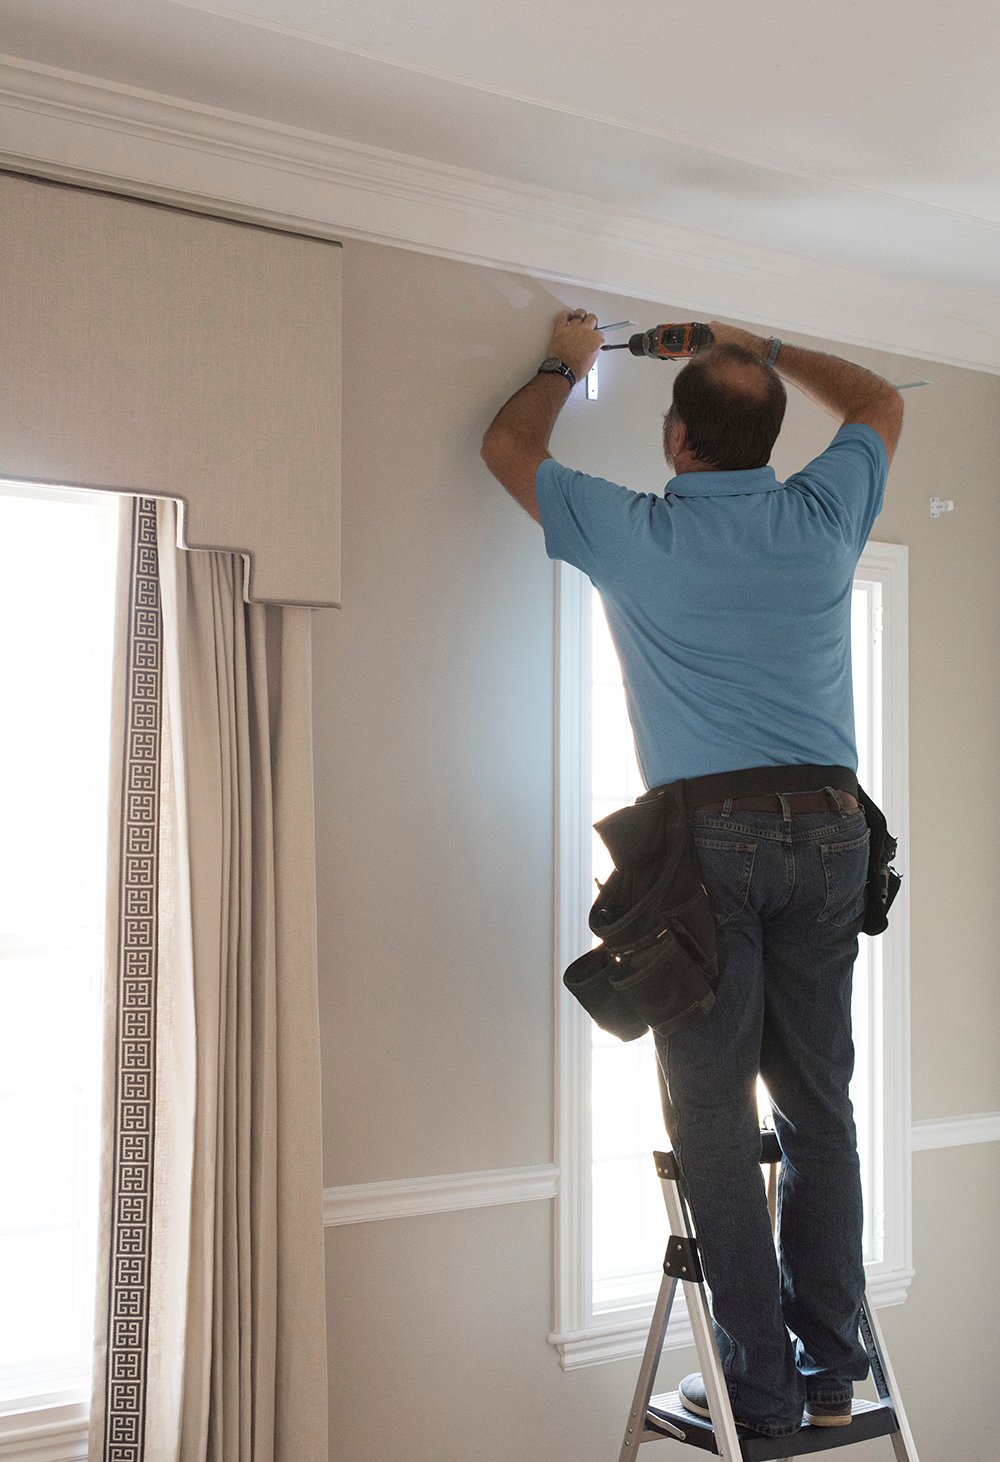
 Calico called once my window treatments were completed to schedule a professional installation. Emmett was thrilled- one less project on his to-do list! Joel showed up at our house for the installation and both windows took less than an hour… he even removed our existing plantation shutters for me. He immediately guessed I was a designer, which made me laugh. I spewed off how high I wanted the drapery panels to hang above the floor and of course- he already knew how it should look (because it’s his job and he’s very good at it). It’s nice to work with people who know these design measurements! I even asked him to hold up the cornice so I could “eyeball it” (such a Sarah thing to do) and he happily obliged. It ended up right where my designer, Kaye, had noted. What can I say, I’m an admitted perfectionist. Argh. Joel cleaned everything up and was on his way, leaving me with these stunning window treatments to admire.
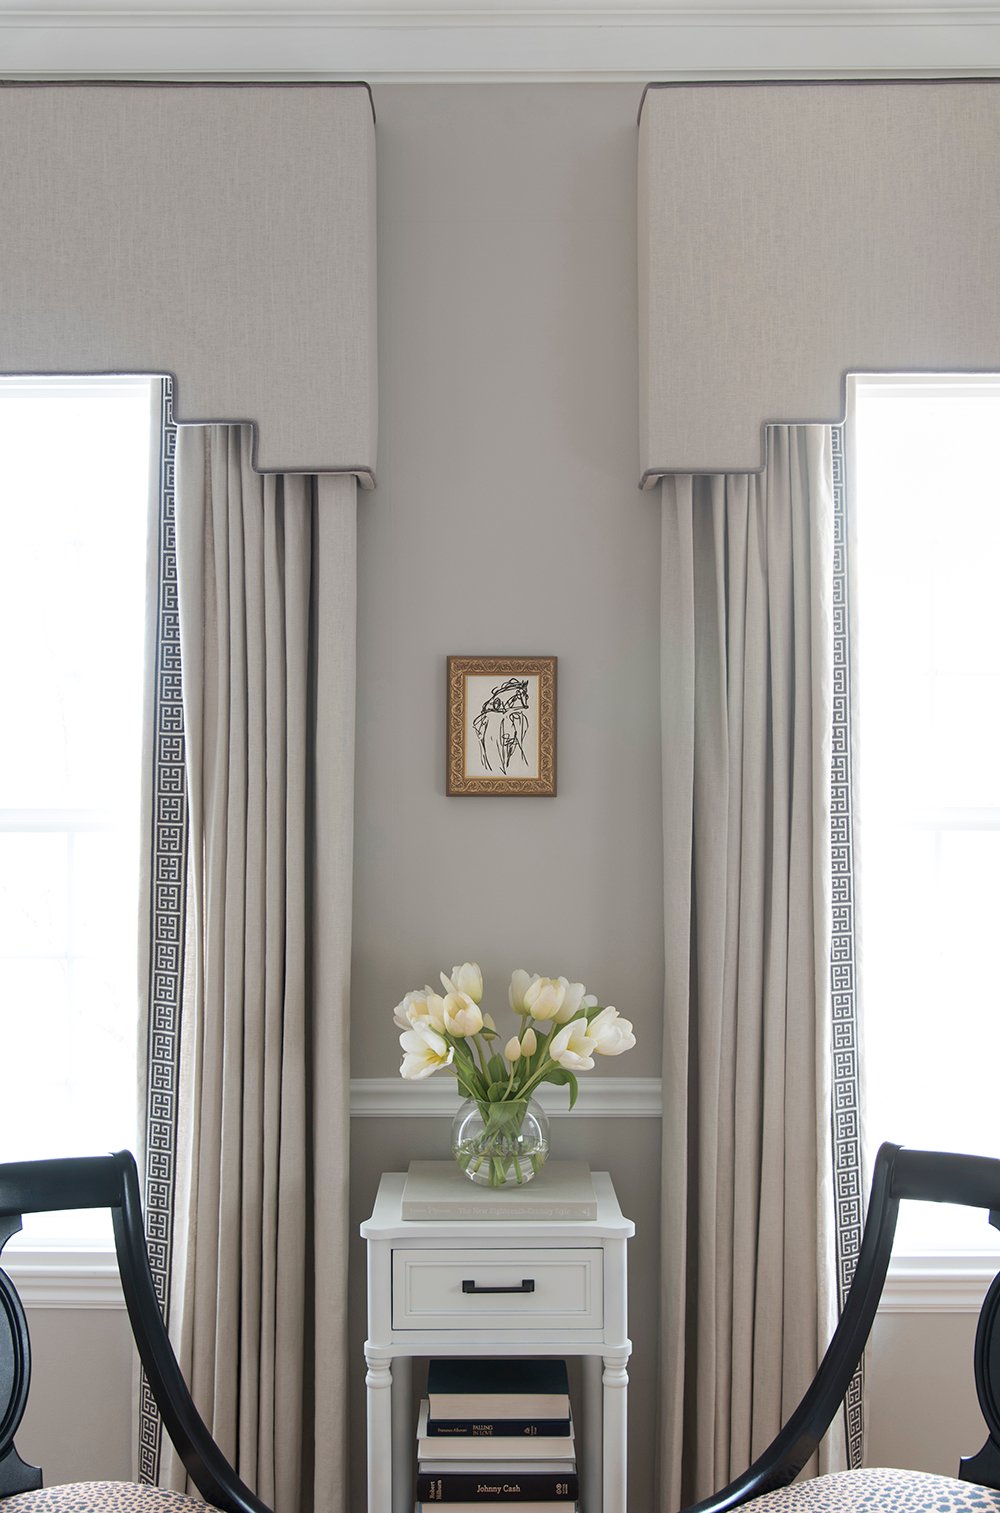
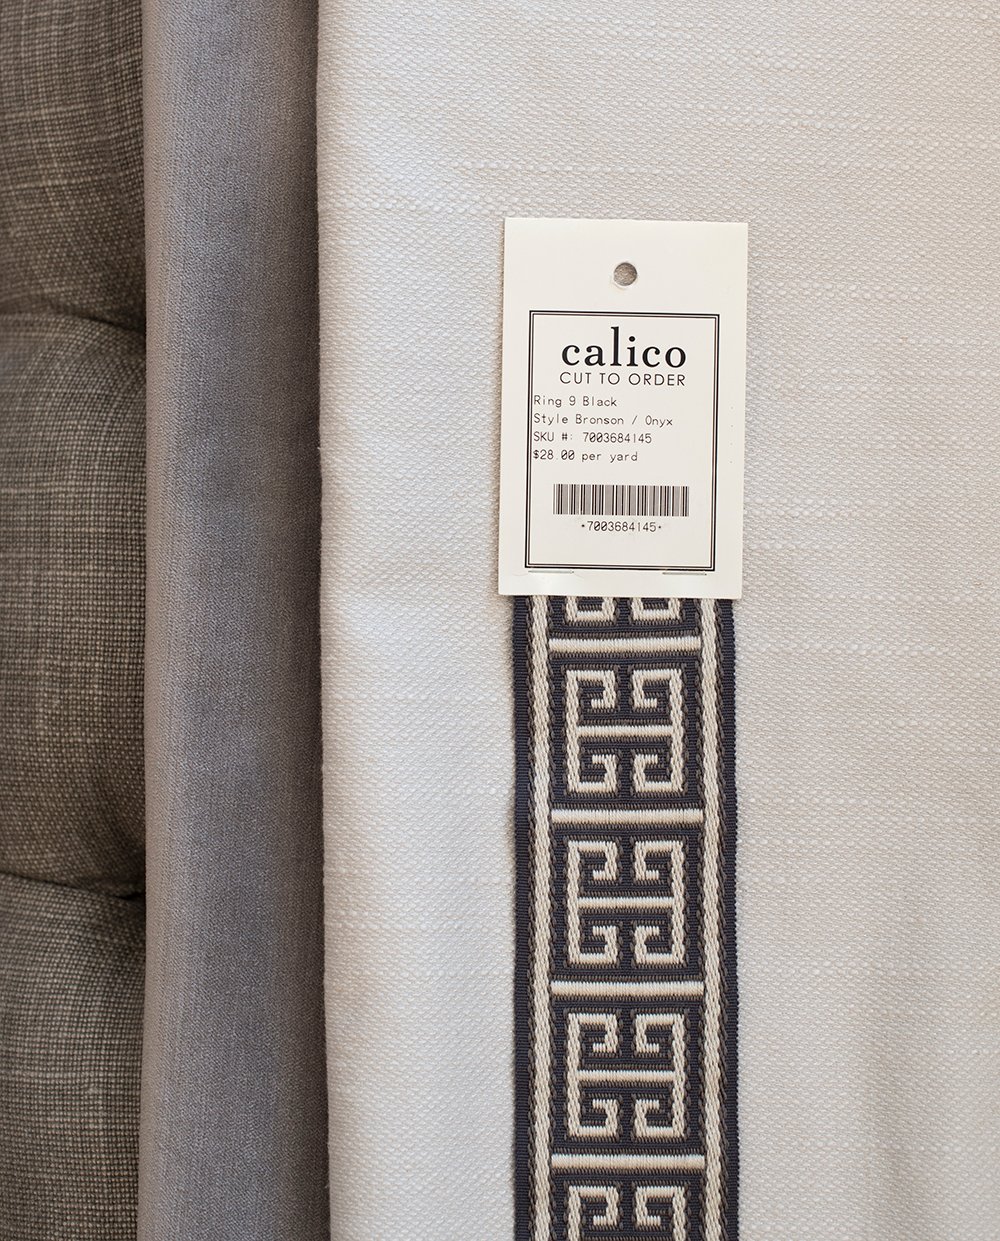
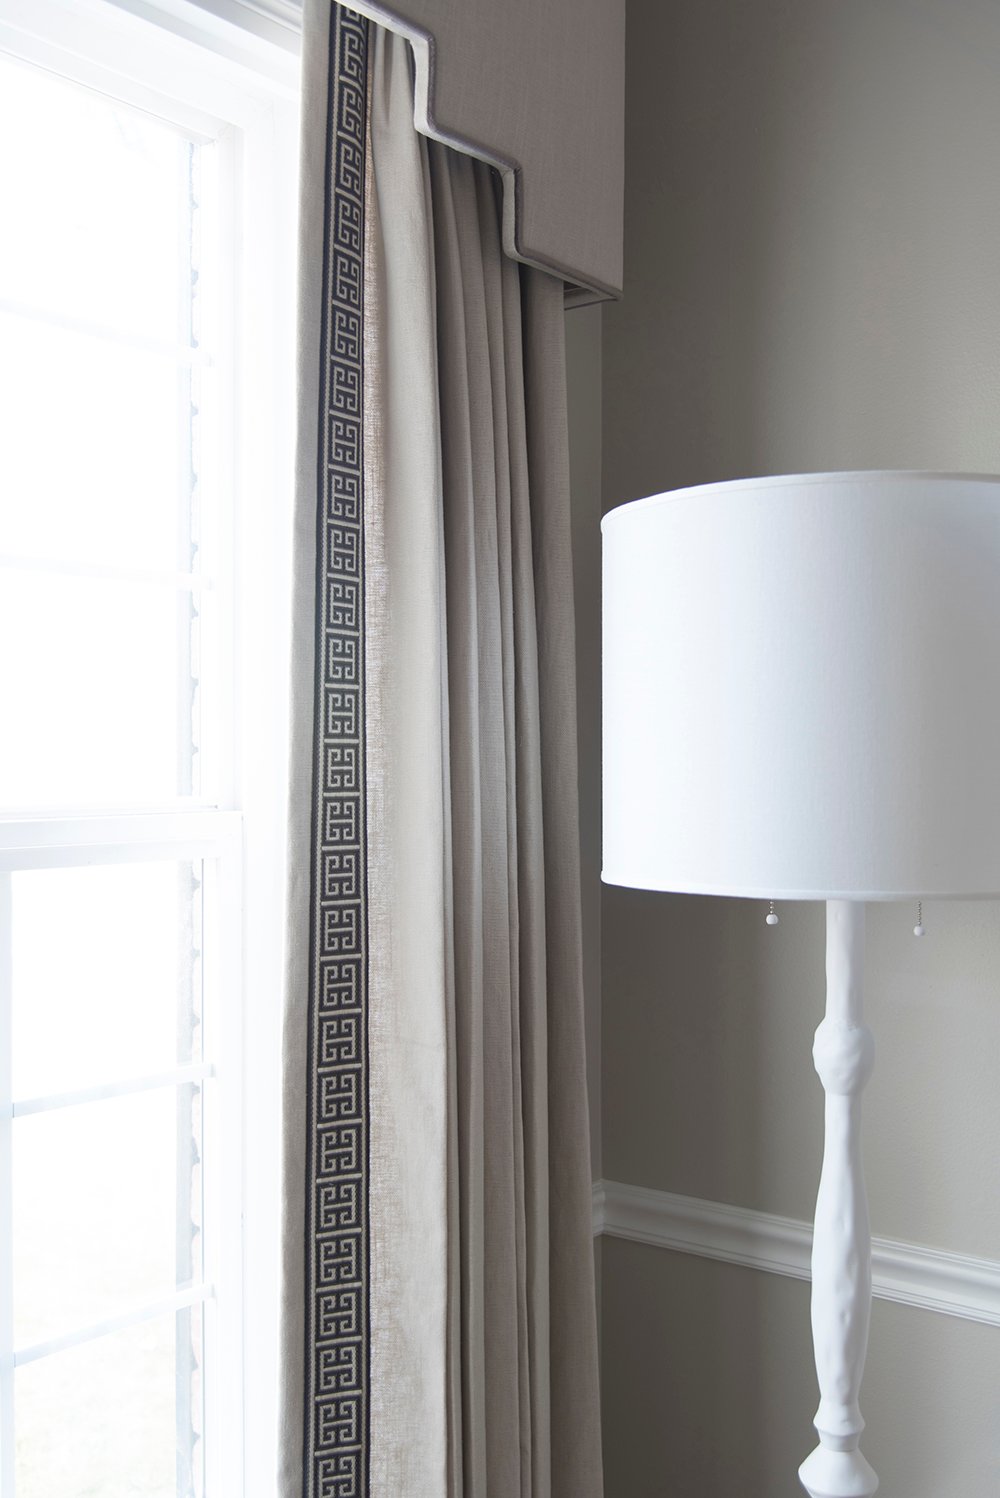
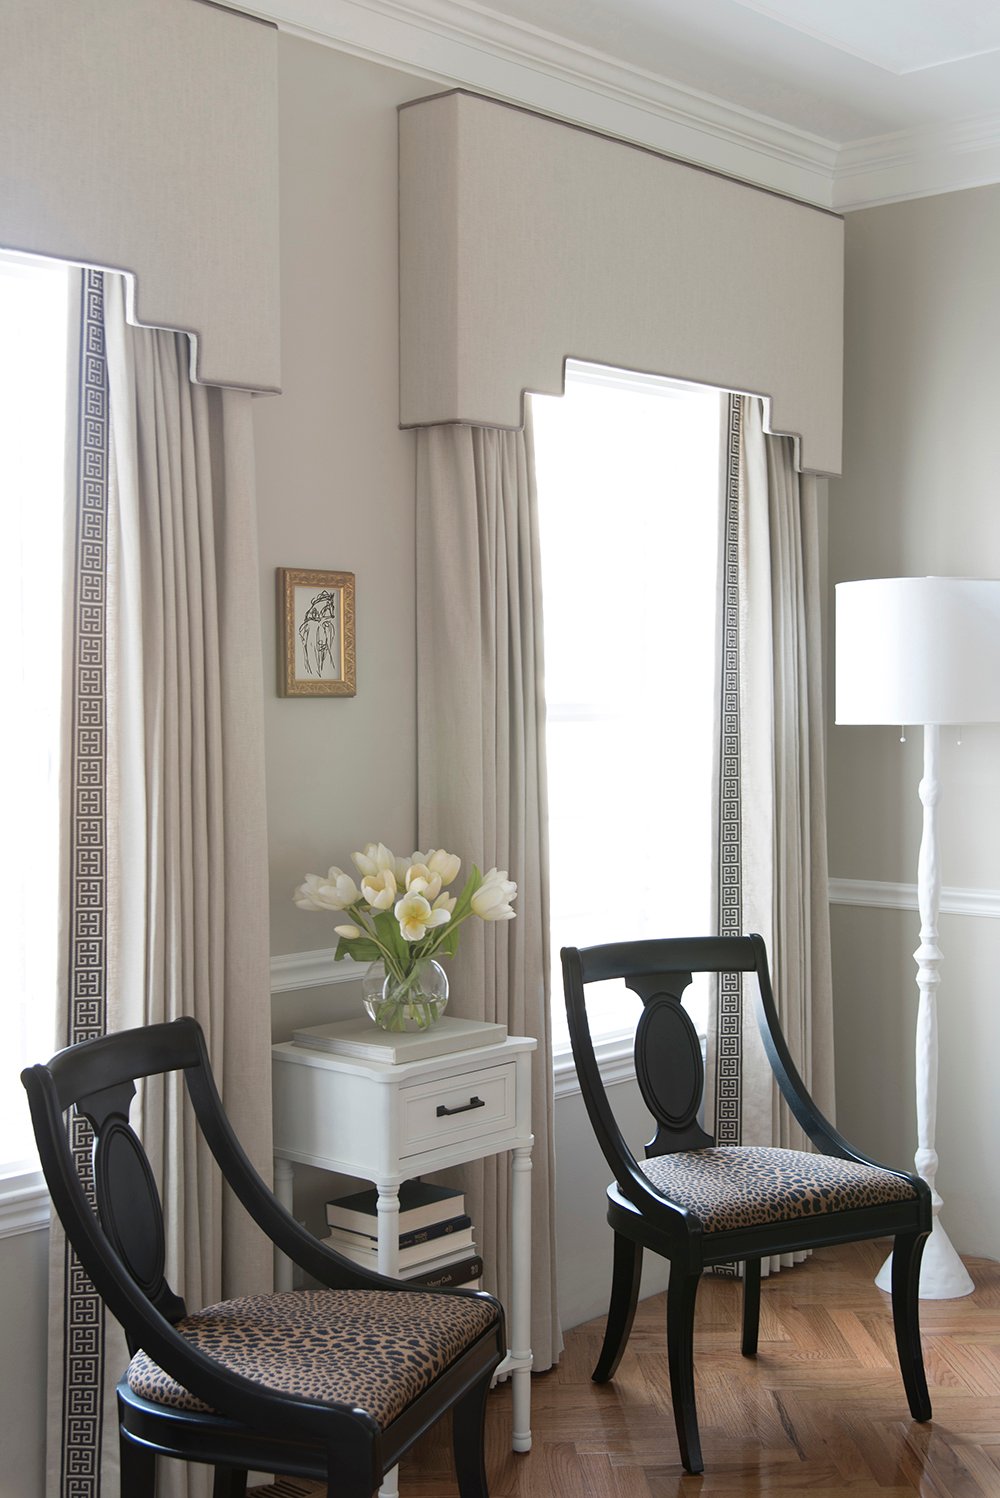
 Let’s talk design, now! I wanted to keep the window treatments in my office traditional and a bit more formal. I love the feminine look of pinch pleat drapery, and this time around- I wanted to add a cornice (that’s the geometric board at the top). It really makes the room seem so much taller and leads your eye toward the ceiling and crown moulding, while looking more formal. I knew I wanted a patterned band on the leading edge of the panels for added interest. Kaye had the idea to add a piped welted edge around the cornice board, as well- which we color matched to the patterned band. Calico has a huge fabric and trim library, but I landed on this combination rather quickly! The panels themselves are a heavy linen / cotton blend and are of super quality. They work for privacy, but still allow filtered light inside… perfect for a home office. I know I’m going to love these for years to come!
 I’m really happy with the end result! What’s not to love about stunning custom drapery? I also promised to share the cost. You know I have a taste for higher-end fabric, and the pricing totally reflects what type of fabric you’d like, how many details you want to add (like trim pieces, a contrast welt, a cornice board, hardware, etc)… these two windows cost around $3,500. That’s honestly an excellent price (coming from someone who used to quote custom window treatments). To break it down- the two cornice boards were around $1,400, the hardware was $100, and the remaining cost was the drapery itself. I hope that’s helpful! Basically, everything is custom made to fit your windows perfectly. It’s an easy way to streamline the custom window treatment process (without hiring a designer or trying to figure it out on your own). If you’d like more information, I’ll copy some helpful links below:
- To make a Calico appointment, click here.
- To request a professional measure, click here.
- To check out their window treatment brochure, click here.
- This is the main fabric I used– a linen cotton blend.
 Now that I’ve shared this post and photographed my beautiful window treatments, I’m going to carefully take them down and store them for safe keeping, so we can begin demo on my office (totally backwards, I know… but I couldn’t say no to this opportunity!). Once we renovate, rework the millwork, and the dust has settled, these beauties will be reinstalled in their rightful place. I’m already looking forward to the day! I think they’re really going to elevate the space and will be the cherry on top once this room is totally finished. Let me know if you have any questions about the process, Calico, or window treatments in general… I’m all ears and happy to help!
Just lovely! While there’s no denying custom drapes are a luxury investment, the cost certainly seems to match the level of detailed service. How amazing to have someone measure, fabricate and install a design you created. Even for a skilled DIYer, I feel like drapes are a major project! (Tabitha Brown would say, sewing is “not in my ministry!”) What great motivation to have those beauties all completed and waiting. As for your office vision, I am beginning to get a sophisticated Parisian salon vibe. The cornices definitely make the ceiling appear taller, and the trim is perfection. I’m wondering about the builtins now, though, because I thought they were going under the windows. My curiosity about the final design plan is getting pretty serious over here.😉 Oh, the suspense! 💜
Thank you, Peggi! They’re definitely a luxury investment that come with a higher price tag than my typical DIY or readymade window treatments. I’m all about mixing high & low! The little table was a $15 find that I spray painted for the space. Haha! I actually really like it and think it will stay in the finished space once it’s all wrapped up. It fits perfectly between those two windows. Drapery is definitely a MAJOR project. That type of sewing is “not in my ministry” either- I love, love, love Tabitha Brown. I’m amazed how much taller they make the room feel. Those cornice boards really did the trick. The built-ins are going on the wall opposite of the windows (floor to ceiling). I thought they would nicely balance out the window treatments, since it has kind of turned into a statement wall. I need to share the final design plan- or maybe find the motivation to finish it. Ha! Happy Thursday! xox
Wow those are very glamorous window treatments Sarah. Like something out of a fancy boutique hotel. Ooh la la! So excited for you. Yay!
Your chairs look beautiful too with those gorgeous drapes! So excited to see what else your dreaming up for this room. I know it’s going to be amazing 🤩
Thank you, Colleen! I’m really happy with how they turned out, and I’m even more eager to get going on my office project! I hope you’re having a beautiful week :) xox
What a transformation! I always like a nicely dressed window, but this combination of drapes/trim/ cornice elevate the whole room. Can wait to see your design for the rest of the space!
Thank you so much, Izabela! I’m really excited to get started on this space. The window treatments have me excited :) xo
I could drool over these drapes all day, but alas…I have questions, lol. What is the difference between a valance and a cornice? I’m assuming maybe it has something to do with the height, but I’m clueless. Also, what is the difference between drapes and curtains? I’m assuming here it has to do with weight of the fabric, but again, clueless. I can see from the pictures that this material is much higher end than most drapery panels out there, and I can’t stop staring. I love the way custom drapery turns out-it just looks so much more upscale and elevated. I’m getting a European boutique hotel vibe from the sneak peek, and I’m digging it. Are the walls staying the same color? I love the way the color matches the drapery panels. Already it feels more light and bright in there! I’m always amazed at your design and impeccable taste Sarah.
I’ll leave you with this hilarious story from my grandma. Her first marriage was to a wealthy man from New Jersey. They purchased a home in Atlantic City and from her words, the architecture was very similar to a Victorian. They had a parlor with high ceilings and large windows. She had custom drapes made for the room, with apparently very expensive “beauuuutiful” fabric. Installation day came and the drapes were hung, but in the process a bird made its way into the house and they couldn’t get it out. I still remember her telling me this story, and the look on her face when she told me: “wouldn’t you know that damn bird shit all over my custom drapes!” We had a huge laugh over that one. It was one of the few times I saw my grandma laugh to the point of tears. I asked her what happened to the drapes and I guess the cleaning bill cost more than the fabric! Her moral of the story: “Never trust a bird, and for god sake make sure they never get into your house!” 🤣😂 Happy Thursday Sarah! Your office is off to a pleasant start, and I’m excited to see it unfold.
Me too, Lauren! Thank you :) Awesome question on the cornice vs valance. The big difference is the structure. A valance is usually made of fabric or the window treatment material, while a cornice is made of wood and looks more rigid / upholstered… like a box. Most people use them interchangeably since they’re so similar. I’m all about the European vibe your getting- that’s lovely to hear. Haha! I’m not sure about the wall color yet. As much as I love color and would like to go bold- I work best in a neutral environment… especially since I’m looking at colors, textiles, and design elements that are influenced by surroundings. I’m envisioning my office to be neutral for functionality purposes (but hopefully not boring). I am LOVING the story about your grandma’s custom drapery. HAHAHAH!! Thank you for sharing that. I’m going to remember, “Never trust a bird, and for god sake, make sure they never get into your house!” LOL! Thanks for the Thursday giggles. xox
The color & detail of the drapes are beautiful! You do such a great job walking us through the process of going with something custom that it doesn’t feel daunting to try. Thank you. Cannot wait to see your design ideas and the room come to fruition!
Have a great Thursday!
Thank you so much, Danna! I’m so excited to get going on this room and finally have a beautiful office to work in everyday :) Happy Thursday!
When this pic popped up on your Instagram you would have thought it was from my own house, that’s how excited I was! 😂 they are just soooooo good!
Awww, I love hearing that Brittany! Thank you! I’m so excited to tackle my home office space. I can’t wait to really put the finishing touches on this room. The window treatments have me excited :)
Love hearing about this! I’ve done it both ways- designing windows for my clients as a designer and now I’m more on the DIY end of things doing things for myself in my own home! We just finished a big DIY curtain rod for a bay window that turned out pretty luxe looking, but man- nothing compares to custom made drapes and those pelmets- gah!! So pretty!
Thanks, Jennifer! I’m so happy you liked this one. Amazing work on your most recent DIY! It sounds absolutely beautiful :) xo