Wispy Pine Needle Arrangement DIY
 How was your weekend? We finally made it into the mountains for some skiing and being active outside was just what the doctor ordered (actually the exact opposite, but I did it anyway). We took one day to enjoy the outdoors and the other day to work and be productive- my favorite kind of balanced weekend. I’m back at it this morning and I have a fun & simple post to share with you. I’ve been pulling together this same pine needle arrangement for the past 5-6 years and it’s truly the easiest impressive centerpiece to style for the holiday season and winter months. The same concept can be applied to any branch, spray, or pick… for any season really. Click through for my process!
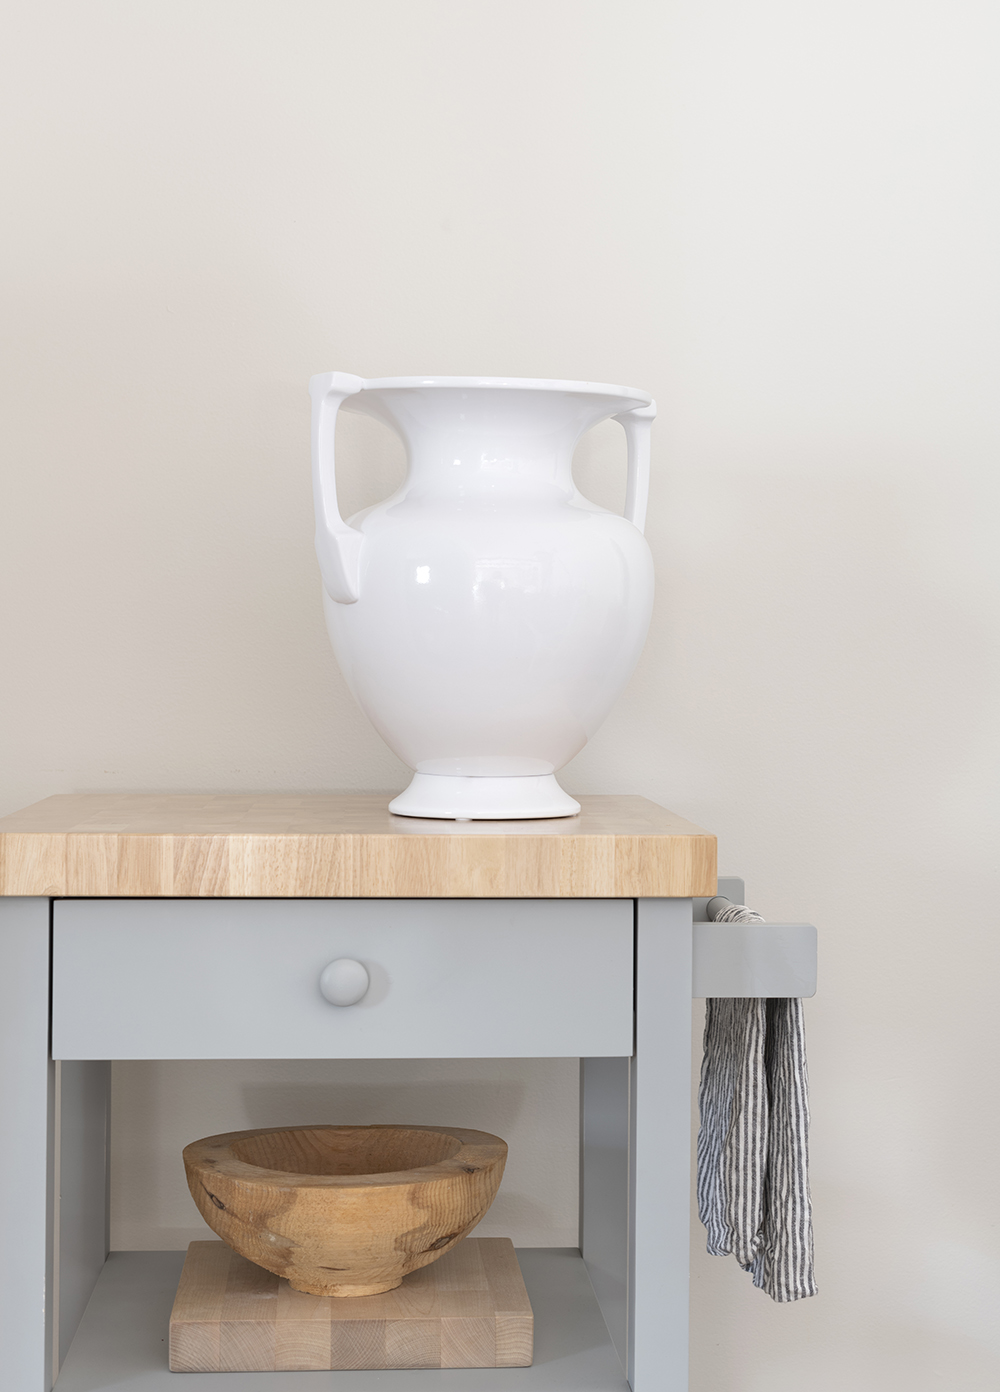
 The above image is the first time I shared this specific centerpiece here on the blog… it was in our previous home. We didn’t have room for a tree, but I wanted to incorporate simple and elegant decor that would last all winter long. I loved it so much, I’ve been replicating the look ever since!
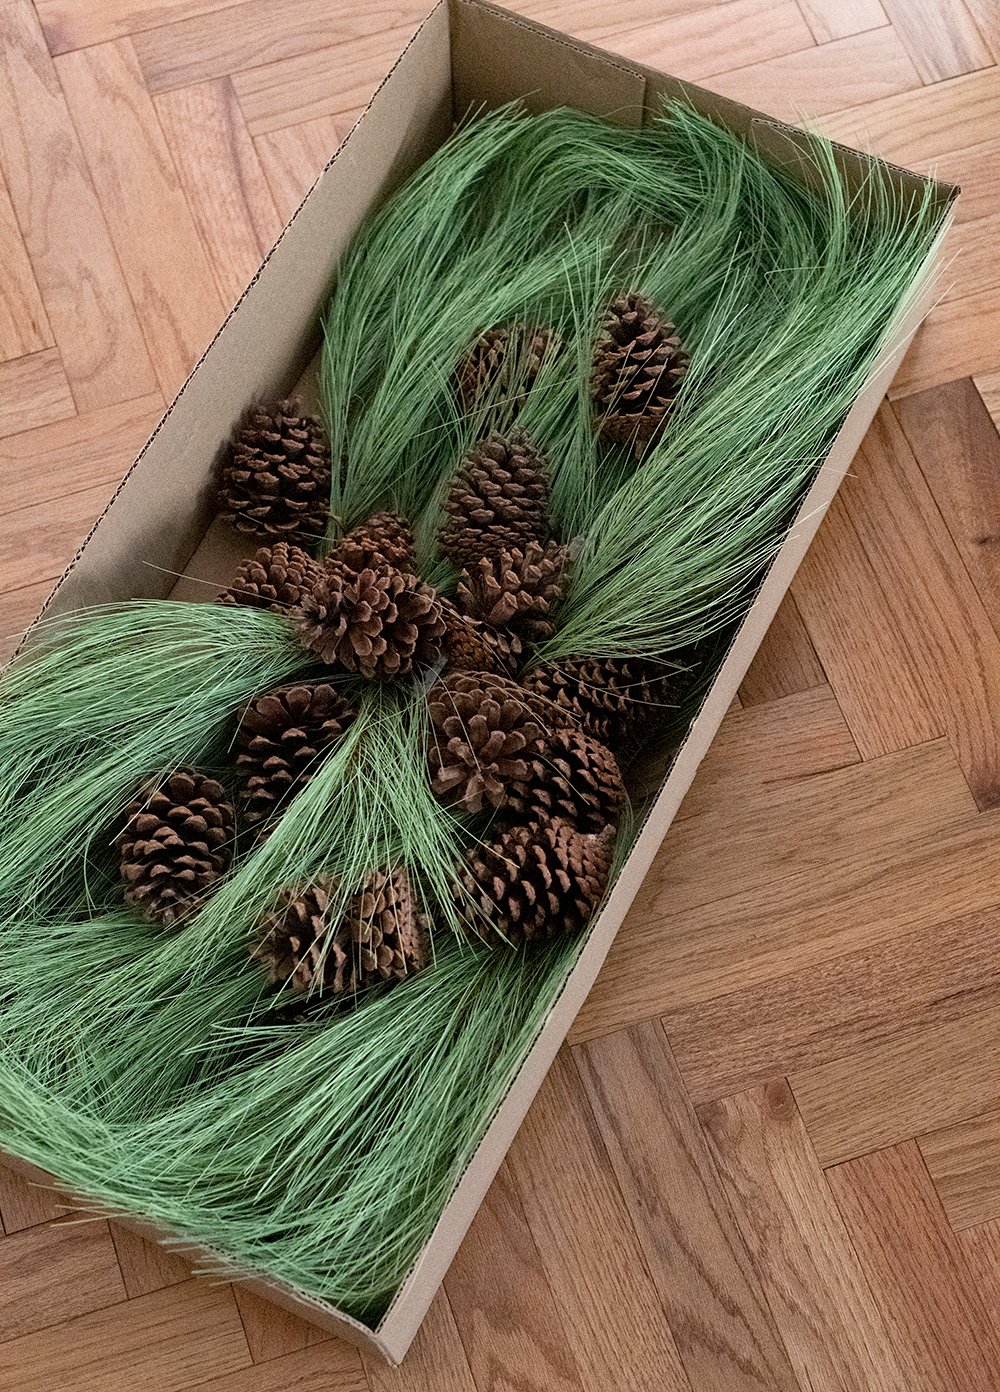
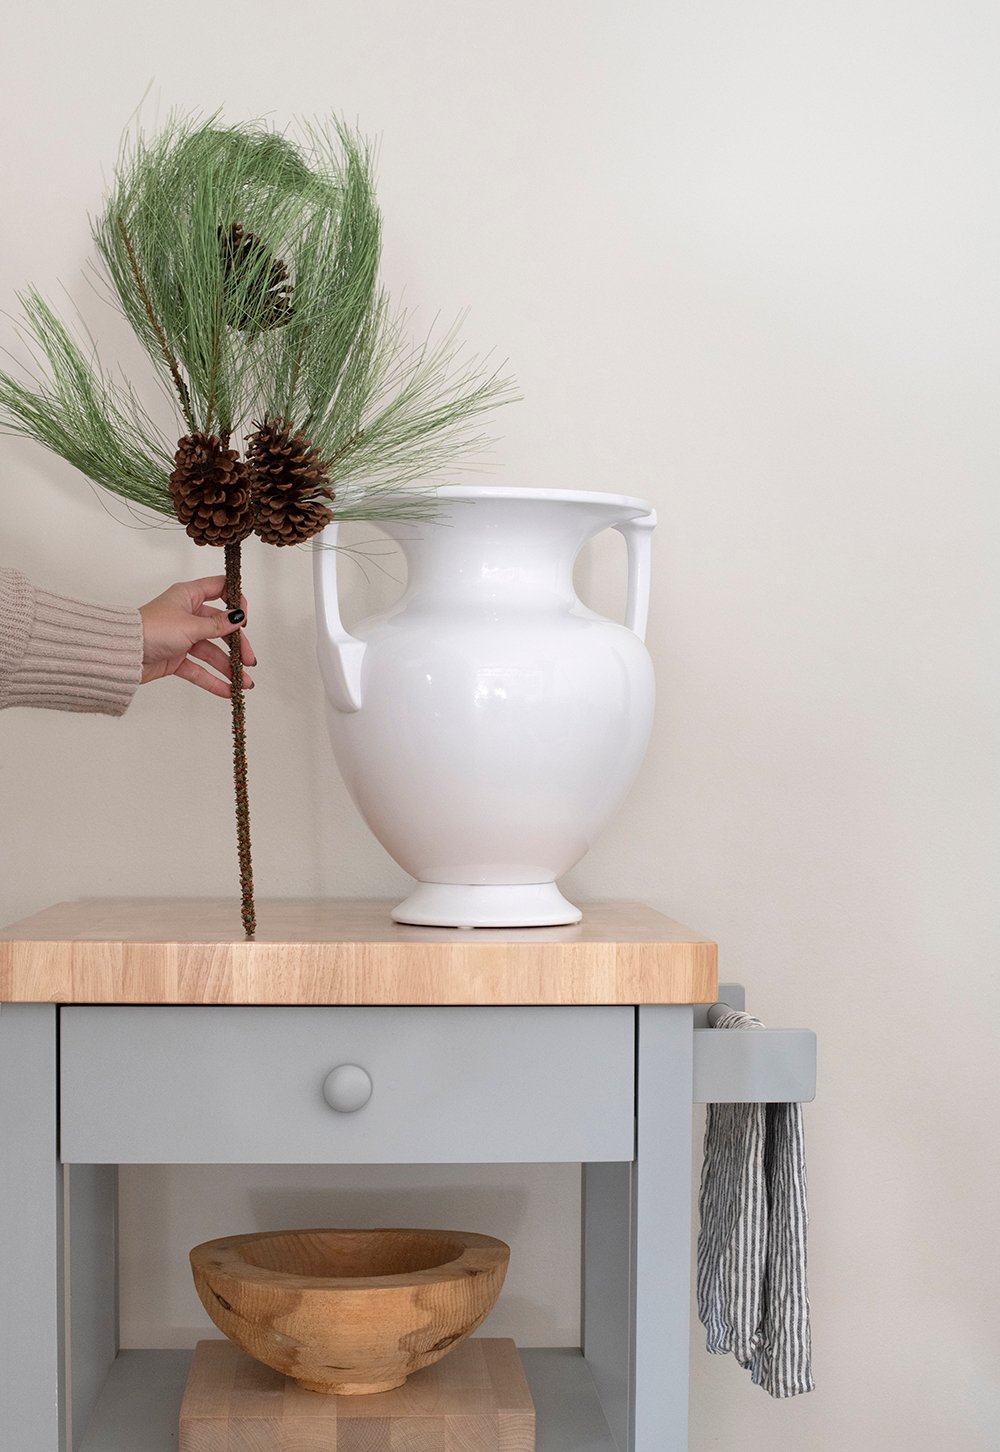
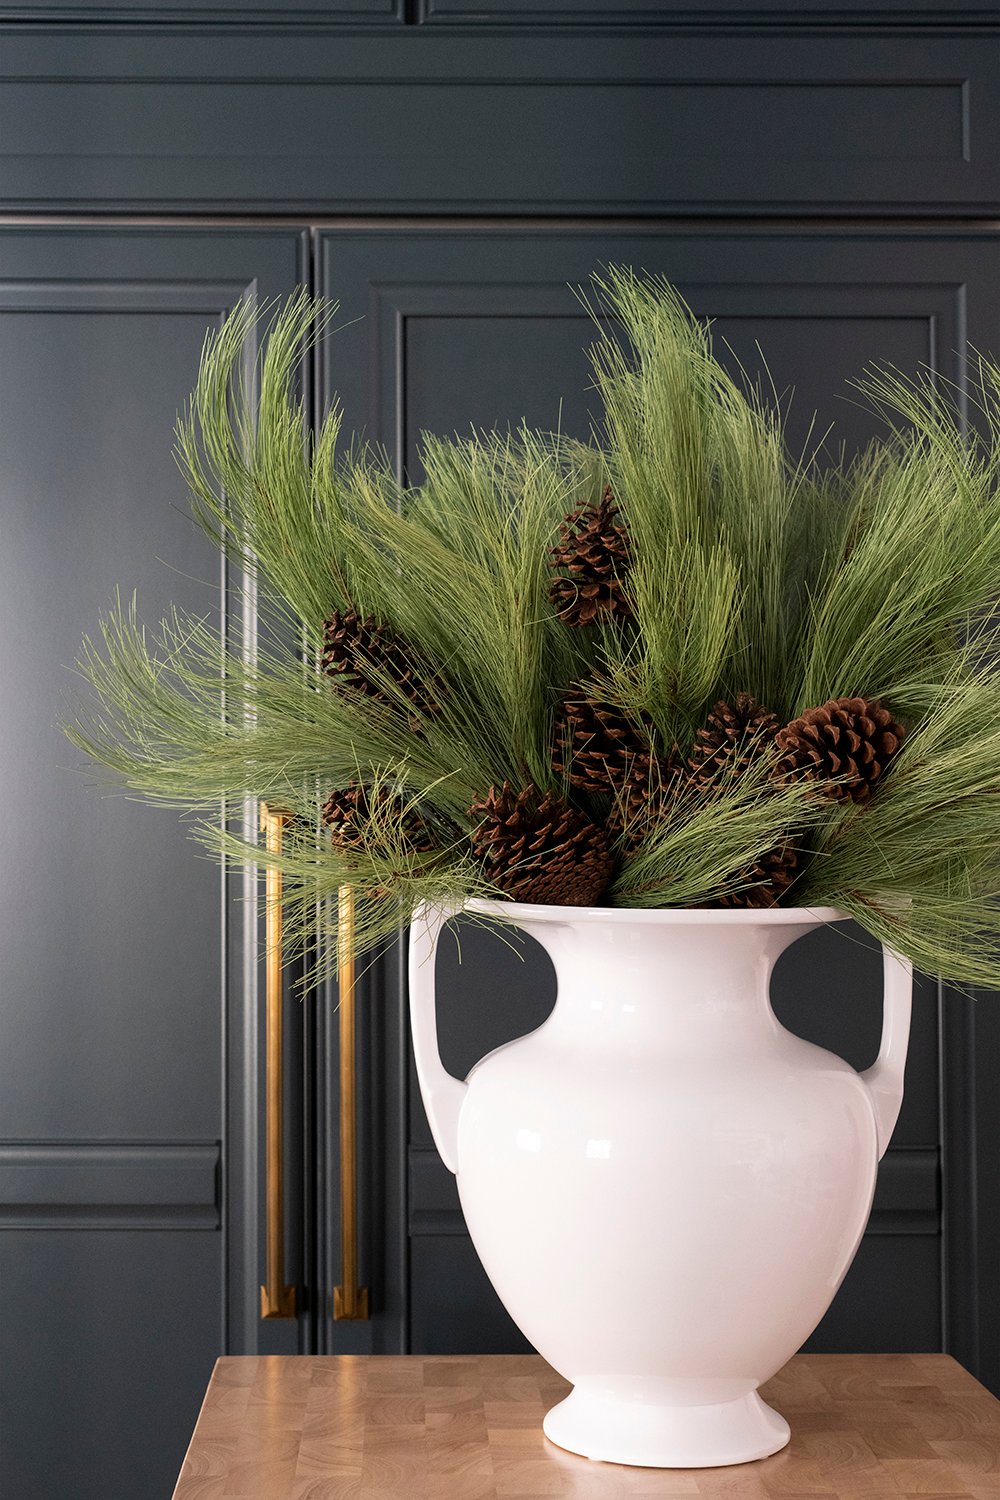
To achieve the same look you only need three things: clear tape, your favorite oversized vessel or urn, and pine needle sprays (or any other branch you’d like to use).
 I’ll begin by saying- no faux greenery, florals, sprays, picks, branches, or garland looks nice straight from the box. They all require fluffing and manipulation to achieve a realistic look. Gather up your supplies and worry about styling & bending them as you go…
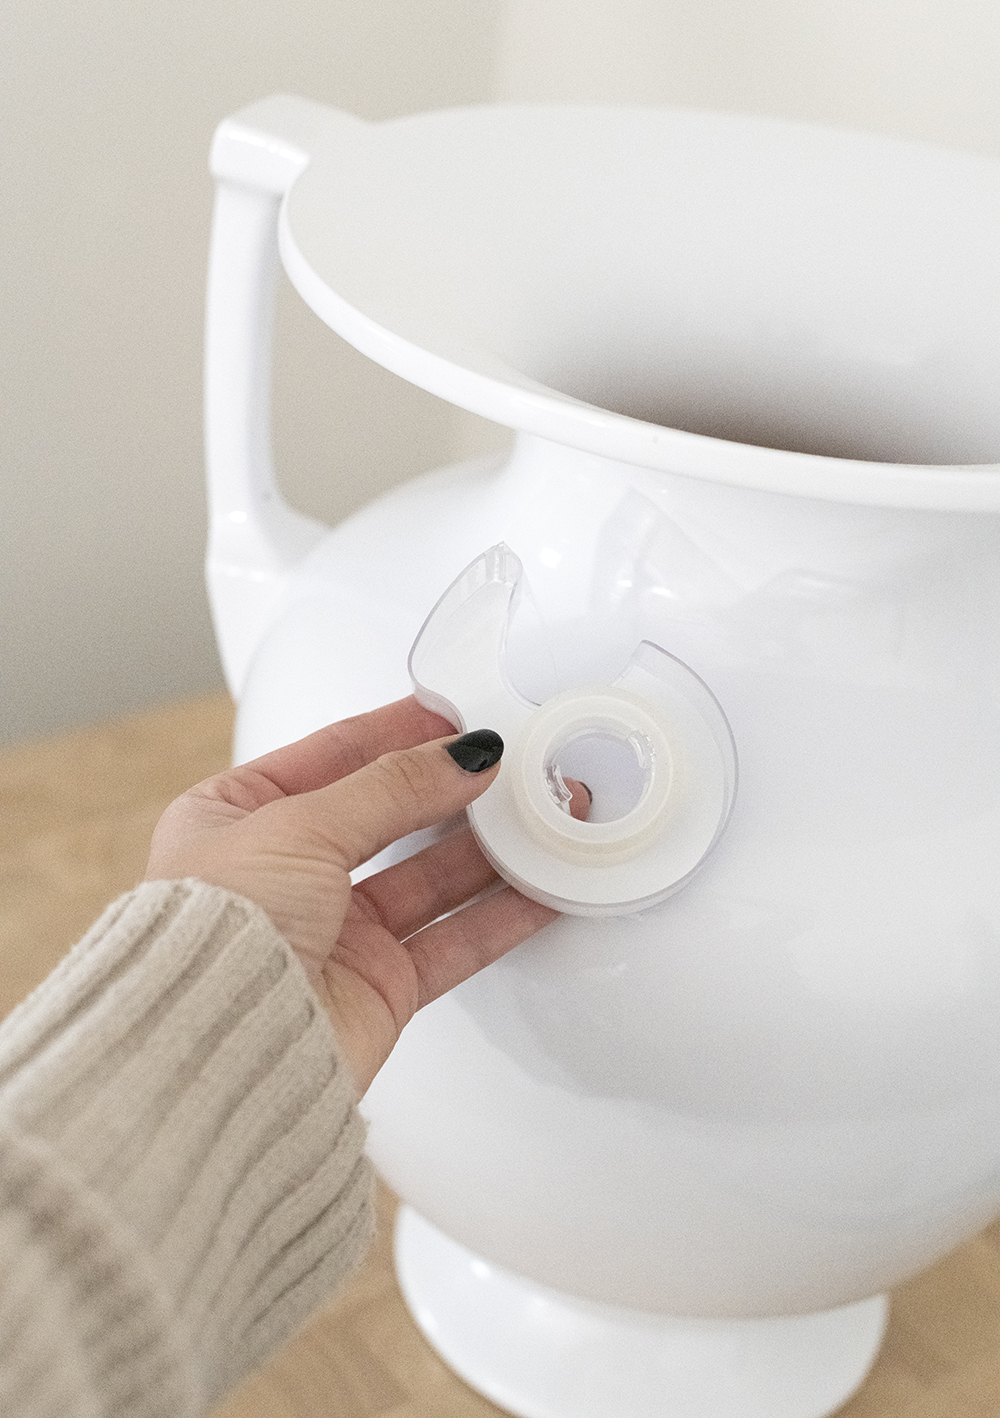
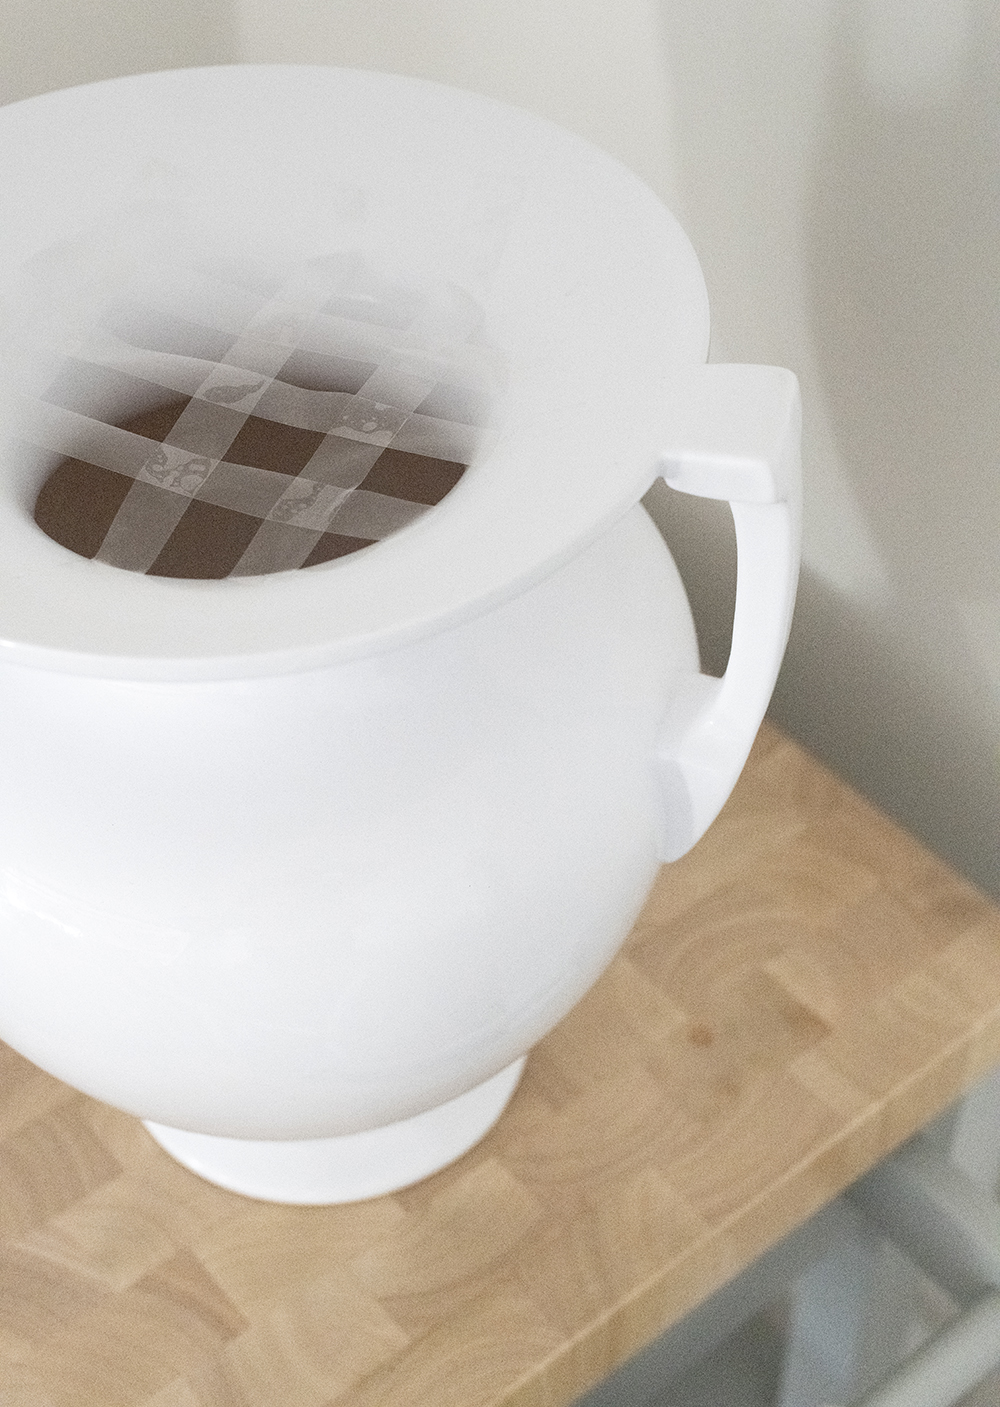
 You’ll start by making a tape grid on the top of your vessel. It’s as easy as it looks… make 2-3 vertical lines with the tape, then repeat with 2-3 horizontal lines. This budget florist hack is one that makes creating professional-looking arrangements so much easier.
 Now you can grab your first branch and fluff! I try to bend the branches as you’d find them in nature… not to perfect, and with gravity in mind. They should look organic and a little wild for a realistic effect.
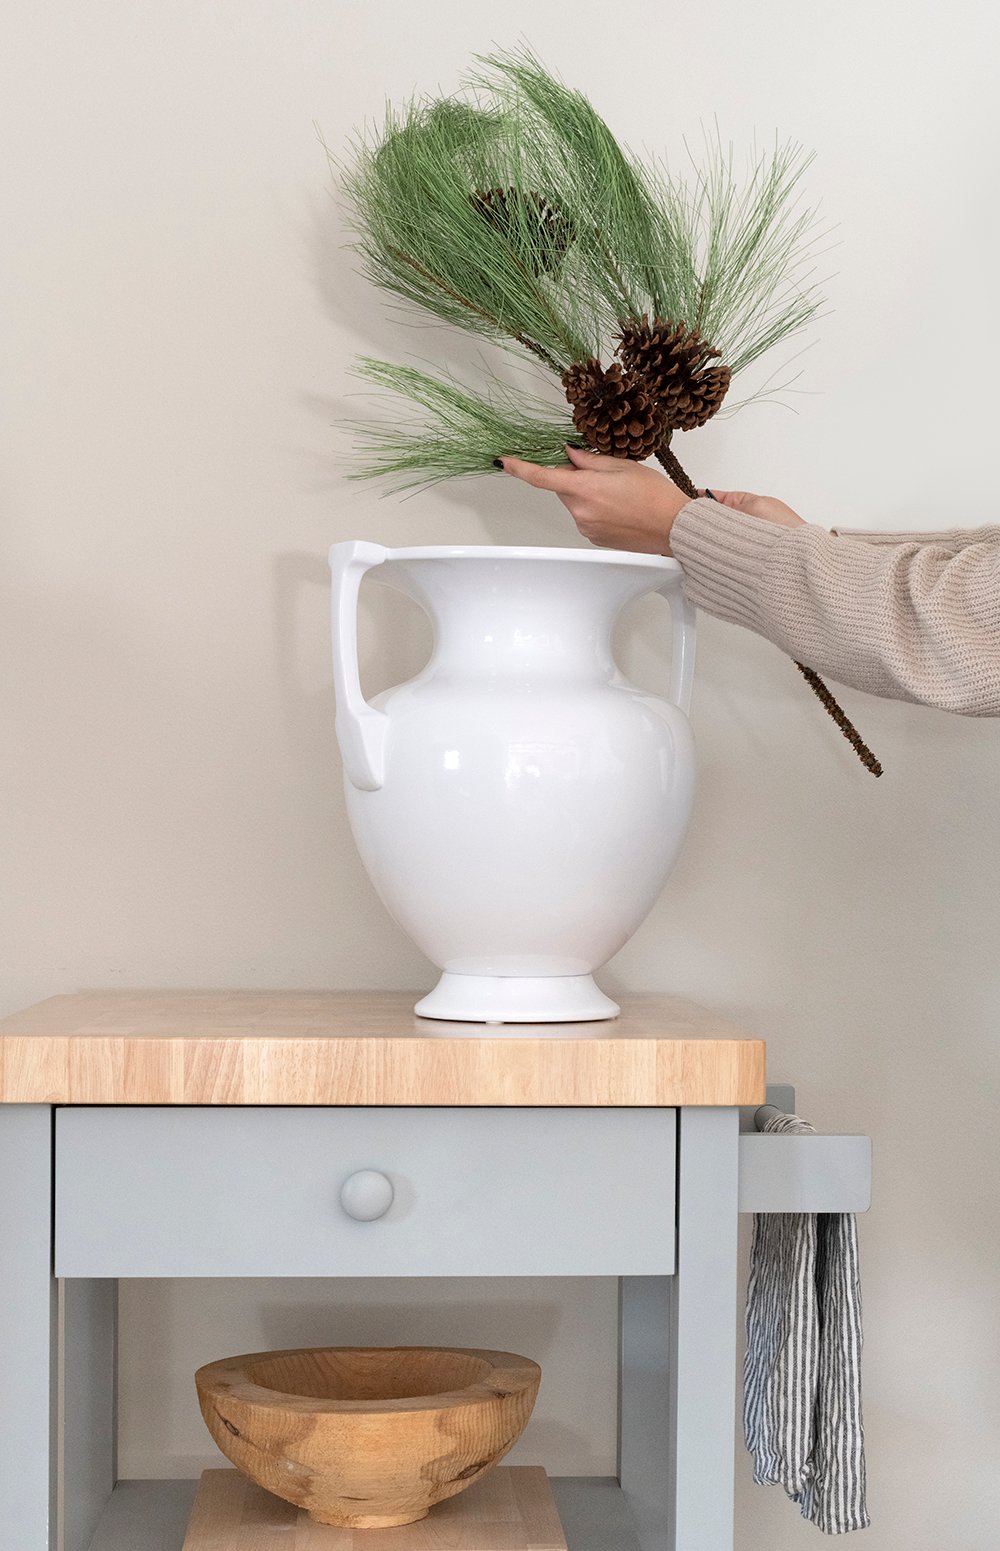 Keep adding more branches until you’ve reached your desired result (I used four)– bending and fluffing as you go. Once they’re all set in the tape grid, you can further manipulate the wispy pine branches.
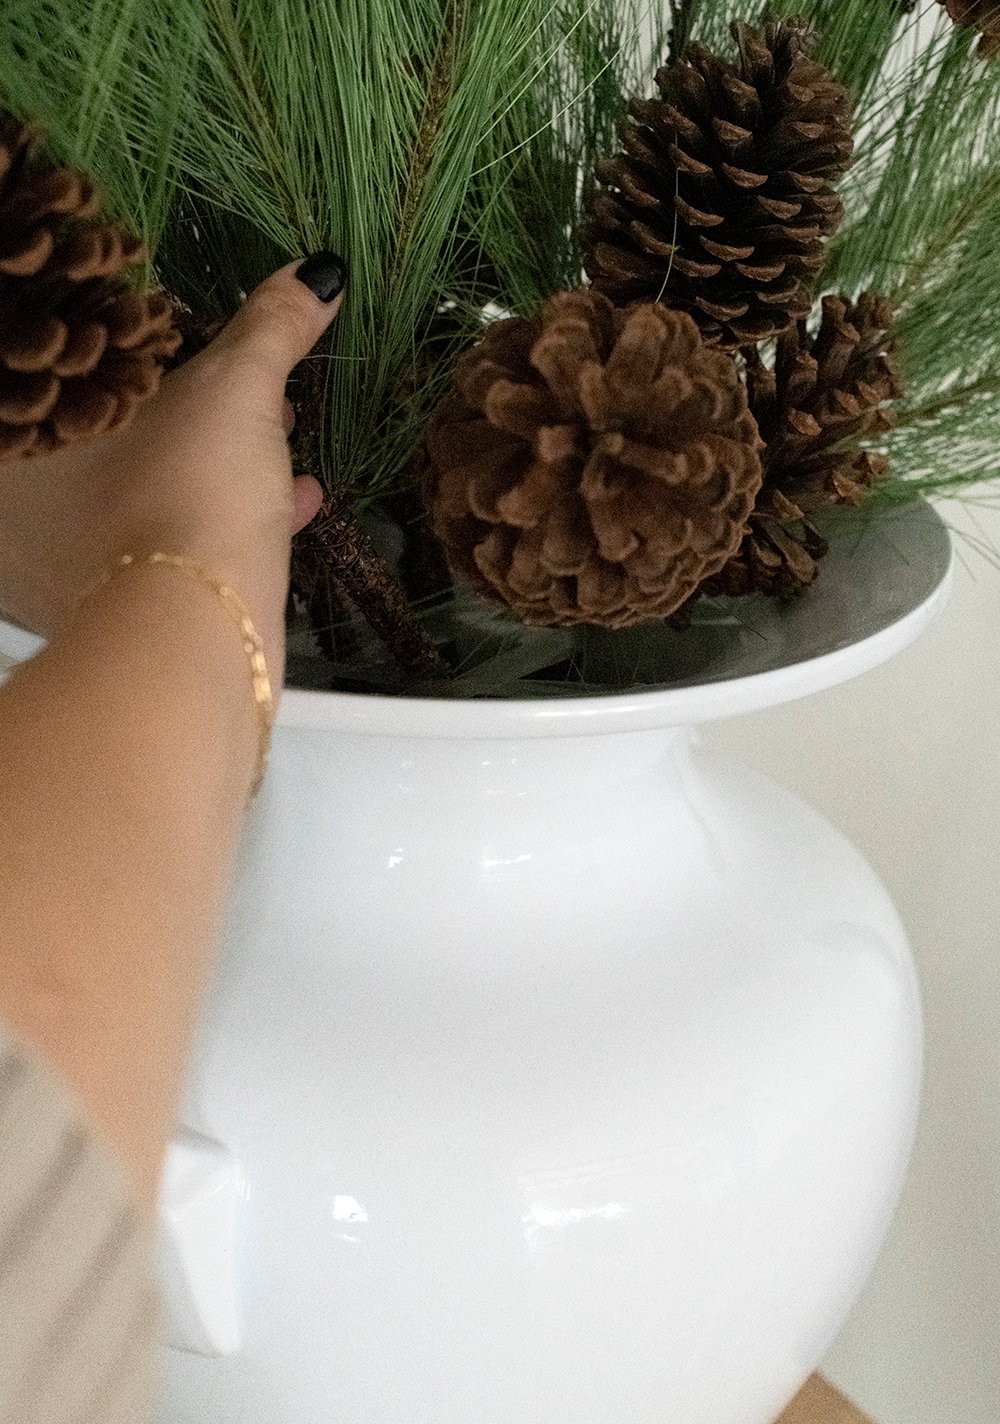 Here’s my finished centerpiece and end result (below)… perfectly imperfect! I love that these picks have real pinecones attached. I think that adds to the realism of this arrangement, while adding texture & warmth. The pinecones can also be bent as you’d like. I try to keep them pretty centric for a balanced look.
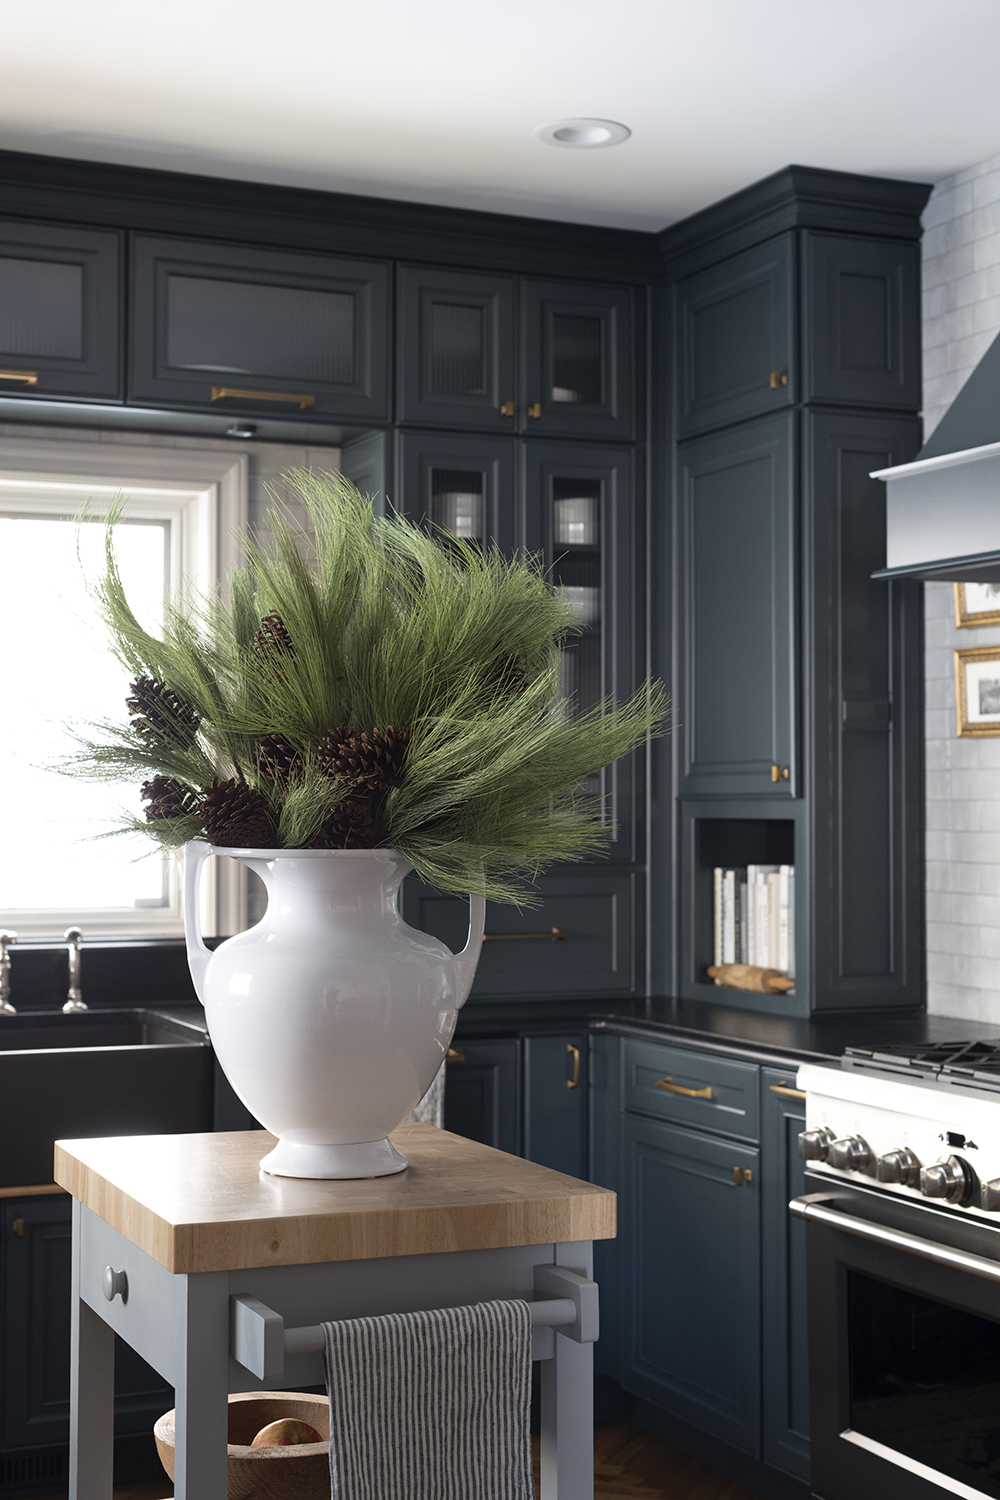
 This oversized wispy arrangement can be styled anywhere… it’s a versatile one with plenty of texture and color for the holiday season or winter months ahead. I tried it in my kitchen first…
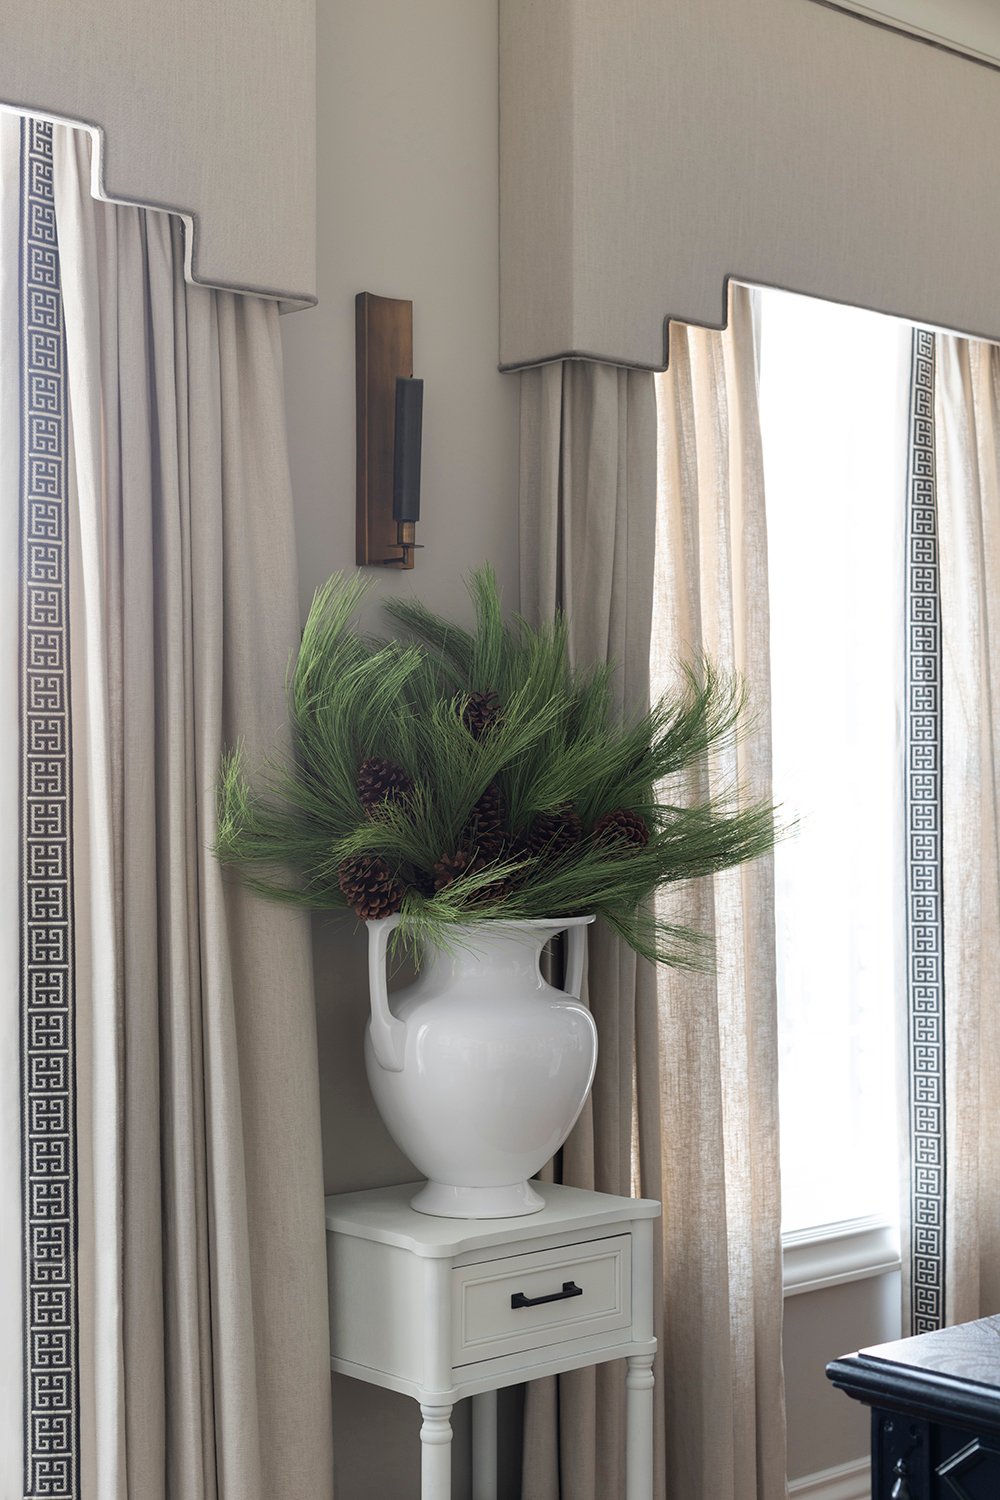
 Then I moved it to our living room… it actually started on the coffee table, but a certain long dog tail knocked it, so I had to move it to a taller side table. Ha! Eventually, I landed on keeping it in my office between my windows (shown in the intro photo of this post). My point being- it looks good anywhere and that soft texture is my favorite!
 I hope this post inspires you to create something fun this holiday season! I love floral arranging and these types of centerpieces act as sculptural art… I think they look even more impressive this time of year. Use them on a table, kitchen counter, console, entry table, credenza, or desk for an elevated winter look. Every year this centerpiece receives a lot of positive feedback and praise from holiday house guests! The matching garland is sold out in my shop, but we still have plenty of picks ready to quick ship, if you want to give it a try. Here’s to another fun and festive week ahead! I can’t believe we’re already into December…
Good morning! Festive and simple seems a perfect combination, especially at this busy time of year. That vase (urn?) is enormous; I’m impressed that you only needed four picks for such a full look. I also love that the pine cones are real! Important point about fluffing faux greenery. For some reason, I hadn’t thought to zhuzh the branches of my little tree. It’s much better now although still undecorated. Ha. We got our first proper snowstorm yesterday-about 5 inches! The dogs were psyched, and I was inspired to bake ginger snaps. Shoveling serves as our winter sport. Lol. Speaking of that, my brother recently was telling me of hok skis. (Bless his heart, he still thinks I’ll become winter adventurous!) Have you ever used them, or are you strictly a downhill skier? I’m glad you got outside and enjoyed a favorite activity. Sometimes doctors underestimate (or don’t consider at all!) the rejuvenating power of nature. Cheers to a lovely wintry week!💜❄️
Hi Peggi! That vase randomly came from Walmart a few years ago- the scale is amazing! I had 5 picks in it at first, but removed one because it was looking smooshed in my photos. The fluffing really goes a long way with the pine. I’m going need to photos of this charming tree you’ve curated!! I can’t wait to see it once it’s all decked out. Yay for a proper snowstorm- I bet Joe & Jason were thrilled. We still have a few inches on the ground and the dogs are loving it. What I would give for one of your ginger snaps right now! Holiday time in the kitchen baking (and eating) is my favorite. I definitely count shoveling as a workout, ha. I have used those skis before. Typically we either do one or the other though alpine / downhill skiing or snowshoeing / winter hiking. They’re fun though! Nature really is healing- I fully believe that. I hope you have a fabulous winter week, too! xo
I love all of the diy arrangements you put together. This wispy wonder is magnificent. I envy the enormity of the urn- I never find pottery in large scale like that. I’ve been itching to do a small seasonal diy lately, but haven’t nailed down what I’m wanting. Thanks to my tumble down the stairs there has been a halt in decorating. The tree isn’t even halfway done, and small pesky tasks like climbing a ladder to hang a wreath above the mantle have to wait. I tried my hand at asking the man of the house for assistance- not realizing he’d try to stick a suction cup wreath holder without any moisture. You should have heard the kids screaming about a ghost when the entire situation toppled over hours later! Luckily nothing except the wreath holder was harmed. I’m finding ways all over the house to get Christmas creative- thanks to your always lovely inspiration. Your ski adventure looked positively dreamy. It’s funny, as a kid I hated every minute of skiing, and happily traded for a board when my parents allowed it. Now the thought of getting on a snowboard sounds like a slow and sure death, hahaha! I’d love to try a pair of skis one day to see if my preference has changed with age. Anyway- here’s to all the Christmas wrapping I can do-seated-with an elevated foot! Haha!
Thank you so much, Lauren! That giant vase came from Walmart a few years ago. I do love the scale of it! You tumbled down the stairs?! I hope you’re ok and are hanging in there. That sounds terrible. The holidays aren’t meant to be stressful… be gentle on yourself if you don’t get to everything. I am cracking up at Jeff installing the wreath and the kids freaking out. Saturday was really the best day- it felt good to be back on my skis. I used to work as a ski and snowboard instructor throughout high school and college, but these days I stick to skiing. It’s too expensive to have equipment for both! My friends are split 50/50 (skiers and snowboarders). We have a lot of fun! Next time you’re in Utah during the winter months, we should go up. Keep that foot elevated and feel better soon! xox
Happy Monday 🌲
Wow Sarah those faux pine limbs are substantial. Beautiful 😍 it makes for a grand arrangement along with that huge vase. Peggi mentioned you used 4 in total, it looks so full. Just lovely! And yes it really looks amazing everywhere in your house. Wagging tails definitely dictate placement for sure 😂 Like the garland the pine cones are a pretty detail. Love it! Speaking of garland I will be installing mine today on the banister. Got the tree up and decorated this past weekend so I need to keep the holiday momentum going.
We don’t have any snow here yet but we were shoveling leaves yesterday. Serves us right for flying south before the leaves fell. Ha!
I’m so glad you were able to ski this weekend. Yay! Fresh air with a favorite activity is great medicine I would say. It sounds like it rejuvenated you so that’s wonderful ❤️ I don’t have any faux limbs to arrange but I certainly can trim some from my evergreen trees and use your tape trickery for a sculptured look. Your Christmas inspiration is getting me in the holiday spirit. Thanks so much for the very helpful tips this morning, it will surely motivate me to get moving 🥰 Have a splendid Monday! Xoxo
Thank you, Colleen! It’s amazing what a good amount of fluffing and bending can do. Crosby’s tail is the one we have to watch out for, ha! I hope you enjoyed your day decorating the banister and kept the holiday momentum going. I’ve been getting festive and I’m excited to bake some treats (as gifts) in the kitchen later this week. Someone else in Canada messaged me today and said they were bummed about not having snow. We still have quite a bit on the ground here- hopefully you’ll get some for Christmas… I’ll take all the snow I can get during the winter months. My philosophy is if it’s going to be cold, it might as well be pretty with snow. Raking sounds productive! We waited too long to get ours finished. Your evergreen branches would be perfect for this! I hope you’re Monday is going well and you’re having a fun day. xo
Your arrangement is gorgeous! I love faux greenery for the fact that you can bend, reuse, and never water! Lol! But seriously, this pine spray with real pine cones is the best. I love it in every room you styled it. Cant pick a favorite.
I will say the hours of fluffing greenery or adjusting ribbon is not my favorite but everything looks so much better when you take the time.
Your outing sounds like the best medicine. Hoping your week is off to a great start! Here for you. xoxo friend!
Thank you so much, Danna! I think faux is the way to go when it comes to holiday greenery- it’s so much easier and I think it turns out to be more cost effective in the long run… definitely my preference. Fluffing is the worst part, indeed (but it’s always worth it)! I hope you’re having a good week, too. I can’t thank you enough, xo!