Custom Monogram Doormat
 You’ve probably pinned variations of this DIY before- it’s all over the internet, but I wanted to share a version that gives everyone access to custom typography! You guys know I’m picky about type because of my background in graphic design and this project was no exception.
This DIY was the result of a tight tight budget due to renovating. I’ve had my eye on a custom door mat for awhile now, but as I was about to shoot the front entry for you guys sans doormat, I had the idea to make one myself. It cost all of $25 and took about 30 minutes. Click through for a sophisticated, monogram doormat that looks like you splurged. This budget friendly project couldn’t have come at a better time… just in time for your holiday guests to arrive (and to wipe snow from your boots).
 What you’ll need for this project:
– Black Acrylic Paint
– Jute Door Mat
– Sponge Paint Brush
– Sharpie
– Scissors or X-Acto Knife
– Poster Board
– Printable Template (see below)
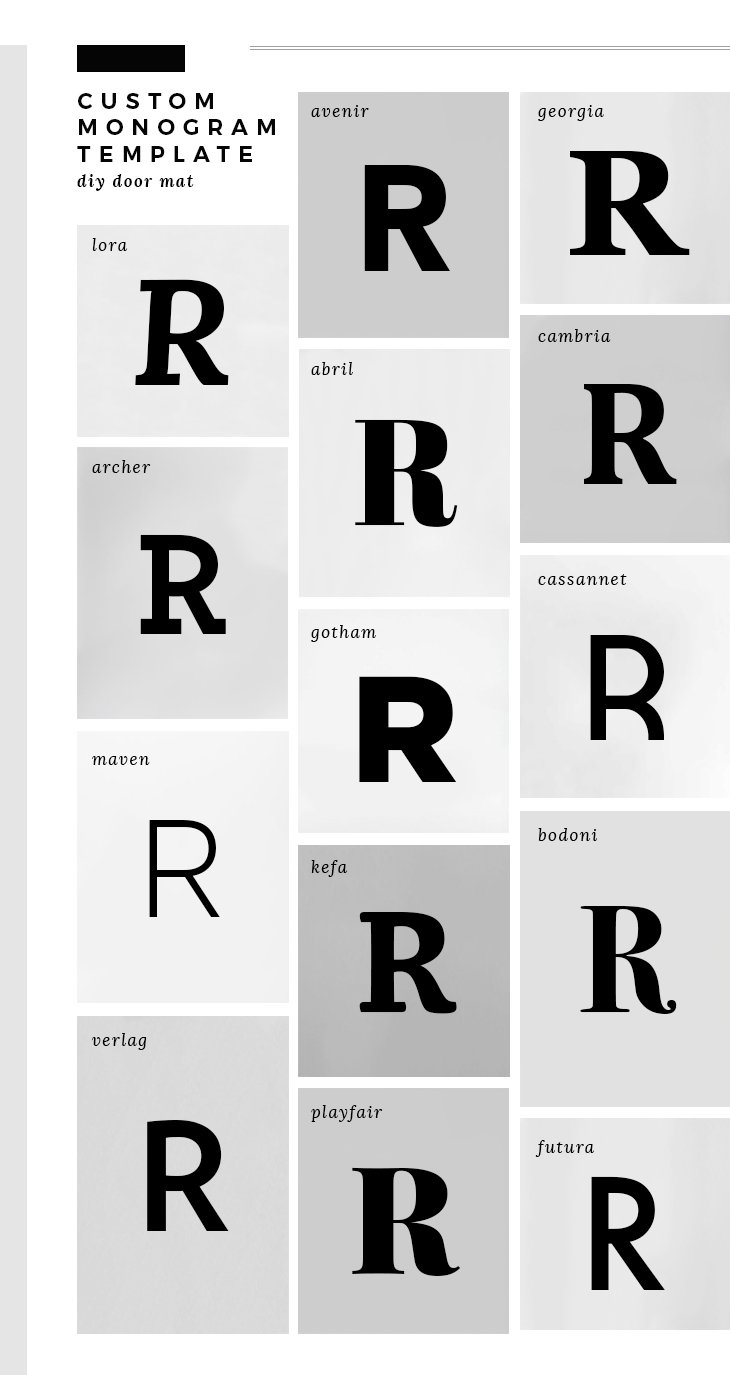
 Step 1 // Print your custom template. If you’d like a printable template, all you have to do is comment below with the monogram letter, font name, and your email address. I’ll email you a printable file and you can cut it out and get started! Easy peasy, right? Consider it a little early holiday gift from me to you. Here’s the fonts you have to choose from:
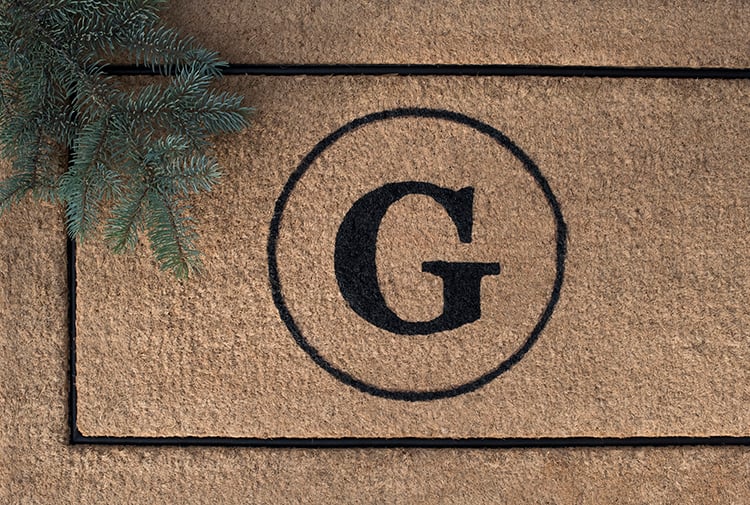
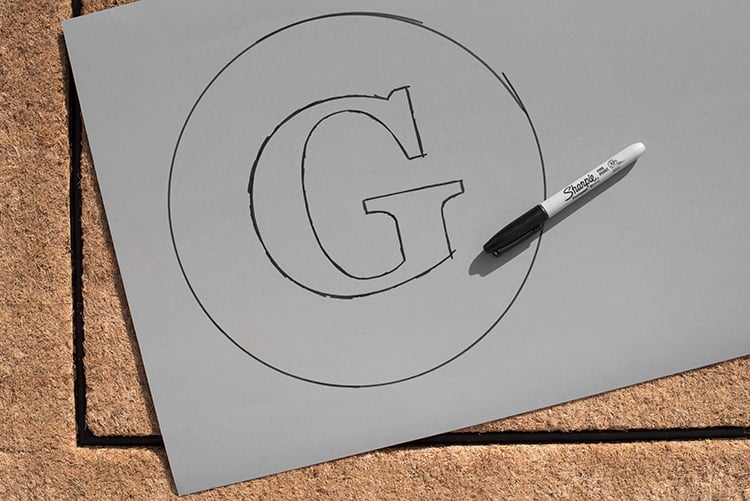
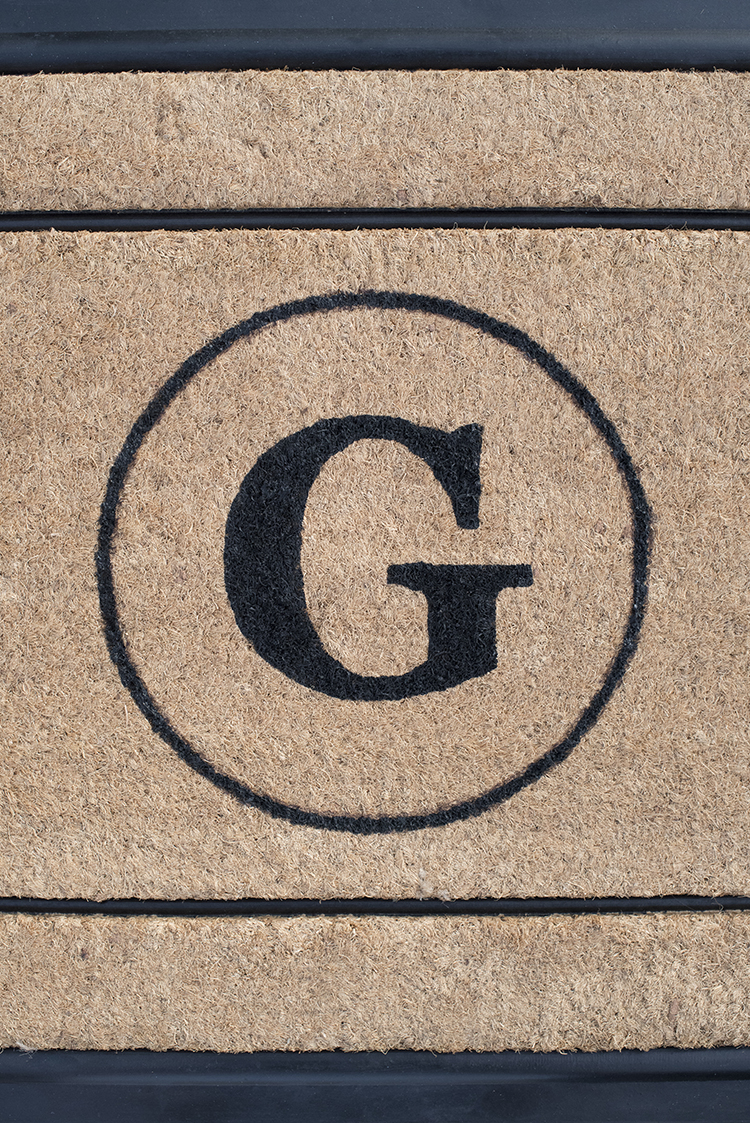
 Step 2 // Trace a circle. I decided to stylize my monogram and add a circle around the letter. To begin, I traced a mixing bowl (an 11″ circle) with a sharpie directly onto the rug.
 Step 3 // Print the template. Print and cut out your custom letter. This can be done on regular printer paper.
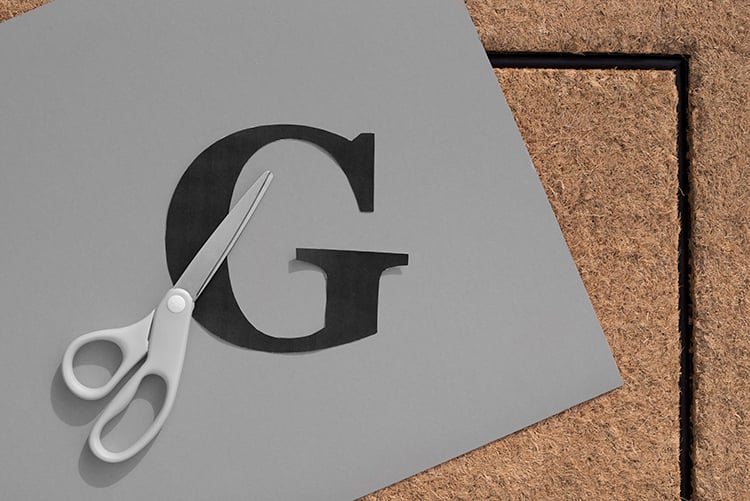 Step 4 // Trace the letter onto poster board. After your letter has been cut out, trace it onto poster board. It’s helpful to trace the same size circle onto the poster board first…. then measure, center, and trace the letter.
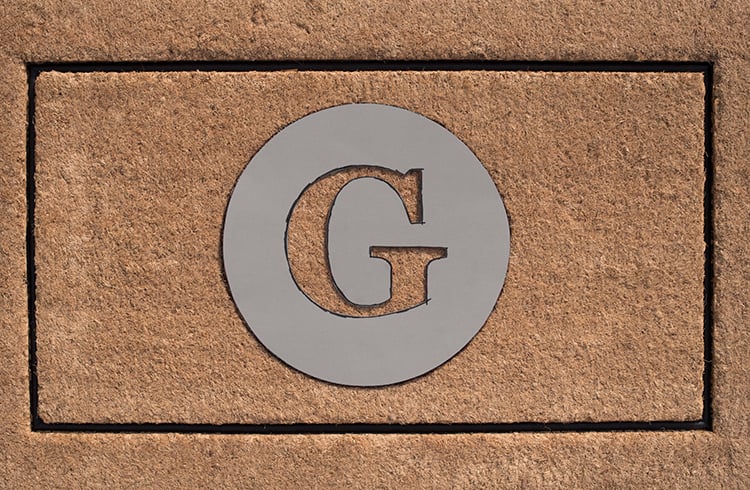
 Step 5 // Cut out the stencil. Carefully cut out the stencil. I used an X-acto for this step because it makes the inner letter a little easier.
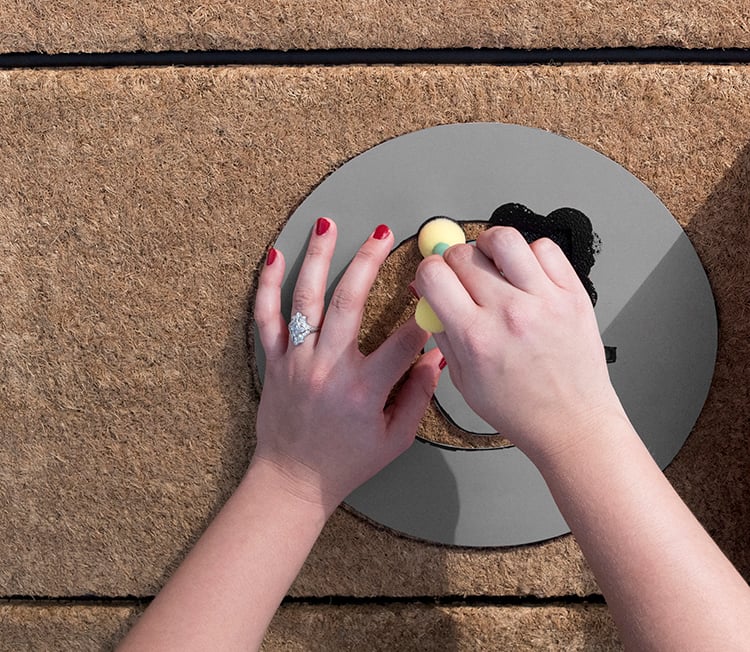
 Step 6 // Paint the stenciled monogram. Using a sponge brush, press the paint onto the stencil. Be careful not to shift the stencil during this process. The rug really soaks up a lot of paint, so be generous and use a lot! The outcome will look nice, saturated, and dark if you go heavy on the paint.
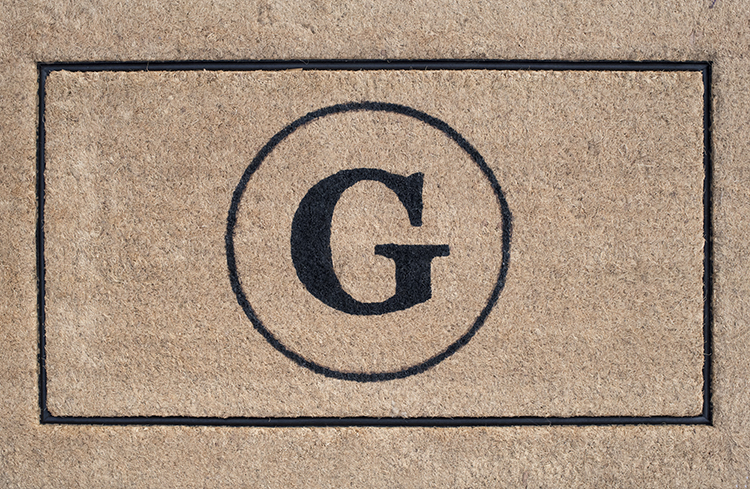
 Step 7 // Remove the stencil. Gently pull the stencil straight up, revealing the monogram. I freehanded the circle around the letter after stenciling the interior letter. Allow the rug to dry overnight, then it’s all finished!
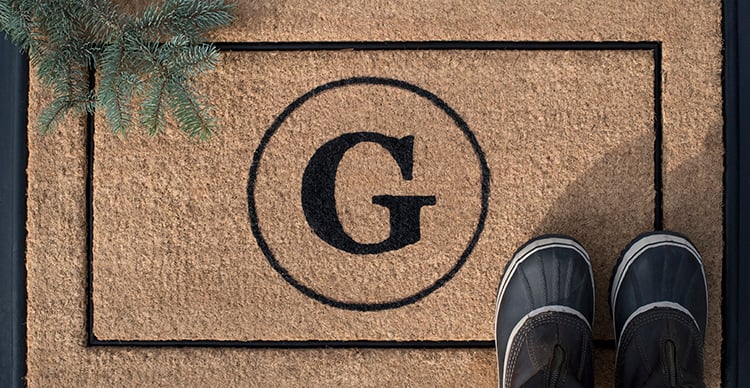
 Not bad for a quick and inexpensive DIY, right? By doing this myself, I saved over $50. I invited one of my girlfriends over while doing this project and she made one as well. We got to chatting about how these would also make really thoughtful Christmas gifts. My pet peeve is a DIY that looks like a DIY. It’s safe to say this looks like a spendy purchase… so I’m calling that a win.
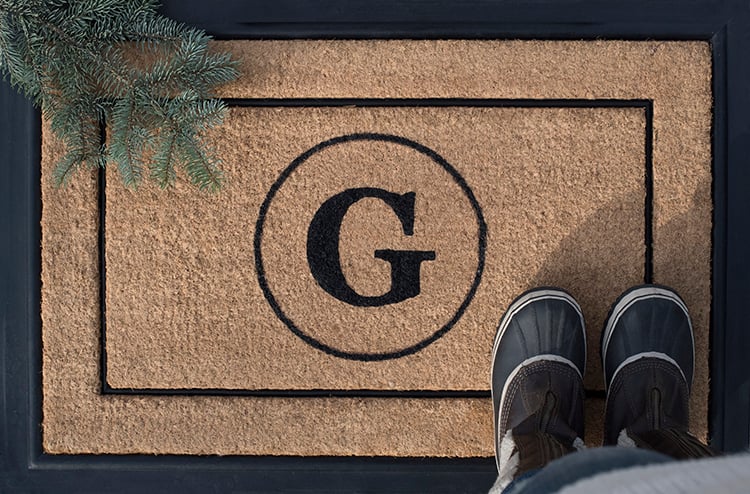 As soon as my house numbers arrive in the mail, I’ll be sharing the entire front entry (sorry to keep you waiting)– a new exterior door, my coveted vintage door knocker, the custom doormat, new exterior lighting, and a new outdoor plant! Just wait until you see the before and after.
Ok, are you guys going to give this one a shot? Let me know which monogram and font you want!! Share it with your friends so they can join in the fun. Everyone have a great week!
love that! so simple and personal!
Thanks Allison! Let me know if you want a template :) xo
Hello! When you say you freehanded the circle, does that mean you used the sharpie to fill it in, or did you use a small brush to fill in the sharpie-lined circle?
Hi Isabel! Great question. I just used a smaller paint sponge to fill in the lines. The sharpie is just for tracing! Hope this helps to clarify. xo
Futura “S”.. thank you so much!!!!
Your template is on the way! xo
Fantastic idea! Where did you purchase the mat?
Thanks, Katie! The exact mat I purchased is linked in the supply list. xo
I know a few people who will be getting these as Christmas presents! any way I could get a “G”, “H”, and “M” in Georgia? thanks for sharing such an easy and beautiful DIY project!
Sure thing!! I just sent over your templates :) Let me know how they like them. xo
I would like the R in Georgia font. Thank you!
It’s on the way! xo
Sarah, great project! I would like an H in Georgia font. Thanks, Linda
Would love to have fonts
Just let me know which letter and font you prefer, Barbara ;) xo
Love the mat–very classy. I’d like F in kefa font. May I ask for more than one template? If so I would also like V & Z. . I enjoyed looking at the decor. I imagine the rest of you home is just as lovely Thanks much.
Beautiful! Would love Cambria E
Classically beautiful!
C in Playfair
Hi I would like to have the Monogram template in Abril for letter O and T.. I love your simplicity and elegant!!
Thank you for such an amazing DIY.. I can’t wait to try this out, as we are moving into our new home this week. I would love the Letter K Georgia and the letter C in Georgia font as well. Thank you very much. Happy Holidays to you and yours
I just purchased a home and was looking for a monogrammed door mat that wasn’t $50 or higher. This looks great and seems easy to do! Has the paint worn off any?
Could you please email me a template of the letter “Q” in Verlag, Avenir and Gotham?
Thank you so much and happy holidays!
Hi Neda! So far, it’s holding up great. I will say- the area in which I have the mat is pretty covered, so it isn’t really exposed to weather. I actually made another one to test it, and put it under one of our gutters to see how it held up… it faded, but the biggest issue was the jute shedding. Hope this helps! I’ll email over your templates. Happy holidays to you and yours! xo
Hello
I would love to make this for all my siblings. Could I please get the following in Georgia font: B, C, G, K, M
Thank you so much!
Hi Lynn! What a thoughtful gift. I’ve emailed over your templates. Happy holidays! xo
Can you send me an “F” in playfair? Love this idea! Thanks so much!!!
No problem! It’s on the way. xo
Such a fun post! Can’t wait to attempt this DIY, can I please get a ‘P’ in georgia?
Thank you :)
Thank you! Good luck, Camika… I just sent over your custom file. xo
What a fun project! Can you send me “P” in Cambria…..thanks”
Sure thing, Susan! Coming to your inbox now. xox
Could I have an M in playfair pretty please?
Thanks!
I just emailed it over! Enjoy :)
Hi Sarah ,
Can you please email me S in Cambria .
Thank you
And in Georgia please . Thank you soo much
Hi Sarah, great project! Could I get an S and a K, both in Kefa? Thanks so much!