How to Plan and Design a Shower Niche
When we renovated our first bathroom, I spent more time thinking about the shower niche than I ever expected. It’s one of the most used elements in the bathroom and one of the easiest places for a design to go sideways. A well planned shower niche suddenly feels like a huge decision. It disappears into the design while quietly doing its job, and feels complementary of your space. A poorly planned one becomes visual clutter and looks like an obvious mistake you notice every single day. Over the years (and many bathroom projects later), I’ve learned that designing a shower niche is less about trends and more about choosing the right material, proportion, and planning ahead. Click through to see how to plan and design a shower niche!

If you’re renovating or are about to dive into your bathroom makeover, be sure to read my 20 bathroom remodeling tips… before you begin your renovation! These will come in handy as you’re planning and getting started.
Why Every Bathroom Needs a Shower Niche
A shower niche is a recessed box or shelf built into the shower wall to hold everyday products and toiletries. From a design perspective, it’s an architectural element that needs to feel intentional and complementary to your overall bath or shower vignette. Because it’s permanent, it should look like it was always meant to be there.
A thoughtfully designed shower niche keeps products off the floor or tub ledge, eliminates bulky aftermarket caddies, and contributes to the overall organization of a shower. It’s one of those details that quietly elevates a bathroom without calling attention to itself. It’s really a must-have if you’re renovating a shower or bath. It certainly beats a corner shelf, a shower caddy hung around the shower head, a suctioned soap dish, or any other after-the-fact alternatives.
Consider Real Life Application Before You Start Designing
If you’re wondering how to go about designing your own shower niche moment, I’d recommend asking yourself these questions before getting started… I always begin with how the shower is actually used, before thinking about tile or placement.
- Who uses it most often?
- Will more than one person be using this shower? If so, should you consider creating a niche for each person’s products?
- How many bath and shower products will need to live in the niche?
- Are we talking oversized bottles or a minimal routine?
- How much space do you have to work with? Consider what is behind the wall… that influences depth.
- What type of tile or material lives in the shower and will surround the niche?
- Could this provide an opportunity to get creative with pattern, color, or texture?
- Do you want the niche to stand out or blend in?
- What is your overall aesthetic?
- What is your carpentry / tile skill level? Or will you be hiring this project out?
Your answers to the above questions will definitely influence how the design of your niche will unfold, and help you squeeze out the most functionality. A lot of people prefer to buy a pre-built niche insert (yep, they make those!) and tile over top of it. Emmett and I typically take a different route…
Rather than purchasing a pre-built niche, we both agree it’s easier to let the materials and answers to our questions influence the design… rather than a “one size fits all” solution. For example, you want to make sure the tile, stone, or material look balanced, the cuts are equal, and you have enough for the back, surrounding sides, and bottom shelf. If you buy a pre-constructed option, sometimes it’s difficult to force your material to fit. We prefer to build the niche box to fit our material instead. I think it’s just easier from a craftsmanship perspective and you get a cleaner look.
Where to Place a Shower Niche or Ledge
Placement is one of the most important (and most overlooked) parts of shower design. Ideally, a niche should be easy to reach without bending or stretching and positioned where it won’t be directly hit by heavy water spray.
From a construction standpoint, interior walls are usually the simplest option. Exterior walls can be done, but they require extra attention to insulation and waterproofing. From a visual standpoint, I always try to place the niche so it aligns naturally with the tile layout… typically offset or on thirds.Clean grout lines make an enormous difference in how finished the niche feels.
Sizing and Orientation: What Actually Works
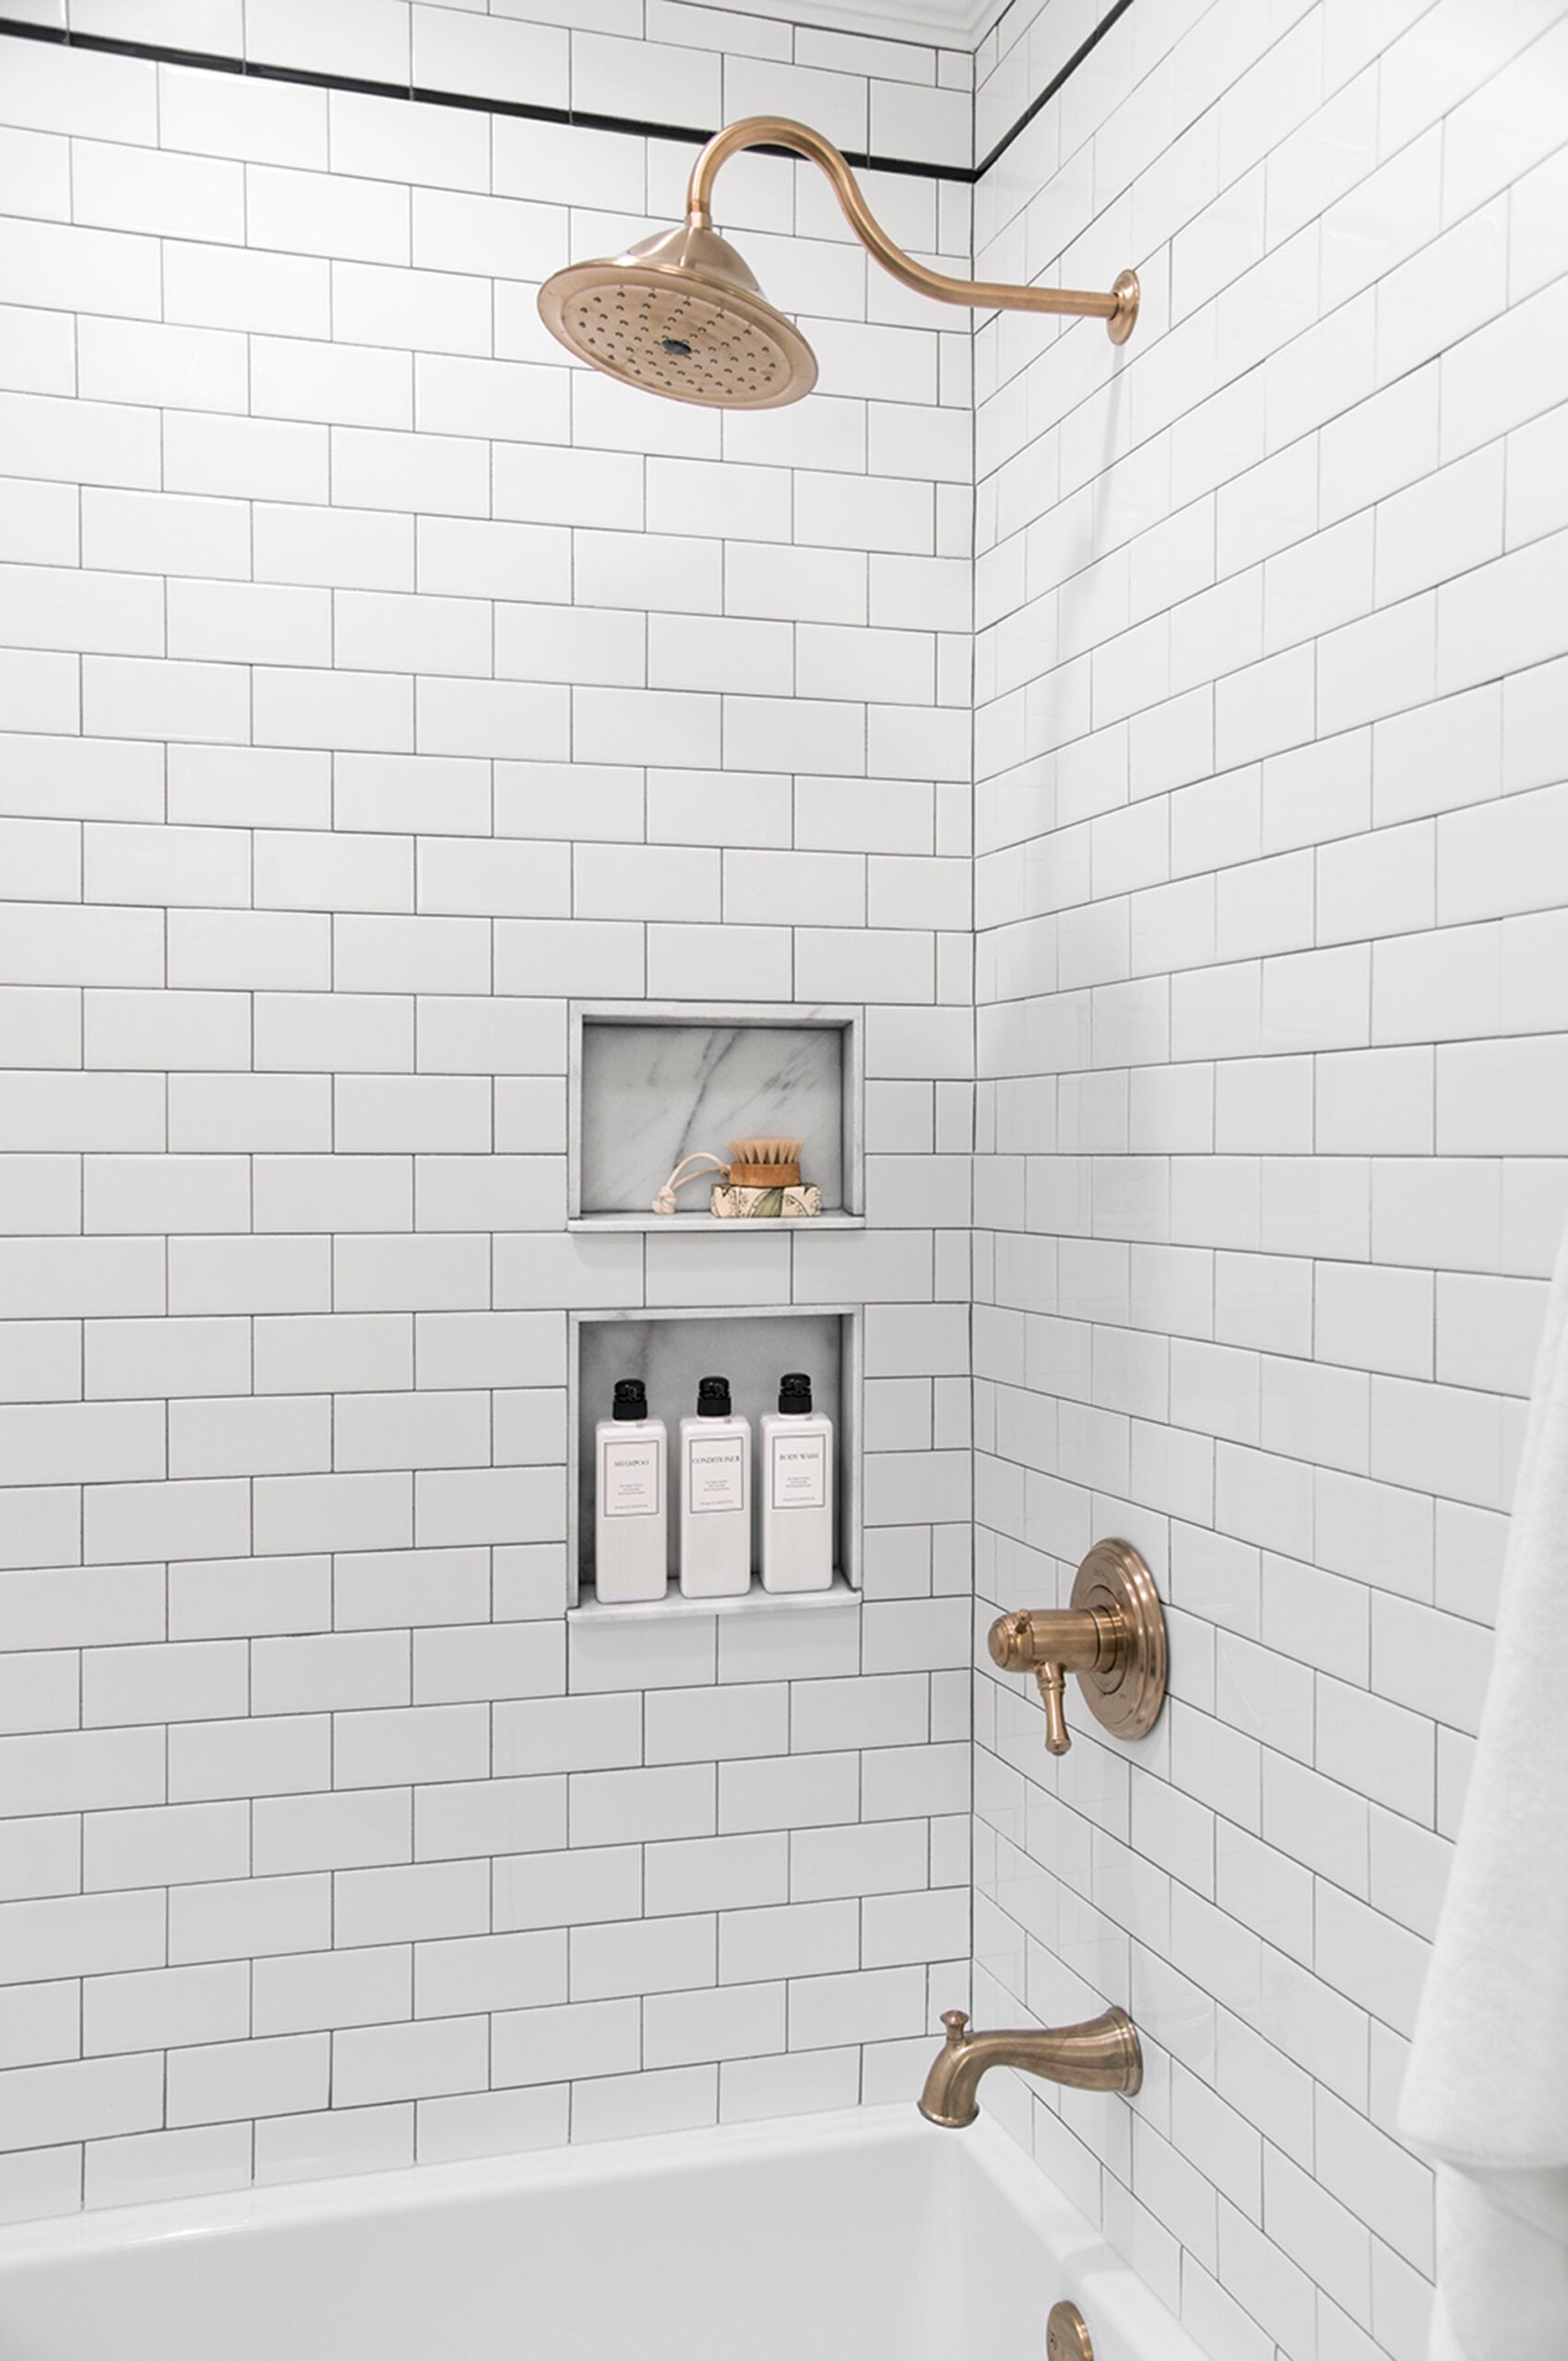
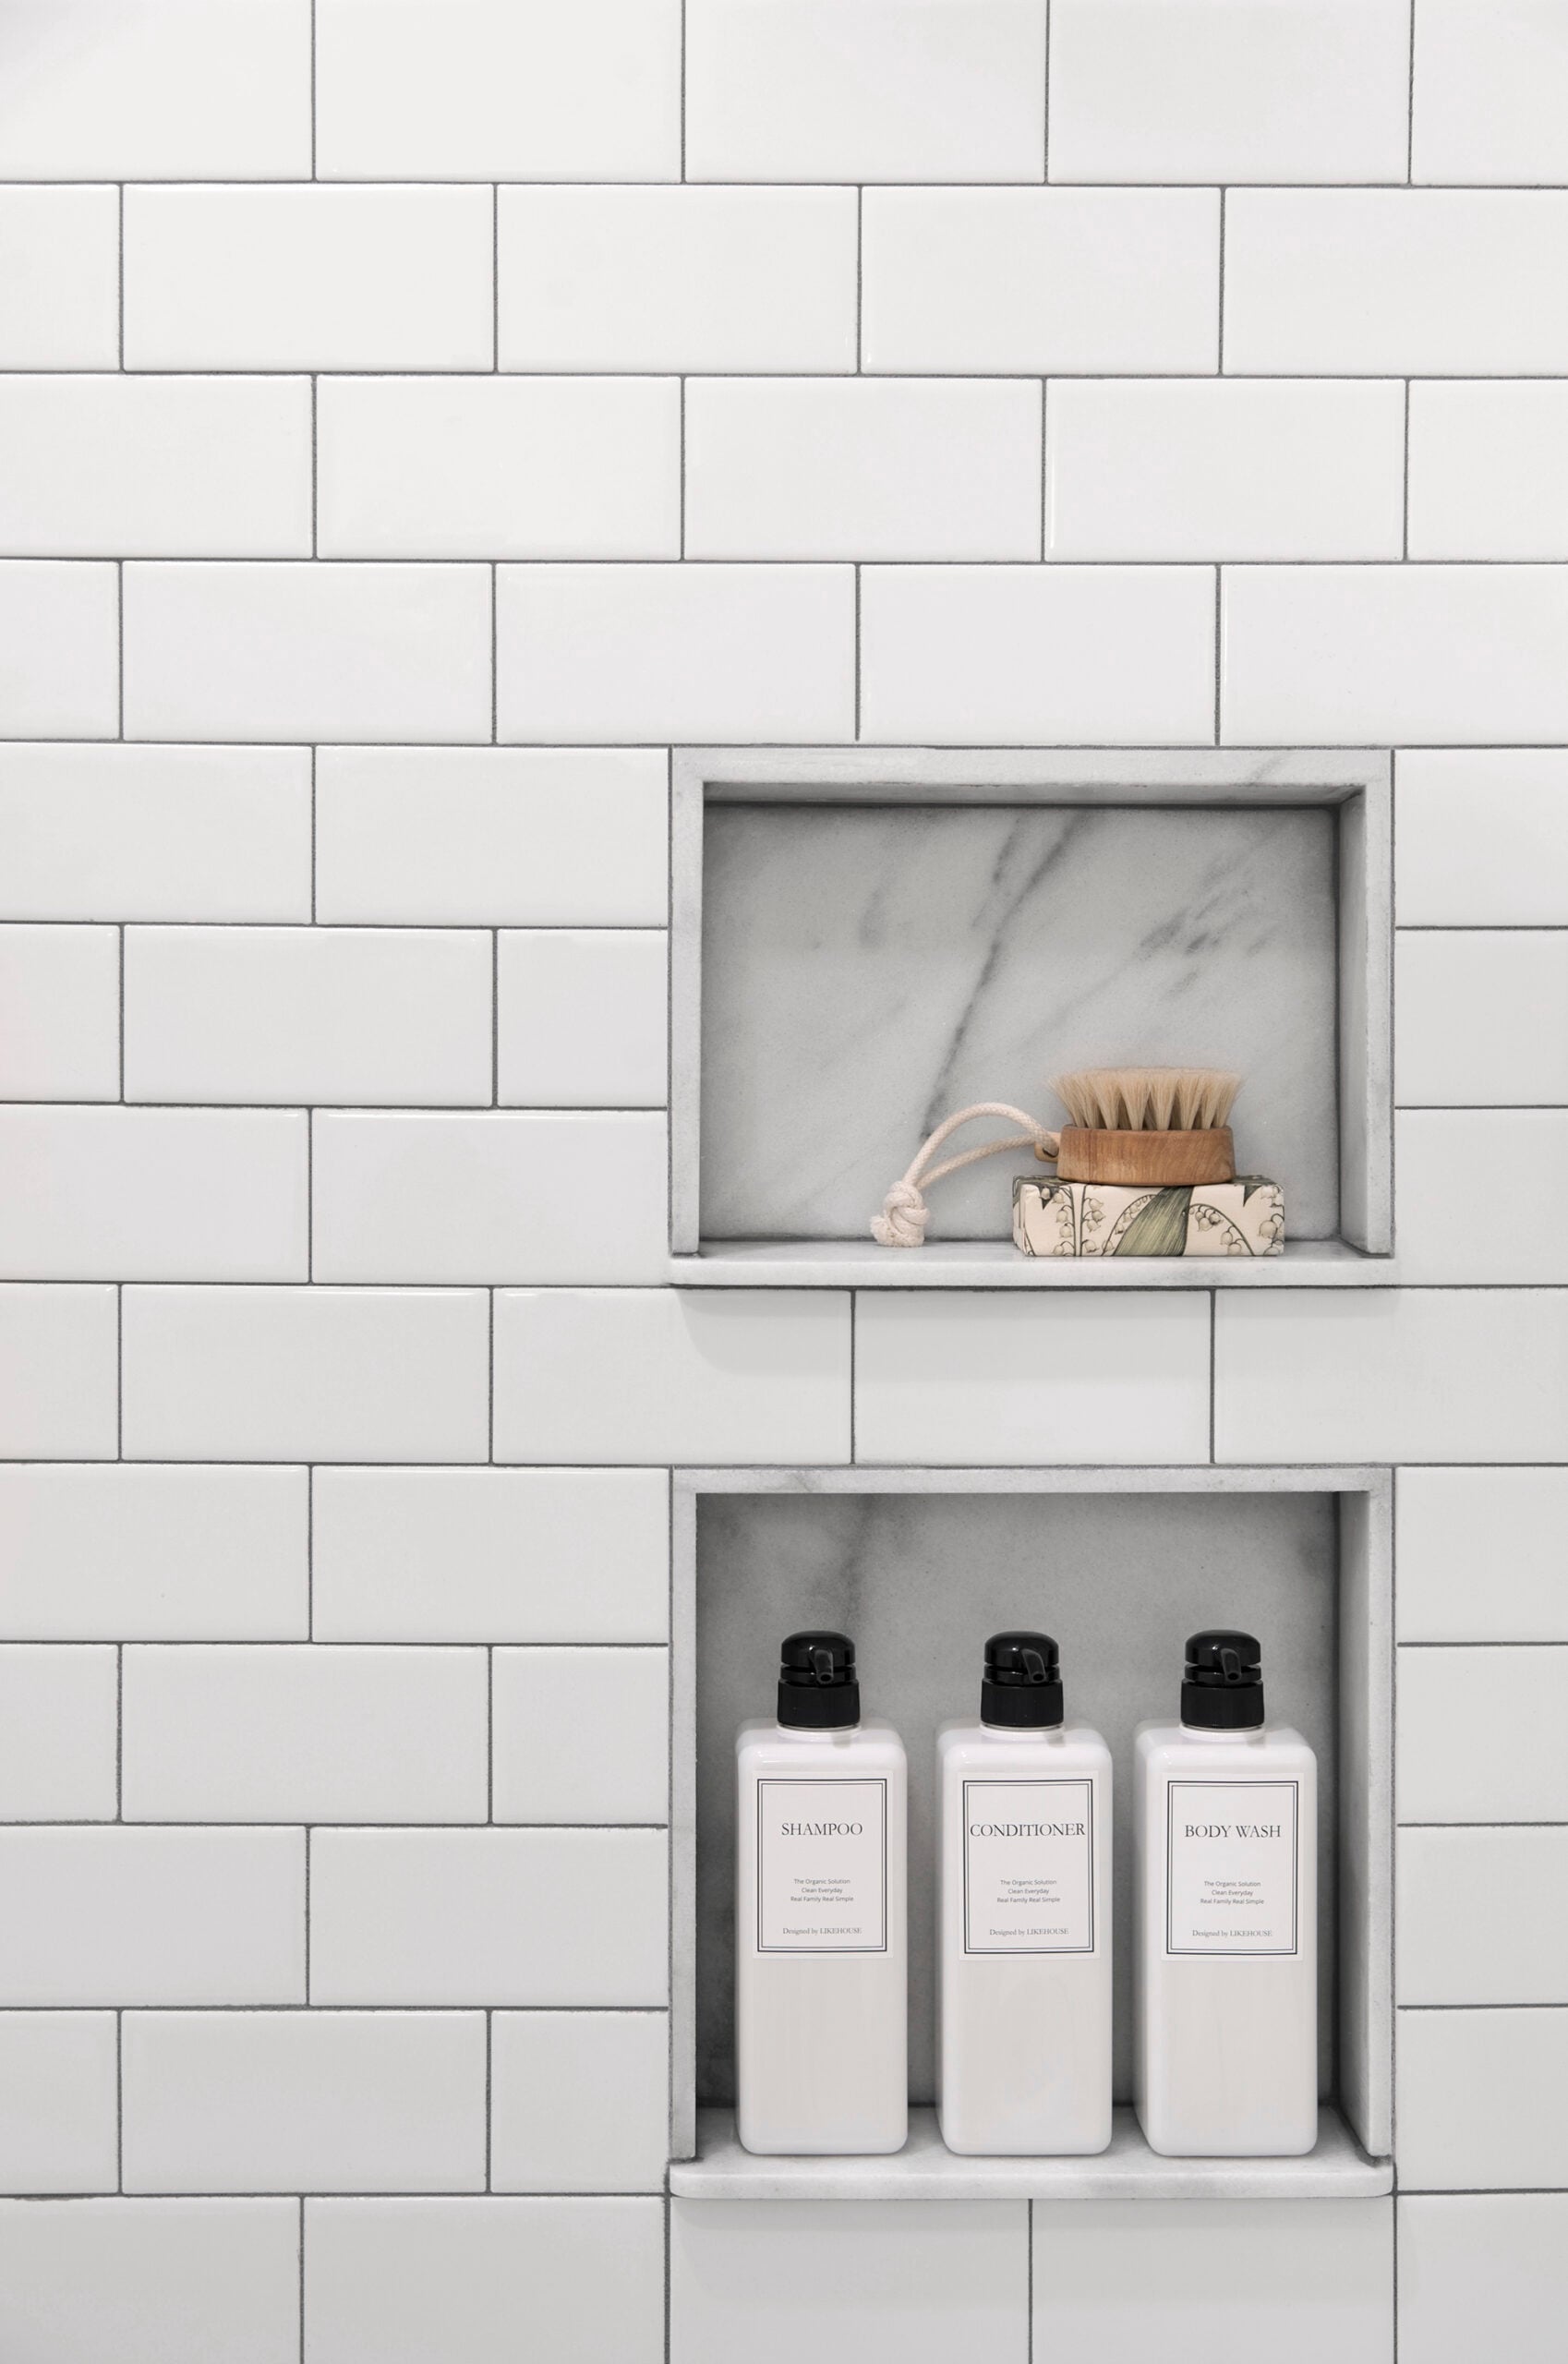
A niche should be sized and positioned to support daily habits, not just look good. There’s no universal size for a shower niche, but there are some designer guidelines I like to follow. Horizontal niches tend to work beautifully in shared showers or when you’re storing larger bottles. Vertical niches are often better in tighter spaces or on narrow walls.
If more than one person uses the shower daily, two smaller niches can feel more organized and balanced than one oversized opening. The goal is always proportion- something that fits the wall, the tile, and the way the space is used.
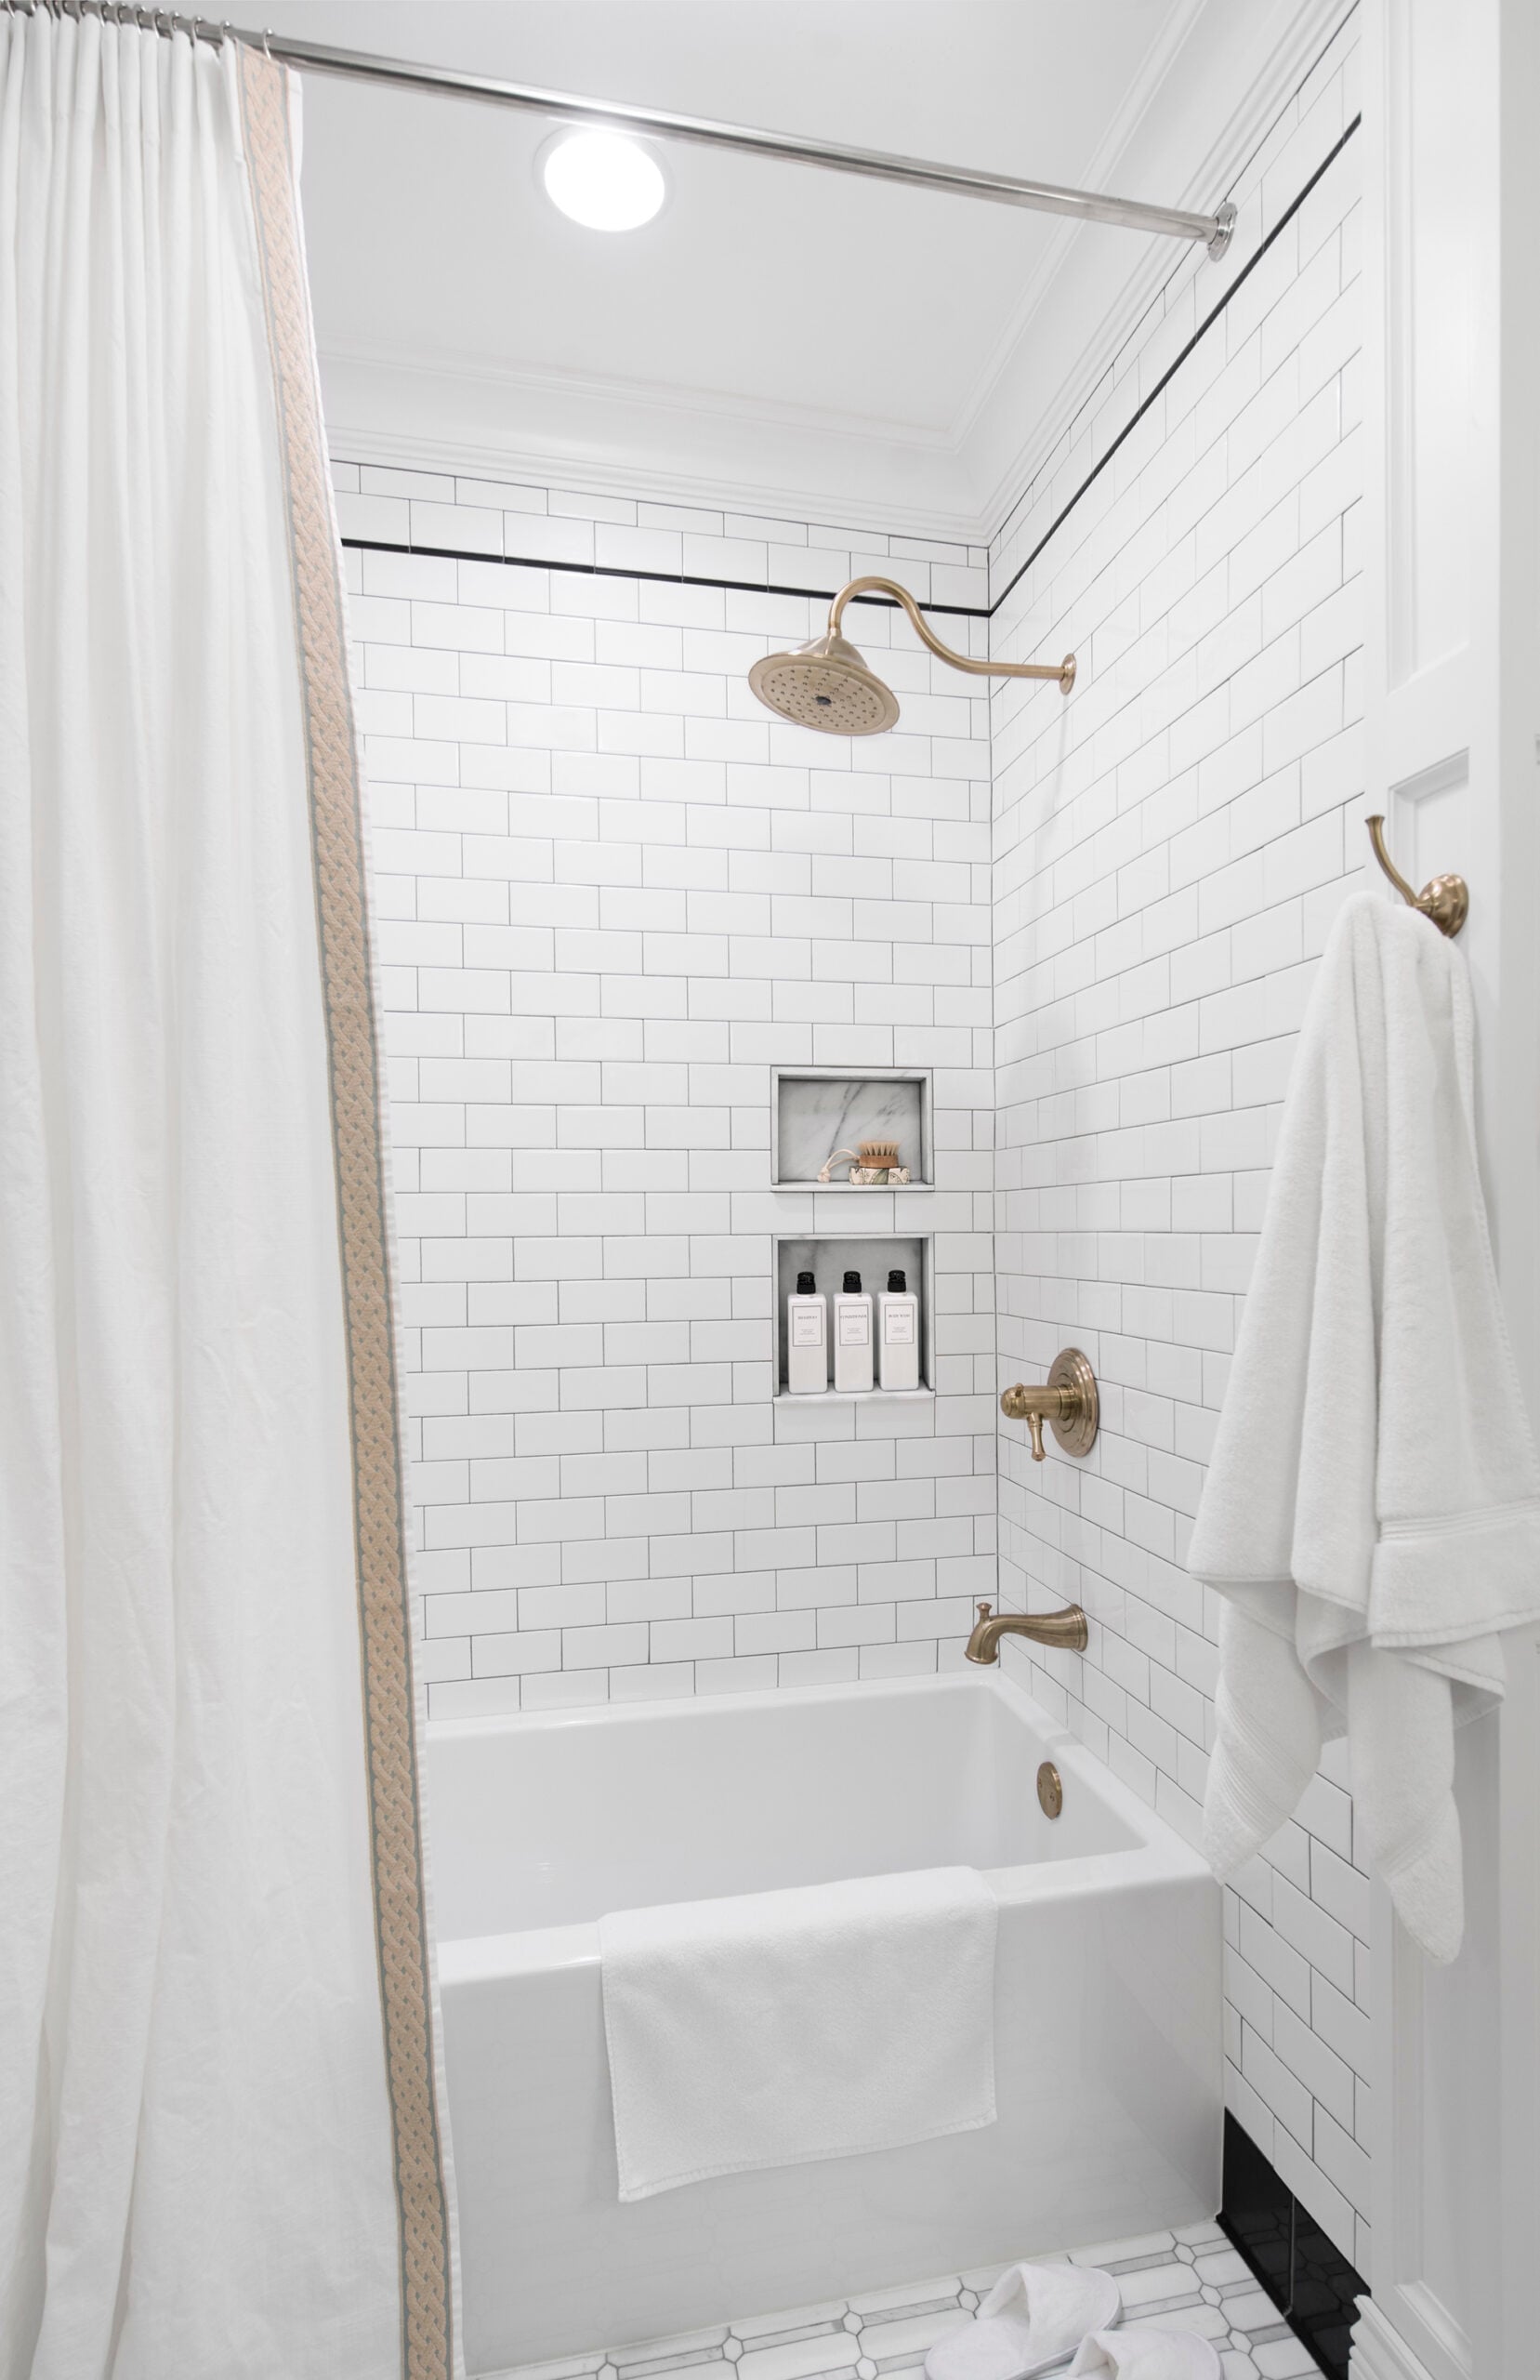
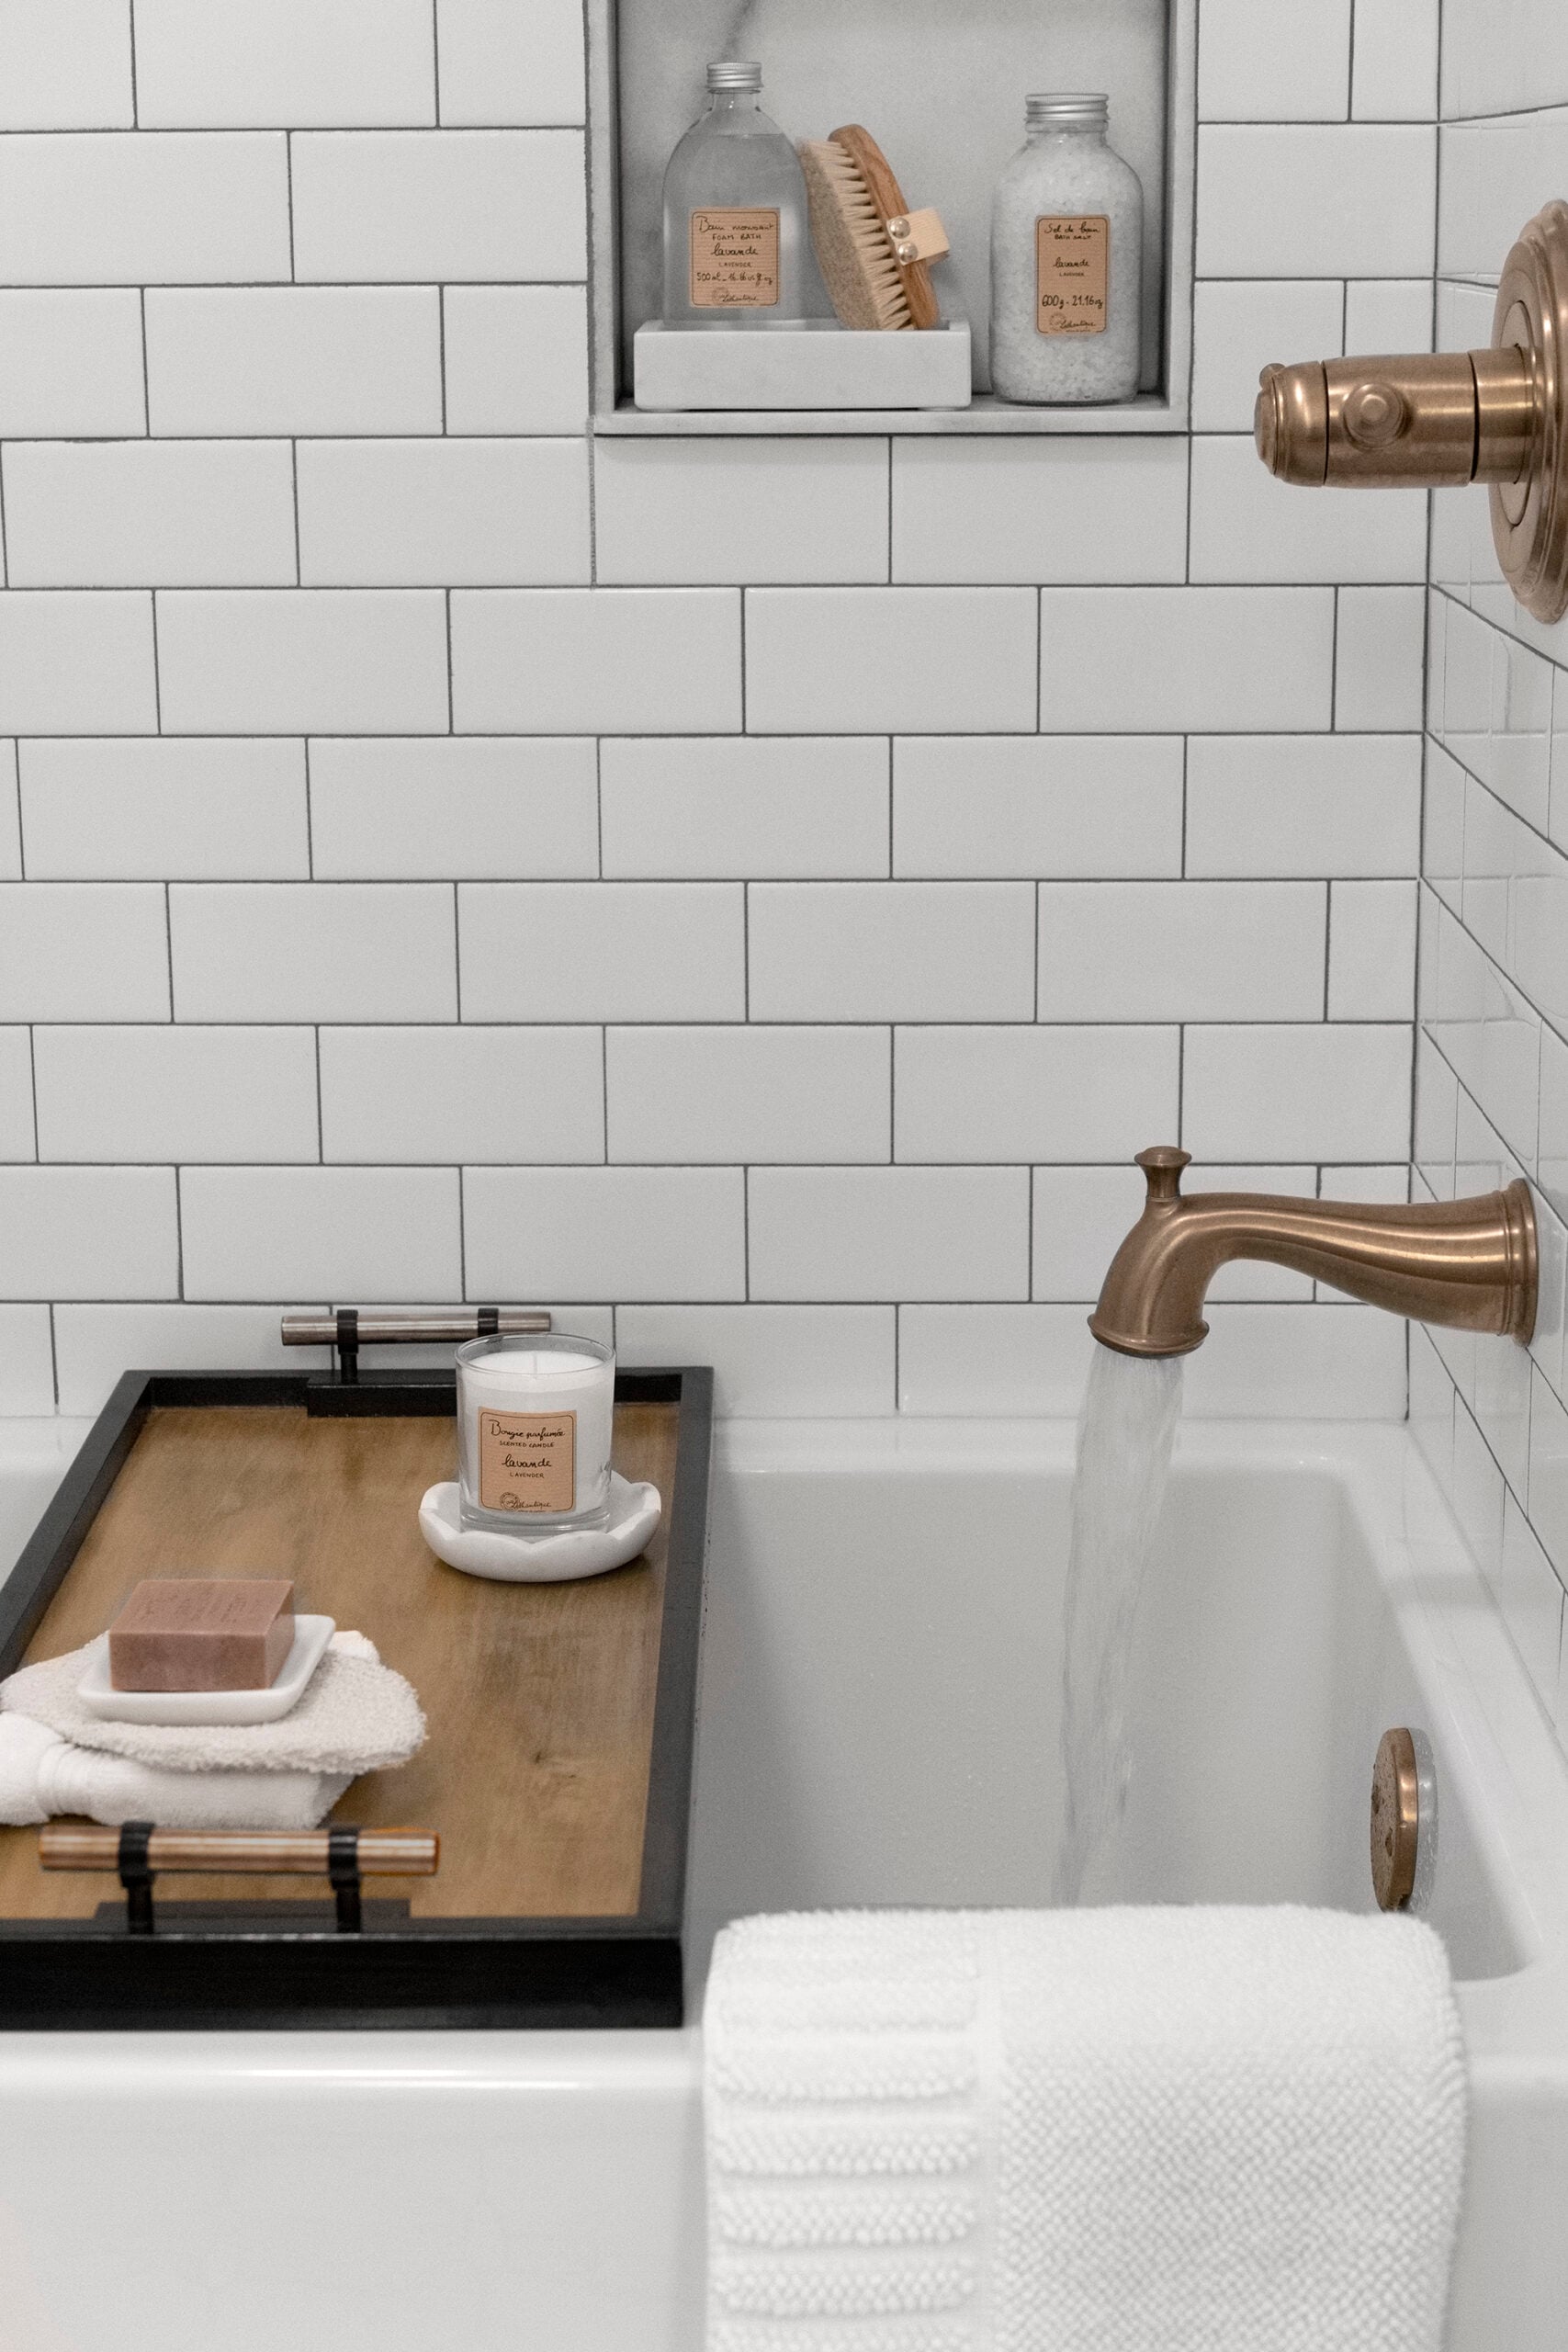
Alternatively, don’t sleep on considering a shower ledge! That’s another clever solution and play on scale for shower organization… and a great way to add depth if your bath products are larger. Don’t be afraid if the bottom shelf underneath the products protrudes a little. I actually prefer that, and think it’s a nice visual difference.
Tile Choices That Feel Timeless
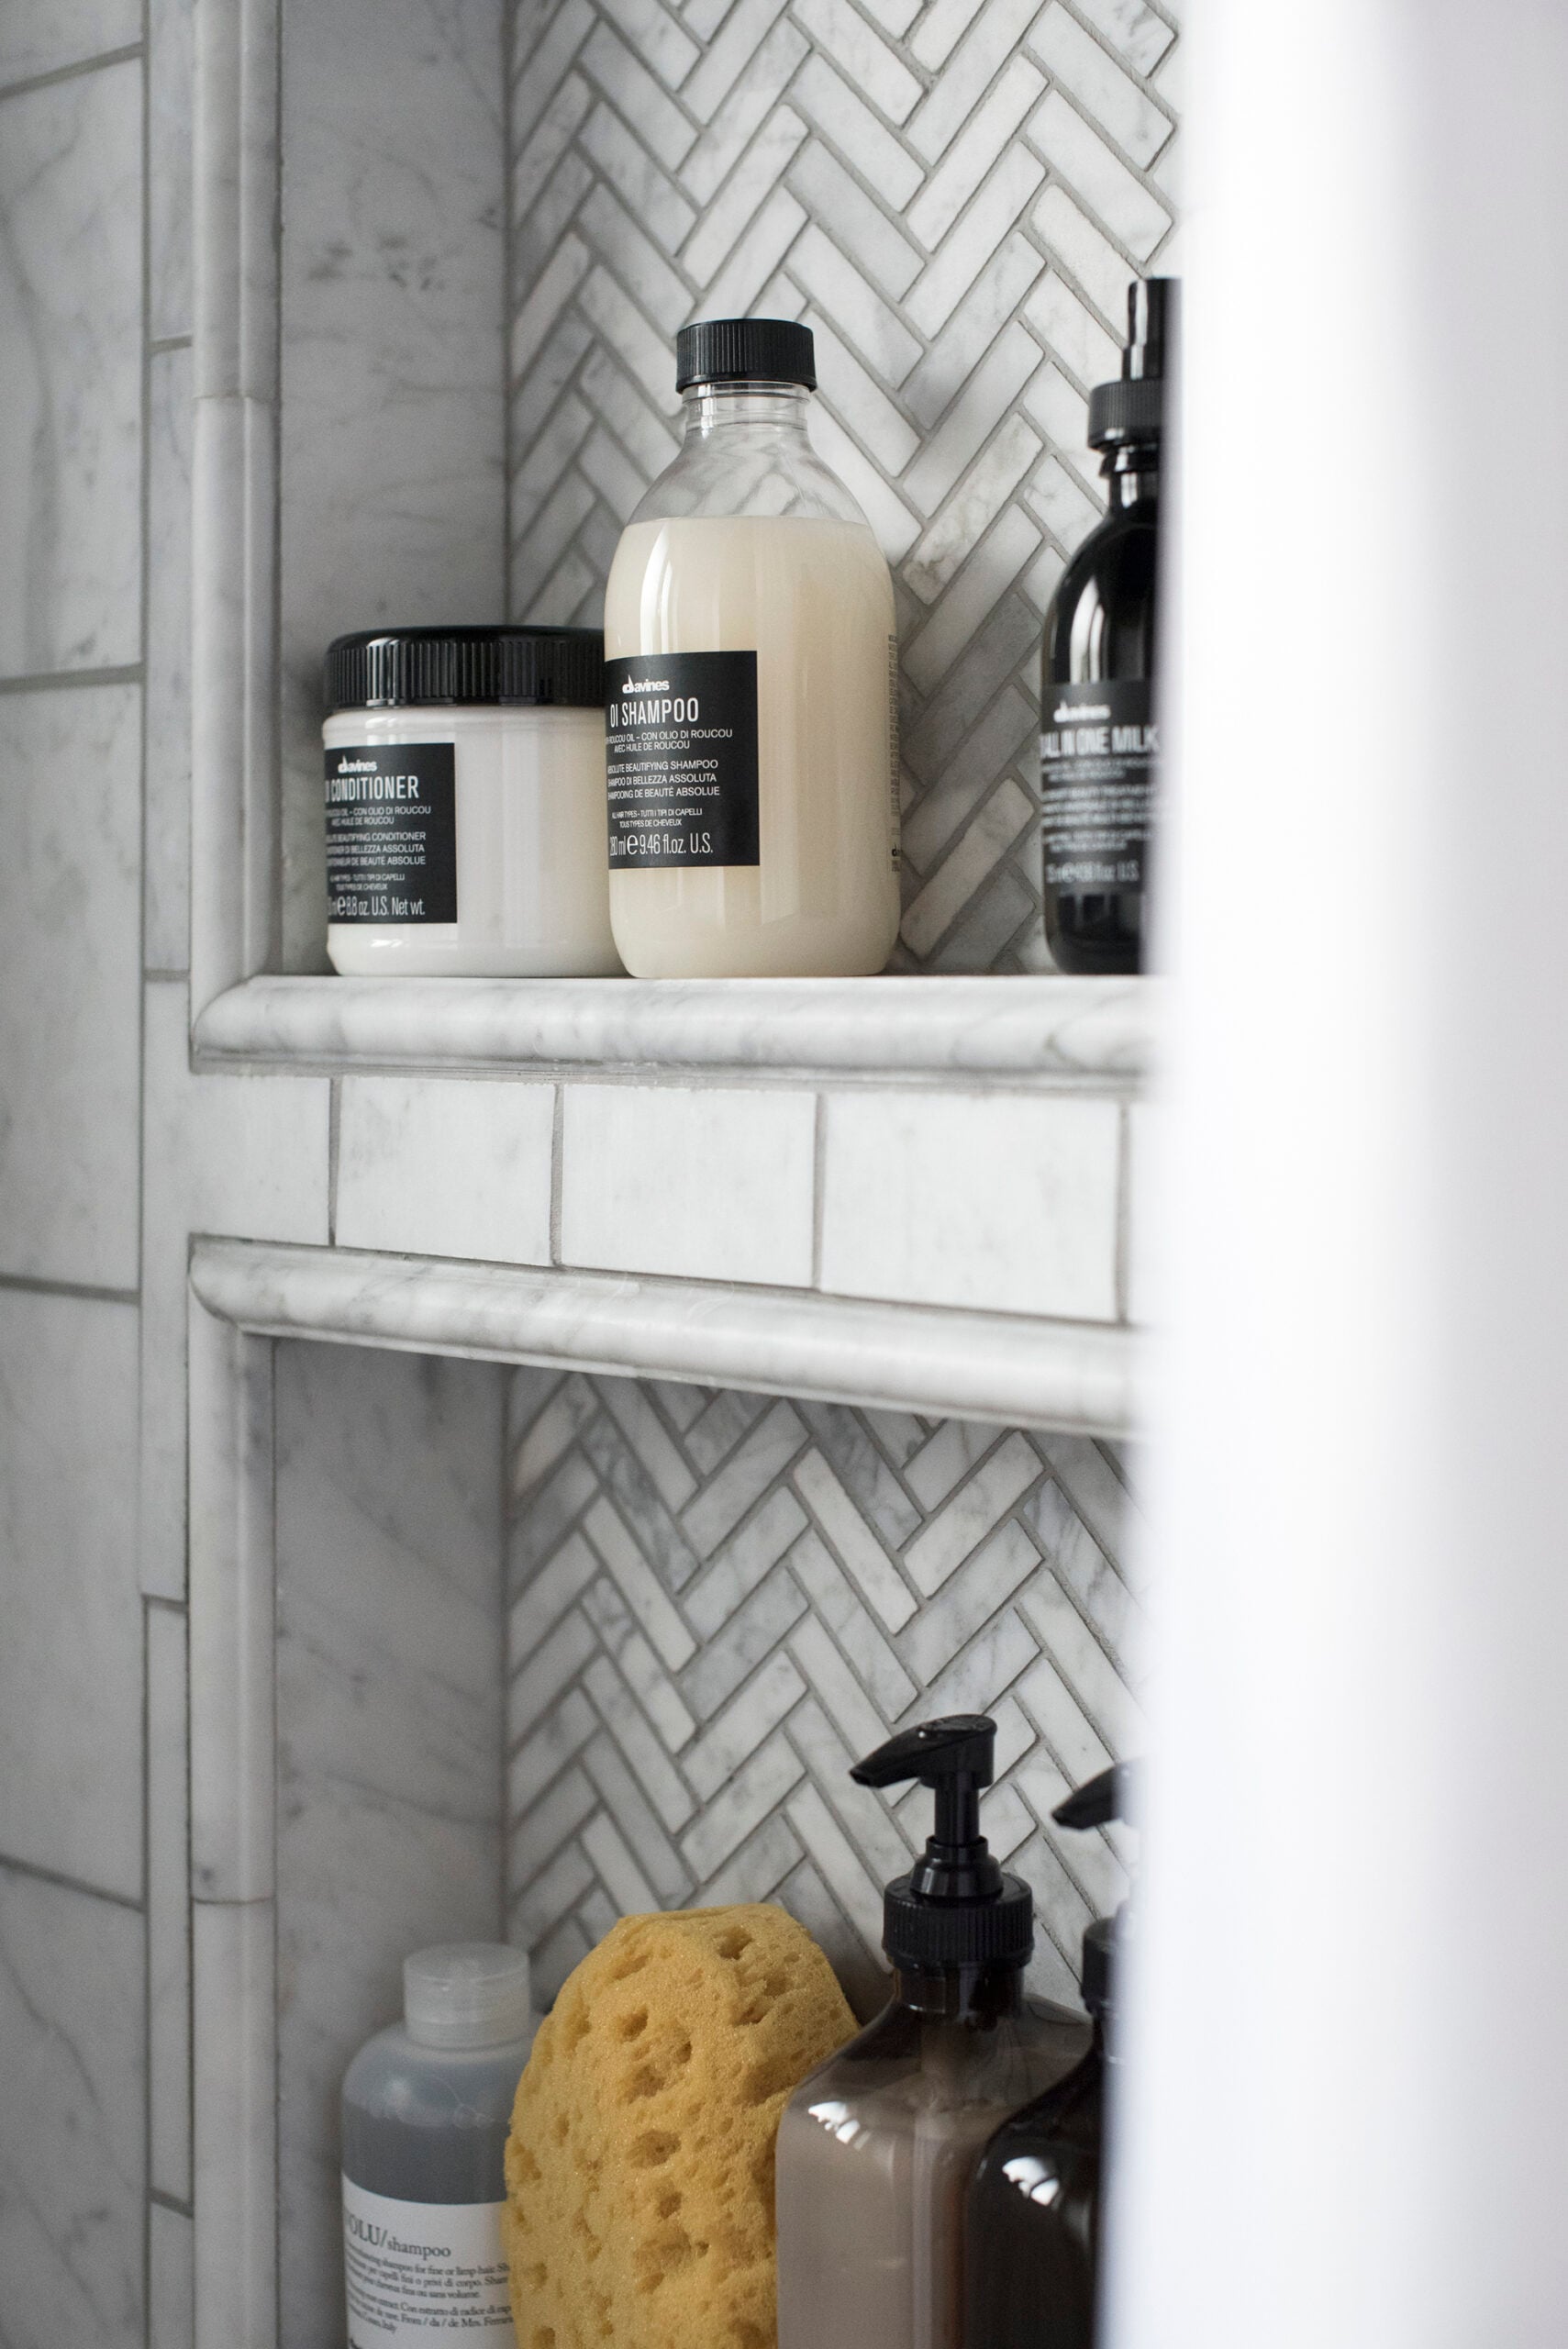
This is where you can introduce personality. You can tile the niche in the same material as the surrounding shower walls for a seamless, built in look, or use a complementary tile or stone inside the niche to create subtle contrast. I tend to prefer subtle contrast here.
Whatever tile you choose, alignment matters. When grout lines flow naturally into and around the niche, it looks intentional. When they don’t, even beautiful materials can feel off. Make sure it’s framed out with clean mitered edges or finishing trim pieces.
Common Shower Niche Mistakes I See
The most common issue is sizing a niche too small. A niche that can’t comfortably hold real bottles looks like a design fail. Another frequent mistake is placing a niche without considering the tile layout, resulting in awkward cuts. Over design is another thing I often notice. Bold accent tile, heavy trim, or trendy shapes can feel like a good idea at first but often age quickly. In my experience, the niches that last the longest are the understated ones.
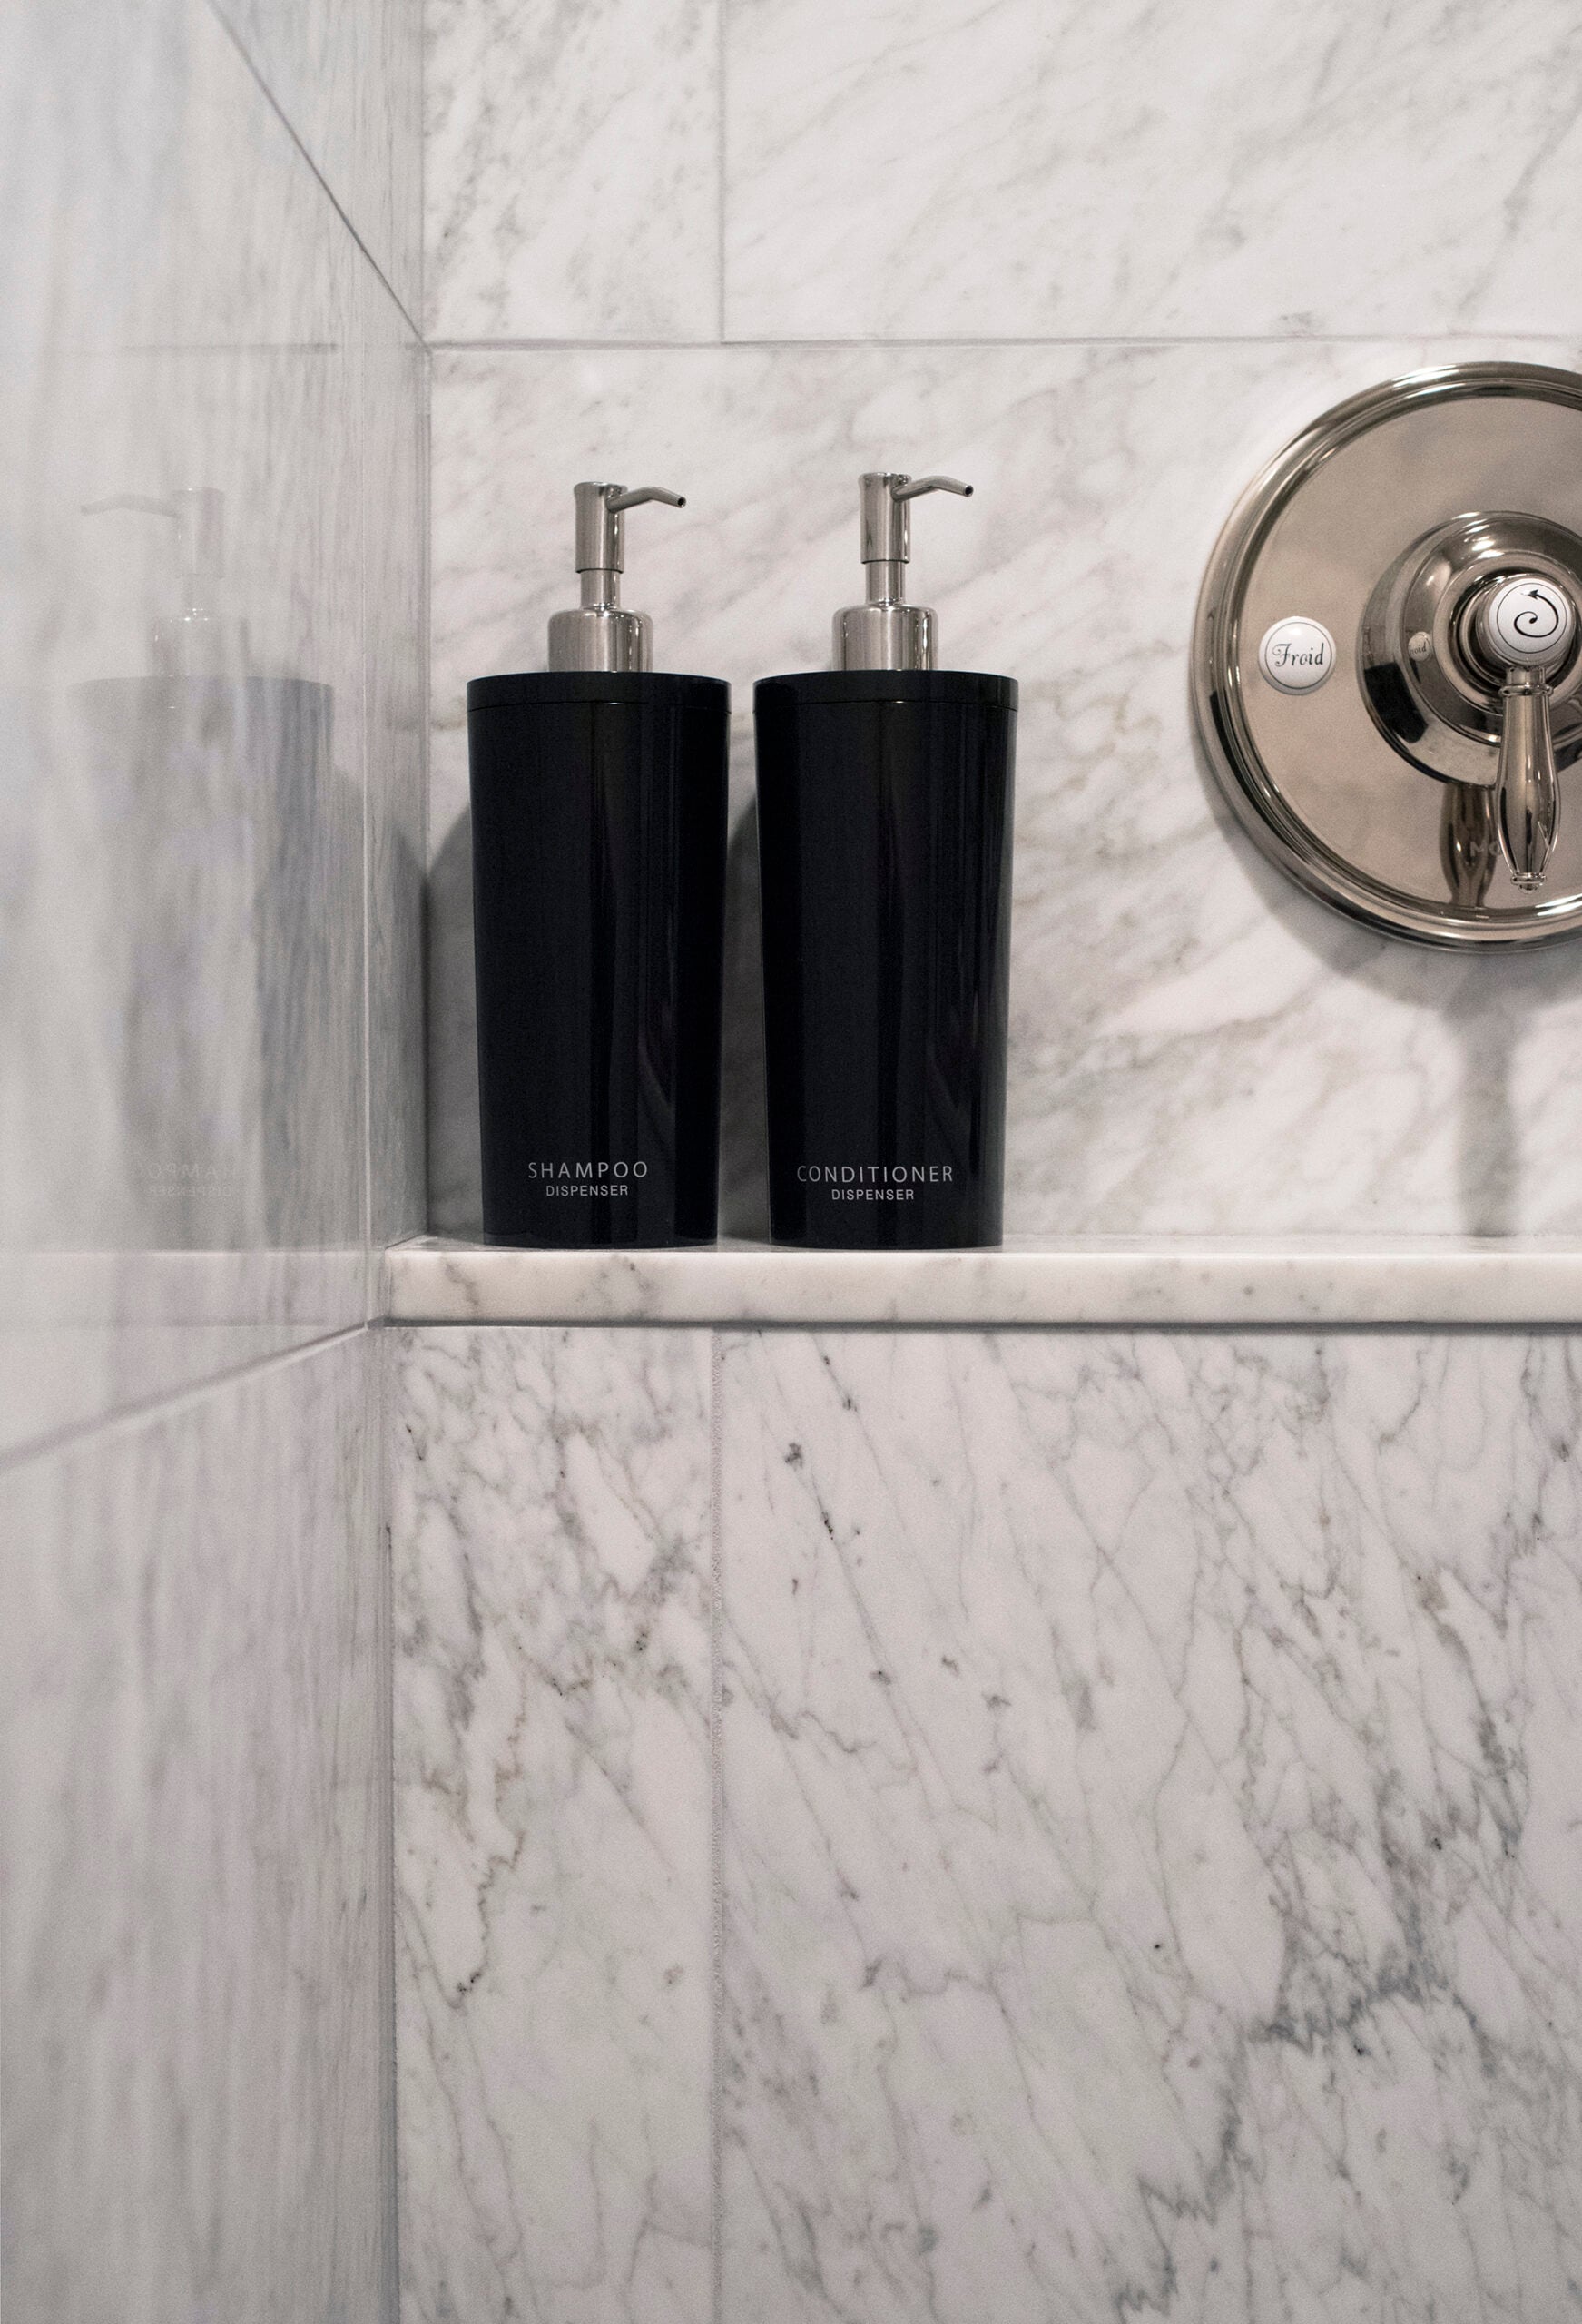
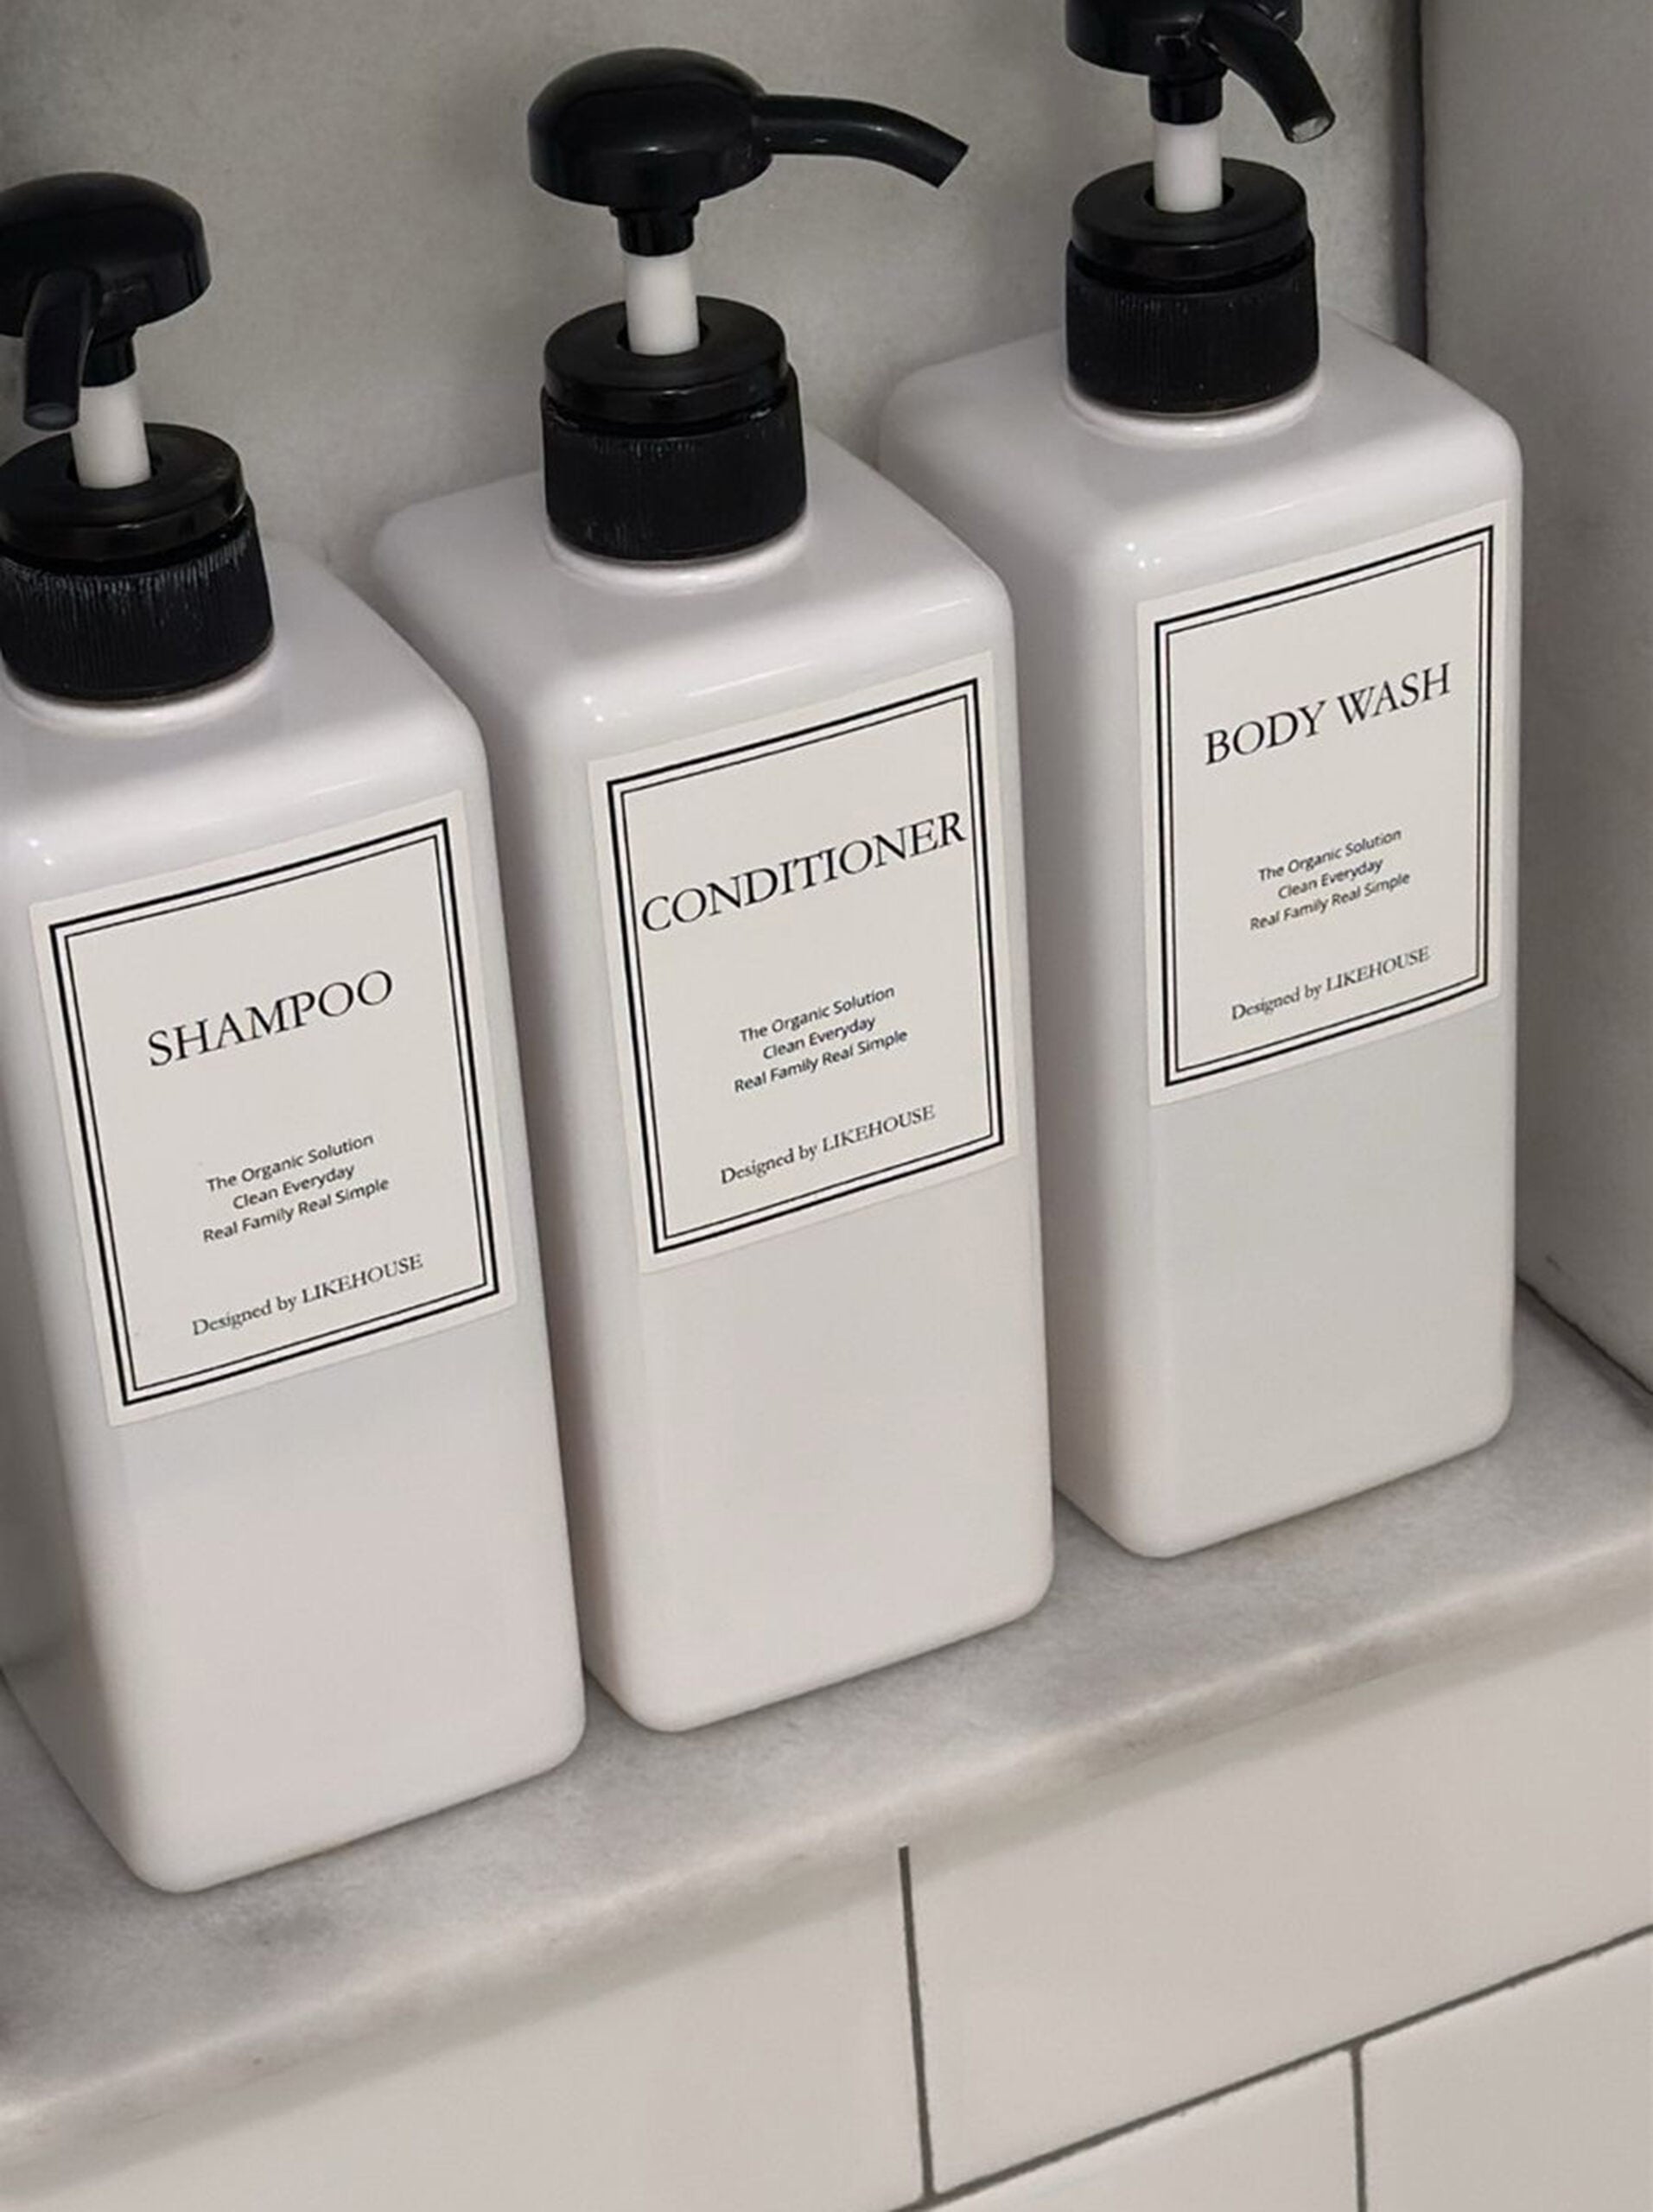
I will say this… there aren’t really any hard and fast rules when designing a shower niche. It’s safe to mix and match materials, pattern, and color. Anything goes as long as it’s done with intention and good craftsmanship. I’d also put functionality high on the “successful niche design” list because that’s the whole point, right? It needs to hold all of your shower things! I’d say you score major bonus points if you invest in aesthetic toiletry containers. I use this set of three soap dispensers for our guest bathroom niche.

Most niches are installed between waist and chest height so they’re easy to reach during daily use.
A depth of around four inches works well for most bottles without interfering with plumbing.
Matching tile creates a seamless look, while subtle contrast can add interest without overpowering the space. Alternatively, you could use a stone remnant. Check out this post on how to save money and shop stone remnants in a slab yard. They’re perfect for a shower niche or a quick bathroom vanity upgrade.
Pencil trim is always an easy, classic option!
Niches are easiest to install during a full renovation when waterproofing and tile layout can be planned together. We install ours before waterproofing membrane goes on (see the photo below, post waterproofing).
Related Posts
Looking for more bathroom design and renovation posts? Here are some reader favorites that may be helpful for your next bathroom project…
- How to Make a Small Bathroom Look Larger
- Standard Bathroom Dimensions To Know Before Renovating
- How to Properly Light a Bathroom for Function and Design
- Why an Exhaust Fan & Light Combo Is the Best Choice for Bathroom Renovations
- Classic Bathroom Plumbing Fixtures from Wayfair
- Burl Bathroom Vanity DIY & Similar Burl Parsons Tables
- How to Tile a Backsplash the Easy Way Using Mussel Bound
- The Best Mapei Grout Colors (Designer Tile Pairings & Advice)
- Bathtub Refinishing Process & Reglazing A Tub White
- How to Style a Bathroom That Feels Like a Boutique Hotel
A shower niche may be a small detail, but it’s one you interact with every day. When it’s planned carefully, it disappears into the design and functions well. When it isn’t, it becomes a daily annoyance and design eye sore. Like most good design decisions, the best shower niches are practical, understated, and classic. They don’t call attention to themselves but you notice the difference every time you step into the shower. Questions? I’d love to hear them in the comments below! Does anyone have bathroom renovations planned for the year ahead?

I don’t know when I’ve thought so much about shower design! Ha. Neither of our bathrooms have a niche; in fact, I don’t think I’ve ever been in a bathroom that had one. ( I must not stay in the right hotels.) I’m pretty sure that I now consider them a must-have if I ever get to renovate. I like the look of the two stacked niches with tile that blends. Although, the one with the marble inset around the plumbing fixtures is kind of genius… Getting excited for the reveal!
Really?! I’m so surprised to hear that. You definitely have to consider if a bathroom renovation happens in your future :)
When I was designing our niche I think the biggest thing I lacked guidance on was framing it out with tile and what to do about the cut edge of tile being exposed? do you have to buy bullnose? Is there a heavy grout line there? Do you buy an accent tile to frame the opening? If you want it just a simple square like some of the ones above do you just flip the cut edge to be at the grout line and keep a honed edge at the border of the niche? Like the marble inset niche above- did they miter the corners of the subway tile to make it that clean??? HOW??? :-) I was pressed for time and a decision (read: at home depot the night before) so we ended up going with an different border tile, same color, that I really do like very much, but the bathroom I’m designing for a friend now will just have a simple niche, no borders, so want to be sure the tilers do it properly. When I was searching I saw a lot of information about the designs, but no much about the details… maybe you can flag that to do a post on when you tile yours? I’d love it!!
I’ll do my best to answer those below :)
Do you have to buy bullnose? Is there a heavy grout line there? … I prefer a finished edge to a heavy grout line- it just looks more finished, IMO. Therefore, I’d choose a pencil trim with a finished edge or cap the surround with bullnose tile. Schluter is another option, although it gives a more industrial look.
Do you buy an accent tile to frame the opening? Typically yes- my preference is pencil trim! Whether that is a contrasting color or material… that totally depends on the design plan.
If you want it just a simple square like some of the ones above do you just flip the cut edge to be at the grout line and keep a honed edge at the border of the niche? Like the marble inset niche above- did they miter the corners of the subway tile to make it that clean? … That specific one definitely looks mitered- and we actually mitered the pencil trim in our previous bathroom. That’s the best way to do it, but obviously it’s tedious. Otherwise, you could use a bead of the same color grout or sealer as the tile around the niche box to make it less noticeable and hide the raw tile edge.
Hopefully this helps!! xox
Such great questions (and answers!). I am so excited to see the reveal of your finished bathroom but I’m enjoying all of the projects and design inspiration along the way.
Thanks so much for following along Dawn! Happy Friday :) xox
I love our niche! We planned it around our Costco size shampoo and conditioner 😂 the worst thing we did was letting our tile guy talk us into fusion grout on the pebble backsplash and floor. 3 years on and we have to somehow redo the whole floor because it disintegrated. Wish I had followed you back then!
Ha! That is awesome!! We just got a Costco membership at the beginning of the year and I have never been so amazed. lol!
Sarah, love your website! Keep it up! I was afraid to do a niche in our new downstairs shower because I didn’t know if it would retain water or be hard to keep clean. Is there a slight tilt to the ledge to encourage water drainage? We need to remodel our two upstairs baths and now I’m thinking about niches again.
Thank you so much, Lori! They don’t really retain water and I personally don’t think they’re difficult to keep clean, but it all depends on the material and tile I suppose. I’ve seen them built both ways, but for the most part- I’d say they’re typically level. Since they’re not very deep, water retention isn’t really an issue, in my experience. Hope this helps! xox
We recently had our bathroom renovated and our (less than stellar) contractor tiled our niche but never got shelves installed. He used a pre-built niche, but I would like to have 2 shelves added to it and I don’t even know where to begin. Where do I buy glass for the shelves and how do I find someone to install them? Any ideas you have are appreciated.
Hi Abby! I would probably have the glass custom cut… maybe you could drill in some little brackets to support the shelves and do it yourself? That’s probably the route I would take. It’s tough once it has already been installed.
We are almost done with 3 bathroom remodel. When I came home from work all of the niche’s have metal trim. I hate it. I’ve never seen this before. I can probably live with it in 2 baths but in the master we did marble and it takes away from everything. Is it a real pain to take it off and blend it in like all of the niches I’ve ever seen?
Hi Stacey! Congrats on your bathroom renovations- that’s really exciting. The metal you’re seeing is called schluter. If you didn’t specify the niche design to your tile contractor, sometimes they use that particular project to finish an edge for a clean, industrial look. If you’re not into it- unfortunately it would be difficult to remove and it’s tiled into the niche. I’d recommend calling your contractor and pay to have them demo the niche and start over with your preferred design. Hope this helps! That application is often used in modern or commercial settings.
Great niche ideas! The last one posted is my fav! What material is used inside back of niche? Painted Sheetrock, stucco?
I’d say it’s probably a larger field tile- ceramic or porcelain.
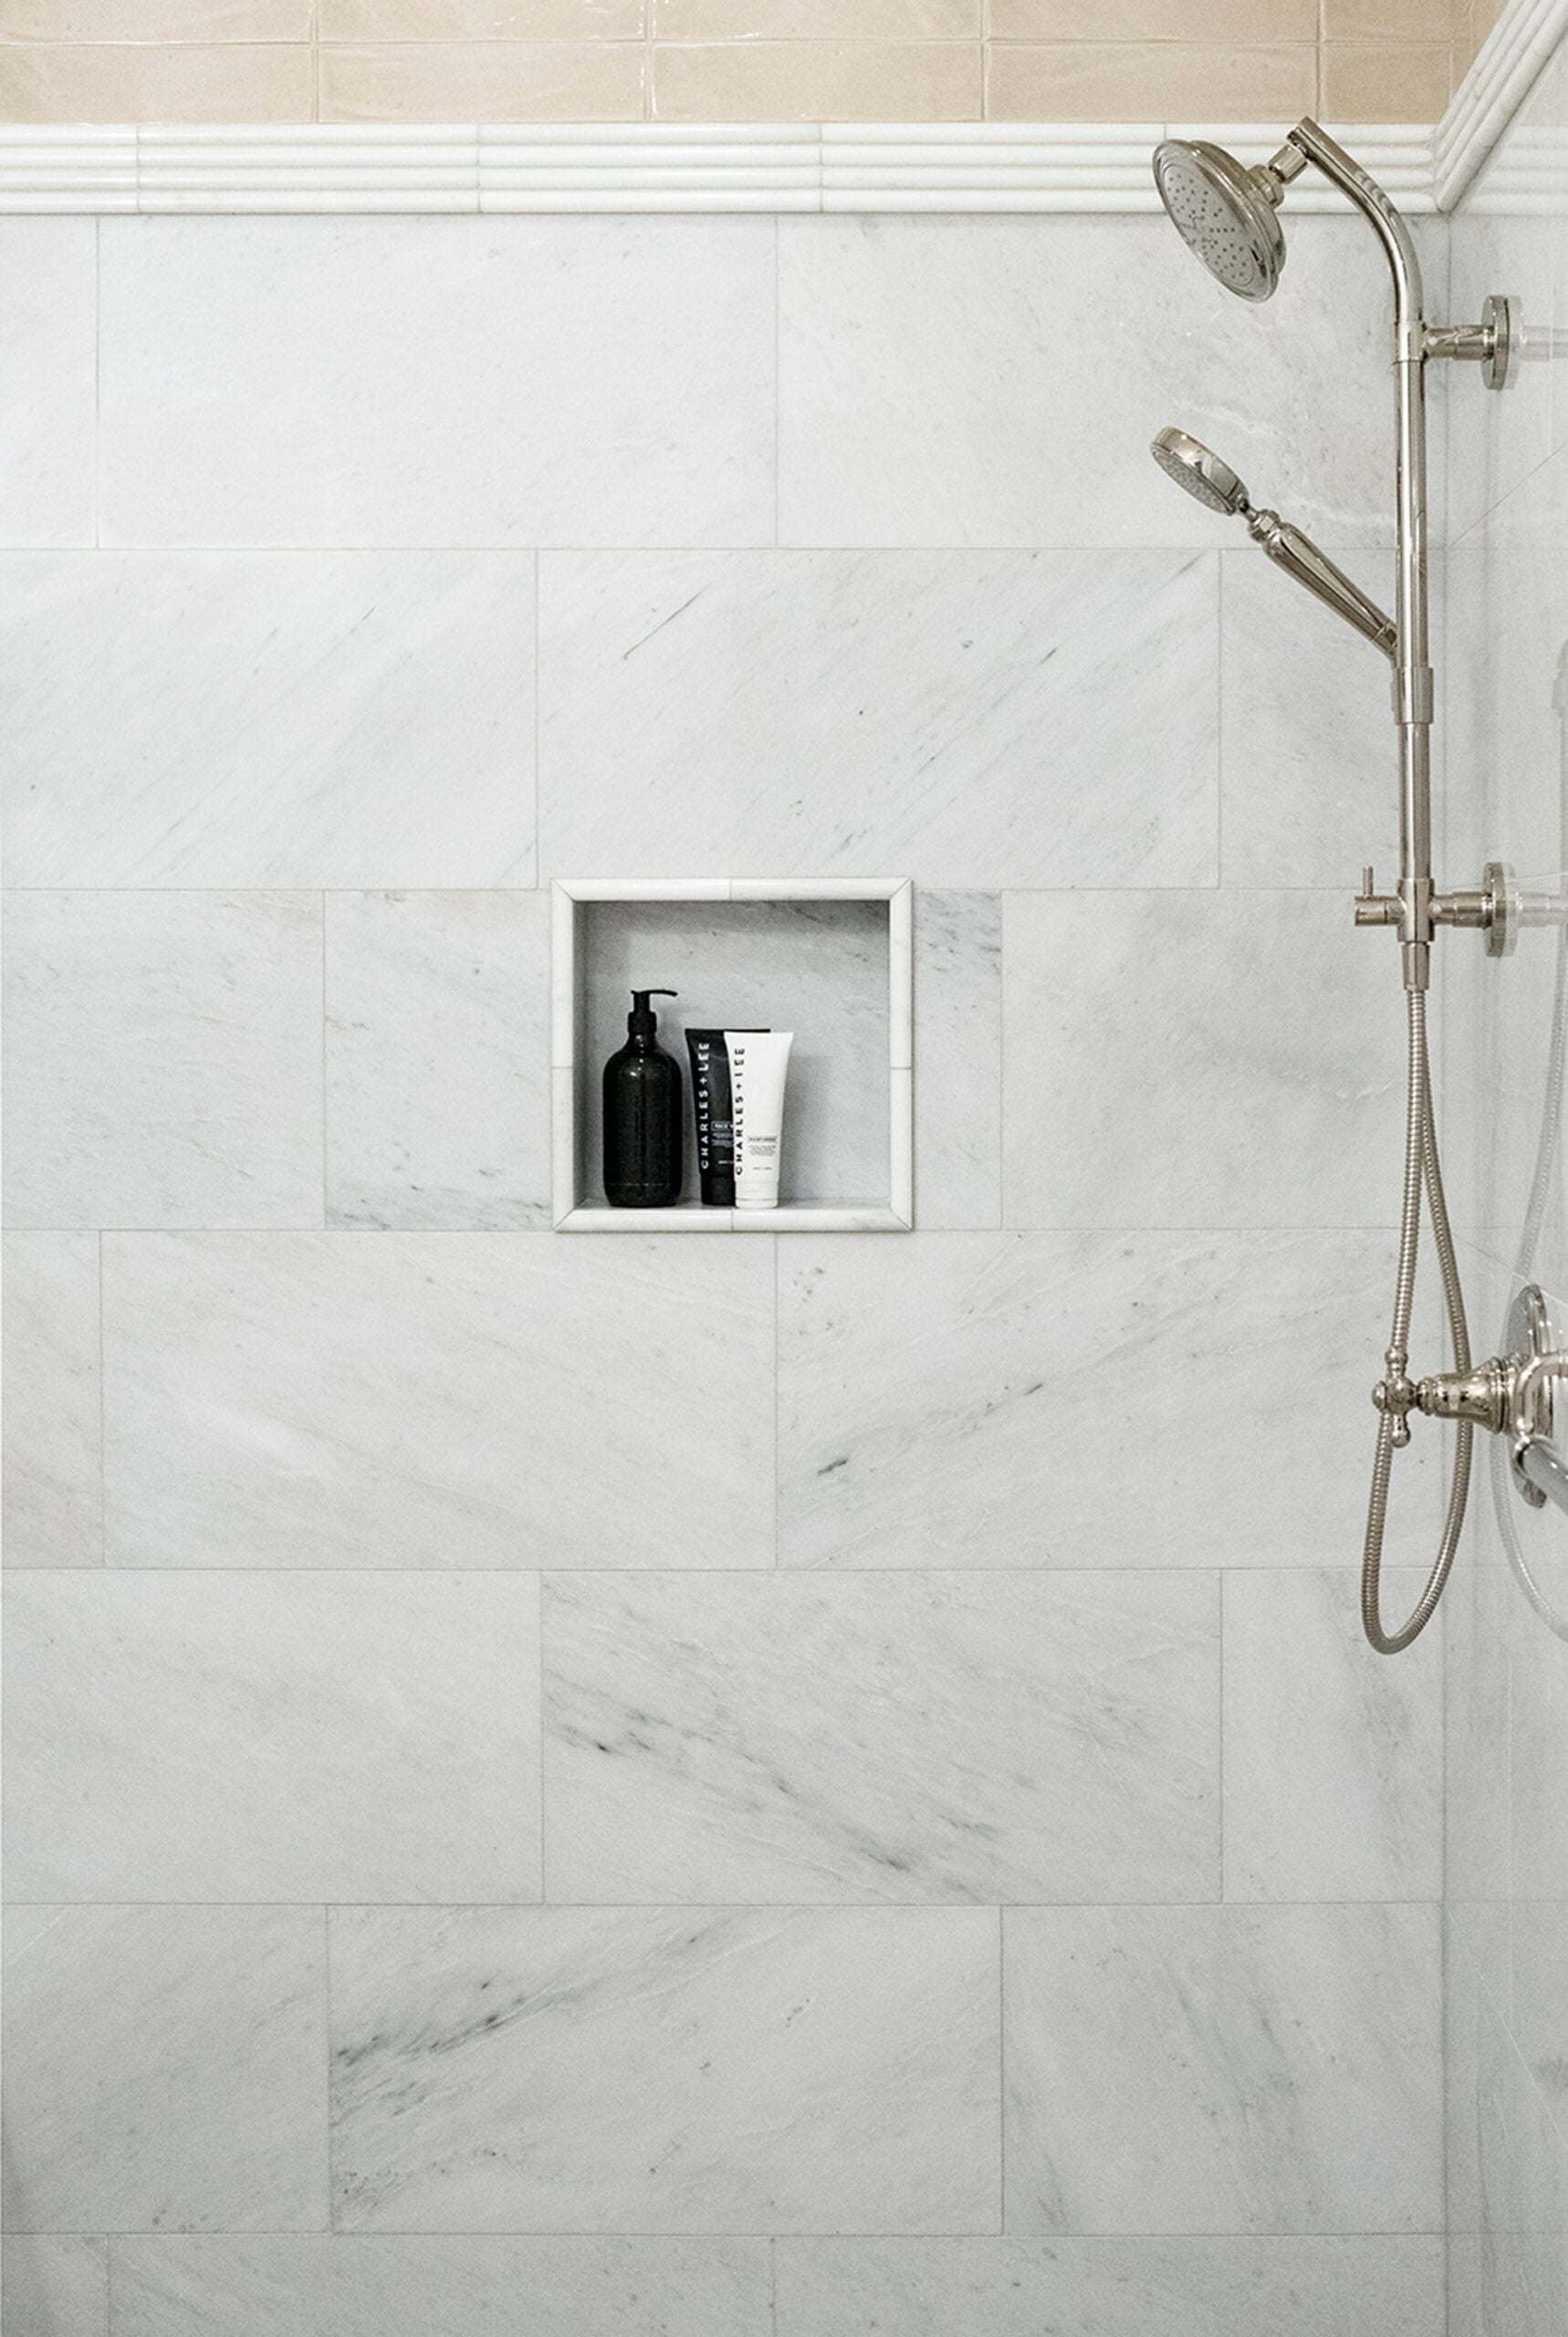
Could you provide the name of the two types of tile used in the top picture? Thanks so much!
Those are from the bathroom in my previous home. You can find the marble subway here: https://rstyle.me/+8I7Wk_oNXWal-_EadBolIQ
And the herringbone marble here: https://rstyle.me/+ZlyaNwdcT-AOb4-eFWEDGQ
Every single concept here looks modern and fantastic and design forward. The trend is to bound all tile edges with metal profiles. I detest these profiles, yet many of the tile alternatives would scream 80S and 90s. Congratulations. These niche trim ideas are 5 years old now, yet inspirational for me today.
Thank you so much, Kevin! What a nice compliment. My design goal is always to keep things classic.
Hi Sarah! Is it doable to add a niche where there isn’t one already? My builder put in those corner shelves, which are pretty terrible. My goal is to remove the shelves (without damaging the tiles?) and adding a niche.
Hi Brittany! If the shelving is grouted in, it would most likely damage your tile, and you’d definitely need to demo tile to install a niche, which would result in retiling. Hope that helps!
Hi Sarah! This is super helpful. I wanted to know if you could share your thoughts on whether to install a niche on the most visible wall or try to hide it in a side wall to avoid seeing clutter? We’re starting a bathroom reno and I’m torn. Maybe slightly leaning on keeping it front and center because we’ll be using our fancy floor tile as the back of the niche. Thoughts???
It really depends on your personal preference. For example, in our guest bath- the product containers are streamlined and really pretty, so I don’t mind the interest the niche and products add… so we made it highly visible. In our primary bath, where it’s a bit more cluttered with jumbled products, I’ll probably keep it more hidden when it comes time to renovate! Hope that helps.
Hi Sarah, I’m so glad I stumbled on your blog. I love your shower niche ideas. We are just starting a bathroom remodel and I’m stuck on making the right decision for our niche…help! We’re doing an off white penny round tile on the floor of the shower and an aqua blueish subway tile on the walls. Wall or floor tile for niche? So many decisions and it’s overwhelming to say the least:) Also, for a shaving solution- niche or shelf?
This is a fun conversation on one small but important topic. In the homes we built, people love when the niche is hidden and not exposing all their mess. Having a good tile guy is important because they can lay it out and make sure the tile lines up with the niche well. I love a good ledge to hold everything too. Do you think a ledge or niche for propping up your leg for shaving is a necessity in showers? Like a low niche to put your foot on.
How I would love to be planning a bathroom renovation this year! Good morning Sarah. This guide is fantastically useful. I’d have never thought how all of the points you bring up can affect the function (or lack of) when installing a niche. I just assumed everyone used the pre-fabricated box; I also assumed they’re all around the same size. The way you and Emmett handle niches makes perfect sense. No two showers are the same, and I’d have never thought to consider how the placement could play a role in tile placement. All of our showers have the terrible pre-fab inserts; they’re all showing their age, and I recently discovered that the insert (and tub) in the kids’ bathroom was painted. 🫠 Question: is it too much to have a ledge and a niche in one shower? You’ve provided so much food for thought. Not me mentally planning a bathroom renovation in my head, lmao. Regardless, this post is a good one. Thank you for sharing!