Exterior Deck Painting Tutorial
 Our amazing friends and neighbors have a beautiful a-frame cabin. Just before social distancing began, Emmett & I decided we would surprise them with a deck makeover. As things escalated, this project made more and more sense… we could paint and style their porch without having to be in contact with them, while giving them a safe place to enjoy outside of their home. Of course they knew we were up to something (and gave us free rein to do whatever we wanted), but we snuck into their backyard and began to makeover their porch in the woods. It’s truly a picturesque spot and as promised- I have the first part of the post for you today… the best (and fastest) way to paint a deck. Click through for the complete tutorial and for some pretty crazy before and after images!
*This post is sponsored by Lowe’s. All content, ideas, and words are my own. Thank you for supporting the brands that allow us to create unique content while featuring products we actually use & enjoy!
 As always, let’s start with a before and after! I’m continually amazed by the transformative power of paint. We were able to totally change the look of their deck on a tight budget. Emmett and I hauled over a few of our key tools, our Graco paint sprayer, and went to work. Doesn’t it look a thousand times better? Obviously I have yet to install lighting and style the space with furniture, but even with the updated paint- it feels fresh and new again. PS… does that coffee table in the before image look familiar? It should- we gave it to them after they moved in, but it used to live in the backyard at our previous home.
 Ready for the tutorial? I’m linking everything we used for this transformation below!
SUPPLIES + TOOLS
- Dewalt Orbital Sander (or Dewalt Sheet Sander), we used both since there were two of us sanding simultaneously
- Sun Joe Pressure Washer
- Purdy Paint Brushes (for edging)
- Handy Paint Pail
- Valspar Tintable Exterior Stain and Sealer (we used 5 gallons of color “Darkest Night”)
- 3M Masking Film
- 3M Painters Tape
- 3M Masking Tape
- Graco Magnum ProX17 Electric Stationary Airless Paint Sprayer
- Trimaco Tyvek Protective Paint Suit
- Buckets (for cleaning and spraying)
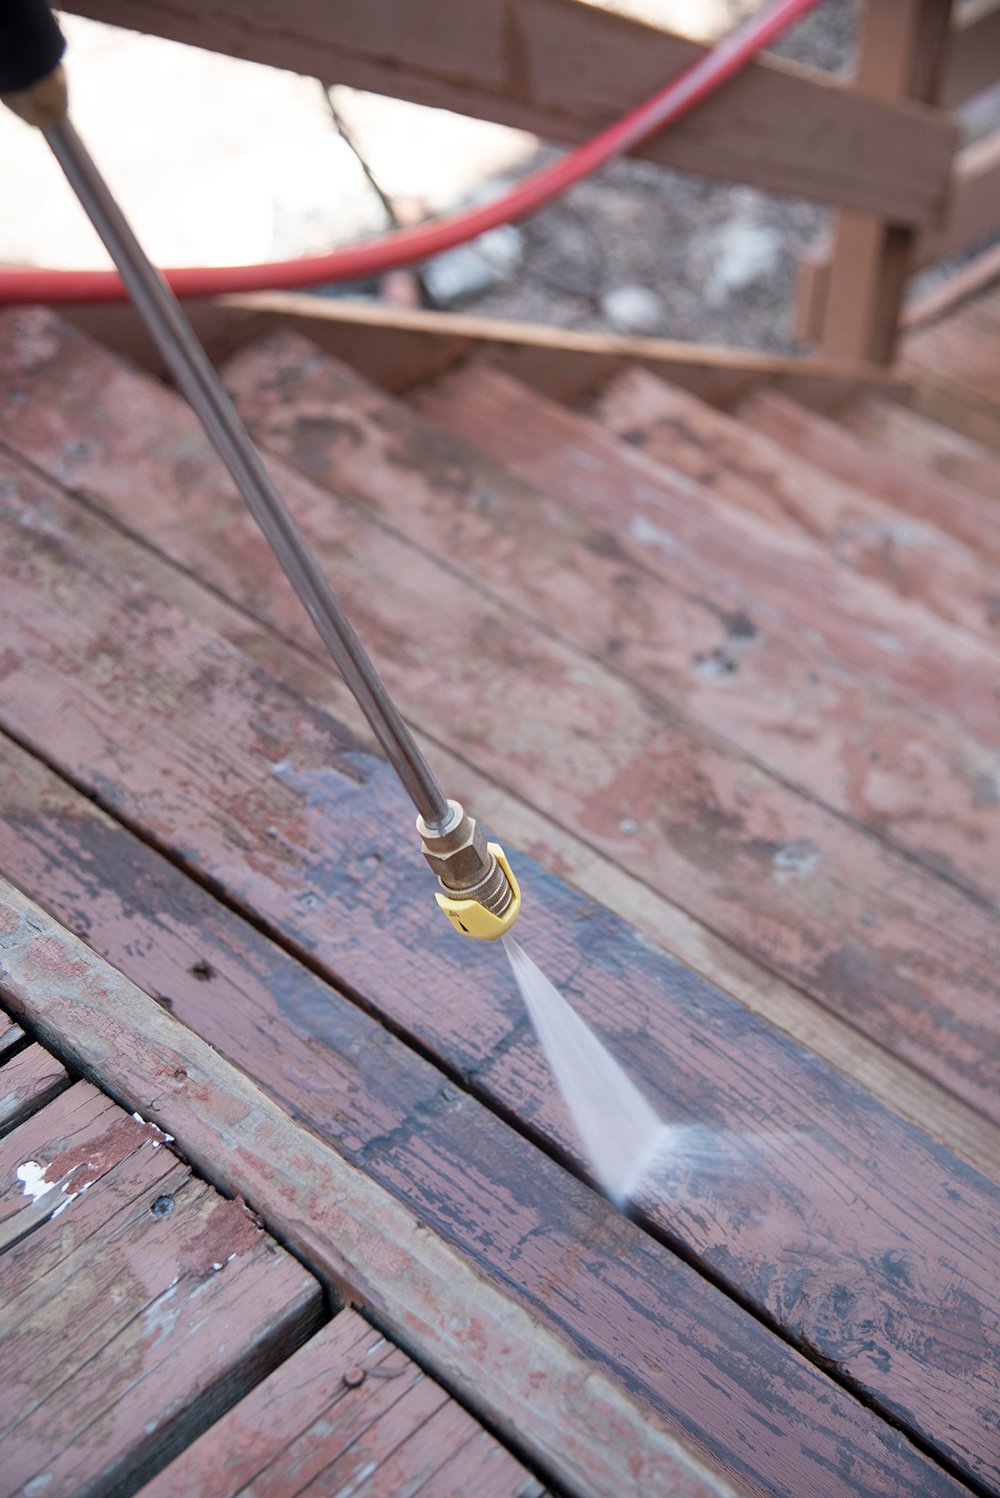 Step 1 // Power wash. After removing the furniture and taking down the existing string lights, the first step was to clean and power wash the entire deck. We’ve had our Sun Joe pressure washer for a few years now and it’s an affordable tool that we use every spring and summer. If you’re in the market- I’d highly recommend this option! The goal of power washing was to remove any large, loose peeling paint and debris.
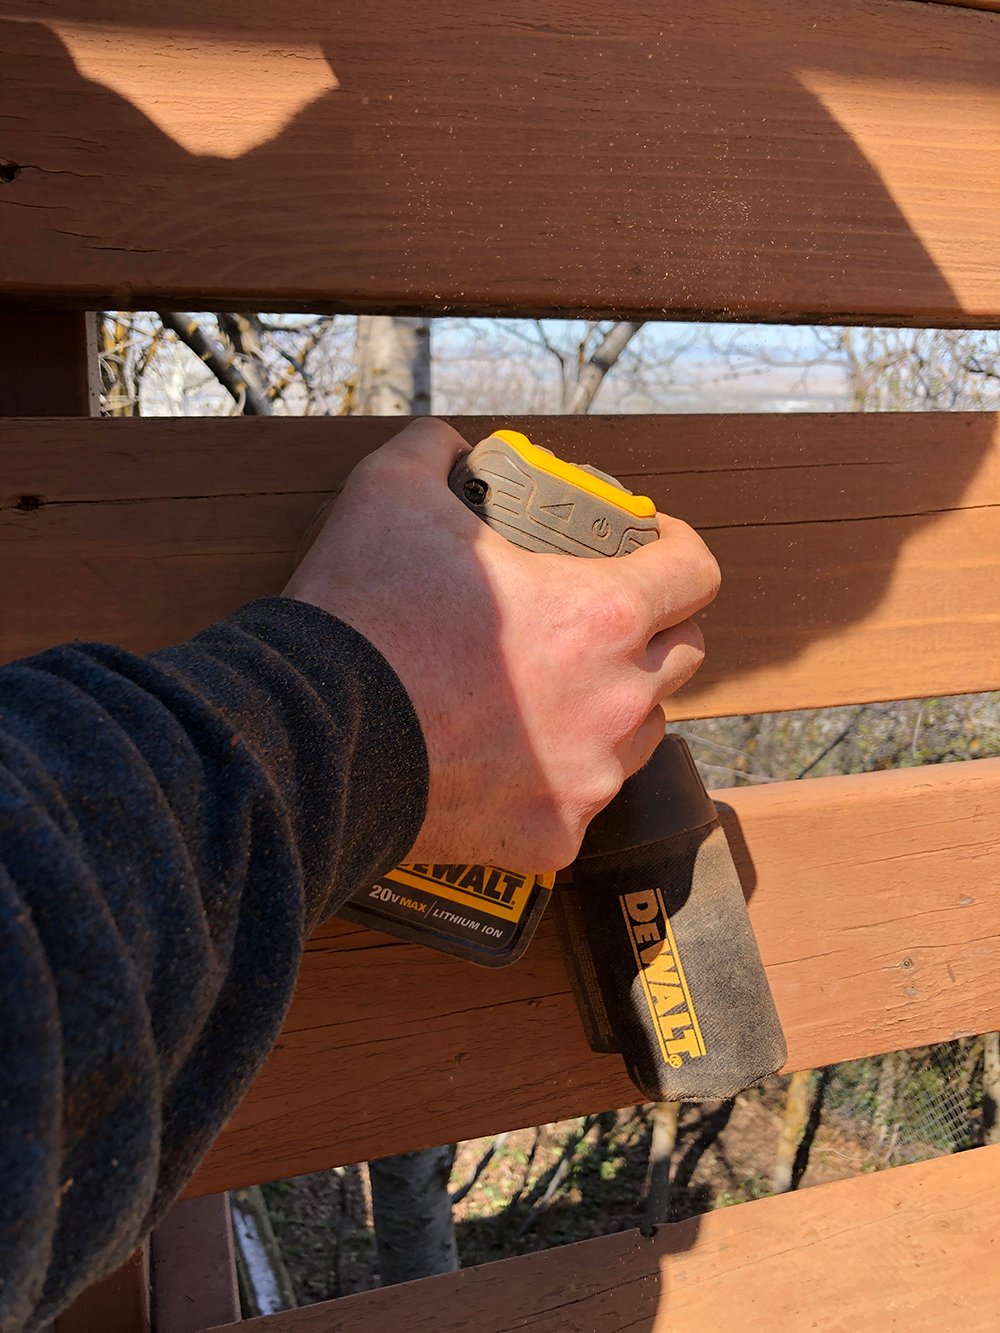 Step 2 // Lightly sand. Once the deck was nice and clean, we decided to lightly sand it. This step is dependent on the shape of your existing paint, stain, and wood. Our neighbor’s deck had multiple (old) coats of this Thompson’s sealant and stain. While it’s a great product, we didn’t love the orange look of it, and the previous homeowners didn’t maintain it. It seemed to be well over a decade old and was in really rough shape. The power washer helped to strip any peeling pieces away, but we really needed to sand down some rough areas. By lightly sanding the entire deck, we also ensured our new stain and sealer would bond properly. Just a light sanding is all you need, and tools make this process pretty quick as opposed to sanding by hand!
 Step 3 // Edge difficult areas with a brush. We landed on Valspar Tintable Exterior Stain and Sealer, and used 5 gallons in the color “Darkest Night”. Before busting out our paint sprayer, we edged the difficult areas by hand using a brush. I trimmed out sections close to the house, around the window, railing areas that were difficult to maneuver, and the top side of the beams.
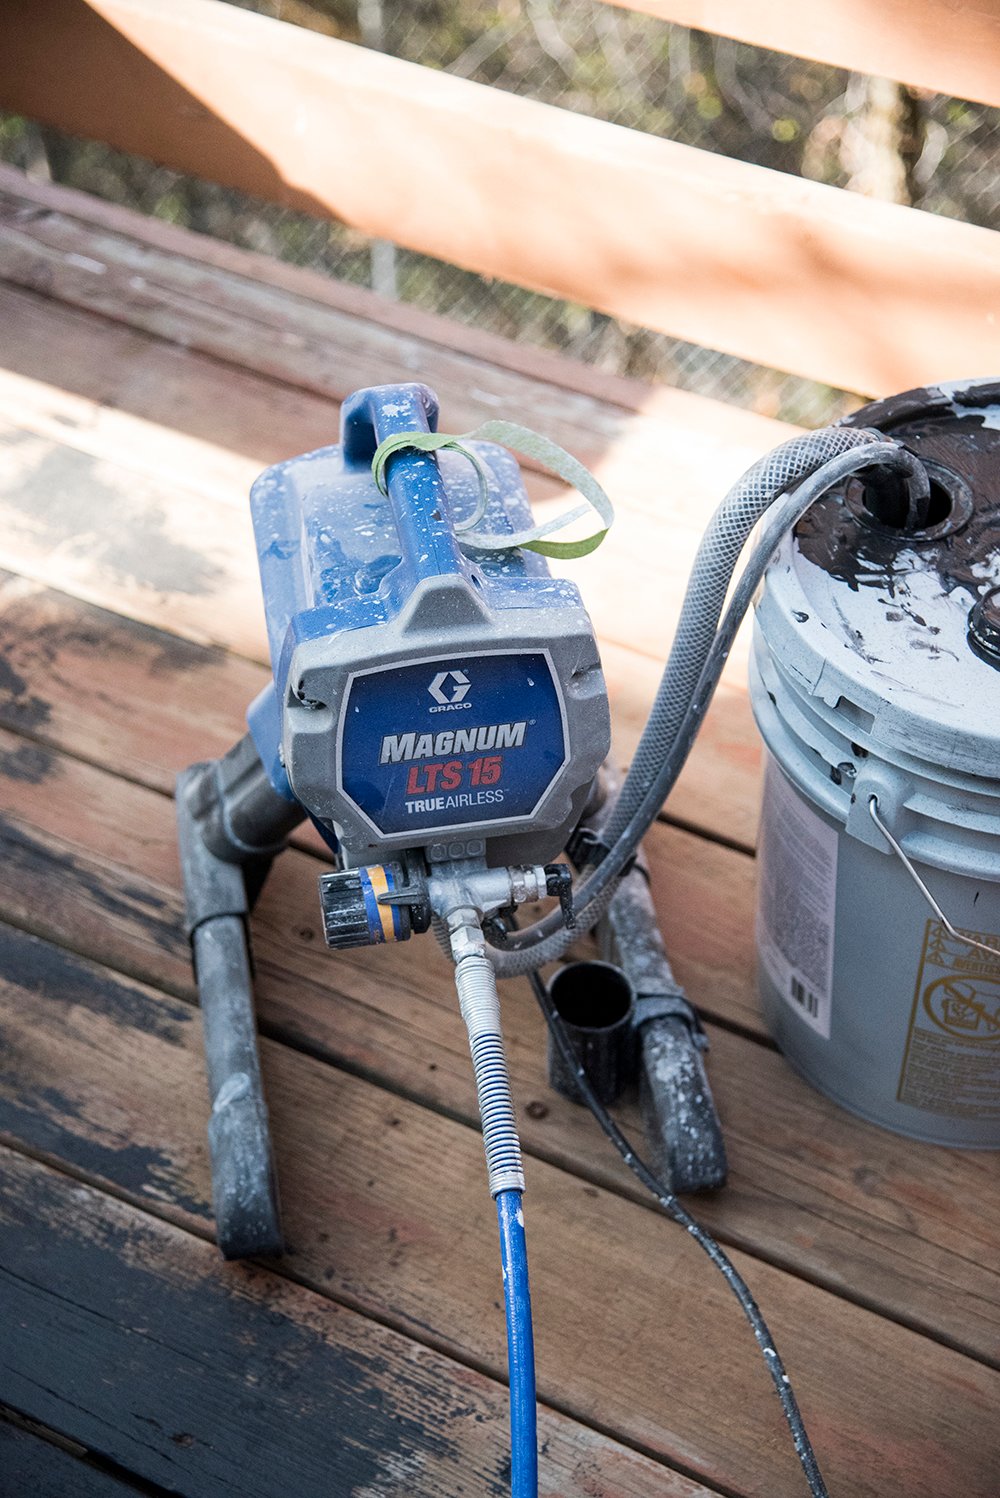 Step 4 // Prep the paint sprayer. Our Graco paint sprayer is probably the best investment we’ve made in our painting arsenal (you can probably tell by the looks of it, just how much we use this thing). We can easily and quickly tackle paint projects… even a giant deck of this scale with difficult to reach areas. Before using the sprayer, we hooked up the hoses accordingly, and connected it to our 5-gallon bucket of paint.
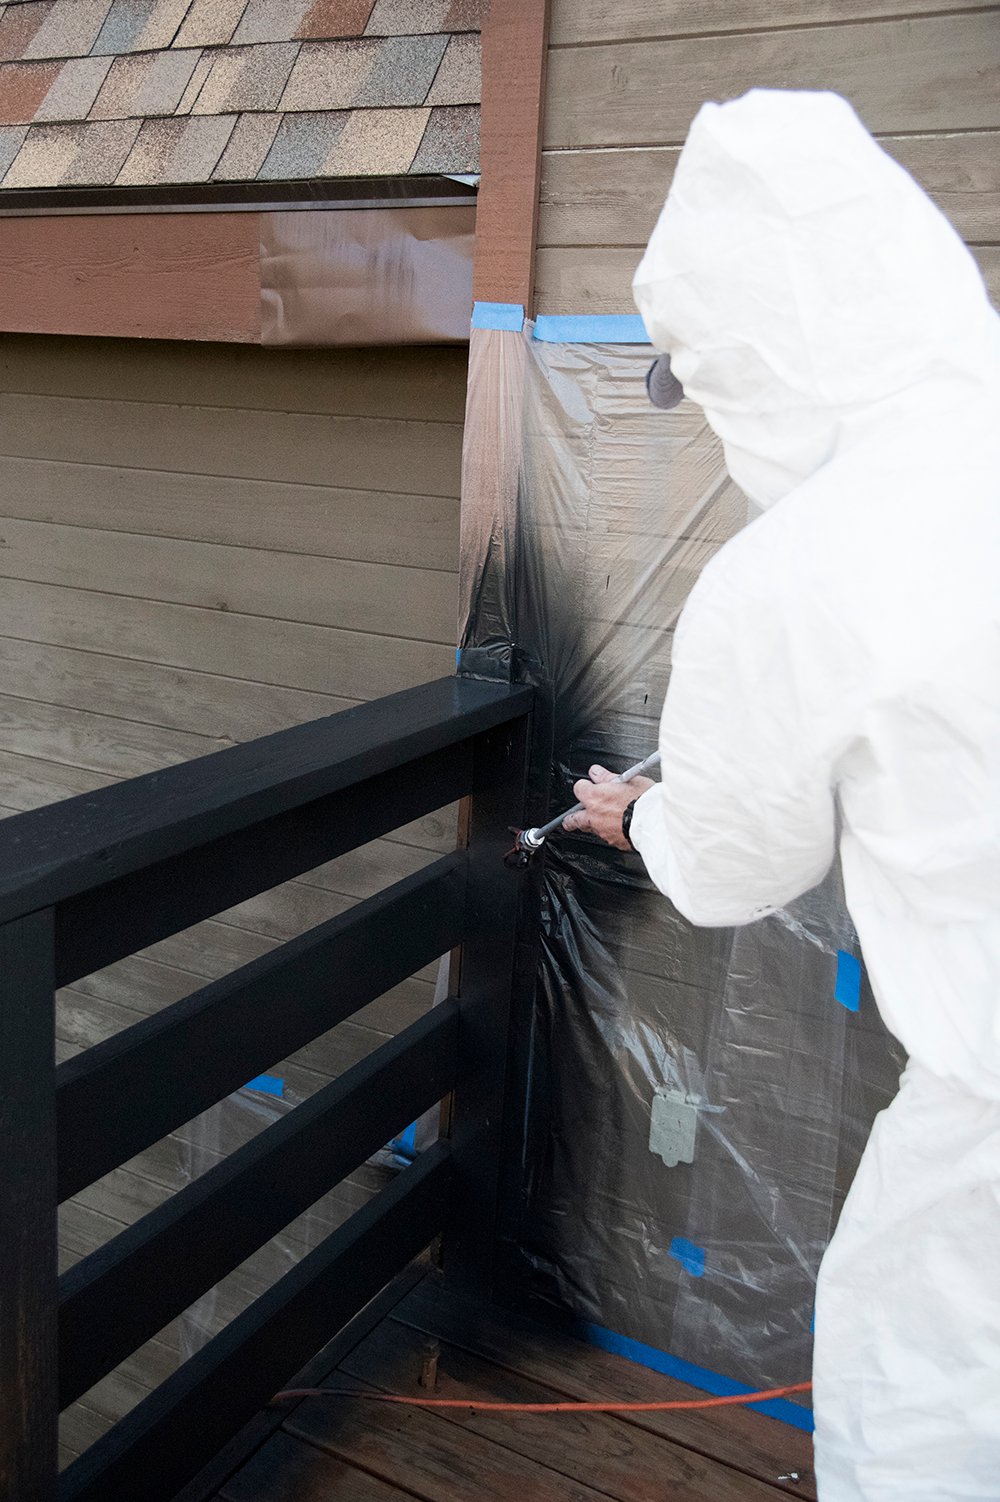 Step 5 // Mask it off and start spraying. Before we started spraying, we masked everything off with 3M masking tape and film. We wanted to protect the house from the high-contrast black paint. The homeowners are planning to paint the entire exterior someday, but aren’t quite sure when… so until then, we want it to look crisp, intentional, and free of dark paint. Emmett hopped into his Tyvek suit and we were ready to roll.
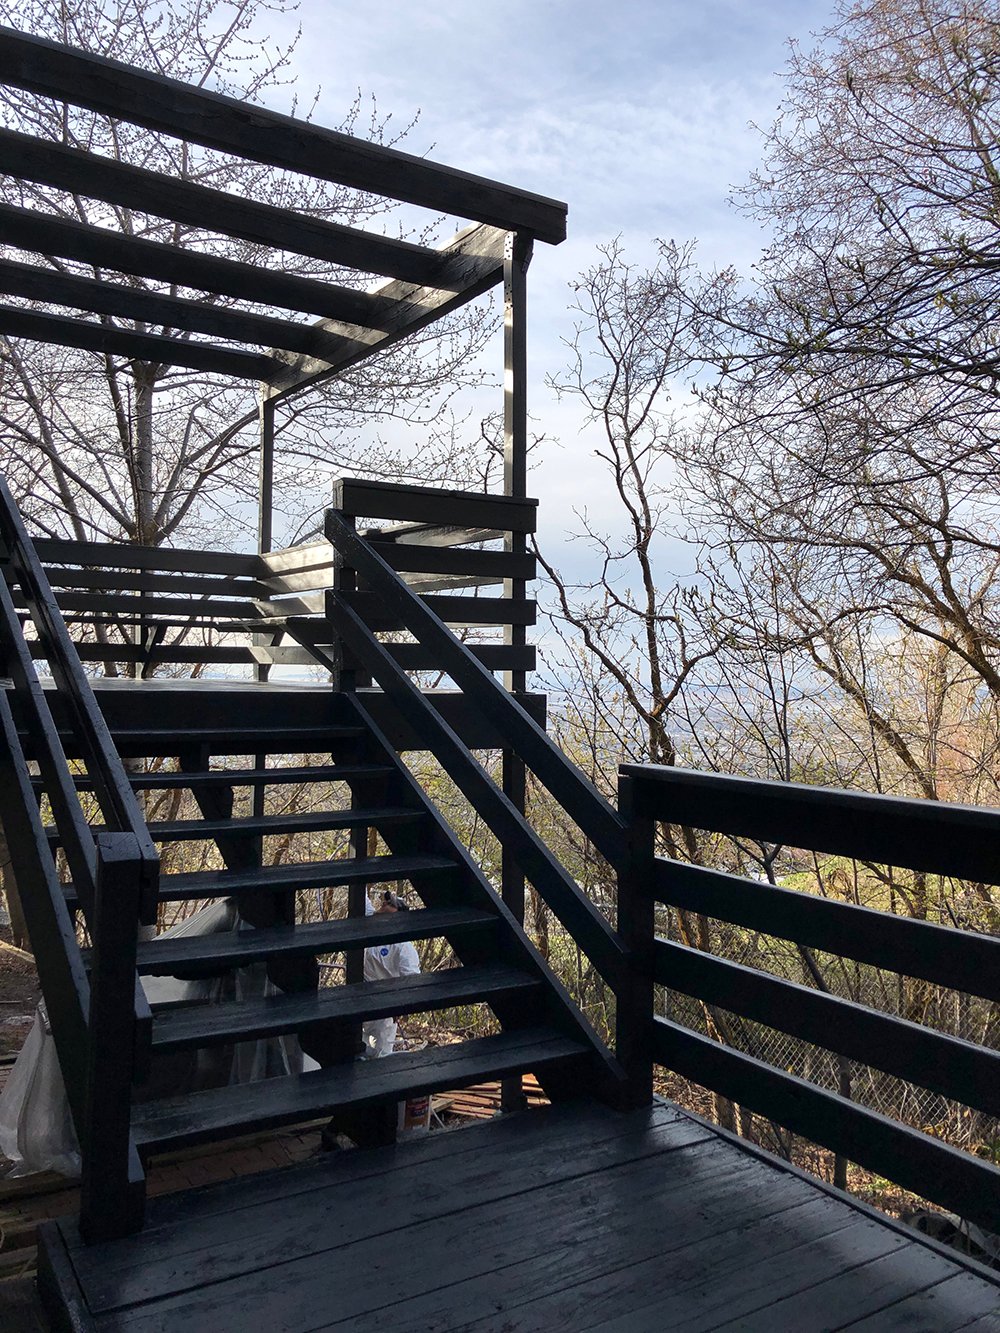 The entire deck took under an hour to spray. Can you believe that?! Prep and masking are the most time consuming parts of the process. Once you’re ready to spray, it goes really FAST. He hit the top, the sides, the underside, and covered every square inch of their a-frame’s porch. After we had completely covered the deck in paint, we moved onto the last step… cleaning up.
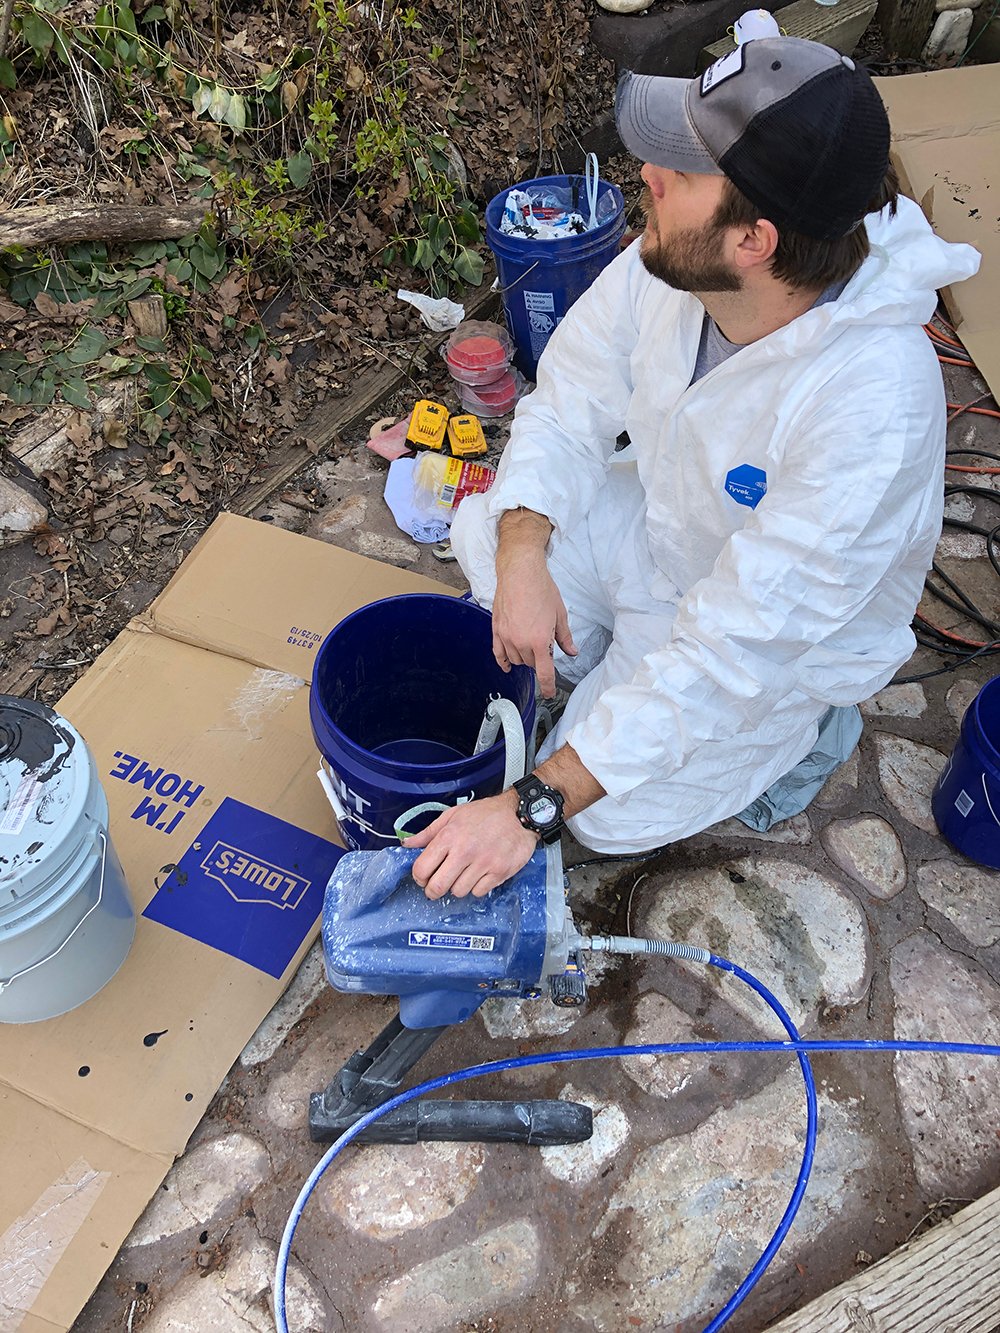 Step 6 // Clean up. We made sure to clean up all of our tools, paint products, and thoroughly clean our paint sprayer before packing everything up and trekking back to our house. Ready for the final side-by-side before and after?!
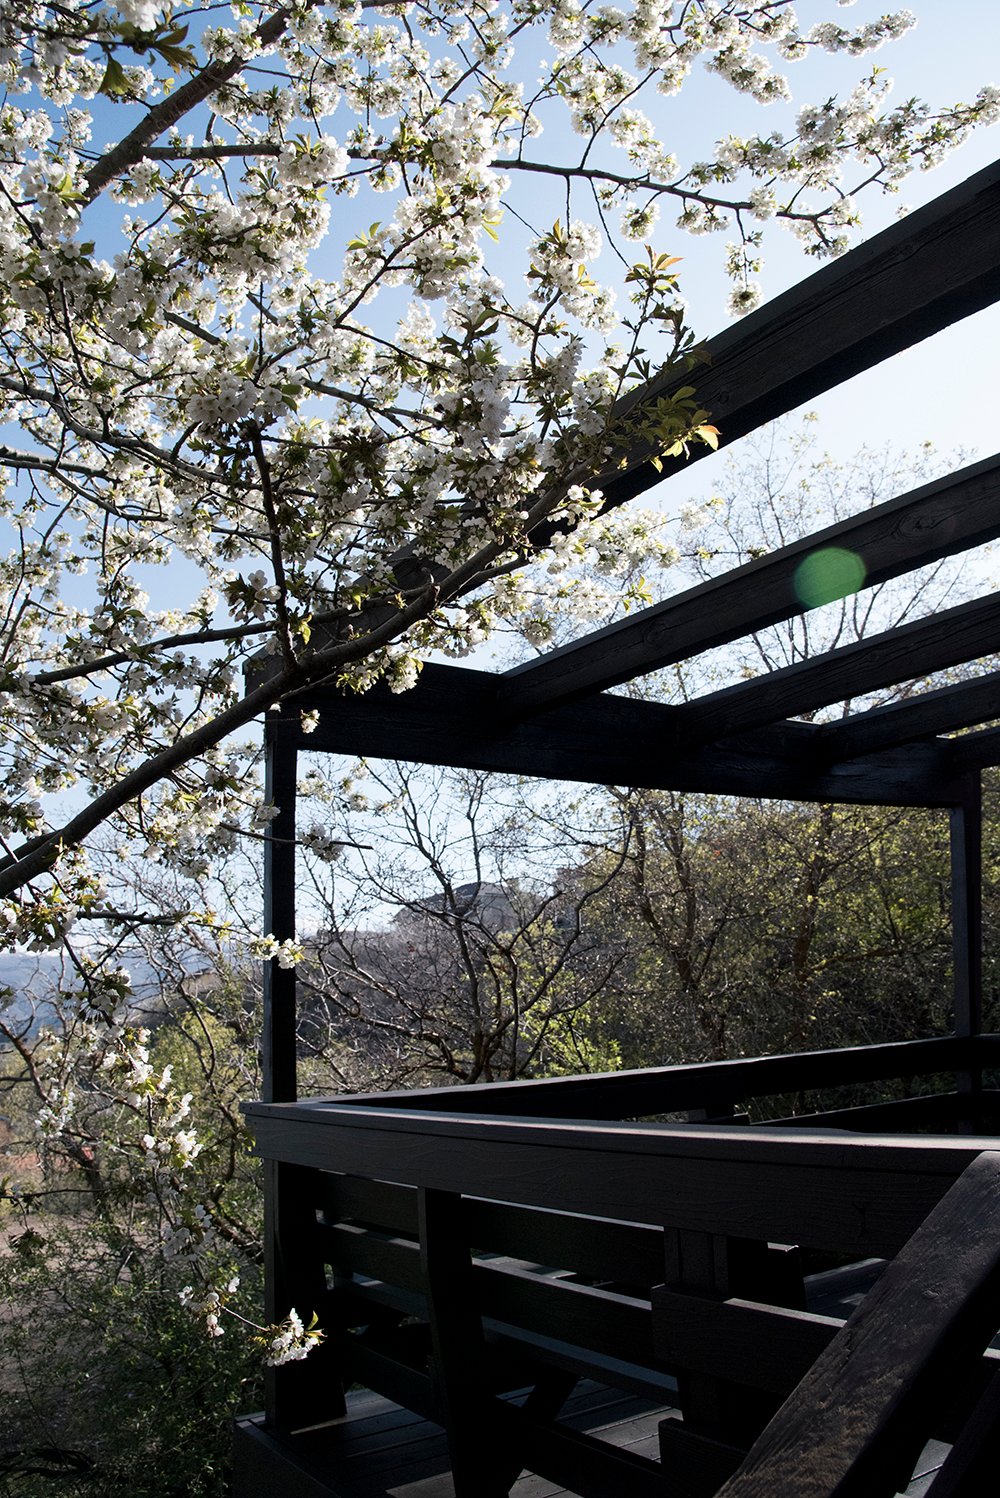
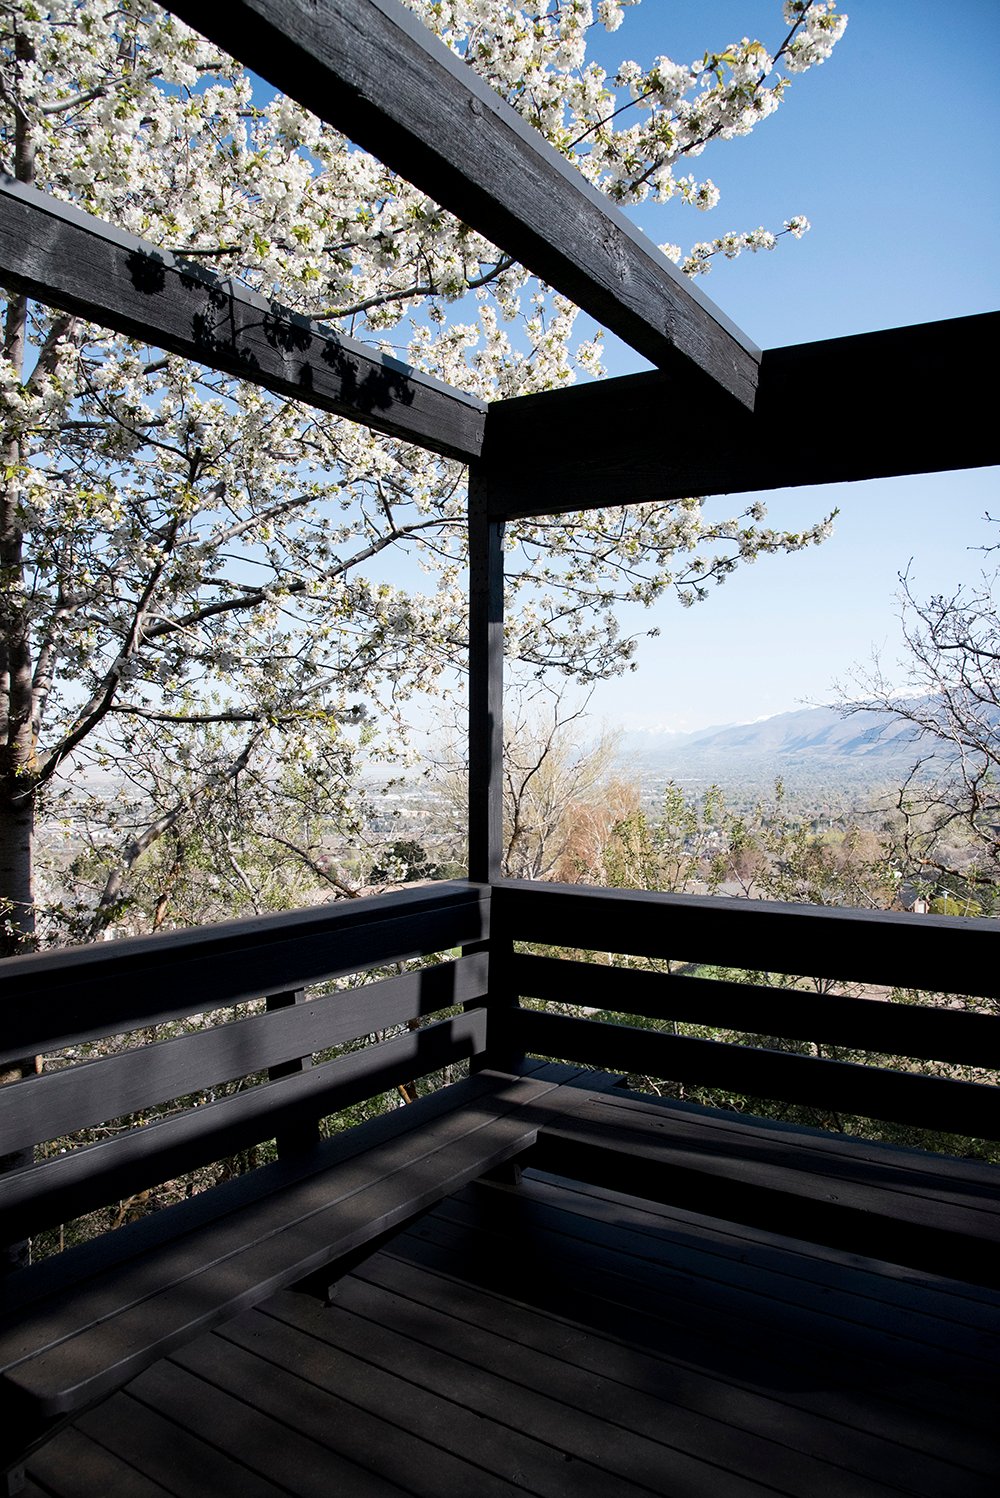
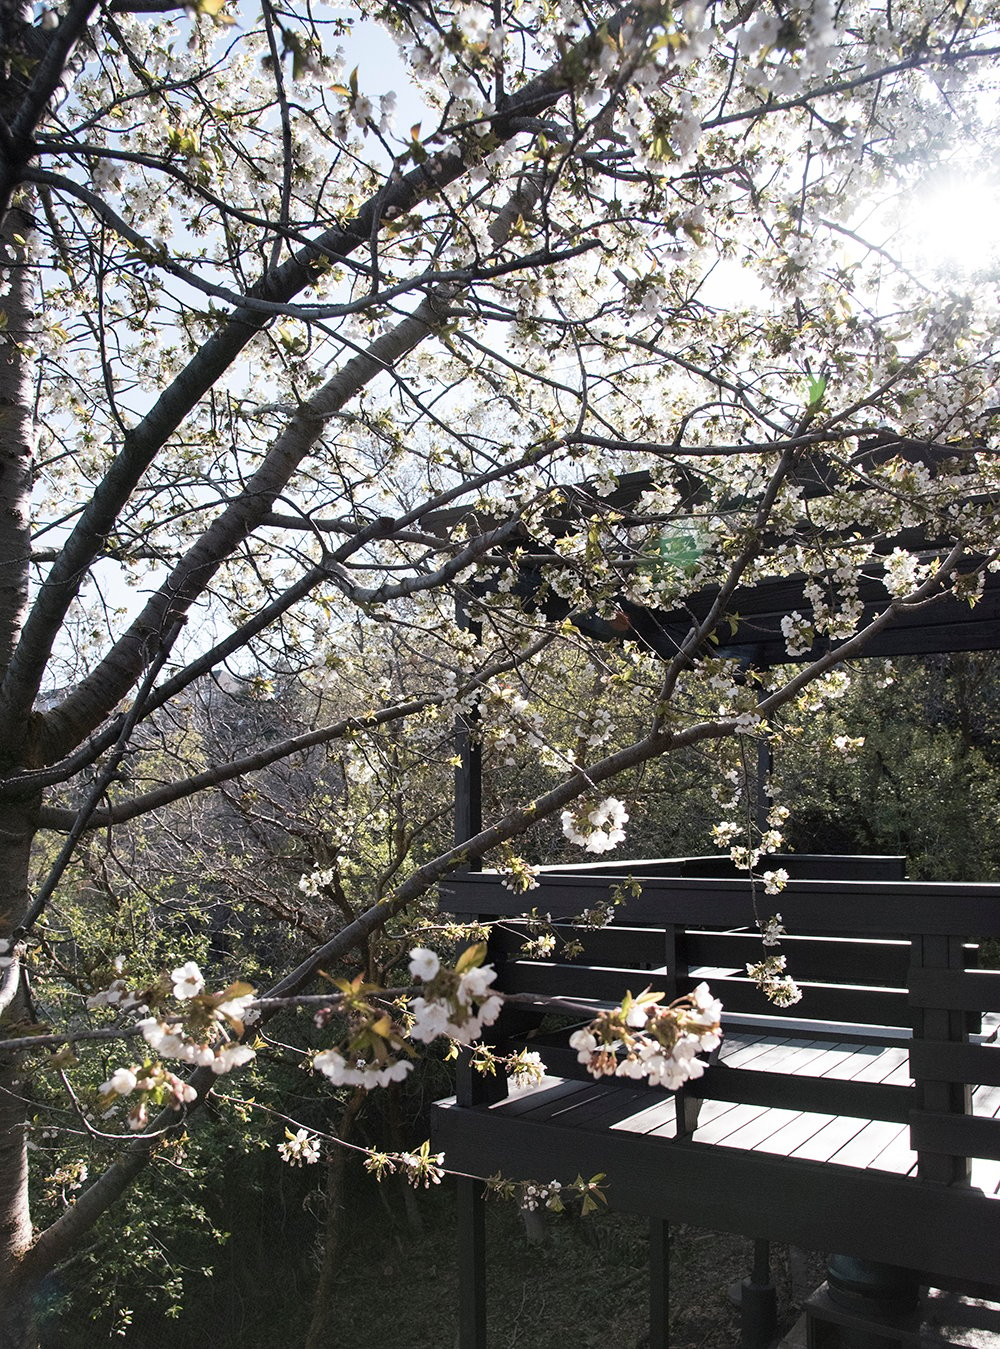
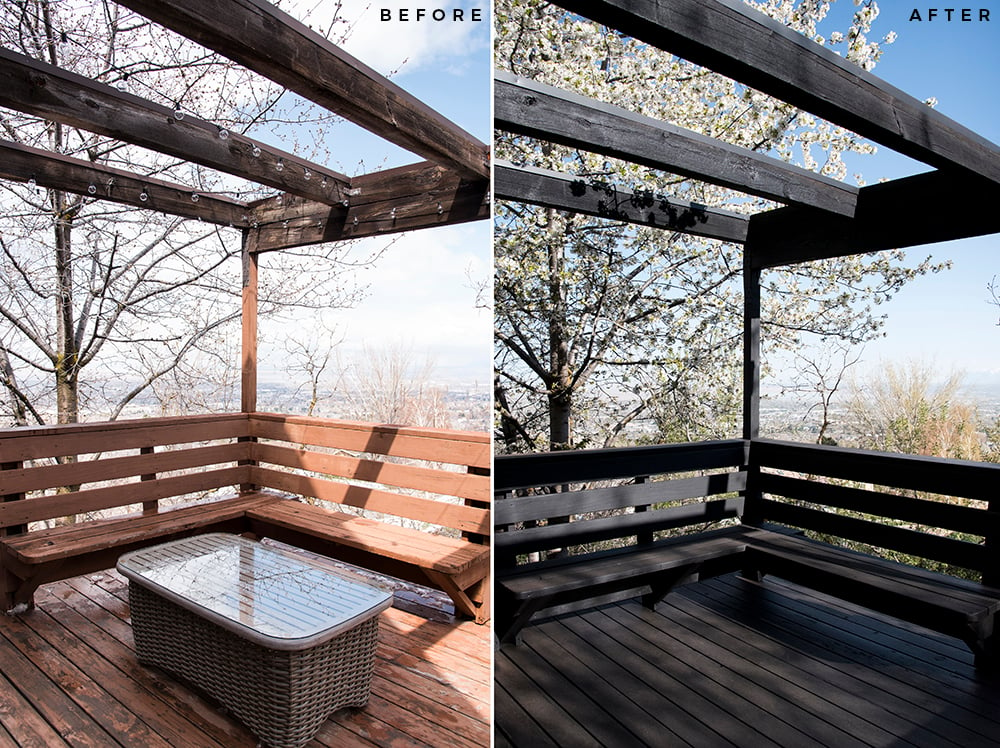 All paint is magical and transformative, but black paint will forever be my favorite for disguising imperfect wood or exterior structures that have aged. Doesn’t it feel fresh again? I also like how it better blends with its environment and those beautiful trees. I’m anxiously awaiting the remainder of the outdoor furniture to arrive, so we can style this space and finish it for our friends to enjoy. We’re hoping by the end of the month or early next month, we’ll have everything we need to wrap this up. I also want to send a big thank you to Lowe’s for helping us help others. They truly have everything you need at affordable prices to turn your space into an outdoor oasis. Stay tuned for the final reveal, my friends! I think our neighbors are going to be pleasantly surprised. I’ll be sure to capture their reaction, but so far- they’re digging the black paint.
 Have you ever painted a deck or porch? I’m always impressed how drastically you can change the look of it on a budget. Let me know if you have any questions in the comment section below. I can’t wait to show you more of this deck and the charming a-frame that belongs to our friends!
Wow, wow, wow! New rule: all decks should be black! That looks fantastic! Those are some lucky friends. Not only do they have the coolest neighbors and a breath-taking view, but now they have a killer deck. I’m 100% jealous of your paint sprayer. Our fence is in need of some love, and that would make quick work of it. (I’ve also really been thinking of going black…) I’m so anxious to get a look at this A-frame. Your neighborhood seems amazing! Woods, a golf course and an eclectic mix of homes. I think SLC might be more interesting than I had imagined. Have an amazing Tuesday, Sarah! Are you in full scheming mode over the guest bed situation? I know your solution will be even better than the original! (Just more work…)💪💖
Right?! It looks SO good! I’m anxiously awaiting the remainder of the furniture to arrive so I can style it (that’s the fun part). That paint sprayer has been used so many times since purchasing it. I can’t believe we didn’t buy it sooner (given the amount of paint projects we tackle). Our neighbors were amazed how quickly we were able to paint their entire deck. I’m a big fan of black in exterior settings. It just seems to blend better and look clean. Our neighborhood really is cool! We found a fun pocket that is diverse and eclectic… with incredible views. Emmett & I feel really lucky to live here. Ahh yes- I’m in scheming mode for the bed. I think I’m leaning toward a DIY… I just need to find fabric. Happy Tuesday :)
We’re you worried at all that the black could get dirty quicker or extra hot in the sun? This is what I want to do with our deck but everyone keeps telling me it’s a bad idea!!
Great question, Alexa! I’ve discovered that black actually looks really great outdoors and can even look more “clean” than white or brighter colors. A couple years ago, we painted our carport black and I have zero regrets! It never looked dirty or got super hot. For this makeover, we’ll also be integrating a lot of outdoor furniture (including a large outdoor area rug), so that should help with the floor portion of the porch and bare feet. I vote do what you like, feels good visually, and is functional for your family :)
It’s amazing how transformative a little elbow grease and paint can be! What neighborhood is this? I live in SLC (Sugarhouse).
Right?! It’s a pretty amazing difference!!
Would you mind sharing why you chose black stain instead of black paint? Is there translucency to it? I can’t tell from the photos.
There really isn’t a translucency at all, but I just hit post on a comment reply to Kat on the same subject- check that out if you don’t mind :) Thanks Jen!!
Looks great! How many coats were used on the deck?
We used two coats!
This post could not have come at a better time. We are getting ready to paint our deck (parts of it that are not Trex), and I am getting completely overwhelmed trying to figure out whether to use paint or solid stain (we need to use a solid color to make sure old wood and new wood on the recently installed part of the deck look the same). How did you settle on exterior stain/sealer versus paint (which you used for your gorgeous carport makeover)? Thanks so much.
Love hearing that, Kat! Amazing questions. Although the product we used for the deck is called “stain” it is indeed a solid color (the wood grain doesn’t show through). The name is kind of misleading. We landed on the Valspar product for this one given the condition of the wood and the fact that the entire deck is built of wood. Our carport was built with multiple materials (wood, siding, metal, etc) so paint was the best product for that project… whereas the deck is totally composed of wood. For the deck, we wanted something that was all-weather defense, deck specific, long lasting, sun-blocking protection while hiding the grain, mold & mildew resistant (since it’s among trees), fade resistant, easy to clean, and rain ready in a short time period (4 hours) since we tackled this during the spring season here in Utah. Hope this helps! xo
Wow– great tutorial–thanks! I did look at your carport and it looks fantastic as does this deck but since you can’t see the homes, I’m still wondering if you think a black deck would work for an exposed deck (not a lot of landscaping/trees) and also on a light colored colonial home.
I should add that the deck itself IS in rough shape and looks in some ways similar to this one!
Black is great for wood that is in rough shape because it camouflages imperfections! If you’re looking to get more years out of it before replacing- definitely use a stain with a sealant.
That’s kind of a loaded question, Camille! Ha :) I never do remote paint consultations because there are too many factors at play (surroundings, reflection, architecture, aesthetic, etc). Something that looks great at my home and works with my color palette might not fit yours. However, I can say that black is a great, timeless color that can pretty much go with any aesthetic. It’s also great at disguising wood and exterior elements that have weathered and aren’t aging well (like our previous carport). It really all boils down to your vision and design plan.
Hi Sarah! what grit did you use for sanding? Also what pressure setting do you recommend for decks? I am afraid of splitting the wood. Thank you!
Great questions, Jackie! We used 80 grit sandpaper and followed up with 120 grit. We used a 15 degree nozzle for power washing the deck, but the existing paint was really thick, old, and stubborn, so depending on the state of your wood- you could go less.
I would think black would be hot to sit on and hot to walk on once the sun hits it. I guess it depends on how much shade vs. direct light this gets.
Luckily, the deck isn’t in full sun (thanks to those beautiful trees surrounding it), but there will also be a large outdoor area rug that covers the majority of the deck. I’ve also ordered cushions for the existing bench seat, as well as additional seating that won’t get hot. I’ll share the final reveal soon :)
Wow, what a beautiful transformation! I loved your carport makeover still and this is already so good! The black allows your eyes to look more at the scenery than all the decking. I am sure your friends are loving the color and how well it turned out!
What do you think about staining concrete patios? We did 8-9 years ago and thinking about re staining this fall. Always another project on the horizon…ha!
Saw the pictures of your camping trip…just breathtaking! Did you get the freezing temps most of the east got over the weekend? We got some lower temps and it was divine sitting outside!
Have a great day!
Thank you, Danna! That’s exactly what I was hoping for… the deck to better blend with the surroundings so you could take in that gorgeous environment and trees. I honestly don’t have experience with staining concrete, but it’s a conversation Emmett and I have had recently. We’d love to do something to our back patio to make it feel less basic and to help disguise dirt (or muddy paw prints) at some point. While I prefer outdoor tile or pavers, he thinks staining or stamping the concrete is a more durable (and affordable) option. I love the idea of treating the concrete in some way to add character though! Anything has to be better than plain concrete. I’m going to share more about our camping trip in a blog post on Friday. It was really a beautiful spot! We didn’t have the freezing temps, but it was cooler outside (50s at night camping / low 70s during the day). Hope you’re having a wonderful week so far :) xo
Oh I’m a huge fan of this transformation Sarah!! You and Emmett did a killer job! I absolutely love black for decks and railings; it blends so much more nicely into the landscape and allows the colors of the yard to stand out, instead of the deck. I think this is an amazing surprise for your neighbors; how did this come about? I’d love to know the backstory. It already looks amazing, and I did recognize the coffee table!! Xo
Thank you so much, Lauren! Almost a year ago, our friends were searching for an a-frame cabin, but were only finding ones they liked in remote areas high in the mountains. One came available in our neighborhood, they went to check it out with their realtor, and we helped convince them to move to our neighborhood. Ha! It’s really fun having them close by. They’ve been itching to tackle their first room renovation, but are saving for a bathroom or larger renovation inside, so when Lowe’s reached out asking if we had an outdoor project in mind for this spring / summer, we immediately thought it would be fun to surprise them with a deck makeover (especially given the pandemic). It would be zero-contact for us and give them a space to enjoy outside their home. They bought the place for the amazing views and secluded property, so it made perfect sense. It’s fun to mix it up and do something outside of our own home every once in awhile… we also love helping others, so it’s an exciting and fun makeover for everyone! Have a great day :)
Hi this looks awesome! How long did you wait between power washing and sanding and painting? We just power washed our deck yesterday and I’m wondering how long I need to wait until I can paint it. Thank you
Wow – just wow… The detailed steps are great help. We are first time home owners and have painted our deck in the past. These steps have clearly showed us the RIGHT way of doing it. This has inspired us to paint our deck black. Wish us luck!