Bathroom Renovation
As mentioned in my previous post: we bought a house, it needed a lot of work, we’ve been renovating for the past year. I’m excited to finally share the first of many transformations– the bathroom:
Living in a small house with one bathroom isn’t easy. Going into the project we agreed on four important factors to maximize the space:
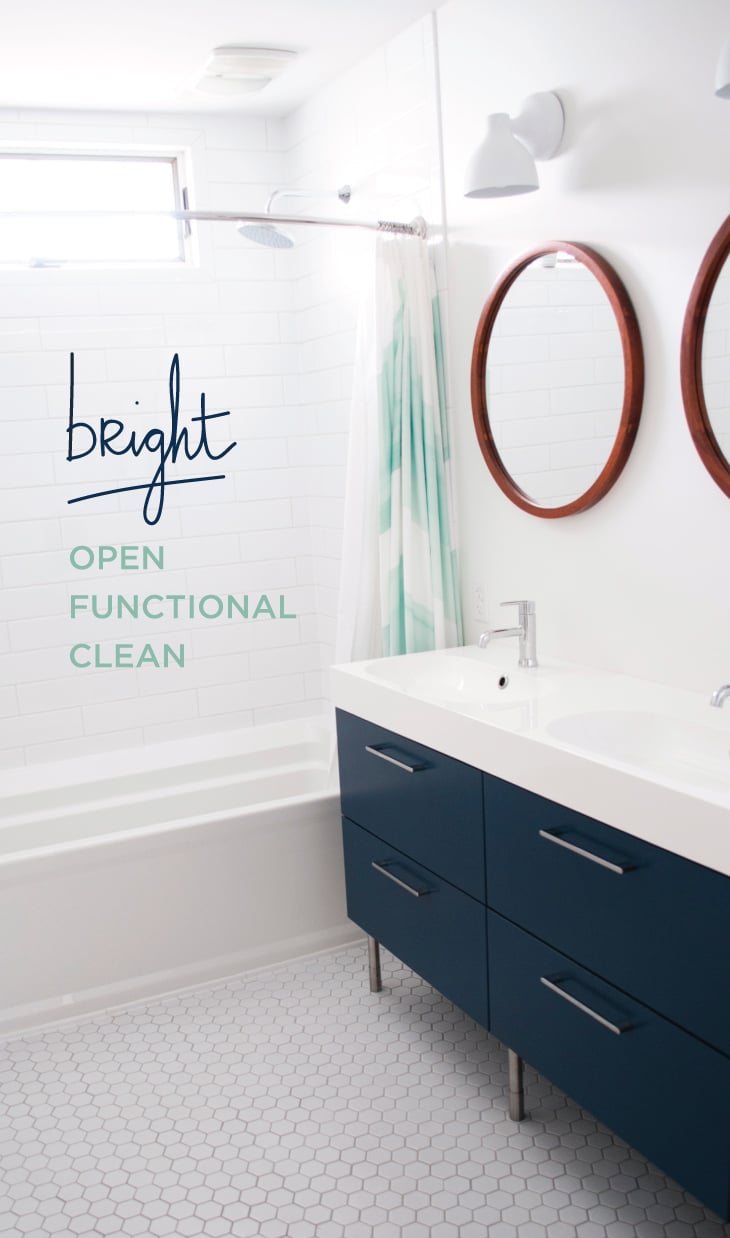
1. Above all- it needed to feel bright.
2. We had to open it up, even if that meant knocking down a wall.
3. It should be functional.
4. It should be clean, as well as look minimal with modern lines, making it feel larger.
This is what we had to work with (photo courtesy from our realtor):

Pretty horrible, right? You can bet we started demo right away. Buying a foreclosed home poses unique challenges and the bathroom was no exception. We ended up with a complete redo: new electrical, new plumbing, knocking out walls- which were replaced with new drywall, new tile, new fixtures, sink, toilet, bathtub… it’s all 100% updated. To see more of the demolition process, it’s all documented on my old blog.
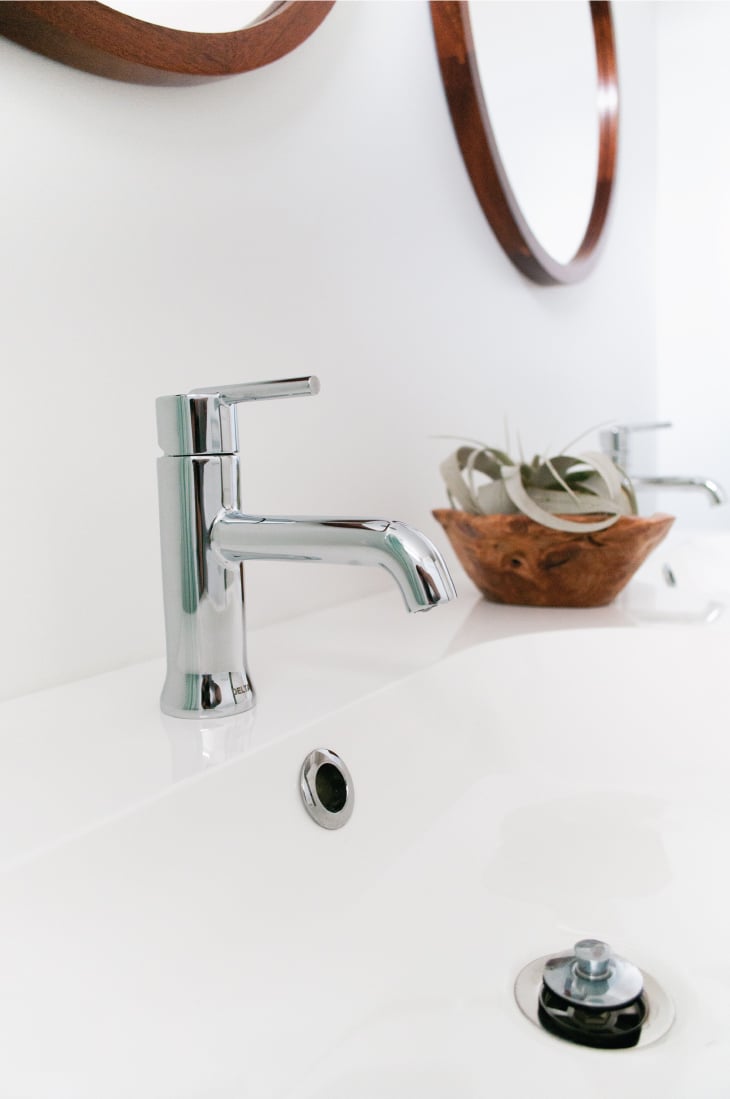
Dreaming up a new space was the fun part, but staying on budget was certainly more difficult than expected. I knew I wanted the color palette to be light, calm, and airy. I always love navy in a bathroom paired with soft gray tones. Kalyn had more insight on the practicality side of things, such as conserving water and electricity with efficient faucets and lighting.

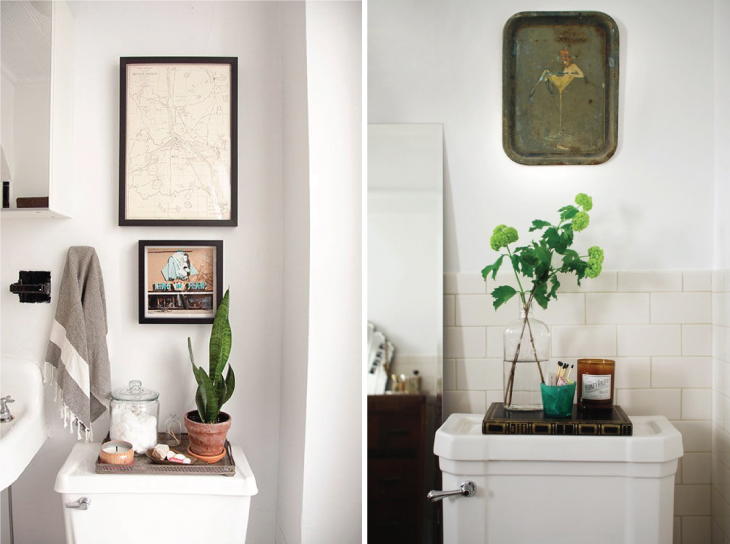
I have yet to style and accessorize the bathroom, but I definitely want to add plants, texture, and create a vignette above the toilet area. I’m hoping to bring in some unique items and contrasting colors to make it feel a bit more eclectic. I’ll shoot more photos once I have the complete design finished, but this is my inspiration:
Above photo sources: Jason Santa Maria & Megan Born for Design Sponge // Sweet Thing Blog

Product Sources: Miles & May Mirror // Xerographica Air Plant // Contour Sconce Lights // Hex Glossy Floor Tile // Nate Berkus Shower Curtain // Laundry Basket // Eucalyptus Hyacinth Soy Candle // Memory Foam Bath Mat // Art by Lisa Golightly // Bathtub and Shower Faucet Set // Vanity & Sink *I painted the wood colored vanity navy // Wood Turned Bowl
*I’ve had some people ask about the vanity, which is from Ikea, but modified. After lots of research, I found that painting Ikea furniture is possible- even the laminate stuff, but you do have to use a special bonding primer. We also purchased Delta faucets and drains for the vanity and sink, giving it a little upgrade.
It feels nice to finally share a project that has taken so long. I’ll be sure to update once there is more to see and it’s fully styled! Thanks for following along.
Great post as usual.
Hi there!
I found you via pinterest. I can’t wait to explore the rest of your blog now, as it looks like you’re doing a lot of the same reno’s as us, with the same style.
We were planning on the same ikea vanity/sink, but double basin. But I’m worried about the deck space. Do you feel these ikea sinks provide enough deck space around the basin? (for placing all your junk while you get ready!)
I’m scared!
Hi Meegan!
Sorry for the late response, but to answer your question- I love the vanity. It’s actually really spacious and I have a ton of room for storage. In fact, we had house guests over a few weeks ago and my friend commented on how it was nice for storing cosmetics, cleaning supplies, etc. The drawers are both deep and pretty tall. I think you should go for it! I don’t have any regrets.
Thanks for reading!
Hello I love the color you chose for the vanity. Can you tell me the name?
Thanks, Liz! It’s Ben Moore, Black Panther.
Thanks for this comprehensive post! I’m about to dive into my first ever bathroom reno and gathering all the sources has been so time consuming. My husband and I had a totally fruitless trip to Lowe’s the other day– we didn’t like ANYTHING they had, so I’m going to just browse and buy it all online. Love what you did here!
http://www.bethanytab.com/blog/2013/09/as-we-found-it.html
Hi Sarah,
First off, thank you for your response on the hardwood floor stain. Your bathroom turned out great. I’m thinking of changing mine, which is smaller than yours:) i don’t have any storage and was interested in this vanity. Could you elaborate on the process you used to paint that vanity? I see you mentioned a special primer. Really appreciated you taking the time to answer my questions! Thanks again.
Hi Kerrie! No problem at all. Thank you for the sweet compliment. This vanity has a TON of storage and that’s what I love about it. I used Zinsser primer; it works really well and is a bonding primer. Prior to priming, hit it with a low grit sand paper, just to rough up the surface a little (little being the key word). After priming, let it dry completely… at least a day. Then apply two coats of paint, allowing it to fully dry in between coats. I used a semigloss finish since it’s in a bathroom. I haven’t had any chipping, bubbling, or peeling whatsoever and it’s been painted for over two years now. Hope this helps! Let me know how it goes, xo
Hi Sarah, did you add legs to the vanity as well? If so, do you mind sharing where you got them from?
Thanks so much!
We did add legs! They came with the vanity from IKEA at the time… I’m not sure if they sell it as a kit anymore?